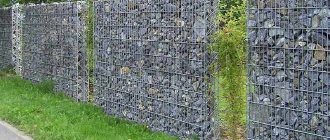
Barbed wire fencing: design features
The main element is a wire, along the entire length of which pointed elements are fixed, and they are located in compliance with a certain pitch. This allows you to ensure safety and reduce production costs, since there is no need to fix the prickly elements at a closer distance. The fence performs primarily a protective function.
In addition to wire, supports are used. The height of the structure is standard - up to 2 m, there is no need to make the fence higher. The wire is pulled in rows. Their number is determined by the height of the fence. The barbed wire is attached to the fence with special brackets. Such elements are used only where the material touches the pillars. The wire is not fixed between the posts; transverse sections of the same material and steel strings are used to support it. This avoids sagging.
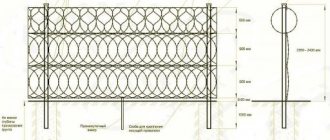
Tension option
A characteristic feature of all chain-link fences is their ease of construction. You can do everything with your own hands, even for a person without any construction skills. As an example, we can consider how to properly stretch a chain-link mesh onto a fence made of corrugated pipe.
Wire mounting
Territory marking
You need to install stakes at the corners of the perimeter and pull the rope. Its length is the total length of the fence mesh, but the fabric is several meters longer.
Next, you need to mark the areas for attaching the racks. Typically, the distance between the posts is no more than 2.5 m, since the chain-link is a flexible material.
Fence post installation diagram
To calculate the required number of supports and then tension the chain-link, the length of all sides of the perimeter must be divided by 2.5. For example, the length is 57 m. This length will definitely not be divided into 2 or 2.5. If you divide by 2.5, you get 22.8. Then there are several options for the development of events.
The first is to place 22 supports with equal spacing between each other, 57 / 22 = 2.59 m. But it is almost impossible to calculate the location of the supports so accurately. Another way to stretch the panel over the fence is to place 22 supports with a distance of 2.5 m, and the last posts will stand a little closer. This way you can determine how many racks are needed to tension the fabric.
It is necessary to drive stakes along the rope at intervals of 2.5 m. You need to control at all times that they are on the same line. Then in the end you will be able to pull the chain-link beautifully.
Sketch with mounting options
If the area has a large slope, it will not be possible to tighten the chain link, since the mesh will not be secured well in a tilted state. There is only one way out - to terracing the area.
Where there is a significant transition and difference in ground level, a longer and reinforced stand is installed, where the canvas is fixed on one side at one level, and on the other side - on the other. Why should the material be cut? Another way is to build a fence from free-standing frames.
The photo shows a fence at the dacha.
Near a private house
Installation of supports
Holes need to be drilled in places for installing fence posts. The depth of the well is usually 1.4–1.6 m. To prevent the posts from moving when the earth swells in the spring, they should be deepened below freezing of the soil by 20–25 cm.
The corner posts are installed first; they bear the greatest pressure. A layer of gravel (20 cm) is poured onto the bottom and compacted well. Then sand (20 cm) is added and also compacted.
Drawing of a sectional fence
A professional pipe is inserted, having first coated the underground part with an anti-corrosion compound. Prepare a concrete solution: 2 parts cement (concrete grade not lower than M250) and 1 part sand. Mix, then add 4 parts of crushed stone and mix everything again, add water and mix too. The main thing is to control that the concrete does not turn out to be very liquid. Then we pour it into the hole under the pillar.
It is imperative to look at the level of the pillar. It must be clearly vertical. This can be checked with a plumb line.
We pierce the concrete solution with reinforcement, removing the air. The next corner support is placed on the opposite side of the fence. Then all other racks are mounted using the same technology. The fabric can be stretched only after the solution has hardened, that is, after 10–14 days.
Diagram with dimensions
Types of Barbed Wire
The material is constantly being improved, its properties and protective functions are improving. As a result, it becomes possible to simplify the design of the fence. It is difficult for attackers to overcome such a barrier, even if special tools are used to cut metal.
Barbed tape "Egoza"
Previously, the appearance and properties were different - wire with pointed spikes attached to it. Nowadays a galvanized metal strip is produced, the edges of which are cutting blades. This material lasts a long time. Its peculiarity is that the tape is spiral-shaped; it is used to form canopies, as well as to make sections that make up a wire fence.
It is possible to stretch the tape. However, the highest protection is provided when the original shape of the product is preserved - spiral-shaped, so many loops do not allow one to get through the fence: any attempts to move the wire or cut it with a tool will lead to injury to the hand, since there are cutting edges everywhere.
Flat barbed wire barriers
This is a tape that can take the form of a mesh or a ring. As a result, the degree of protection of the object behind the enclosing structure changes. You can use this tape to fill sections when making a barbed wire fence with your own hands or make a canopy out of it (spiral-shaped material is suitable for this purpose).
Spiral "Bruno"
This variety is considered one of the most effective. This is due to the shape of the wire: it forms a volumetric spiral of large diameter. When installing a wire fence made of such material, the likelihood of unauthorized entry into the fenced area is reduced. The sizes are different, the diameter varies from 45 to 90 cm.
Spiral-shaped products are installed on the ground or as a canopy on the fence, while a larger spiral is installed on the ground, and a smaller diameter is installed on the fence. There are different ways to install such a product:
- exactly - in 1 or 2 rows, and the second option is preferable, since the level of protection is higher;
- inclined.
You can install free-lying spiked wire on the ground. It is also placed on supports in 2-3 rows (depending on the height of the fence).
How to paint?
The chain-link mesh must be painted correctly. There are several ways to do this.
- You can use a roller or brush. This process will take a lot of time, especially if you use a brush. A fur coated roller will paint the chain-link very well.
- It is advisable to use a spray gun. This way the work will go much faster and better. True, the material consumption will then be quite large. In addition to the fence itself, all surrounding surfaces will be painted.
- It is convenient to paint the fence with a fur mitten. It is dipped in a dye composition and the chain-link is hand-dyed.
Before painting, the chain-link is prepared. If there is an old coating, it is sanded and removed. It is necessary to degrease the mesh with a solvent and coat it with anti-corrosion primer. Then the paint itself is applied.
Barbed wire fence: areas of its use
This type of fence can be installed on objects for various purposes:
- private housing (houses, cottages);
- construction sites;
- military or industrial facilities;
- warehouses;
- car parking;
- dog walking areas;
- any objects that need monitoring, barbed wire on the fence is installed in addition to the tracking systems;
- pastures and protected areas;
- barriers to protect animals in the forest belt through which highways pass;
- special purpose zones (prisons, secret facilities, ammunition depots).
Fidget installation. Fidget installation instructions
Instructions for installing the fidget are available in this video
For estimators. On one of the forums I saw a recommendation: take the E7-24-13 price, find the price for installing reinforced concrete fence posts and subtract it from the E7-24-13 price. The price for installing the fidget will remain.
The cost of installing a fidget depends on what fence it will be installed on, what method, at what height, and how far away the installation site is. In the case of installation of fidget in Kiev, Lvov and other cities that are located far from Zaporozhye, we can send a team of fidget installers on a business trip or offer installation of fidget to our partners who install fidget in these cities. We do not recommend searching the Internet for information using the search words fidget installation instructions , fidget installation instructions . We found that no one gives clear instructions for installing Egoza, but the search results contain many pages containing viruses. The presence of a security system on your computer, in the form of an antivirus and other applications, does not guarantee your security 100%. Therefore, it is better to come to terms with the idea that fidget installers are reluctant to share their production secrets, and you should get used to the idea that fidget installation needs to be ordered from specialized companies and let them earn money or install fidget on their own , having previously traveled around and seen how fidget is installed at others.
Pay special attention to safety precautions. Injuries from fidget installation can be serious. After all, it was precisely so that the attacker would be afraid of getting seriously injured that you decided to buy a fidget . The photo shows the Cossack fidget and the hand of our employee.
The installation scheme (installation of the fidget) is quite simple: it can be installed directly on the ground, for this it is pinned with special mounting brackets. You can install prickly fidget in one or several rows. You can install the fidget on the very ground in front of the fence. Most barbed spiral barriers are installed on top of fences; concrete fences, brick fences, wire fencing systems, for example TM Betafence, Kazachka. To install fidget barbed wire you need: a bracket for fidget , anchor bolts, two or more guide galvanized wires or barbed wires, the fidget itself, mounting brackets, special tools, pliers for clamping staples, good specialists. Do you want good fidget installation specialists? Call us and we will send a team of fidget installers to your site.
Different ways to install the fidget are shown in the video and diagrams below.
When installing fidget, buyers have questions: we buy fidget 450/3 with 86 turns with a stretch of 21.5 meters, but it stretches at most 18 meters. Why? Answer: the reason is the installation technology. Look at the photo where this fidget 450/3 is stretched to 21.5 meters and the video where it is stretched to 21.5 meters and 18 meters.
Wire installation
We are considering 2 methods of installing this type of fence:
- forming sections of wire with sharp elements between the posts;
- fastening the wire structure at the top of the fence.
The choice is made taking into account the intended purpose of the object. For example, in areas of special importance, the second option is used - a fence with a canopy made of studded tape; in this case, protection is often enhanced due to the electric current passing through the metal parts of the structure. A wire fence also provides security; this option is quick to install.
Types of mounting brackets
There are several types of fastening elements that differ in configuration, which allows you to fix metal strips of different properties and shapes. Main options:
- Direct. On such products, 1 row of wire with spikes or more is fixed. The function of straight brackets is the same as that of the top of the posts, which rise above the fence more than is customary. For this reason, they are interchangeable, but the fence looks better with special elements.
- L-shaped. One shelf of the bracket is attached to the posts, sections of the fence, and the other is set aside, and not always at a right angle. This type increases the reliability of the entire structure, since it is not possible to jump over or climb over the fence due to the bracket bar extending to the side, on which the wire is fixed.
- U- and Y-shaped, rounded. Designed for fastening spiral cutting belts.
If uncoated products are used, they can be attached to metal poles by welding. This option is possible with independent construction. In most cases, polymer-powder coated brackets are used. Such products are attached using self-tapping screws; they are not intended for welding due to the presence of a protective layer.
Installing a spiral security barrier on a fence
This method is considered the simplest. The result is a reliable and inexpensive fence. You need to prepare:
- wire (tape with a cutting edge);
- brackets;
- screws or welding machine;
- metal staples;
- pliers;
- steel string.
The choice of method for attaching the brackets is made taking into account the type of material from which the poles are made. If they are protected with a polymer powder coating, self-tapping screws are used; if holes are not provided for this, you can make them yourself. The metal strip is attached to the brackets using staples. To prevent it from sagging, the string is tightened. It needs to be passed through the wire rings on the fence. A distance of at least 50 cm from the top edge of the fence is sufficient.
Stages of ground installation
Select the material with the largest diameter. It is recommended to build a fence consisting of 2-3 rows of reinforced tape with thorns. To attach the tape with a cutting edge, a frame is provided - metal posts and logs. They are installed in the same way as with any other type of fence: they are buried in the ground, concreted, and cross members are welded.
Logs are provided for each row of tape with a cutting edge. Moreover, the section is filled gradually when the wire is attached above each crossbar. Brackets are installed at the top of the fence. It is advisable to use U- or Y-shaped elements for this purpose: they will best secure the top row of tape with a sharp edge. Also, a fishing line is stretched between the rows (between the lags), it is important that it goes inside the rings of the tape with the cutting edge. This will prevent the structure from sagging.
Installation of a solid studded fence
In this case, a studded mesh is used. It consists of wire with blades and is produced as a finished product. The mesh needs to be secured between the posts. The principle of their installation is standard: they are placed at a distance of 2.5-3 m, buried in the ground by 0.8-1.5 m (depending on the level of soil freezing).
The mesh is attached between the posts using special elements - eyelets. You can make an individual order for such supports. Up to 20 eyes are provided on each product; they are welded to metal posts at a distance of 10-20 cm. It is easy to weld them yourself. The mesh will be attached to the eyes with metal brackets; it is not advisable to use fishing line. If the barbed wire is pulled tightly, it will not sag. For reliability, you can thread the fishing line only in the upper part of the fence - along the edge of the material.
Construction of a stepped base
The construction of a stepped foundation on a slope is almost no different from a strip foundation. There is only one difference: its construction begins with marking out areas for attaching support posts. The distance between the supports is one step.
Drawing for the construction of base steps
The installation of formwork on a slope also has its nuances. The formwork is poured from the bottom point. The work is carried out taking into account the established steps. Only after preparing one step on the slope is the next one poured. M250 concrete is used for pouring.
To reinforce a stepped foundation, corrugated reinforcement with a diameter of 8–12 mm is used. It is knitted in increments of 200x200 mm and laid in the form of a double mesh.
Visual reinforcement diagram
When the base is prepared along the entire perimeter of the slope and hardens, begin welding the transverse logs and attaching the fence profile.
The photo shows a stepped foundation on a slope.
Fence with steps
Slightly sloped area
If there is a small slope in an uneven area, then you need to dig a pit for the foundation from its highest point, removing the earth at the same level. Typically, the recess and height of the base for the fence along the contour of the site are unchanged, except in cases where in a certain place the border of fertile soil is buried below. In this situation, the depth of the pit becomes greater until the soil is completely removed from the trench.
Option for installing a barrier on uneven terrain
The construction of a fence foundation is done in the same way as a strip foundation. When the concrete solution has completely hardened and the formwork is dismantled, backfill the earth on a slope along the base. The ground surface is leveled so that along the perimeter of the structure the embankment and the blind area are at the same level.
Below is a photo of a fence on an uneven area on a small slope.
Fence made of corrugated sheets at the dacha
Plot with a medium slope
If the slope is more than 25 cm, then this slope is called average. This is taken into account when marking the base. You cannot choose the highest section of the future fence as a starting point. So, the lower part is chosen as the main one. This is explained by the fact that in such places on the slope the lower part of the foundation may be above ground level.
Sketches
When digging a trench under the base of the fence at the lowest point of the territory, you need to control that the depth of the pit is deeper than the fertile soil layer.
Then they dig a trench, heading towards the highest part of the slope, and maintaining the same depth. If the height difference exceeds the depth of the foundation on the slope, fill the earth at the bottom of the foundation.
Strip foundation drawing
When everything is ready, vertical filling of the earth begins. Any soil can be used to fill a pit on a slope. In particular, previously selected from the trench.
With this option of constructing a foundation on a slope, labor costs are minimal, and the consumption of concrete solution will be insignificant. With the right technology, the earth will not crumble, and the fence will last a long time.
Below is a photo of a fence on a slope with an average slope.
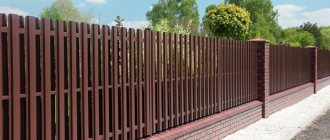
Metal picket fence
Area with a high slope
If the mountain is very steep and the difference in the extreme sections of the base is more than 100 cm in depth, this slope is called large. In such an area, the best solution is to build a stepped foundation. It will require more labor-intensive and costly work.
Reinforcement diagram for a step under a fence with brick pillars
The specificity of the construction is that in the lower part the foundation for the fence on uneven territory is made at ground level, and in the upper part - taking into account the calculated recess. To move from level to level, several ledges are made.
Below is a photograph of a barrier on an uneven site with a large slope.
Installation with steps
Advantages and disadvantages of such fences
Positive traits:
- high degree of protection, which is important for a fence that is erected to enclose an area;
- reliability, long period of operation of the structure;
- razor fencing is resistant to corrosion due to its protective coating;
- the ability to build a fence with different characteristics: flat, volumetric;
- low cost;
- ease of installation: the barbed wire is attached to the fence using special brackets;
- It is possible to increase the protective properties of the structure - current is passed through it.
The main disadvantage is considered to be low decorative qualities, which is important when installing a fence on a private property. In addition, such a design is transparent, which may be unacceptable if private property is being fenced off.