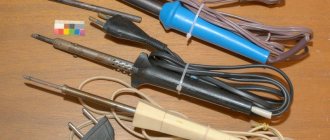
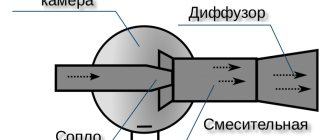
Such a simple device as a soldering iron has its own design and component parts. The smallest in size, but not in importance, is the sting. The soldering iron’s ability to perform its tasks depends on its quality.
Working tip properties:
- Thermal conductivity. The most important characteristic. It is this that determines how much heat from the heater will be transferred to the work area;
- The ability to accumulate thermal energy. The characteristic is mainly related to the size of the sting. A tip that is too thin will instantly give off heat when it comes into contact with a massive part;
- Strength, or more precisely, wear resistance. No one is going to hammer nails with a soldering iron. However, over time, the tip wears out - under the influence of aggressive fluxes or mechanically;
- Protection from oxidation. Even the thinnest film of oxides sharply reduces the ability of the tip to transfer thermal energy to the soldering site.
The ideal material for the manufacture of a soldering tip (from the point of view of thermal conductivity) is copper or its alloys. The reverse side of the moon is extremely low wear resistance and susceptibility to corrosion.
The direct opposite is steel and nickel alloys. High strength, no corrosion - but disgusting thermal conductivity.
Therefore, manufacturers produce soldering iron tips from various materials, adapting to market demands. They also do not stop experimenting with composite materials, giving tools ever higher consumer properties.
What kind of soldering irons are there?
Soldering irons vary in heating, design and purpose. There are both gas and arc ones. But it is electric soldering irons that have gained the greatest popularity. In this article we will look at different types of soldering irons and soldering stations, and their features.
We will mainly consider tools for soldering electronic circuit boards, rather than water pipes and massive structures.
Comparison table of the best soldering irons
| Name | Main characteristics | Price |
| Union PS2005-40 | Simple configuration, device power – 40 W, operates from a network with a voltage of 220 V. | ₽ 133 |
| Bison Professional 40W | The power is 40 W, there is a cone-shaped tip and a two-component durable handle, and a cap is included. | ₽ 694 |
| Bison Expert 60W | The power of the device is 60 W, the kit includes a special stand, a protective cap and solder. | ₽ 804 |
| STAYER PROFESSIONAL 55409 | Power - 8 W, the soldering iron comes with a nozzle, stand and solder. | ₽ 692 |
| Bison Professional 200W | Power - 200 W, there is a shutdown button. | ₽ 1 482 |
| Rexant 220V 25W | Power - 25 W, has a ceramic tip, the handle is made of heat-resistant plastic. | ₽ 335 |
| Rexant 220V 30-70W | Power - 70 W, there is a switch for operating modes (70 W and 30 W). | ₽ 345 |
| Rexant HT-019 220V 40W | There is a built-in vacuum pump, shock-resistant plastic is used, and is non-slip. | ₽ 388 |
Copper and “eternal” stings
Before reviewing the soldering irons themselves, you need to give a general idea of the main types of tips and their differences.
There are copper tips, and so-called non-burning “eternal” tips.
Features of copper tips
Copper tips are the most common type of tips. However, today they are losing ground to other types of stings.
Let's look at the pros and cons of copper tips.
Pros of copper tips:
- Low price;
- Available at any radio store;
- They heat up faster and lose heat more slowly;
- Copper blades are low maintenance. They can even be cleaned with files;
- Copper tips can be machined, i.e. give them shape with a hammer;
- They make it easier to start your journey in soldering.
And yet, the disadvantages of copper tips are quite critical:
- A meager set of stings in shape and size. Even if you find a thin copper tip. then it will quickly lose its shape;
- There is also the need for tinning before work. It's not difficult, but it takes time;
- Copper tips quickly lose their shape due to high temperatures and need to be replaced.
Care of copper tips
It's time to forget about cleaning the tip with wooden planks. For these purposes there are sponges and copper shavings.
Caring for these stings is simple. Excess solder and soldering flux residues can be removed with a damp sponge. And with the help of copper shavings you can remove both excess solder from the tip and carbon deposits from its surface. As a last resort, you can process the surface of the copper tip with a file. You can also give them the desired shape using a hammer and anvil.
They are easily deformed by light blows with a hammer.
Copper tip tinning
Before you start soldering, the copper tip must be tinned, i.e. Cover the work surface with a small layer of solder.
Without tinning the copper tip, soldering will be difficult.
Leading fireproof tips
This is a type of tip (they are also called “eternal”) that does not need to be tinned before starting work, does not lose its shape, and can be used for years. They have a special coating, usually a thin layer of nickel alloy. These types of stings have their own significant advantages and disadvantages.
Advantages of fireproof “eternal” stings:
- Can be used for a long time;
- There is no need to tin them;
- Wide variety of different shapes and sizes;
- High-quality tips keep their proper shape for a long time.
Flaws:
- It is strictly forbidden to clean such tips with a file, needle files or sandpaper. You risk destroying the non-burnable surface of the sting. An exception is copper shavings for cleaning carbon deposits and excess solder;
- The tip gives off heat quickly and gains it more slowly, unlike a copper one (strongly dependent on the design of the tip and the soldering iron as a whole);
- Very easy to care for. Beginners may have difficulty with them;
- Non-burnable surfaces are easily corroded by soldering acid;
- It is more difficult to get used to them after copper stings.
Caring for unburnt tips
Non-flammable tips cannot be handled or cleaned with any tools.
You can clean the surface of the tip from excess or old solder with a damp sponge. The sponge should not be too wet, otherwise there will be splashes and steam. You can remove oxides and excess solder from the tip with copper shavings.
Copper shavings do not damage the coating of the tip.
But the main thing to remember is one rule - there should always be solder on the tip. The exception is when you need to remove excess solder from the board or parts.
We removed the braided solder from the board contacts and immediately applied new solder to the surface of the tip.
Solder on the tip protects the working surface from strong oxides that arise during soldering due to air. If the tip is covered in oxides, then solder will stop sticking to its surface. It can be re-tinned, and even restored using a sting activator. Read more in this article. If you had to solder with acid, then immediately after work clean the tip with a sponge or shavings to remove solder, and cover the tip with fresh solder.
It is also unacceptable to mechanically process a non-burnable tip or shape it with a hammer (as is done with copper tips).
In terms of a number of advantages, “eternal” stings are in the lead. Just one good quality tip can be used for years, and it will be like new. But not everything is as simple as it might seem at first glance.
Universal temperature stabilizers
Of course, quality material alone is not enough. It is necessary that the optimum temperature is maintained at the tip of the sting itself. It is for these purposes that a special sensor can be installed in his body. This option is considered optimal in situations where it is necessary to maintain a constant temperature in the soldering zone. These tools are especially important in cases where you need to work with elements that are sensitive to overheating. In this case, the technician can set the tip temperature to a higher temperature than the melting point of the solder.
A specialist can work without fear of damaging parts. In addition, most designs use fairly simple schemes when the temperature is set in advance and does not require constant monitoring. It is also worth considering that the regulator can be installed in a housing or placed in a separate unit. This does not affect the quality of work at all.
Today, there is a certain category of radio amateurs who most prefer their own tools, including tips for soldering irons. Most often, after trying many different options, the master chooses a specific tip or tries to make it himself.
Originally posted 2018-07-04 08:13:06.
Conditional separation of instruments
All tools (no matter for what job) can be divided into three conditional groups:
- Tools that require experience to operate. They do not tolerate mistakes, and give a false idea of the craft;
- Tools that don't require much experience. They will help you learn this or that job, and tolerate the mistakes of beginners;
- Professional tools that are too good for beginners. They require a lot of experience to realize their rich potential in work, but can also help in training.
Now let's look at examples of soldering irons and soldering stations.
Types by heater type
The heater is the most important element of a soldering iron; carefully study it when choosing a tool. There are gas and electric heaters. The former do not require connection to any networks, but during operation they emit fumes that are harmful to health. In addition, they are not suitable for small jobs - radio amateurs are better off choosing a soldering iron with an electric heater. Now they are much more widespread than gas ones and are made from a variety of materials. For example:
- Made from an alloy of chromium and nickel (nichrome)
- in the shape of a spiral. Inexpensive, reliable, durable, but they take quite a long time to heat up before use. Overall this is a good option for home use. - Made of ceramics
- has a straight shape. It is more expensive and very fragile, requiring careful handling. At the same time, it heats up much faster than the nichrome spiral analogue.
For soldering at home, you can also choose soldering irons with a pulse or induction heater. The first ones are optimal: strong, durable, heat up quickly, but are quite expensive. The second ones are generally practically professional. They are placed on blowtorches and stations.
The simplest nichrome and EPSN soldering irons
The most popular soldering irons are nichrome soldering irons with copper tips without a temperature controller.
These are old Soviet soldering irons and EPSN. They work very simply.
The nichrome spiral heats up from the electric current passing through it (usually a mains voltage of 230 V). And it heats up the soldering iron tip.
Soldering irons with this design have been around since the dawn of electronics. They are still ideal for soldering wires and simple DIP mounting of large parts on boards. And also for soldering radiators and cooling systems.
Conventionally, 60 years ago they produced more soldering irons. Not every KT315 could withstand huge stings that heated up to 380 ℃. Radio amateurs soldered as best they could. Someone assembled a temperature controller using triacs. And someone wound copper wire over the tip, having previously tinned the edge of the wire.
And in this way an even smaller tip was obtained, which was heated from the main one to acceptable temperatures.
These soldering irons are already obsolete. Yes, they are still being produced, but this is due to their cheapness and simple assembly. Of course, modern soldering irons are much better than their previous generations, but due to their features and capabilities, they are poorly suited for thin SMD soldering.
The tip of such soldering irons is usually secured with bolts or nuts with bushings.
The advantages of such soldering irons:
- Low price;
- Sold in any store for radios, electricians and apartment repairs;
- They are ideal for soldering wires and large DIP pins.
However, in current realities, such soldering irons have significant disadvantages:
- Even the smallest soldering iron (25 W) overheats boards and parts. It is necessary to assemble an additional temperature regulator to reduce the temperature at the soldering iron tip;
- There is no grounding;
- As a rule, such soldering irons are powered directly from the mains and are not controlled by anything. Yes, you can buy a soldering iron powered by 40 V with a step-down transformer, but the price will be higher;
- Lack of even the simplest temperature display, not to mention calibration;
- Poorly suitable for fine work;
- It takes a very long time to heat up and cool down (heating time can reach 10 or 15 minutes depending on the size);
- Poor selection of stings due to mounting and heating.
Slightly improved soldering irons of this type are currently being produced, but they are not far removed from their ancestor. All the same copper tips, all the same simple design.
The more power a soldering iron requires, the larger it will be. A 25 W and a 100 W nichrome soldering iron differ in size by almost 3 times.
An example of a SPARTA soldering iron. Copper tip, coated. Burns out. Suitable for soldering wires and DIP parts for the first time. The price is only 150 rubles, and a soldering iron stand is also included (albeit very fragile). Copper tips for nichrome soldering irons are of poor variety. Usually these are conical, flat and wave-type stings. All copper tips are solid, i.e. they are heated by a nichrome thread from the outside, not from the inside.
Also, copper tips for such soldering irons can be produced with a special coating, which slightly extends the service life of the copper tip (but not for long). Should beginners buy these soldering irons? Yes, at least because of its price and for the sake of the first experience. You can simply desolder parts with such a soldering iron, solder wires, or assemble simple radio sets. Enough for the first 10-15 hours of practice.
These soldering irons are cheap, reliable and simple. And are available in any radio parts and repair stores. You can solder wires and pipes (with high-power soldering irons), but nothing more. This option is not suitable for fine work. Modern electronics are much more complex, so the requirements for installation and soldering irons have changed.
The main thing is to take a soldering iron with a wooden handle, and no more than 25 W. A wooden handle heats up less and does not smell as strong as a plastic one. And it is advisable to assemble a temperature regulator for such a soldering iron. You can take, for example, an EPSN soldering iron.
Features of soldering wires
In the preliminary connection of soldered parts, the most problems arise with the wires: to do this, you have to touch them with your hands, which causes the metal surface to become dirty, and the wire solders have to withstand mechanical loads more often than other soldered joints.
Twists of wires
Before soldering the wires, they must be twisted correctly. The main types of wire twists for soldering are shown in Fig. Each of them has its own purpose:
- Bandage twists are used to connect rigid (thick single-core) current-carrying wires, i.e. through which electrical power is transmitted. Especially – external wires. The band connection ensures sufficient electrical contact even if the oxidized junction is not soldered or overheated.
- Grooved twists are made on wires in low-melting insulation (plain PVC, polyethylene), when complete spreading of the solder with minimal heating is required. Grooved twists are heated only along the groove.
- Simple twists can be used to connect both single-core and multi-core wires that have just been stripped of insulation (shiny).
- Simple sequential twisting, so-called. straight British, or simply British, is applicable for connecting current-carrying wires of flexible cables with a cross-section of up to 1.4 square meters. mm, not subject to regular heavy mechanical loads, e.g. electrical extension cords or temporary sheds.
Electrical wires that experience regular and/or constant mechanical stress must be multi-core. They are twisted as shown in the figure below: the ends are marked, the “brooms” are pushed into each other and twisted in the British way. Soldered with high-strength low-melting solder, e.g. POSK-50 (see below) with activated flux that does not require removal of residues, also see below.
Parallel (dead-end) twists of wires with a cross-section of over 0.7 square meters. mm, it is advisable to solder by immersion in molten solder, see below. Otherwise, you will have to heat it either for a long time, or with a too powerful soldering iron, which will cause the insulation to creep and the flux to boil away prematurely.
Note: single-core tinned wires – leads of radio electronics parts – can be soldered end-to-end or with a crochet hook, see fig. on right.
What is soldered, but not soldered
Flexible coaxial cables and cables for computer networks such as twisted pair (“vitukha”) are not intended for connection by soldering. An experienced cable technician who has a complete understanding of the electrodynamics of signal transmission lines can, in exceptional cases, make a coupling on them. But when performed by an amateur, even if he is otherwise a qualified electronics engineer and installer, the throughput and noise immunity of the line will fall below the permissible level, up to complete loss.
How to clean and preserve the sting
The soldering iron tip is cleaned of solder residues by rubbing it against a soft porous or fibrous pad. Foam rubber is most often used, but this is not the best option: it burns and sticks to the sting. The best material for cleaning it is natural felt or basalt cardboard. But even better is 2-step cleaning, first with a sponge-tangle made of metal tape, and then with felt. After cleaning, turn off the soldering iron, insert an even hotter tip into the solid rosin and wait until it stops bubbling. Then the tip is removed and held with the end down so that the excess rosin drains off. Once it has cooled completely, the soldering iron can be stored.
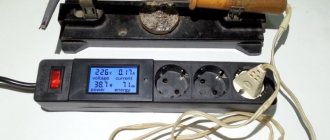
Modern soldering irons are already soldering stations
What is a soldering station? This is not necessarily a soldering iron + soldering iron set. It can be one soldering iron, but with regulation, configuration, control and temperature indication. Modern soldering irons can fit all this right into the handle. Therefore, such soldering irons can be considered stations. But due to the more familiar format “just a soldering iron and a power cord from it”, it is still perceived as an ordinary soldering iron, and not a station. A soldering station doesn't have to be expensive. It may even be cheaper than some soldering irons. Further in the article there will be examples of such conventional “soldering stations”. As modern electronics installation has become more complex, the need for different types of tips and temperature control has increased.
Heating element types
Any soldering iron, no matter how expensive it is, performs soldering by melting the solder; soldering irons differ only in the heating method, heating elements, the presence of temperature control and other parameters. The following is a table with types of heaters.
| Heater type | Active element | Heat loss | Advantages | Flaws | Approximate heating time |
| Nichrome | Nichrome wire | High | Simplicity | Nichrome burnout | high inertia |
| Ceramic | Nichrome wire in sintered ceramic | Low | Durable | fragile | Tens of seconds |
| Induction | Ferrite | Low | Durable | Temperature adjustable | Seconds |
High heat loss means that not all of the expended energy was transferred to the tip; the higher the heat loss, the worse the temperature control.
The most common are nichrome heaters and their varieties, due to their ease of maintenance, low price and simple operation.
Next in popularity are ceramic ones; their heating element is distributed evenly throughout the heater, resulting in high heat transfer and minimal losses.
The top three are inductive heaters; they operate on the principle of an inductive electric stove - the metal is heated due to magnetic induction, but at a certain temperature (Curie point), the heating stops and a constant temperature is maintained. It should be noted that the operating temperature is determined by the material of the tip.
Requirements for modern soldering equipment for 2022
If you are going to solder boards or repair electronics, then the soldering irons and stations are required to:
- Availability of temperature control with stabilization, indication and adjustment functions;
- Various fireproof “eternal” stings in shape and size;
- Sleep and temperature memory functions (so as not to keep the soldering iron constantly on, thereby saving electricity and reducing the load on the tip);
- Good characteristics of temperature stability on the tip.
Currently, not all soldering irons meet the requirements presented. Let's look at popular soldering irons and stations among radio amateurs and electronics engineers.
Soldering irons 900 series
The next most popular are CXG soldering irons with HAKKO 900 series tips.
The most popular were the 900M. The sting sizes are given below (sometimes they may differ, especially Chinese copies).
These are the most popular fireproof stings. They are sold in almost any radio store, not to mention AliExpress. The variety of shapes allows you to perform a wide range of tasks for soldering boards and radio components (DIP, SMD and BGA). Numerical and letter designations are practically not mentioned. Typically, stings are named by their visual shape (cone, hatchet, flat, etc.). Compared to conventional tips for nichrome soldering irons, the 900M tips are hollow (empty inside, because they are put on the heating element). Attaching the tip to the heating element of the soldering iron differs from simple nichrome ones. Here the tip is secured with a nut and bushing.
Installed on a huge number of soldering irons of different stations. For example, on Lukey HAKKO 702, 936, 902, 701, 8586, etc. In addition to Lukey, there are different copies of the station under other names.
However, despite all the advantages, this type of tip has a serious drawback - the gap between the heating element and the tip itself.
But first, let's look at examples of soldering irons with such tips. They are also different.
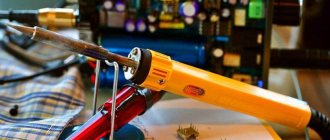
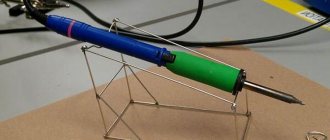
Soldering iron with blue handle SumSour 220 V from AliExpress
This is practically the most common soldering iron. Usually sold as a kit with soldering tools like this:
Power 60 W. Power supply: 220 V. Temperature adjustment is carried out by turning the potentiometer from left to right.
Features a typical 900M series blade mount.
This soldering iron doesn't even have a thermocouple to measure and control temperature.
This is an example not from the series of “soldering stations”. This soldering iron only has power control and a power indicator. That's all. There is no real regulation here, much less control and stabilization of the temperature on the tip.
Power adjustment is carried out by changing the position of the potentiometer, which in turn regulates the BT136S triac. And BT136S supplies voltage to the heater.
These soldering irons are sold individually and in sets. It is not recommended to buy sets due to low-quality components. An example of low-quality components from a typical set:
Tweezers are curved. Low quality solder. Even the stings burn out quickly. Yes, stings from AliExpress can also be of good or terrible quality.
The tips from this set quickly lose their shape after a few days of use. The tip in the photo example on the right lasted more than 7 years.
Therefore, soldering with the tips included in the soldering iron kit is not recommended.
The only thing that is really good in this set is a thin copper wire for jumpers, a sponge for cleaning the tip from solder, and a stand for the soldering iron (although it is also flimsy).
Pros of SumSour 220 V from AliExpress:
- Low cost;
- The popular 900M series tips are used;
- There is an indication of inclusion;
- There is power adjustment.
Serious disadvantages of the soldering iron:
- Mediocre build quality due to cheaper production;
- No grounding;
- Not heat resistant wire;
- No temperature control. The temperature is regulated by a triac. There is no thermocouple that would measure temperature in this soldering iron;
- The problem with overheating of the tips from the point above;
- Slow heating of unburnt tips of the 900M series (this is a common problem for all soldering irons with such tips, but here without a thermocouple everything is much more serious);
- There is no temperature display, not to mention sleep mode and other useful and mandatory functions of modern soldering irons.
This soldering iron can solder wires, DIP chips, SMD parts and even BGAs, but it is absolutely not suitable for beginners. Without experience and practice, you can stumble upon serious shortcomings of such a soldering iron. It doesn’t even make sense to buy it for such quality, not to mention sets.
If you already have such a soldering iron, then be sure to buy a new set of high-quality fireproof tips for it. And if possible, it’s better to buy another soldering iron.
Soldering irons GS90D
These are no longer just soldering irons, but full-fledged stations. Available in different capacities. The control and display board of the GS90D is located in the handle itself. Temperature adjustment is carried out using buttons.
The GS90D is better, and on average 3 times more expensive, than the blue handled SumSour soldering iron shown above, but it still has the same tip problem of the 900M series.
Pros of the GS90D:
- Availability of temperature indication;
- Good adjustment;
- Uses the popular 900M series tips;
- Heat-resistant wire (at first glance this is a trifle, but sometimes due to carelessness you can accidentally burn the wire and not notice it in time. Here the wire is protected from such cases);
- There are additional functions.
Minuses:
- Not the best thermal stabilization;
- Overpriced.
Of course, this soldering iron goes to a new level compared to the simplest ones, but it is not the best choice for beginners. It just doesn't hold the temperature well and has the disadvantage of the 900M series tips.
Soldering station Lukey 702
Popular soldering station Lukey 702 among radio amateurs and electronics engineers. The station's soldering iron is a clone of Japanese HAKKO soldering irons. In general, in other Lukey models the soldering iron is the same as in the 702 (there may be differences in the type of heater, but more on that below). The station has a soldering gun, which makes soldering any components much easier. This is a significant plus. This station also has a soldering iron with 900M series tips. As you can see, this iron has more internals than the SumSour 220 V. 5 wires are connected to the station from the soldering iron. The first two are a thermocouple for controlling and measuring temperature, the other two are a heater.
The fifth wire is ground.
Grounding allows you to reduce the risk of damage to the chips on the board by static electricity, which can appear on the soldering iron tip or even on the station itself.
The temperatures of the hair dryer and soldering iron are adjusted using buttons.
There is a soldering gun and a soldering iron that can be used to perform 90% of soldering work and replacing display modules or back covers of smartphones and tablets. In addition, the hair dryer has replaceable nozzles for different sized jobs. From the soldering gun the following are connected to the station: a thermocouple, a heating element, a turbine, grounding and a reed sensor.
The reed sensor responds to a magnet that is installed in the hair dryer stand. Need to put your hair dryer into standby mode? Just place it on the stand with a magnet. The hair dryer will begin to cool down quickly and go into standby mode. And if you need the hairdryer again, you just need to take it from the stand. The hair dryer will begin to heat up to the temperature at which it was placed on the stand.
On the other hand, this station has a number of disadvantages that can be problematic for both beginners and experienced electronics engineers. Let's look at the pros and cons of the station.
Pros of 702 station:
- There is a soldering iron with 900M type tips and a hair dryer;
- It is possible to change the nozzles on the hair dryer and the tips on the soldering iron;
- Easy adjustment of temperatures and air flow;
- Thermal stabilization and temperature control;
- Automatic shutdown of the hair dryer (there is a reed switch in the handle of the hair dryer that turns off the hair dryer if you put it on the stand);
- Digital temperature display;
- Fast heating;
- It is possible to calibrate the temperature.
On the one hand, this is a good price-quality station for a small workshop for repairing equipment. But it is outdated and has a number of disadvantages:
- There is no automatic shutdown of the soldering iron;
- Still the same problem with 900M tips;
- High price;
- Without disconnecting from the network, the station can turn on itself;
- Not heat resistant wires.
- Terrible PS/2 connector on the soldering iron;
- A large hair dryer with a lot of vibration in the body due to the turbine.
If desired, you can reflash the Lukey 702 using a programmer, improving the operation of the station.
Disadvantages of 702 station and its improvements
The problem with wires is that they are not heat resistant. You can melt them by mistake or accidentally.
Connecting a soldering iron leaves no room for improvement. It is made through a PS/2 connector, which can be found on old computer keyboards and mice. If the mount for the computer is not critical, then for the station everything is in vain. The connector is not fixed by anything, and can often simply fall out when working with a soldering iron.
And the hair dryer cannot be disconnected from the station if it is not needed (and if it breaks, it will be more difficult to replace it with a new one). In other analogue stations there is practically no such defect. So, should we take station Lukey 702? There are two options. Either take 702 and improve it, or take a similar station that will have these shortcomings corrected.
For example, this Eruntop 8586 station has power off buttons (not to be confused with regular power off buttons, which do not disconnect the station from the network). And overall it is much cheaper. Although it does not have a soldering iron temperature indicator.
And in general, the analogues look more compact than the original 702 station itself. From the point of view of circuitry, they are identical (except for the control function for adjusting the air flow. It is digital. Although this is even more convenient.
Or here is an example of a station that is a close analogue of 702.
Therefore, the purchase of station 702 is in question. You will overpay for the brand and popularity of the station, although you can buy exactly the same modified station. And of course, the connectors for connecting a soldering iron and hair dryer to the station may differ.
There are also options with compressor control of the hair dryer. This hair dryer is lighter, it produces less vibration and noise, however, due to the compressor, the station itself is large, and the hair dryer cannot be disconnected from the station. And the compressor at the station is very noisy.
If you still decide to buy a 702, then remember that it must be turned off from the network after use. Or install a plug with an off button. There is a design flaw in the station. Even if you turn off the soldering gun from the front button, and it is on the stand, it may turn on spontaneously due to the failure of the triac. Such cases have already happened. The hairdryer just caught fire. The on and off buttons on the front side of the station do not turn it off from the network. Therefore, the station must be disconnected from the network if you are finished soldering.
An example of modification of the Lukey 702 soldering station:
Problem with 900M series tips
The main problem with these tips is the presence of a large empty space between the heating element and the tip itself.
There are several possible solutions.
Reducing the gap
You can move the heating element, fill the gap with sand in empty places, or pick up a small nut on the tip of the heating element.
Or you can even move the heating element closer to the tip.
Although these solutions, to put it mildly, are not very good. If you need a different type of tip, you will have to install everything again. By the way, the heating element itself is very fragile. Such modifications can easily damage it.
You can also replace the old nozzle with a new one, which is smaller in size. This will allow you to reduce the distance between the heating element and the tip.
Installation of a ceramic heater
There are two types of heating elements. These are ceramic and nichrome. Ceramic heats up faster and holds the temperature better. But it's more expensive. It’s true that simply replacing a nichrome heating element with a ceramic one will not work. Firstly, they have different temperature sensors. Secondly, you will have to calibrate the station. Well, the final touch is the need to replace the operational amplifiers that amplify the data from the temperature sensor. The sensor values for nichrome and ceramic heaters will be different. For one, the sensor can be made using a thermocouple, and for the other, using a thermistor. This is a significant difference.
In the Lukey 868 station, Japanese ceramic heaters were installed in the soldering irons, and in the Lukey 702, Chinese nichrome ones were installed. They are not compatible without additional changes to the circuits.
Station calibration
Many stations have a calibration function. There is software calibration where you can adjust the station’s custom temperature to the real one. And there is the usual setting using potentiometers. Such potentiometers are installed on boards.
Temperature meters are needed to calibrate the station. Without them, it will not be possible to accurately calibrate the station. Of course, you can set it approximately to the melting temperature of the solder, but this will not be as accurate as checking with another independent temperature measuring device.
Working together with a soldering gun
Using a soldering gun you can stabilize the soldering temperature of the soldering iron. It is enough to simply heat the soldering area with a hairdryer at 100-150 °C with medium air flow.
This method allows you to avoid the appearance of large drops of solder on small contacts (especially when soldering any connectors, such as micro usb)
Use of copper tips
Alternatively, you can use copper tips. They heat up faster than non-burnable ones.
You can choose an identical copper tip in shape and size exactly the same as the non-burnable one. Installs exactly the same as fireproof. Although this option is not ideal. Yes, such tips are in demand, but copper tips lose their shape during operation. Of course, they are not as expensive as fireproof ones, but this is still not a solution. They also need to be tinned constantly before work. And modern stings have long ceased to be consumables. And changing the shape is a very critical parameter, especially if you solder every day. And finding really good copper tips on AliExpress is quite problematic. The problem with the 900M stings has been resolved in the next generation.
What are the soldering steps?
The main objective of this technology is to connect two metal parts, most often conductors, with a low-melting alloy so that they hold firmly and pass electric current with the lowest possible resistance.
To do this, you need to perform a series of actions sequentially. Let's look at them using the example of soldering wires. This:
- removing insulation from the connected ends of the wire;
- mechanical stripping of metal cores to an ideal state of oxides;
- heat treatment with flux - tinning the ends with a thin layer;
- heating the solder and applying it to the soldering area.
The dielectric layer of the wire can be made of polyethylene, fabric, varnish or other similar material. It needs to be removed.
This work is best done with a sharp knife, placing its blade almost parallel to the axis of the metal core. This prevents cutting and deep scratches. They weaken mechanical strength and increase electrical resistance. This cannot be allowed.
Thin wires coated with varnish can simply be treated with an open flame of matches or a lighter. The same method is suitable for twisted pair and even thicker wires.
There are special pliers of various designs on sale for stripping insulation from the end of a wire of any diameter. They allow this work to be done professionally without damaging the core.
After removing the insulation, the condition of the metal surface is assessed. Pay attention to cleanliness, absence of dents and cuts.
Only pure metal can ensure a high-quality connection of parts when soldering. It is created by mechanical cleaning of the surface and chemical solutions.
First, they work with a knife blade, lightly pressing it against the contaminated metal at an obtuse angle. The core is pulled from the insulation layer to the bare end, rotating slightly in one direction. The metal will immediately lose its dullness and begin to shine.
Chemical cleaning involves treatment with solvents, alcohol, and FES flux.
The final cleaning of the metal surface of the conductor is carried out by heat treatment with flux, using a tinned soldering iron tip. The most popular and universal remedy is rosin. It is used in a solid state, dissolved in alcohol or jelly-like.
The sale allows you to purchase rosin in any form and provides a wide range of other fluxes.
For soldering parts of electrical circuits, it is not recommended to use fluxes containing acids . They are quite difficult to completely neutralize, and even minor residues quickly oxidize the metal and destroy its structure.
The sequence of tinning a wire core with solid rosin:
- Heat the soldering iron to the desired temperature. It can range from 180 to 240 degrees and depends on the solder and the metal parts being connected. To control the heating, the tips are touched with a tip of solid rosin. If it begins to rapidly form steam, then heating is normal.
- The cleaned conductor is placed on the rosin and touched with the tip of the soldering iron. The wire is rotated to coat it evenly with molten flux.
- The tip of a soldering iron melts the solder and applies it to the rosin-treated wire, evenly distributing it over the surface.
A solution of rosin in alcohol is applied with a brush to the surface to be tinned or simply dripped through a dropper tube.
Jelly-like rosin is squeezed out of a special syringe, which is very convenient to do.
The conductor treated with liquid or jelly-like rosin is heated with a heated soldering iron tip with a drop of solder, accelerating it over the entire contact area.
For soldering, after both contact pads are prepared for connection: cleaned of dirt and oxides, tinned.
The soldered ends are connected together. A piece of solder is placed on them with a heated soldering iron, ensuring that it spreads over both areas. After this, the tip is sharply retracted to the side, and the parts remain motionless until the tin completely hardens. This is judged by a slight darkening of its color.
Correctly performed soldering is distinguished by a strong connection of contacts and a smooth surface of the solidified solder, which is slightly shiny. Its quality is checked using a small mechanical tensile force.
If the surface of the solder has darkening and unevenness, then the soldering is unreliable and needs to be corrected.
New generation of tips – T12 cartridges
The new generation of stings is structurally different from those presented above. It's not even a sting anymore, it's a cartridge.
It is even incorrect to simply compare the 900M tip and the T12 cartridge. A single T12 housing contains both a thermocouple and a heating element.
A correct comparison of T12 with 900M blades would be like this. T12 tips do not have such a gap between the tip itself and the heating element. This will allow you to achieve the best contact between the heating element and the tip itself. There are only 2 wires coming from the cartridge itself. This is both a heater and a temperature sensor.
The 900M from Lukey 702 has separate wires for the heating element and temperature sensor.
The tip itself is made of copper inside and covered with an alloy on the outside. Of course, T12 tips (cartridges) will cost more (especially original ones) than 900M. One cartridge will cost approximately the same as a whole set of different types 900M! But do not forget that the T12 cartridge is both a heating element and a temperature sensor. And all this in one building!
Let's compare different types of stings in one photo:
And of course the T12 tips have a wider selection of different tips. No 900M tip can achieve exactly the same miniature tip as the T12 and still maintain its performance.
Now let's look at a typical T12 soldering iron.
Externally, it looks like a soldering iron with 900M tips. Of course, the cartridge (tip) changes differently. Simply unscrew the nut and sleeve and you can change the cartridge. To completely disassemble you need to unscrew the base of the handle.
There is nothing inside except the contacts for connecting the T12 cartridge and the switch (vibration sensor).
But where is the grounding? This soldering iron does not have it. Those. The station itself to which this soldering iron is connected is grounded, but the soldering iron itself is not grounded. There are different soldering irons and T12 stations. Somewhere there is a grounding of the soldering iron, and somewhere there is not.
The SW-200D ball switch (vibration sensor) allows you to put the soldering iron into sleep mode. You stop using the tip, put it on a stand, and the temperature on the tip automatically decreases to room temperature. This is economical, convenient and protects the tip from unnecessary excess heat. And the most important thing is that you can use any stand. This is a ball sensor. It only reacts to prolonged inactivity. The same reed sensor in a soldering gun on a Lukey 702 will turn on only when a magnet approaches, i.e. when you place the hair dryer on the stand with a magnet. And here, while the soldering iron is in operation, it periodically moves, and the ball sensor does not put the soldering iron into sleep mode.
T12 cartridges heat up faster, transfer heat better, and are much better at soldering, unlike the above-mentioned soldering irons. Pins with T12 cartridges have deservedly gained fame as very high quality and the best of their kind among repair shops and radio amateurs.
Finding something better in terms of price and quality is currently simply unrealistic. If there is something better, it is only ten times more expensive.
Among the disadvantages of T12 soldering irons, we can highlight the wear of contacts in the body. Those. Over time, when cartridges are frequently replaced, the contacts may begin to lose contact with each other. To a large extent, everything depends on the type of soldering iron body. There are plastic cases for 500 rubles, and there are metal ones for 2,000.
Now let's look at a soldering station based on T12.
Soldering station Quicko T12-952
One of the best T12 stations. There is a power off button and a standard network cable connection. There is also a 24 V power supply option instead of mains power. If necessary, the fuse can be changed without disassembling (although it is better to look at the station board for faults if the fuse does blow). A display with the main menu is installed. Lukey 702 doesn't have nearly as much information about the station. When you press the encoder (temperature regulator) for 2 seconds, a menu of settings and additional functions will appear.
You can set the auto-shutdown time of the soldering iron and adjust the temperature. increase the voltage, find out the firmware version, turn off the sound notification, etc. A whole mini PC!
Among the shortcomings of the station, you can cancel the lack of grounding of the soldering iron and the lack of Russian language in the menu and settings.
KSGER T12 FX9501
This is basically the same station, but it has different firmware and a different developer.
You can even select the type of tip used, the time, and even set a password for the station (although why do you need to set a password for the soldering station?).
This station has a soldering iron grounding.
The entire T12 station in one handle
There are T12 stations with a control board directly in the soldering iron handle.
True, for such a soldering iron you will need a 24 V 72 W power source.
T12 DIY KIT
Or you can even assemble the T12 station yourself without a display, only with a temperature indicator. And it will even have an automatic shutdown of the soldering iron thanks to the SW-200D ball vibration sensor. The following KIT DIY kits are sold: And in general, the station will be several times cheaper than ready-made options. True, for the station to work you will need a power supply. In the ready-made versions of T12 Quicko T12-952 and KSGER T12 FX9501, the power supply is already inside the case.
Working with electronic components
Soldering electronics is the most extensive and complex topic that requires experience, skills and special equipment. However, even an amateur can replace a faulty element on a printed circuit board even with only a network soldering iron.
Lead-out elements (those with legs) are the easiest to solder. They are preliminarily fixed (plasticine, wax) with pins in the holes of the board. Then, on the reverse side, the soldering iron is pressed tightly against the tail to warm it up, after which a solder wire containing flux is inserted into the soldering site. You don’t need too much tin, just enough so that it flows into the hole from all sides and forms a kind of elongated cap.
If the lead element dangles and needs to be held by hand, then the soldering area is first moistened with flux. A very small amount is needed; here it is optimal to use bottles of nail polish, pre-washed with acetone. With this soldering technique, tin is collected on the soldering iron in a small amount and a drop of it is carefully brought to the terminal of the element 1–2 mm from the surface of the board. The solder flows down the leg, uniformly filling the hole, after which the soldering iron can be removed.
It is very important that the parts to be joined remain motionless until the solder has completely cooled. Even the slightest violation of the shape of tin during crystallization leads to the so-called cold soldering - crushing the entire mass of solder into many small crystals. A characteristic sign of this phenomenon is a sharp clouding of the solder. It needs to be reheated and wait until it cools evenly, completely still.
Poor quality, cold soldering
To maintain tin in a liquid state, it is enough for the soldering iron to contact the tinned surface of the tip with any point in the moistened area. If the soldering iron literally sticks to the parts being soldered, this indicates a lack of heating power. For soldering heat-sensitive semiconductor elements and microcircuits, regular solder can be mixed with fusible solder.
How to learn to solder boards
Before starting complex soldering, for example, working with diode strips, experts recommend that novice craftsmen acquire inexpensive budget boards. After practicing on them and mastering standard soldering techniques, after some time the beginner will learn how to solder microcircuits.
This type of soldering consists of successive steps:
- Preparatory. Before starting work, you need to ensure a strong connection and reduce resistance. For this purpose, the surface must be thoroughly cleaned of grease and dust. For degreasing, you can use napkins and soap solution. Acetone is used when you need to clean the surface of a circuit to a shine. Methyl hydrate is recommended as a safer solvent. It is as effective as acetone, but has a less pungent odor.
- Placement of board parts to be soldered. Before you learn how to solder circuits, you need to know the locations of all its elements. Flat parts must be soldered first. These are a resistor and a varistor. Then they move on to the capacitor, transistor, transformer, microphone and potentiometer. This sequence guarantees the safety of temperature-sensitive board elements.
- Heating the joint to improve the thermal conductivity of the metal. The soldering iron tip must be pressed against the circuit components for a few seconds. It is important to prevent it from overheating. This will be indicated by bubbles appearing on the surface. In this case, the soldering iron must be removed from the soldering area.
- Solder application. This is carried out until a slight elevation appears on the diagram.
- Removal of surplus. Performed after the solder has hardened and cooled. It is recommended not to rush, but to give the circuit some time to cool down. This is important because the connections made may be damaged and the work will have to be done again.
Every man should learn how to solder circuits. This will make it possible to repair plugs, modems, etc. yourself.
Soldering as a process is not limited to working with copper wires and microcircuits. Having mastered the ability to use a soldering iron on wires, you can move on to subsequent, more complex operations using various solders and various metals.
T12 competitors
In addition to the T12, soldering irons and stations similar in concept are produced. Some of them are superior to any T12, but their price is several times higher.
TS100
Miniature and powerful soldering iron. The entire control unit is located directly in the soldering iron handle.
Combines the most important advantages of T12. And this soldering iron can be flashed and further configured via USB.
TS80
Even smaller and better TS100. It will be especially useful for those who repair equipment on the road. There is a grounding connection for the soldering iron. The disadvantages include the high price and crude firmware.
Is the TS100 AND TS80 worth buying for beginners? More likely no than yes. The price is several times higher than that of any fully equipped T12 station. In addition, some of its functions are useless for beginners.
And why do you need mobility, fine-tuning and compactness if a beginner is just learning to solder and learning the basics of electronics?
A little more about originals and copies
A set of original tips sometimes costs almost as much as a full-fledged station. And this is the price of quality. Few copies can come close to the original in terms of characteristics. However, even the lowest quality copies can be soldered. Yes, copies of tips and other components for soldering irons will not be equal to the originals.
On the other hand, you can buy the original later, when you learn how to solder copies, which are several times cheaper in price. The money saved can be spent on radio components, screwdrivers, multimeters and other necessary things.
And a copy is not a fake. The fake will repeat everything, right down to the name (Lukey 702 is a copy of HAKKO, but is called and assembled differently).
Professional equipment
Professional equipment costs tens of times more than their cheap analogues and copies. At first glance it may seem that this is an unnecessary overpayment of money, but this is not so. In service centers, where the average day of soldering can be 6 or 7 hours in one day, this difference can be quickly noticed. Speed, quality and temperature control are important here.
Radio amateurs, in principle, have little need for such equipment. In assembly shops or service centers they can solder as many boards and parts in one day as a radio amateur could not solder in several months. This is not a reproach towards radio amateurs, but rather an explanation that for a hobby, professional equipment at a price of 50,000 and 100,000 rubles will be excessive, and amateur radio practice will not reveal even part of the potential of such equipment (not to mention the payback).
ATTEN ST-862D and Quick 861DW
There is no point in even comparing Lukey 702 with these stations. These stations have a hairdryer power of 1 kW. These stations also have angled attachments for hair dryers, which are convenient to work with under a microscope.
A real battle of the titans.
JBC and HAKKO
Soldering stations from this company, as well as from the Japanese HAKKO, do not give a chance to either the Chinese T12 or the Chinese TS. Only the price for them can even reach 600,000 rubles. Thermal tweezers, attachments for any microcircuits, convenient and thoughtful ergonomics and the highest quality. It doesn’t even make much sense to consider them, since beginners don’t even need such stations in theory.
Bottom and top heating
Also, do not forget about the lower and upper heating (IR heating). Without them, it will not be possible to efficiently solder massive BGA chips. And soldering a huge number of identical boards using solder paste using only one hair dryer is quite a task. You can read more about this in the article about soldering. Thermopro is not cheap equipment, but first you can assemble your own bottom heating using available components.
Bottom line
There are dozens of types of stations and soldering irons. And in general, for beginners there is an opportunity to quickly learn professional soldering on budget equipment.
What to choose
For beginners, you can buy a regular nichrome soldering iron. You can solder boards with it, desolder parts, and assemble radio sets. Available at any household. store.
Learn how to handle such a soldering iron and care for the tip. Enough for 10 hours of practice. You can solder homemade printed circuit boards. And with such a simple nichrome soldering iron, you can start your journey in electronics repair, for example, by resoldering transistors and failed electrolytic capacitors. Next are two options. Or buy T12 right away, and then buy a hairdryer separately for it, or instead of T12, Lukey 702 (or its equivalent). These two options will cover all your amateur (and even professional) soldering needs. Of course, it’s better to immediately take the T12, since the 702 and its analogues have outdated tips like 900M, which you need to get used to. But the kit includes a soldering gun, with which you can solder microcircuits and change modules on smartphones.
Is it possible to assemble a station or soldering iron with your own hands at home?
The soldering iron itself is unlikely, but the station is quite good, especially the bottom heating.
You can change the firmware, do voice control, whatever. Even modding the station by changing the color of the temperature indicators. But making a homemade hairdryer, soldering iron or tips is already unrealistic. There are ready-made options for any price and need. It’s difficult to make something new, especially if you don’t have a metal processing machine and the necessary workpieces.
Post Views: 86
Soldering of massive parts
Finally, we'll briefly talk about soldering parts with high heat capacity, such as cable joints, tanks or cookware. The requirement for the immobility of the joint is most important here; large parts are pre-connected with clamps, small parts with lumps of plasticine; before soldering the joint, it is grabbed pointwise in several places and the clamps are removed.
Massive parts are soldered as usual - first, solder at the joint, then fill the seam with liquid solder. However, special solder is used for these purposes, usually refractory and capable of maintaining high tightness, as well as withstanding partial heating well.
When soldering like this, it is extremely important to keep the parts well heated. For these purposes, the soldering seam is heated with a gas burner immediately before the soldering site, and a massive copper hatchet is used instead of a conventional electric soldering iron. It is also constantly heated in the flame of a burner, simultaneously wetting it with solder, and then the joint is filled, partially melting the previous seam by a few millimeters.
A similar heated soldering technique can also be used when working with a regular soldering iron, for example, when soldering thick cable cores. The sting in this case acts only as an operational tool for carefully distributing the tin, and the main source of heating is a gas burner.
How to solder pipes
Copper pipes are soldered using a high-temperature method with any hard copper solder with activated flux paste, which does not require removal of residues. Next, there are 3 options:
- In copper (brass, bronze) couplings - soldering fittings.
- With full distribution.
- With incomplete distribution and compression.
Soldering copper pipes into fittings is more reliable than others, but requires significant additional costs for couplings. The only case when it is irreplaceable is a drainage device; then a tee fitting is used. Both soldered surfaces are not tinned in advance, but are coated with flux. Then the pipe is inserted into the fitting, securely fixed and the joint is soldered. Soldering is considered complete when the solder stops going into the gap between the pipe and the coupling (0.5-1 mm is needed) and protrudes outward as a small bead. The fastener is removed no earlier than 3-5 minutes after the solder has hardened, when the joint can already be held by hand, otherwise the solder will not gain strength and the joint will eventually leak.
How pipes with full distribution are soldered is shown on the left in Fig. The “distributed” soldering holds the same pressure as the fitting one, but requires additional pressure. special tools for unrolling the socket and increased solder consumption. Fixing the soldered pipe is not necessary; it can be pushed into the socket with a twist until it jams tightly, so soldering with full distribution is often done in places that are inconvenient for installing the clamp.
Soldering copper pipes
In home wiring made from thin-walled pipes of small diameter, where the pressure is already low and its losses are insignificant, soldering with incomplete expansion of one pipe and narrowing of the other may be advisable, pos. I on the right in Fig. To prepare the pipes, a round stick made of hard wood with a conical tip of 10-12 degrees on one side and a truncated-conical hole of 15-20 degrees on the other, pos. II, is sufficient. The ends of the pipes are processed until they fit into each other without jamming for approx. by 10-12 mm. The surfaces are tinned in advance, more flux is applied to the tinned ones and they are connected until they jam. Then they heat until the solder melts and prop up the narrowed pipe until it jams. Solder consumption is minimal.
The most important condition for the reliability of such a joint is that the narrowing must be oriented along the flow of water, pos. III. Bernoulli's school law is a generalization for an ideal fluid in a wide pipe, and for a real fluid in a narrow pipe, due to its (liquid) viscosity, the maximum pressure jump shifts opposite to the current, pos. IV. A component of pressure force arises, pressing the narrowed pipe against the distributor, and the soldering turns out to be very reliable.