Insulating the connection of current-carrying elements is the main requirement for the safe operation of electrical installations. There are a lot of insulating materials and devices used today, one of the varieties of which is heat-shrinkable tubes. They are quite simple to use, so today they are increasingly used in the process of electrical wiring in apartments and houses. And yet, the question of how to properly install a heat-shrinkable tube with your own hands worries many consumers.
How to replace heat shrink at home, analogue
| How to replace heat shrink | Description |
| Insulating tape | The most obvious option for replacement. It is applied by wrapping it around the desired area. It has almost all the same properties as heat shrink. However, over time it begins to peel off, spoiling the appearance of the isolated area. |
| Polymer tubes | Any tubes are suitable, for example from a dropper or a hydraulic level. They just need to be placed over the exposed wires. The tubes can be preheated to make them easier to use. |
| Thread/cord | Wrap the wire with thread or cord and glue it. This is not the most effective analogue, and the process of such isolation takes a lot of time. |
| Rubber tube | Any rubber nipple tube of suitable diameter is suitable. It, just like polymer tubes, needs to be pulled over the bare wire. For a tighter fixation, the tube can be heated with a lighter. |
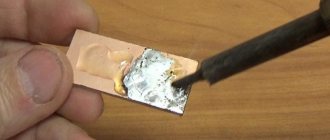
| Heat shrink sleeves | These sleeves are used for welding with optical fiber. Place the sleeve over the wire, connect the ends, drag the sleeve to the place where the wires are fixed and heat it with a lighter or burner. After a few minutes of cooling, you will have reliable insulation. |
Heat shrink is the most popular and reliable means for insulating wires. The principle of its use is as simple as possible. Despite its apparent simplicity, heat shrinkage provides good results. In some cases, you have to look for something to replace the heat shrink because it was not at hand.
There are several analogues, however, you need to take into account that they do not provide the same result as the original.
The most obvious option
Electrical tape is probably the first thing you think of when looking for a heat shrink replacement. It helps protect exposed wires from external factors and eliminates the possibility of body contact with them.
Using electrical tape is extremely simple, you just need to wrap it tightly over the desired area. However, electrical tape deteriorates over time and comes off, which is important to consider.
Various tubes
When heat shrink is not at hand, polymer or rubber tubes of suitable diameter and length can be used to insulate the wires. This could be a tube from a dropper, a hydraulic level. If you don't have a rubber one, use a nipple tube.
To make the application process a little easier, you need to preheat the tube and put it on the wires, wait a couple of minutes and the insulation is ready.
Sometimes the tube is heated after being placed on the wire, it all depends on the characteristics of the material - some immediately harden after heating, while others, on the contrary, become elastic.
Laces, thread
Not the most successful, but quite acceptable analogue. You need to wind the thread around the bare wire (tightly, covering all areas) and glue it with glue. Such protection is acceptable if the wires are hidden and will be affected by the environment.
Heat shrink sleeve
This is a must-have tool when working with fiber optics. The sleeve needs to be put on the wire and heated, after a couple of minutes it will take the desired shape and provide good insulation.
Finding a replacement for heat shrink is not so difficult, because there are many options, you just need to use your imagination. However, such “analogues” are not always effective. Therefore, if possible, it is better to go to the store and purchase heat shrink.
Author: Site editors
chem-zamenit.ru
Incorrect use of electrical tape
Error 1 – lack of tension
During winding, the electrical tape does not stretch, which means it does not stick to the insulated material.
Mistake #2 – Winding Back and Forth
Winding once in one direction and then in another can lead to deformations as in the previous case.
Mistake #3 – taking the easy route
This is clearly shown in the picture. This option can be tempting when there are a lot of wires and little space. But the small contact surface of the tape with the cable is the basis for disconnection in a very short time and exposure of the bare wire. This is especially important in wires with a small cross-section. This method can be used to temporarily mark wires, but not for permanent insulation.
Useful: Driver for laser diode - laser connection diagram
how to insulate exposed wires, heat shrink and electrical tape, what to replace
Do-it-yourself heat-shrink tube will significantly save your budget, without requiring specific knowledge and skills. A technically correct heat-shrink tube, made with your own hands, protects the wires from external physical influence. TV, radio, personal computer - all use numerous wires to deliver electrical energy and various types of information. Citizens who do not want to buy everything they need for a lot of money in a store have the opportunity to do everything themselves. The work does not require special skills and is accessible even to a beginner.
How to insulate wires with heat shrink: let's look at the details
The very name of this material contains the word “temperature”, which will help give the coating the required level of strength. To do this, the heat-shrinkable tube is preheated to +120C degrees.
This is done to give the material greater elasticity. Immediately after heating, the sealed coating can be applied to the desired surface.
As the tube cools, it will return to its original shape. The described technology is convenient in another way. For example, the insulation of a wire with two exposed ends is done without any seams. As the tube cools, it literally “tightly” solders both parts.
Insulating wires with heat shrink can be done in several ways.
The key to success lies in a properly selected heating tool so that it does not “glue” the wire to the wall:
- Heat guns;
- When using a gas burner, make sure that the flame is yellow;
- Construction hair dryer with attachments;
- Lighter;
- Matches;
- Boiling water.
The last three listed methods are suitable for cases where heating is done by hand. In general, a simple procedure allows you to insulate exposed wires with heat shrink. The main thing is to choose the right temperature and prolonged thermal exposure.
Protecting exposed wires
Having understood the basics, you can move on to the practical part of preserving electrical wiring from external influences. We are talking not only about water, but also about dampness, accidental damage and even pets.
It all starts with properly prepared two or more parts that need to be insulated with heat shrink.
All traces of dirt are removed from the surface of the wires. This is done using delicate cleaning products.
Exposed wires should be insulated in stages
The further procedure is as follows:
- Electrical wires are degreased using a solvent;
- Wipe them gently with a soft cloth;
- If the electrical wiring is covered with PVC insulation, it must be removed using mild sandpaper;
- Using a lighter will help remove the polyethylene insulation materials.
Before starting work, you should clean the wires from traces of grease, dirt and the oldest insulation. This is done with a lighter or not very rough sandpaper. As soon as the wires are free of coating, you can begin to work.
Secrets of choosing: heat-shrinkable tape
Experienced builders are familiar with the axiom that new heat-shrinkable tape should be smaller in diameter than the ends of the wires that need to be connected and insulated.
Most reference books even indicate an approximate ratio of 20%. From a practical point of view, this figure cannot be considered true in the last resort.
Connecting individual wires “in a twist” is not always possible with a 20% excess of the heat-shrink tube over the wire itself.
The following practical tips will help to simplify this manipulation a little:
- Heat-shrinkable tubes sold in the retail chain have a certain heat-shrinkage coefficient;
- At home, it is better to use material with a 2:1 ratio;
- The number on the left side indicates how much the tube will shrink in size after cooling;
- On sale you can find materials that insulate wires with a high ratio;
- First, they need to be tested in the field;
- A small piece of tube is heated to a temperature equal to 120C*1/2 = 60C degrees;
- Depending on how much weight has been lost, a decision is made as to whether it can be used in the future.
The heat-shrinkable tape should be smaller in diameter than the ends of the wires that need to be insulated
At the time of purchasing a connecting material, it is necessary to study its performance characteristics. In view is the shrinkage coefficient - an indicator that reflects the ability of a material to change its original size after heating and cooling. Isolating, for example, headphones can be done using a coating with a minimum ratio of 2:1.
We solve difficult questions: what can replace electrical tape?
This question comes up quite often, because traditional insulating tape is not always suitable. A heat-shrinkable tube with certain characteristics will help replace it. For example, it is necessary to connect and protect the wiring through which current flows. It is clear that plasticine is not the best sealant in such a situation, not to mention the fact that using tape is an equally stupid idea.
To work, you will need a thermal gun, the operating mode of which is set in the range from 120 to 200 degrees. Setting the mode to 70-120 degrees, instead of the one indicated above, is necessary when using Chinese-made tubes.
A heat gun is an excellent alternative to electrical tape.
In the future, you need to adhere to the following algorithm:
- Heating always starts from the middle of the joint;
- As it warms up, the heat source is carried out in a circle, except for the corners;
- You need to make sure that the thermal sealant “presses” tightly to the central part of the wire;
- The point of the metal junction gradually heats up;
- After this, you need to gradually heat the two end parts so that after cooling they can quickly restore their original size;
- Give the joint about 2 hours necessary to cool;
- If you can write on the finished product with a washable marker without compromising the strength of the insulating coating, then the work has been done efficiently.
How to use heat shrink for wires (video)
In industrial and domestic conditions, heat-shrinkable tubing is used for insulation work. They are performed under the influence of heat - the surface is heated to +120C. After this, the tube is put on the wire and cooled smoothly. The main thing is to choose high-quality material, the shrinkage ratio of which is at least 2:1.
Add a comment
www.6watt.ru
Heat shrink tube: installing insulation with your own hands
Insulating the connection of current-carrying elements is the main requirement for the safe operation of electrical installations. There are a lot of insulating materials and devices used today, one of the varieties of which is heat-shrinkable tubes. They are quite simple to use, so today they are increasingly used in the process of electrical wiring in apartments and houses. And yet, the question of how to properly install a heat-shrinkable tube with your own hands worries many consumers.
Insulation Installation Tools
In order for the heat shrink to fulfill its purpose, it must first be heated above +120C. It will soften and become elastic. As it cools, it will begin to decrease in size, tightly fitting the junction of, for example, two wires being connected. This is one hundred percent guaranteed insulation.
This means that the main tool in this process will be any device that heats the insulating material. If we are talking about professional tools, then there are several of them:
- gas burner (propane-butane), the main thing is that the flame of the fire is yellow;
- special thermal guns;
- construction hair dryers (their kit includes several attachments with which you can adjust the power of the heat flow).
If we are talking about carrying out the insulation process at home, and also with your own hands, then you can use matches, a lighter, or put the heat-shrinkable tube in boiling water. It is important here not to overheat the material so that it does not burn and become brittle.
Do-it-yourself heat shrink installation process
So, let's now answer the question, how to use heat shrink tubing? First of all, the elements that are to be insulated are prepared. Let these be the two ends of the electrical wire.
- They need to be cleared of their plastic shell.
- Use a solvent to degrease the wires using a cloth.
- If the internal cable insulation is made of polyvinyl chloride, it must be removed with fine-grain sandpaper.
- If the insulation is polyethylene, then it can be removed with a flame from a lighter.
How to choose and prepare heat shrink
There is a strict rule that states that heat-shrinkable insulation should be smaller in diameter than the ends of the twisted wires that it insulates. And this difference should not be more than 20%, but only after the material shrinks. That is, the tube is placed loosely on the connection, and after cooling and shrinking it decreases by at least 20%.
When choosing an insulating material, you must first pay attention to the shrinkage coefficient. The standard indicator for the main quantity of products is a ratio of 2:1. That is, the reduction in size occurs twofold. True, there are products with a higher coefficient.
Before carrying out the main process, the heat-shrinkable tube itself must be heated with your own hands to half the required temperature, that is, to 50-60C. This is especially true for a product such as a large diameter tube.
Shrinkage process
Since we are discussing the process of insulating the connection of the ends of two wires, first a heat-shrink tube is put on one of the wires, the two ends are twisted, then the insulating product is mixed onto the joint itself. Everything else is as follows:
- If, for example, a special gun is used for heating, then you need to set the temperature on it in the range of 120-200C. If you are using a Chinese-made tube, then experts recommend reducing the temperature to 70-110C.
- Heating, and therefore shrinkage, must begin from the middle of the joint. Warming up must be carried out evenly in a circle, so that the central part of the product is pressed tightly against the metal junction of the two wires.
- Next, the two end parts of the tube are heated alternately, starting from the middle and moving towards the end.
- The joint is left for cooling.
Important! Local overheating should not be allowed, which is why it is so important to heat the insulation evenly. After cooling, the surface of the heat shrink tube should be smooth.
Some models are coated on the inside with an adhesive composition. So, during the heating process, the glue will definitely come out, this will not reduce the quality of the insulation.
How to choose the right heat shrink
This question is actually quite serious. It is based on the tube size and shrinkage coefficient. Therefore, when buying a set of heat shrink tubes, you need to pay attention to these two indicators.
To help you understand what we are talking about, here are a few examples.
- The following symbols may be printed on the tube or its packaging: 10/5 or 10 mm/5 mm. The first number is the actual diameter of the product, the second is the diameter after shrinkage. European tubes are designated in inches. By the way, one of the most famous thin-walled models is called “PBF”.
- There is another designation: 10/2:1. That is, the diameter of the tube is 10 mm, and its shrinkage ratio is 2:1.
It was already mentioned above about tubes in which an adhesive composition is used. So it is in them that the shrinkage coefficient does not have a standard indicator. It can vary from 2.8:1 to 4:1.
If we are talking about the form of heat shrink, then there are three options:
- round;
- oval;
- flat.
Currently, manufacturers are trying to offer tubes of different colors in order to use them to connect wires of the same colors. This is done for ease of operation and maintenance of electrical networks and installations. By the way, yellow-green tubes (domestic and pbf) for grounding loops are also produced. Today, transparent heat-shrinkable tubes have also appeared on the market. They perform all the same functions as their colored counterparts. But they also have one advantage. It consists in the fact that you can put markings inside the tube, which are clearly visible through it.
Shrink insulation of small diameter (pbf and domestic thin-walled) is supplied in coils that can accommodate from 10 to 100 m of insulation. Tubes with an adhesive composition are sold in cut lengths of either 1 m or 1.22 m. Thick-walled products are also sold in cuts, and not in coils.
onlineelektrik.ru
dimensions, characteristics, instructions for use, how to do it yourself, Repair and Construction
All electrical wiring must be safe for human life. This is one of the most basic requirements for electrical installations. It is especially necessary to remember the places where the wires are connected, because this is where overheating, contact failure, or even fire can occur. That is why reliable insulation should be made in these places. One way to insulate is to use heat shrink tubing ( HERE ). This type of protection has many advantages compared to other types of protective insulation for cable connections. But in order to use heat shrink correctly, you need to know what it is, why such a tube is needed, and how to choose the size. This is exactly what this article will discuss.
Main purpose
The main purpose of heat shrink is to insulate current-carrying conductors. Thanks to its electrical insulating properties and simple installation, it can successfully replace conventional insulating tapes.
Nowadays, you can easily purchase heat-shrinkable tubes in electrical goods stores, which are used to protect the connection of wires. The popularity of this product as an insulating material lies in its ability to reduce its diameter due to high temperature. The required shrinkage temperature reaches 120°C. However, in order to do this, you need to know how to heat heat-shrinkable tubing. Thanks to heating, the heat shrink wraps very tightly and reliably around the insulated object, providing good insulation, as well as providing mechanical protection for the wires.
Manufacturers produce tubes of different sizes, and they are also color-coded. Due to this, they are used not just for good insulation, but also to further determine the purpose of the insulated wire.
For example, to mark DC wires, red is used for positive and black for negative. And for marking five-core electrical cables, brown, white, black are used, which indicate phase conductors, zero is indicated in blue, grounding is yellow-green.
Using HERE for cable marking is quite convenient, because the heat-shrinkable tube does not need to be pulled over the entire length of the wire. You just need to stretch a small piece of heat shrink over the insulation onto the end of the wire, as shown in the photo above. This marking is very reliable and is not afraid of external influences, as well as temperature changes. Its service life is more than twenty years. This product is durable, inexpensive and very easy to use.
Advantages and disadvantages
When compared to other types of insulation, heat shrink has at least four advantages.
Firstly, since the heat-shrinkable tube fits very tightly, it does not move due to various mechanical influences. Secondly, installation is a simple and quick process, but you still need to know some rules of use. Thirdly, after shrinking, the insulation material becomes stronger, so the wire becomes even more resistant to mechanical damage and acquires additional rigidity at the junction. And the service life is much longer than that of conventional electrical tape. The fourth plus is a wide range of applications.
Among the disadvantages of the tube HERE, the following can be noted:
- It cannot be reused, because when heated it changes its diameter, so it will definitely be damaged when removed.
- The price of heat-shrinkable tubing is higher than the price of electrical tape, but not so much that it becomes a decisive factor when choosing a protective and insulating material.
If during use some other shortcomings are discovered, then these are shortcomings of the selected manufacturer.
The video below provides a visual comparison of heat shrink and electrical tape:
Where is the tube used HERE
Although the main purpose of heat shrink tubing is to insulate contacts, there are other ways to use it:
- Insulation of water and metal pipes from aggressive environments.
- Shrinkage of a metal or wooden power transmission line support onto the butt in order to protect the wood from corrosion and rotting in the ground.
- Longitudinal sealing of cable bundles. Despite the external insulation, you can use a special tape that completely fills and also insulates the space between the wire cores.
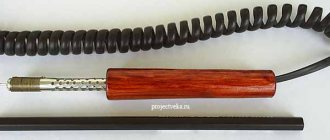
- To improve the ergonomics of the handles of sports equipment and construction tools through the use of corrugated and ribbed surfaces of the tubes.
- Converting simple tools, such as screwdrivers, into dielectric ones using insulation HERE.
- Protection of the wire from high temperature. There are products whose operating temperature range varies from -65°C to +260°C. This protection helps the wire to withstand such operating conditions, even if there is a source of heat and fire nearby. These types of heat-shrinkable tubes are called fluoroplastic or Teflon.
Characteristics of Heat Shrink Tube
First you need to know what heat shrink for wires is made of. It is made of polymer, thanks to which it can change and shrink. The size of the tube HERE can be reduced by half or even six times. The shrinkage ratio of the product varies from 2:1 to 6:1.
Heat shrinks also come with an adhesive layer; they are used when connections need to be very reliably sealed to protect them from moisture and corrosion. The adhesive layer provides additional strength to the joints.
Heat-shrinkable tubes differ in their polymer composition. Some are made from PVC, elastomers, polyolefins and various other materials. It is important that the product is resistant to fire, ultraviolet rays, and also has good mechanical properties.
It is also important to talk about the sizes of heat-shrinkable tubes. All manufacturers put a designation on the product that will indicate its dimensions. The diameter is indicated both before and after shrinkage. The first numbers indicate the internal size before shrinkage, and the next ones indicate either the diameter or the coefficient by which it can be calculated. The basic or standard ratio is 2:1. The maximum diameter of the HERE tube is 120 mm, and the minimum size is 2 mm before shrinkage.
The most required heat shrink sizes are provided in the table:
If you want to know how to select heat shrink tubing, we recommend watching the video provided below:
How to use heat shrink for wires
All that remains is to find out how to use heat-shrinkable tubing. So, first you should choose the appropriate size of heat shrink. If you need to insulate the wires, then you need to cut off a suitable piece that would cover the insulated area, taking into account the fact that there will be longitudinal shrinkage when heated. Usually it is up to 10%, this information is indicated by the manufacturer. There should be no damage or any burrs on the surface, as well as on the sections of the cut tube, because they can contribute to the rapid destruction of the material.
First, the tube HERE is pulled onto the cable, and then you need to make a connection, over which the heat shrink will be put. After joining, it must be heated with movements from one side to the other, so that large longitudinal shrinkage does not occur. This can also be done by heating from the middle of the joint to the edges. The second method is applicable on fairly long sections.
It should be remembered that it is impossible to warm up at both ends at the same time because an air bubble may remain, and this is very undesirable. Wrinkles may also appear on the surface. The heat-shrinkable tube should be heated very carefully and evenly so as not to overheat in some place, as a bubble or surface rupture may appear.
The heating rate and temperature are determined by experiment. However, you should not rush, especially if you have no experience in this area. Heating too quickly or at too high a temperature may damage the heat shrink.
The insulation process itself is not too complicated; if you wish, you can insulate the wire yourself. However, first you can experiment on some piece of wire and make sure that everything is done correctly, and only then start insulating the critical connections.
Finally, we recommend watching a video that clearly shows how to use heat-shrinkable tubing for wires using a hair dryer and a lighter for heating:
Now you know what a heat shrink tube is, what it is needed for and how to use this device at home. We hope that the information provided was informative and interesting for you!
www.remontostroitel.ru
Types of heat-shrinkable tube (according to GOST)
There are several types of insulation classification. There are options based on the material of manufacture, installation method and wall thickness.
Material
Tubes on the market are classified according to the type of plastic used in their manufacture. The most common varieties are:
- PVC or polyvinyl chloride;
- polyester;
- fluorine rubber;
- polyethylene;
- polyvinylidene;
- polyethylene terephthalate;
- materials containing polyolefin.
PHOTO: i1.photo.2gis.com PVC is a simple and cheap material that has significant disadvantages
PVC pipes
They are based on thermoplastic polyvinyl chloride. This material is distinguished by its high insulating properties. At the same time, its significant drawback is the small range of operating temperatures, which can vary from -20ºС to +80ºС.
PHOTO: plastirub.be Polyester is superior to PVC in all respects
Polyester shrinkage
A material that has become a development of conventional polyvinyl chloride. Compared to the latter, it has higher physical strength and resistance to chemical attack. Often used in the production of thin-walled and thick-walled heat-shrinkable tubes.
PHOTO: sc01.alicdn.com Photopolymer has a high production cost
Photopolymers
Another group of materials with very high performance characteristics, which makes their use indispensable in creating reliable protection against physical and chemical influences. The disadvantage is the high cost due to the complexity of production.
PHOTO: home.premiumfull.ru Polyolefin shrinkage is the most modern and high-quality insulation option
Polyolefin tubes
A material that is obtained by chemical processing of polyethylene with the addition of dyes, plasticizers and additives that prevent combustion to the finished product. It has a wide range of operating temperatures (from -50ºС to +125ºС). It also has high resistance to strong oxidizing agents, but gradually deteriorates with prolonged contact.
PHOTO: build-experts.ru Foamed or synthetic rubber can withstand low temperatures, but is destroyed when exposed to fuels and lubricants
Elastomer tubes
The basis of this material is synthetic rubber. This option, due to the original qualities of the base composition, is highly resistant to high temperatures, but at the same time practically does not withstand the ingress of fuels and lubricants. Another significant disadvantage is the high cost of production, which also determines low demand.
PHOTO: ad-cd.net Silicone is chemically inert and relatively cheap, but does not withstand exposure to solvents
Silicone products
Tubes made from silicone are flexible and virtually non-toxic. Another positive quality of silicone products is chemical inertness and electrical strength. The disadvantage is the lack of resistance to organic solvents.
Heat shrink bundles from plastic bottles
I had an idea how to make heat-shrinkable clamps that could be used for various household purposes. The idea is based on the ability of PET plastic to shrink when exposed to hot air. Through experience, I came up with three types of clamps, which I will tell you about. This clamp consists of two parts
Composite clamp
Making the first part
: The first element of the bundle is a ring approximately 2 cm wide, cut from a plastic bottle.
The diameter of the ring is determined by the diameter of the bottle: the larger the volume of the bottle used, the larger the working diameter of the finished clamp. Holes are made along the edges of the strip using a punch. To make this easier, I fold and iron the ring to form a double strip of plastic. I also punch a second hole combined with the first to widen the holes. Making the second element:
For the second part of the bunch, I suggest using a plastic handle taken from wine packages. It has T-shaped ends, which are monolithically connected to the handle itself, so it is quite reliable against tearing.
Using a Clamp
One side of the plastic handle (T-end) is threaded through the hole in the bottle ring. Next, the clamp is wrapped around the product being crimped or the objects being connected and fastened at the other end.
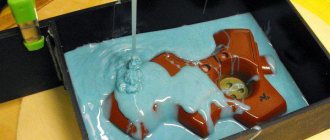
In order for the harness to tightly compress and fix the desired object, it is necessary to apply heat.
For these purposes, you can use a hair dryer (heat gun) or other sources of hot air. At home, even a gas burner from a household stove will do. When exposed to heat, a strip cut from a plastic bottle contracts, resulting in a reliable fixation of the two elements. Note! The shrinkage of the plastic turned out to be not very large, so it is necessary that the strapping initially fits as tightly as possible to the object. For this type of clamp, I use handles from plastic mayonnaise buckets. The general technology for making straps is similar to the previous version, with one difference: such handles have round latching loops, so round holes are made in strips of PET plastic. The handles of plastic buckets are longer, so they allow you to crimp products of larger diameters. Finally, I will tell you how I made a cut-out clamp from PET plastic. For this binding, I cut several strips about 1 cm wide from a plastic bottle. I made a hole at one end with a punch. At the other end I made semicircular cutouts located symmetrically on both sides of the strip. After this, all that remains is to pass the sharp end of the strip into the hole and the heat-shrinkable clamp is ready! Advice! If you need to lengthen the plastic strapping, you can combine several strips into one design. As practice has shown, the rigidity of the connection remains just as reliable. sdelaysam-svoimirukami.ru
How to tighten a small heat shrink tube onto a large workpiece » Useful homemade products
Hello to all DIY lovers!
Currently, instead of insulating tape, heat-shrinkable tubes of different diameters are often used to insulate various wires and cables. A peculiarity of such tubes is that when heated, they can shrink two or even more times relative to their original diameter.
Moreover, such tubes are used not only for insulating wires, but also in many other cases, for example, for finishing the handles of various tools (including homemade ones), as well as for securely fastening a bundle of several wires or other long and thin parts, etc. P.
However, sometimes situations arise when you need to connect several parts into a rather thick bundle or, for example, heat-shrink a thick handle, but there is no large-diameter heat-shrink tube at hand.
I recently had a similar problem when I didn’t have either a large heat-shrink tube or regular insulating tape on hand. I managed to solve this problem quite simply, which I now want to share.
Secret of use
For example, let’s assume that we need to reliably cover such a tube with a fairly large diameter with heat shrink. A cardboard sleeve from food foil will serve as such a tube.
However, the heat-shrinkable tube itself is actually more than two times smaller in diameter than this sleeve.
In this case, you can use the following method
For this, in addition to the heat shrink tube itself, we will need good, powerful scissors.
We take the heat shrink, and lightly squeezing it with our fingers, straighten it so that it turns from a strip into a tube.
And then we begin to cut it with scissors in a spiral, turning it as necessary.
Thus, we form such a spiral tape from it.
Then we take the resulting tape and wrap it around our cardboard sleeve.
In this case, the first tip of the spiral must be wrapped with the next turn, and the second tip must be slipped under the previous turn.
After this, we heat treat our winding.
And now we have a fairly strong winding made from a spiral of heat-shrinkable tubing.
As another example, I wrapped the same spiral around an aluminum tube, which is also slightly larger in diameter than heat shrink.
And in this case, a fairly strong connection was also obtained.
By the way, as a test for such a connection, I tried to tear off the heat shrink from an aluminum tube with my fingernail.
And it didn't work out for me.
As a result, I used scissors to cut the heat shrink and removed it from the tube piece by piece.
In general, in conclusion, we can say that such a connection turns out to be quite strong. Of course, such a connection should not be used unless absolutely necessary, especially if you have electrical tape or heat-shrink tubing of the required diameter on hand. But in an extreme situation, such a connection using a spiral tape cut from a heat-shrinkable tube may well help out.
Another life hack for using heat shrink
By the way, here I can give one more piece of advice.
In order for such a connection to be sufficiently reliable, it is necessary, firstly, to tuck the ends of the tape under the other turns, which, when heated and shrinked, will securely fix them and prevent them from jumping out.
Well, and secondly, for reliable fixation you need to thoroughly heat the shrink tape.
Well, that's all for me! Goodbye everyone and happy crafts in the coming year!
www.freeseller.ru
Advantages and disadvantages of heat-shrinkable products
Heat shrink for wires has the following advantages:
- the ability to hermetically crimp products with complex relief surfaces, providing electrical insulation and mechanical protection;
- high strength with respect to tensile forces;
- abrasion resistance;
- chemical resistance to acids and alkalis;
- simple installation that does not require special skills or special tools;
- elasticity and ease of deformation during installation;
- resistance to open flame.
Note! The tube HERE reliably crimps wire connections, the diameters of which vary significantly. Thanks to tight crimping, the connected products do not move when exposed to mechanical factors, and the conductors themselves become more rigid and resistant to damage
Crimping HERE for conductors of different diameters
Among the shortcomings HERE, the following circumstances are noted:
- The thermotube is a disposable product. If it is necessary to remove it from the conductor, the polymer will have to be cut along the entire length of the fitting.
- The cost of heat-shrinkable tubes is higher compared to the price of traditional electrical tape.
- With increased abrasive loads during repeated contacts with foreign bodies, it is preferable to use several layers of electrical tape or corrugation (plastic or metal).