It is easier and cheaper to make a heater based on nichrome. A meter-long piece of self-regulating cable costs 330 rubles and goes on forever. Sellers surprisingly consistently forget to indicate the temperature of the system setting, but provide information about power that directly depends on conditions, and the indicator, by definition, in the described case is not constant. If we were talking about a resistive cable, the above would make sense. For example, a self-regulating one works independently and does not require a thermostat. Has high fault tolerance. This means that the risk of fire is minimal if you happen to make a homemade heater.
Small homemade heater
Progress
First, we separate the cooler grille from the fan, it will also be useful to us. We place the fan with the correct side (so that it blows outward) into the jar, and secure it to the bottom with several screws. It will be needed to drive hot air into the room from the hot wire. Now we roll the wire itself into a spiral - it can be wound on a thick pencil and removed. This is necessary for greater heat transfer when air passes past the spiral. We fix the spiral inside the case, the ends need to be brought out and connected to the wires. Our heating is almost ready. All that remains is to cover the case with the cooler grill for safety. It’s as if it was specially created for this - it turned out to be an excellent device, reminiscent of a hot hair dryer.
Examples of homemade heaters
As already noted, it is easier to make a heater from nichrome. You will need a section with a resistance of 27 - 28 Ohms to get a power of 2 kW. Do not connect such spirals in parallel. In this case, the power is multiplied by the number of heating elements, and the home switchboard in the Khrushchev building draws 5 kW. If you do not take into account modern high-rise buildings. Power is calculated using the formula:
Do-it-yourself heater-wind blower
With a resistance of 28 Ohms, the result is 1728 W, if the effective voltage value is 220 V. It is unlikely that you will be able to assemble a tubular water heater at home, and there are as many nichrome spirals as you like. Wind the wire around a ceramic rod, as is done in electric fireplaces, or on plates, as in hair dryers or wind blowers. Where to get heat-resistant material. It costs a penny in the capital market, but it’s expensive to buy online. Disassemble old equipment and borrow what you need. Do not use steel for winding; this action will cause unpredictable consequences. By the way, the soldering iron has a ceramic insulator inside.
If nothing comes to mind, use a special hammer (for bricks) to chop off a thin plate from the brick and use it. The fragment is heavy, but reliable. If you find a fire brick, it is better to use a heat-resistant one. Ceramic tiles will do. Don’t forget to make a recess at the ends of the plate for the wire, wind it in one layer, no more. In this case, the heat exchange conditions are violated, and the nichrome can burn. By the way, make holes in the tiles using special drills (for tiles, with a stone at the end). If forced airflow is expected, for example, with a processor cooler, this will improve heat transfer.
By the way, fans are not used at all to increase power, as it seems. The thermal effect of nichrome depends little on air temperature. The wind just picks up the heat and spreads it around the room faster. The heating is more even. Ceramic tiles can be installed using any method, including heat-resistant adhesive (temperatures of at least 800 degrees). When heated, nichrome glows and works as an infrared heater. If the above is not enough, introduce airflow.
It is better to take 230 V motors. Low power asynchronous motors used in hoods or household fans are suitable. Do not use commutator motors: they are noisy and spark. By the way, you can get asynchronous electric motors in a refrigerator, kitchen hood or air conditioner. Linear compressors should be avoided; there are no rotating parts inside. A homemade heater for an apartment is assembled based on a cassette recorder. There are quiet motors inside; you need to properly adjust the speed for rewinding.
If you need a homemade heater for your summer house, assemble a burner based on an injector. They described a similar design, these are popular in the USA. Do not use gasoline to generate heat; the vapors are explosive. We do not recommend blowing ionized air through the nozzle in the heater, but it is possible to place a perforated tile into the fire. It will serve as a ceramic grille, battery and heat emitter. It’s easier to make a homemade heater using a collet travel cylinder. It is necessary to make the attachment correctly, for example, based on a commercial one for cooking.
Some notes
You can improve the device using additional parts:
- gypsum
- steel wire
- switch
The steel bracket does not have to be adapted in any way inside the case - it is only needed as a convenient stand for the device. The switch allows you to easily operate the device. It can be installed on the side of the jar body by adding a couple of screws. But gypsum will help give strength and durability to the nichrome wire. Pour the dry gypsum into water, dilute it and dip a twisted spiral into the solution, then air-dry it under a layer of gypsum until it hardens. Now the heating will be softer, and the device will be more durable and safe. The main thing is not to forget to leave contacts at the ends for connecting the wires.
Result: We have a simple and effective device for heating a room. If everything is done correctly, it will be safe to use and will consume very little power.
Heaters and cables
Not everyone has ever encountered a self-regulating cable; let’s tell you a little more about these interesting components for defrosting systems for building gutters. The ohmic wire generates heat according to the Joule-Lenz law. The effect is directly proportional to the current, inversely proportional to the resistance, and depends on the operating time of the structure. To obtain useful heat in heaters, people were looking for materials with increased resistance. This seems to reduce the Joule-Lenz effect, but the trivial wire cannot be connected to the 230 V network - the core burns out. There is a short circuit. Try to make a heater with your own hands without danger to others.
For example, to get a 2 kW heater, take a wire with a resistance of 28 Ohms. Try making something out of copper wire. Nichrome is endowed with significant resistivity; 3-5 meters of material will allow you to wind a spiral. If you reduce the cut length, the power will increase, but the situation is unfavorable. The conductor is characterized by a certain maximum power per linear meter that it dissipates. If the value is too high, the coil will burn out. The process will take place quickly in the air.
First tip on how to make a heater:
Research the market for similar factory-made designs. What is the power and internal structure of the heater, what materials is the product made of.
Next we copy the technical specifications. Look in the reference book to see what linear power nichrome dissipates. By the way, the technique uses fechral from Norway, the composition of the material is a secret and cannot be obtained in stores.
What to make from nichrome. Metal factories produce:
Everywhere the ability to provide heat in doses is used (unlike copper, where the released linear power is small, the chance of burning plugs is high). The difference between tubular electric heaters is that the spiral is protected by pressed powder from water and air. The outer copper shell is used to maintain the shape of the dielectric. This will allow electrical isolation of the device. Don't forget, nichrome is metal, it's easy to get an electric shock if you don't take precautions.
The self-regulating cable independently monitors the temperature. We would like to inform the readers that the resistive cable is made of an ohmic conductor. Not nichrome or copper.
The composition of the resistive cable is not important, the main thing is that it generates heat while the supply voltage is applied. New technologies have led to the emergence of a dielectric matrix interspersed with graphite. The concept is the basis for cables that self-regulate and expand as the temperature rises. As a result, graphite inclusions gradually cease to contact each other.
Due to this, the resistance of the area increases. The voltage is constant - 220 V - which means the current drops. Consequently, the Joule-Lenz effect is reduced. When the area cools, the reverse process occurs. The self-regulating matrix contracts, there are more graphite bridges, the resistance drops, the current increases, and the thermal effect increases. To make a cable, two parallel copper wires are taken to supply potential. A self-regulating matrix with graphite inclusions is laid between them along the length. The beauty of the design is that the fragments will be heated independently. Temperature plays a decisive role in the magnitude of the thermal effect.
The matrix is configured at the factory. More often we see products with heating temperatures in the region of low positive temperatures, just above zero. The vast majority of cables are used in defrosting branches of structural elements of buildings, so the properties are selected accordingly. It felt a little icy, the temperature dropped to zero, the matrix shrank, and the cable began to heat up. The advantage of the design is that there is no need to monitor the device. At the same time, a resistive cable gives a fixed thermal effect.
Buy wire for winding vape coils in Moscow
Now we will tell you in detail how to wind a vaporizer for an electronic cigarette. Naturally, the nuances will vary depending on the type of winding, but the sequence of actions remains the same in any case.
There are also such unusual coils.
Regardless of the type of winding (pigtail, microcoil or art coil), to implement this process you will need the following tools:
- scissors or stationery knife;
- wire cutters;
- pliers;
- tweezers (preferably with ceramic legs);
- Screwdriver Set;
- a special winder on which the winding process will be quick and convenient (in the absence of such a device, you can take a drill, a large-diameter screwdriver, etc.).
The consumables you need are wire and cotton wool for the wick. In our case, this is Kanthal A1 (you can, of course, take material of any other thickness) and Chinese cotton, which, as a wick, is very convenient, since you can easily cut a measuring strip from it and immediately pull it into a spiral without additional manipulation.
The process of implementing Kanthal winding is as follows:
- First of all, you need to thoroughly wash your hands so that our winding does not pick up foreign odors, for example, food.
- Then we move directly to winding. Take a winder, or whatever you will use instead, and start winding the wire. If you are making a spacecoil, then leave small gaps between the coils, but in the case of microcoils, the coils should fit tightly to each other.
- At this stage, the microcoil is almost ready for use, and the spacecoil needs to be “springed” a little more so that it takes on the “correct” look.
We figured out the winding process. If you want to wind your atomizer with more sophisticated coils, then in one of our publications we talked in detail about the types of windings. There are also algorithms for their implementation.
6 steps.
The next step is installing the spiral. Here you need to take into account some nuances:
- First of all, you need to unscrew the fixing screws and push the edges of our spiral under them.
- After this, we adjust the position of the winding so that it is strictly in the center of the base and does not touch the nearby racks. Next we fix the spiral.
- Then we need to harden our coils. You need to burn the spiral with short and not long presses on the electronic start button. We do this until the spiral is completely warmed up and turns red. If the coils do not heat up in some places, you need to lightly run them with tweezers.
All that remains is to insert the wick into the coils and you can start tasting the new winding. Do you also wind your vape? Or do you have your own special secrets?
If you are an experienced vaper and like to control the entire vaping process, customizing the device for yourself, then you cannot do without a special wire for winding coils. By using such wire and winding it as correctly as possible, you will definitely achieve the desired effect.
In our store's assortment you can purchase single-core and multi-core wires for winding spirals. We offer models with high conductivity, pleasant taste and abundant steam. Thanks to the correct selection of wire, you can independently control the entire process and improve the quality of vaping.
Basic requirements for a garage heater
Considering that the garage is a small space, it is necessary that the heater in it meets the following requirements:
- the amount of oxygen burned during operation of the heater, as well as the level of toxic substances released, were minimal;
- compliance with fire safety technology - it is necessary to exclude the threat of explosion and fire;
- a compact heater should not make it difficult to move around the garage area, taking up little space;
- a good heater heats the room in a short time, maintaining the temperature level for a long time;
- the financial costs of creating a heater should be less than the cost of a factory analogue.
All these requirements are met by a heater that is easy to make yourself. You will need sheets of PCB, a roll of nichrome wire and glue.
Preliminary testing
Nichrome wire (thread) as the main heating element
A preliminary experiment is needed in order to determine the required heater power.
Financially, you will not suffer, since the materials are usually used at hand.
Nichrome wire is a semi-finished product made from an alloy of nickel and chromium. It is characterized by high electrical resistance.
The percentage of nickel in this alloy is up to 80%, providing ductility and corrosion resistance.
The presence of chromium in the wire adds increased hardness and resistance to high temperatures.
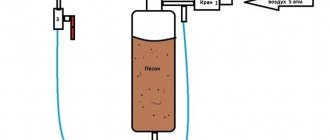
If the resistance of the nichrome wire is unknown, then it is advisable to install it yourself. To do this, twist a spiral from a piece of wire 1 m long.
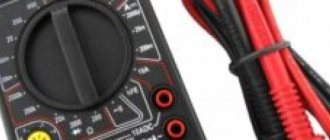
Having placed a thermometer inside it, connect the wire to a power source with a transformer.
At the moment when the temperature on the thermometer reaches 40 ° C, it is necessary to record the readings of the ammeter and voltmeter.
They will help determine the conductor resistance.
Also, if the diameter of the wire is known, you can find out its resistance from the calculation table:
Nichrome wire resistance table for heating device
Next, given that a homemade heater will operate from a 220-volt outlet, you need to find out the amount of wire to obtain an alternating current power of 100-120 units. For example, for a 100 Watt heater you will need 24 m of nichrome wire with a diameter of 0.3 mm.
Where to find nichrome wire
The easiest way to find nichrome wire is to go to a special store (vape shop). True, nichrome thread is not cheap there, and for 1 meter you will have to pay a decent amount.
There are other options where you can find nichrome wire:
- radio markets;
- soldering irons;
- hair dryers;
- fan-type heater;
- electric stove with open spiral;
- Internet.
The ability to detect metal on the radio market is not very great, compared to a soldering iron (working or faulty). A soldering device can be found in a garage, or in a Fix Price store, where the product costs a penny. To find what you are looking for, the device must be disassembled and the wire pulled out. As a rule, the nichrome thread in the soldering iron is thin. Winding 10 turns on a pencil will help determine its cross-section. The length of the wound wire reaches up to 2.5 m.
Options with a hairdryer and heater will cost more. The hardest thing is to get the wire out of the electric stove.
In order not to go to the market and not look for nichrome wire in the store, you can find information on the Internet about the sale of metal or things containing it.
By the way, nickel in the alloy affects the price of the wire.
Heater manufacturing process step by step
Fiberglass as a basis for fastening nichrome thread
To make a homemade garage heater, you will need a sheet of PCB up to 1.5 cm thick.
This will serve as the base for the wire heating coil. Divided into two parts, fiberglass will not only protect against hot wire, but will also quickly heat a cold room.
The entire surface of the textolite sheet is heating. However, to heat a garage, a piece of 0.5 x 0.5 m of material on each side of the heater is enough.
The heater does not have to be square; any rectangle shape will do.
It is more important here that the parts of the PCB are the same, and that the base for attaching the spiral reliably covers it.
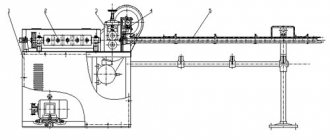
Schematic diagram of a garage heater
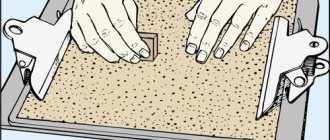
- Textolite sheets on the inside of the future heater are processed with sandpaper.
- Next, markings are applied to the base. A margin of 2 cm is left from the bottom and top edges, and a margin of 3 cm from the side edges.
- Having marked the boundaries of the wire placement, it is necessary to calculate the number of its folds for a length of 24 meters. The length of the winding pitch is equal to the height of the marked frame on the base of the heater (do not forget that the upper and lower fields are not taken into account).
- After calculating the number of folds of the wire, you need to note the distance between its turns. For our heater parameters it is 8-13 mm. According to calculations, small holes are drilled along the edge of the marked frame into which marks - matches or toothpicks - are inserted.
- Next, two more holes are drilled for the output wire to connect to the power source.
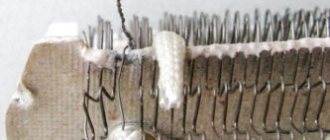
- Without tension, carefully lay the wire in a “snake” pattern. Here matches help form the heating element. Having laid five to seven turns of the “snake”, you need to secure them with paper strips. Paper, 1 cm thick, fixes the filament using Monolith glue.
- The edges of the “snake” are also glued using strips of paper after removing the matches.
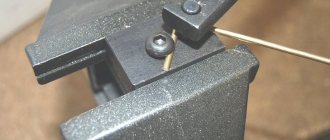
- Metal rivets are inserted into the drilled holes for the network wire, onto which the end of a wire “snake” is wound.
- A washer is attached to the rivet on the outside of the heater. It is needed for reliable fixation of the electrically conductive contact.
The power cord can also be connected inside the heater, not far from the incandescent coil. To do this, the stripped ends of the electrical wire are wound around rivets on the inside of the heater wall.