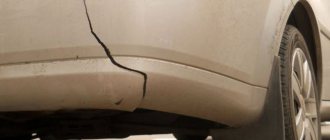
Often, as a result of road traffic accidents, the car is subject to mechanical damage, and car owners of foreign cars have the question of how to seal the bumper on the car. In cases with domestic mobile vehicles, this issue can be neglected and a new part can be purchased and installed to replace the damaged one.
Bumpers for imported cars are expensive, so repairing the part will be the best way out of this situation.
Plastic is a rather specific material, working with which requires certain knowledge. The cost of repairing a bumper in a specialized service ranges from 1,500 to 7,000 rubles . But, nevertheless, welding a bumper can be done by a beginner, who can do it with his own hands if he follows all the technological rules, follows the proposed algorithms, and follows our recommendations.
Even if the bumper has burst into pieces, it can be connected by soldering. There are several ways to restore a plastic structure, in which it is not enough to use a soldering iron, but you will need special tools and equipment. We will tell you how to solder a plastic bumper with your own hands using a minimal set of tools, and consider other soldering methods.
Welding plastic. Grades: polypropylene, fiberglass, polyurethane, hard plastics
Expert opinion
Ilya Vyacheslavovich
Consultant for body repair at krasymavto.ru
Ask a Question
Before you start repairing cracks on the bumper, you need to correctly determine the type of material from which the part is made. Manufacturers mark their product on the inside of the buffer using melting or stamping methods.
It is customary to label it like this:
- Latin letters PP or PPTV - the product is made of polypropylene;
- PUR – the bumper is made of polyurethane;
- PAG6, GF15, GF30 and ABS are hard plastics (have a very high melting point - about 5000°C);
- The fiberglass part is not marked.
If you doubt your ability to determine the material of the product, take a piece of the bumper from the reverse side and consult with specialists.
Soldering the mesh
The metal mesh, which is soldered into the bumper with a soldering iron, is still used by many craftsmen. It is worth considering that combining two materials with different reactions to temperature changes and degrees of elasticity is not a very good idea. If you use this technology, use brass mesh or stainless steel mesh. The method is convenient because you do not need the following tools: a hot air gun or a hair dryer, glue and fiberglass.
Important nuances
- Before starting work, it is necessary to scrape off the top layer of plastic from the welding rods, making the surface rough;
- heating plastic leads to harmful fumes. Use a respirator during repairs.
Everything made of plastic can be soldered. Most often, repairs of plastic parts begin with this, and only then putty, primer and paint are applied. You need to be careful to detect all the cracks in the plastic and repair it efficiently.
Requirements for tools for soldering plastic
To perform the work, you can use a set of tools:
- Soldering iron;
- Scissors, tweezers, extruder;
- Set: construction hair dryer with nozzles and plastic electrodes for welding;
- Orbital grinding machine (OSHM);
- Fiberglass repair kit;
- Suitable supplies: staples, aluminum, copper or steel chicken wire .
First of all, you should remove the burst part from the car body.
This is done, firstly, for the convenience of repairs and to avoid excessive tension of the material in the cracks to the points of attachment to the machine body. The dismantled part is cleaned of dirt deposits and washed thoroughly.
After which the broken parts are combined with each other. If desired, they can be secured with tape on the outside of the bumper. Next, the soldering iron heats up and painstaking work begins.
A soldering iron and a hair dryer for plastic must be selected in accordance with the basic requirements. Such devices must:
- be ergonomic;
- heat up quickly;
- do not overheat the plastic.
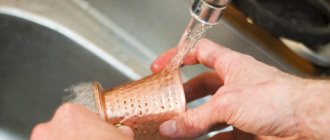
The tool should not be heavy. It also makes the work much easier if the soldering iron has a light bulb that illuminates the soldering area. To make the soldering iron heat up faster, you can grind off the tip of the tip. If you often use a tool at work and it begins to heat up more slowly over time, then you need to clean the sockets. This can easily be done with your own hands .
Unscrew the bolts, remove the tip and, using fine-grained sandpaper, clean the joints. A burnt out or broken tip can be replaced with ordinary steel wire. For plastics, 100-watt devices are usually used.
Remember, to ensure that the soldering iron lasts as long as possible, take breaks during operation so that the transformer does not overheat.
When working with plastic, it is better to use a special hair dryer for welding plastic. It operates in a temperature range from 0 to 650 degrees Celsius and has air supply in 10 positions. The plastic hair dryer is programmed for welding, paint removal, bending, and there is a “soldering” mode. The average retail price of a “hair dryer with attachments” set is 3000-4000 rubles.
Such a device is not cheap and is most often used by craftsmen who do professional repairs. To perform one-time work on restoring a broken plastic structure with your own hands, you can use a construction or installation device of one hundred watts.
Final stage
After the soldering area has cooled and completely hardened, use 40 and 80 grit sandpaper to remove excess plastic and smooth the seam with putty.
To finish leveling the seam, we use a special putty for plastic. Try not to apply too thick a layer of putty, as this may lead to it peeling off from the seam during use. We wait until the putty has completely hardened and begin sanding the seam with P800 sandpaper. We dilute the primer according to the manufacturer's description indicated on the can of primer. Apply the primer in 2 layers, waiting 15 minutes between each layer. Additionally, you can apply a layer of developing primer, after which the identified defects can be eliminated using nitro putty, followed by sanding with P1000 sandpaper. After removing dust from the surface, you need to degrease the part, after which you can begin painting the bumper. Paint the part following the paint application technology.
Repair plastic with your own hands using a soldering iron
Let's consider the option of how to restore the bumper frame and its attachment to the wing using a minimum number of tools. Prepare a millimeter mesh, a soldering iron, scissors, a screwdriver, and a sharp blade. To make soldering the structure with your own hands convenient, as well as to obtain a high-quality result, it must be removed from the car and then proceed step by step .
- Place the part on a flat surface;
- Plug in the 100-watt soldering iron and wait until it reaches maximum temperature;
- Connect the damaged parts evenly to solder them from the front side;
- Cut the mesh into pieces, apply it to the inside of the structure and heat it with a soldering iron. If you have a plastic welding hair dryer, use it;
- Quickly, without allowing it to cool, use a screwdriver to carefully press the mesh into the plastic;
- In case of serious damage, repeat the previous procedure for the front side of the structure;
- Cut off excess plastic with a sharp blade;
- Level the seam with a rubber spatula using plastic putty;
- To improve adhesion, apply a primer, then you can begin painting.
By performing these simple steps with a minimal set of tools, you can solder any plastic car structures with your own hands.
The main thing is to take the work seriously, take your time and carefully solder the gaps. If you can carefully perform this sealing procedure only on the inside of the part, then you can do the plastic repair without painting the bumper!
Expert opinion
Ilya Vyacheslavovich
Consultant for body repair at krasymavto.ru
Ask a Question
Please note that only specialized putty and plastic primer should be used. And if the bumper is painted in the color of the body, the enamel is additionally coated with varnish in 1-2 layers. Afterwards, the bumper is installed in place, and the use of high-pressure washers is avoided for 2-3 weeks. In this case, the cost of repairing and painting the bumper yourself will be worth it many times over!
How to repair minor damage to a plastic car bumper
Bumper damage comes in many different types, from minor scratches and small dents to serious cracks. Small dents and scratches can be removed yourself.
If the car bumper is made of thermoactive plastic, then minor damage to it can be easily eliminated using the polishing method with special chemicals. means.
For example, if there is a shallow scratch, it can be treated with WD-40 universal cleaner.
In order to polish a scratch or chip, you will need a sponge, a soft rag and a chemical reagent. First, you need to clean the damaged area from dirt and dust with a sponge and water. After applying chemical. spray or sponge. Next, the damaged area is intensively polished with a rag until no damage is visible on it.
The second way to eliminate small dents and scratches on a plastic car bumper is to straighten the damaged area with a hot air gun. The essence of the method is that the damaged surface is evenly heated with a hair dryer. Due to heat treatment, the damage is leveled and straightened.
The method is simple and does not require special skills to perform, but it is not without its drawbacks: there is a possibility of deformation of the plastic; heating with a hairdryer can only be used on unpainted areas.
Also, a wax pencil is considered a simple and inexpensive way to eliminate minor damage to a plastic car bumper.
With its help, scratches and chips are simply painted over. Chem. the composition of the pencil fills the damaged areas, leveling them with the general surface and forms a protective layer. The process of removing chips and dents with a wax pencil takes no more than 5 minutes.
Another way to solder a bumper at home
For more complex repairs of a plastic bumper, you need to prepare the following equipment and materials:
- soldering iron, staples for stapler;
- hair dryer, grinder.
You will also need tools for subsequent surface treatment:
- rubber or plastic spatula;
- spray gun, putty;
- primer, paint.
Start soldering the damaged parts from the inside, making soldering evenly along the entire fault line. It is important to solder all branches.
- Secure the seam with staples from a stapler , placing them at a distance of a couple of centimeters from each other. To prevent the legs of the staples from extending to the front side, they should be filed down a little. It will be easy to insert the staples into the heated plastic.
- The front side of the structure should restore its previous shape. Sand it with a sander. To sand the surface, if you do not have a sander, you can use coarse sandpaper.
- After sanding, start soldering the front side.
- Line up the seams by carefully melting the plastic into the grooves. Sand the treated surface.
- Clean the repair area of the part from dust and plastic particles.
- Use a hair dryer to fuse the plastic hairs on the surface of the part. Do this carefully, without overheating the material. Apply putty to the surface. After drying, sand with a sander. Use sandpaper in hard-to-reach places.
- Remove dust and apply 1-2 layers of plastic primer, then paint using a spray gun.
If you are an inexperienced craftsman, then in order to get an excellent result after painting, it is better to do a complete painting of the structure, since local painting (with a transition) requires some skills and abilities.
Sequence of work
Repairing bumpers includes several stages. The following is the sequence of their execution:
- First of all, you need to remove the damaged bumper from the car.
- Next, the preparatory work begins. They consist of cleaning the part by washing, degreasing, and removing paint and varnish material from the damaged area using a grinding machine with a P240 wheel.
- If the bumper has split into several fragments, they are combined into the original integral shape by joining the edges.
- After that I start soldering. The seams are tightened with staples, placing them at intervals of 1 - 2 cm at a depth of no more than half the thickness of the bumper.
- Then the plastic layer is fused with a soldering iron tip to prevent the formation of corrosion.
- After cooling, the seams are cleaned with a grinding machine with a P240 wheel and blown with compressed air. To remove lint and hair, use a tool such as a hair dryer.
- Then putty is applied to the surface of the bumper with a rubber spatula. In hard-to-reach places, apply with your finger or any suitable object. After the material has hardened, the surface is ground with a machine using a P120 wheel.
- Next, the entire part is covered with primer in two layers with an interval of 15 minutes between them.
- A light-colored developing layer is applied on top using a dark base underneath. After drying, the surface is ground with a P800 wheel. The remaining stains are removed with nitro putty. Then wet grout the bumper surface with a P1000 wheel using grinding equipment.
- After drying, the surface is wiped with napkins and degreased. Paint is applied over the primer in 2-3 layers.
- Finally, the surface of the bumper is also varnished in 2 - 3 layers.
How to restore fiberglass and hard plastic parts
If the body kit is made of hard plastic or fiberglass, do-it-yourself repairs of plastic bumpers are carried out using the gluing method. This restoration method is most popular for fans of auto tuning and repair of body parts of VAZ family cars. In this case, after cleaning and thoroughly washing the part, the following actions are performed:
- Treatment of crack edges. After tearing, the edges of the cracks in fiberglass bumpers are framed by threads of material that do not allow the parts to fit tightly together. Interfering fibers are removed using a universal grinder (angle grinder), usually called a grinder.
- We combine the joined fragments and fix them on the front part with tape or special glue
- Next, epoxy resin or a more modern material is prepared - polyester resin , according to the instructions from the manufacturer
- From the wrong side, lubricate the crack and an area 50 mm wide next to it with the prepared composition.
- We impregnate a thin fiberglass mat with the same mixture and apply it to the fracture
- We apply layer after layer of glue and fiberglass until the thickness of the patch is comparable to the thickness of the bumper at the defect site
- We are waiting for the fiberglass to harden and move on to sealing the front side
- Using a grinder, we make a V-shaped groove on the outer surface so that the edges of the break gently converge towards the patch
- We fill the resulting groove with fiberglass impregnated with polyester resin until it is completely level.
- After the repair compound has hardened, we grind the ESM
What to do if there is a crack on the bumper - methods for repairing it
If a crack has formed on the car bumper as a result of damage, then simply cleaning and polishing this place will no longer work; in any case, it will be visible.
To repair a crack, you need to resort to more effective methods. There are several ways to repair cracks in plastic bumpers:
- repairing damage with liquid polymer;
- welding using a rod;
- welding the crack with a hot air gun;
- repairs using fiberglass;
- gluing plastic with a two-component composition.
Let's look at each of them in detail.
To make it easier to work with damaged areas, the car bumper must be removed and secured on a stand. Before starting the repair, you need to thoroughly clean the damaged area from dirt and dust, and if the bumper has already been repaired, then remove the remnants of the repair kit from the last time.
Experts advise treating damaged surfaces with any degreasing chemical before starting repairs. means.
Seal the crack using liquid polymer
For this method you will need: a soldering iron, fine-grained sandpaper, a knife, wire cutters, steel wire, a hot air gun, a piece of protection for the car fender liner.
Sealing process:
- We clean the edges of the crack with sandpaper.
- If the crack is long, then it must be sewn together in several places along the edges with scraps of steel wire. The edges of the wire are bent and cut off with wire cutters.
- Next, the edges of the crack are brought together and carefully soldered with a soldering iron.
- The fender liner protection is made of polymer plastic, which melts easily and is suitable for creating patches. Small strips are cut from the protection fabric (about 2-3 cm wide, 15-20 cm long and 2 mm thick), which will be patches for soldering.
- The place where the patch will be applied and the patch itself is cleaned with a sharp knife.
- We heat the damaged area with a hairdryer in the place where the patch is applied. Next, we heat the patch strip to a semi-liquid state, gradually applying it to the damaged area. This is repeated several times (with new strips) until the crack on the bumper is completely sealed.
- The resulting seam is cleaned with an emery wheel and prepared for painting.
Video instructions for repair using this method are given below.
- Pros: low cost, simplicity, minimal set of materials and tools.
- Cons: likelihood of plastic deformation when heated.
Features of sealing polyurethane parts
Polyurethane materials have a lower melting point than polypropylene materials, and when heated above +220°C they begin to collapse. Therefore, it is important not to overheat the part, otherwise the polymer will become brittle and lose its properties. Also, when performing preliminary preparation, the ends of the cracks in the polyurethane bumper are not drilled.
- The splits are reinforced with a special mesh or staples from a furniture stapler.
- For a heat gun or hair dryer, select a nozzle with a 10 mm nozzle.
- Then 8 mm wide polyurethane electrodes are laid on top and melted with a construction hairdryer. In this case, the polymer should melt quickly, but without evaporation. Just as in the case of a propylene product, the strips are fused starting from the middle of the crack, then the middle of the half, and so on.
Where to start repairing a plastic bumper
The damage needs to be assessed. In some cases, it is more profitable to purchase a new plastic bumper than to waste time, energy, and money on special equipment. And in the end you will not achieve a positive result.
In what cases is repair possible:
- A scratch has been identified;
- Dent detected;
- A crack or through hole has formed.
But in most cases, the plastic bumper receives several or all types of damage. Therefore, you will have to try to restore an attractive appearance and protective characteristics.
Sealing plastic using a hair dryer and electrodes
We offer another way to repair a bumper, which uses special electrodes. To do this, you will need a sharp knife or cutter, a plastic hair dryer with a nozzle, and scissors.
Useful! When welding a polypropylene buffer, no reinforcing mesh is used; the structural rigidity is imparted by the melted and then polymerized repair compound. For welding, use flat polypropylene electrodes or pieces of a bumper with markings similar to the product being repaired, 3-4 mm wide.
- Using a knife or router, cut the plastic material around the crack at an angle of 25-30 degrees.
- The next step is basing the parts of the structure. Use plastic electrodes as fastening elements. You can also cut a tire of the required size from an old bumper. In this case, be sure to pay attention to the markings on the inside of the structure so that the plastics match each other. When soldered, different types of plastic will not provide the necessary strength to the connection.
- Take an electrode or a shredder and place it at the base of the crack perpendicularly. Using a hairdryer, heat the plastic until it begins to bend, lay the electrode along the entire crack line. Trim off the excess with scissors.
- Do the same procedure on the other side of the crack.
As a result, after the plastic has cooled, you will get a homogeneous monolithic connection, strong and reliable, even stronger than the area around the seam. If there are other deformations on the bumper, they can be corrected. Warm up the curved part of the structure with a hairdryer and straighten your arms . Don't forget about gloves.
Step-by-step gluing technology
Before gluing the bumper, carry out a trial test on a small area of the damage. This will allow you to determine the compatibility of the adhesive base with the bumper material. The body kits at the point of failure are first fastened together and only then removed. At this step, determine the material of the spare part in order to select the required adhesive base. Information can be found on the stamp on the inside of the product.
Preparatory work
For strong bonding, we thoroughly prepare the working surface of the bumper:
- disconnect and carefully inspect;
- wash away dirt accumulations;
- completely remove oil residues and dust;
- dry the spare parts;
- degrease by wiping with a chemical;
- sand the edges of the damaged area.
You will also need to drill out any cracks that are too large to avoid causing even more damage. If there are chemical additives in the bumper structure that negatively affect bonding, you need to get rid of them by treating them with a special compound.
Gluing a car bumper
After preliminary sanding, cover the damaged part with a primer and wait for it to dry completely. Or we seal the bumper crack on the outside to prevent glue from leaking out. For this purpose we use foil. Immediately after the adhesive has dried, remove the material.
For initial fastening inside the bumper, we use a reinforcing compound with high adhesion, for example, epoxy resin. If the work is carried out without a primer, then carefully move the damaged areas together. Damaged parts are often held together with metal staples. However, they are fixed from the outside with ordinary paper tape, which securely fastens the edges at the same level before painting. And it is easier to remove than staples after gluing the crack from the inside. After securely fixing both damaged parts, apply an even layer of adhesive mixture to them. Its quantity should be optimal.
Before the glue dries, apply metal/synthetic mesh to strengthen the seam. It is also treated with adhesive on top. We wait for complete drying, it can last from half an hour to several hours (here everything depends on the composition), and proceed to the next phase.
Coloring
No matter how diligently the procedure is performed, the car bumper after repair does not look very attractive visually. Finishing, which includes the following, will help correct all roughness:
- Carefully trimming or sanding away excess plastic.
- Preparing the restored bumper for painting with the obligatory use of putty/primer to prevent peeling and cracks from appearing in the future.
- Coloring in compliance with technology.
Can be coated with paints and varnishes that are not specifically used for plastic products, but only with the mandatory addition of a plasticizer. They are usually painted with ordinary enamel/texture paint to give it a rough finish. To paint under the base color, apply another primer coat.
Once you get acquainted with the information on how to glue a bumper with your own hands, you can do it yourself and not spend money on paying for work at a car repair shop. Follow the step-by-step instructions, and then quickly and reliably restore the part. The cost of glue will be minimal - it is inexpensive - and the effect of gluing a broken bumper will be no worse than when sealed.
To visually obtain information about gluing a bumper with your own hands, it is advisable to watch the video instructions.
Useful video
A visual video about welding a bumper with your own hands from several parts:
Every car owner should know that burst bumpers cannot be glued together for a long time with any glue, they can only be soldered. There is no officially declared adhesive for thermoset plastics, polypropylene and other plastics. “Moment”, “Superglue” and other types of glue, even when using reinforcing fabric, move away from the plastic over time. Previous
RepairWhat comes first: primer before putty or vice versa?
Next
RepairCar putty technology: practical tips on how to putty both bumper and metal with your own hands
Primer
Before covering the bumper with primer, it is thoroughly washed with water and allowed to dry. Then apply the primer, let it dry, sand the primer with 800 grit sandpaper. Wash the bumper again with water and then apply a second coat of primer. When the primer is completely dry, the bumper is inspected using a lamp; the bumper should have a perfectly flat surface.