Metal utensils in the kitchen
Despite the fact that many housewives have long been using pots and pans made of fireproof glass or ceramics, metal cookware is still extremely popular. She has many advantages:
- heats up quickly:
- cools down quickly;
- tolerates temperature changes well;
- it is easy to care for;
- costs much less than analogues made from other materials.
True, metal pans also have disadvantages - in particular, not all of them can be repaired. Utensils are mainly used from the following materials:
- of stainless steel;
- aluminum;
- steel coated with enamel.
Important! Cast iron cookware is still used to prepare some dishes; it retains heat better and distributes it evenly. Read about what and how to cook in such dishes in our culinary blogs:
- What's better to cook in a cast iron frying pan?
- How to cook meat deliciously.
- How to cook oyster mushrooms.
- Caring for cast iron cookware. Rust which is a problem.
But, unfortunately, cast iron cookware most often cannot be repaired. But you can try to put the rest in order.
“They made a blockbuster, but not about us!”
About the film “Salyut-7. The story of one feat,” the participants in the legendary flight responded skeptically:
— We made a Hollywood blockbuster with elements of irrepressible science fiction. Lots of technical mistakes. This movie is not about us,” complains Dzhanibekov.
Actors Pavel DEREVYANKO and Vladimir VDOVICHENKO
The Savins, whom I reached by phone to congratulate on the anniversary of these memorable events, also have complaints about the film:
— Six months ago, the head of the Mission Control Center and I made a lot of comments about this film. They wanted the authors to treat astronautics more carefully. The script was written based on my book. But much was presented rudely and implausibly.
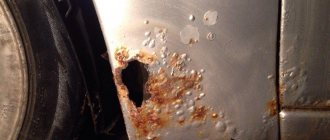
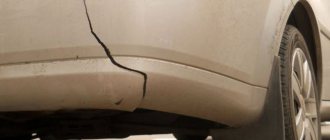
How to close it?
If a hole appears on an aluminum, steel or enamel surface, you can do one of the following:
- plug the hole with a bolt;
- solder;
- make a rivet;
- seal;
- brew.
Important! The first method, as well as riveting, is suitable for any material. But not everything can be soldered - for example, the steel must first be annealed, but the method is extremely unreliable. The best option is to brew it if you have the equipment.
At home
In order to answer the question: how to weld stainless steel at home , you should familiarize yourself with the following information.
For beginners and home welders, the best option for welding work would be electric welding using an inverter . A welding machine of this type has a compact size and operates from a standard 220 V power source.
In addition to the apparatus, the performer will need electrodes: special for stainless steel or regular ones. Welding is carried out on a thoroughly cleaned surface. The connection is made with direct current, the value depends on the thickness of the metal and varies from 40-150 A.
Video
The video popularly explains how to do this.
All of the above methods will help you understand what you can use to cook stainless steel in each specific situation. Depending on the grade of corrosion-resistant steel, the contractor selects the optimal welding mode. The correct parameters guarantee the safety of the welding process for the performer and ensure the required quality of the weld.
Each welder will decide for himself what is the best way to weld stainless steel after reading the listed data.
Install the bolt
This method has a significant drawback - the enamel cannot be restored in this way. Just the opposite - it will gradually peel off. So this option can be regarded as temporary. If you urgently need to repair a small hole in the bottom and absolutely don’t care what happens to the pan later, you can’t think of a better way. The enamel can then be restored.
How to repair an enamel pan? Very simple. You need:
- bolt of suitable size;
- drill;
- metal drill.
The hole is rarely exactly the right shape. Therefore, first of all, it needs to be brought into relative order:
- Take a 3 mm drill (if you have a 2 mm bolt, then you need the same drill).
- Drill the hole, giving it the most correct shape possible.
- Insert the bolt.
- Tighten the nut firmly from the inside.
Important! It’s hardly worth cooking in such a pan, but you can boil the water for a long time - as well as use it for other purposes (for example, if it is steel or enameled, you can paint things in it, boil laundry, etc.).
Salaries are not space
* Today, the salary of an astronaut who has returned from orbit is about 80 thousand rubles. Those who are just preparing for a flight are paid 74 thousand, cosmonaut instructors receive about 100 thousand, candidates for the cosmonaut corps receive 70 thousand. There are allowances, bonuses, they pay for each flight and stay at the station. In six months in space you can earn up to 8 million rubles.
* The maximum possible pension for long service is 85 percent of salary.
* For comparison: American astronauts receive from $65 thousand to $142 thousand per year, Canadians - $80 - 150 thousand, European astronauts - from 85 thousand euros.
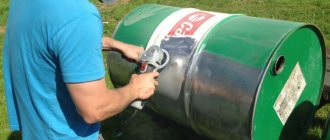
Brazing Solder
Repairing pans using a bolt is the simplest method, but it is not suitable for every case. For example, it is unlikely that it will be possible to repair a curved surface this way. In this case, you will have to solder, and you need to use hard solder - that is, do the same as tinkers used to repair metal utensils on the streets and markets.
You need:
- tin plate;
- tin solder;
- flux;
- sandpaper;
- file;
- high power soldering iron.
Tinned sheet metal is used to make AA battery cases - from there you can take it and use it in this way:
- Sand the area around the hole until the enamel is completely removed and only bare metal is left.
- Apply flux.
- Tin the damaged area with a soldering iron using hard solder.
- Cut out a patch from tin.
- Tin it in the same way.
- Apply a patch to the hole.
- Warm it up with a soldering iron.
- Wait for the solder to melt.
- Press the patch onto the outside of the pan.
- Remove excess solder - this is done with a file.
Solder must be applied in a thick layer - no less than 5 mm. With such a repair, the patch will not fall off for quite a long time. You can cook in a saucepan, but not too often.
Important! Lead is toxic, so if you plan to cook in a pan in the future, use pure tin as solder.
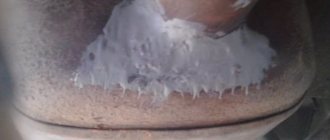
Restoring enamel
How to repair an enamel pan if there is no hole, but the enamel has chipped? We need to restore the enamel. To do this you will need putty, which you can make yourself. You need:
- kaolin – 225 g;
- trephine – 60 g;
- calcined borax – 40 g;
- sodium silicate – 30 g;
- powder glass – 20 g;
- slaked lime – 20 g;
- water – 10 ml;
- capacity;
- mortar and pestle:
- pharmacy scales.
All ingredients can be purchased at chemical stores, but it is easier to do this through an online store. Grind the ingredients thoroughly and mix. Then follow this procedure:
- Clean the surface and dry it.
- Degrease the area where you will apply the putty.
- Apply putty.
- Let it dry for two days.
Quartz sand enamel
There is another type of homemade enamel. For it you will need:
- casein;
- sodium liquid glass;
- borax;
- quartz flour;
- crushed glass.
Here's what needs to be done with all this so that the repair of an enamel pan gives the expected result:
- Combine 12 parts casein, 6 parts liquid glass, 10 parts borax, 14 parts quartz flour and 5 grated glass.
- Mix everything well, add a little water to make a homogeneous dough.
- Prepare the enameled surface in the same way as in the previous case, that is, strip it down to the metal and wipe it with acetone or gasoline, and then dry it.
- Apply the composition you prepared, rub and let dry.
- Then sand it smooth and nice, and you can use it.
Big hole
But what should you do if a large hole has formed in your favorite saucepan, for which there is simply not enough tin from the battery? You will need a piece of copper, that is, a copper plate. Also very useful:
- needle file;
- file;
- sandpaper;
- gasoline or acetone;
- soldering iron;
- tin;
- rosin;
- flux.
Before applying the patch, everything needs to be carefully prepared:
- Wash the pan thoroughly.
- Clean the damaged area from all deposits and rust, if any.
- Clean the plate too until it shines.
- Wipe both surfaces with acetone, gasoline, and white spirit.
- Apply flux or treat the surface with soldering fluid (available at any hardware store).
- Warm up your soldering iron.
- Place the sting in rosin.
- When a light smoke appears, you can start.
- Pick up solder - you need to hold the tip until a film appears.
- Apply solder to the repair area.
- Level it from the outside and inside of the pan.
- Gradually apply pieces of solder and smooth out until the hole disappears.
How to prepare a soldering iron?
If you have already dealt with a soldering iron, repairing a pan will not seem difficult to you. For those who have decided to do this for the first time in their life, it makes sense to first prepare a soldering iron. It needs to be tinned:
- Clean the tip - this can be done either with sandpaper or a file.
- Warm up the device by plugging it in.
- Rub the tip over the piece of rosin.
- Separate a little solder with the heated tip.
- Making circular movements, ensure that the tin spreads evenly over the entire tip - the end should be coated on both sides.
- If you don’t get an even layer, repeat the procedure, but try to clean the tip as best as possible.
Important! If you notice a blue film on the prepared soldering iron, it needs to be cooled.
Can it be used?
You can use the pan, but not right away. It must first be prepared. This is done like this:
- Wait for the solder to cool.
- Clean the soldering area so that the patch does not stand out too much.
- After this, you can try to boil the water - if you did everything correctly, the pan will not leak.
Important! Well, the utensils are saved, it’s time to check whether milk will flow out of it. By the way, if you still don’t know in which pan it is better to cook milk, we will tell you in our article: “In which pan is it better to cook milk porridge.”
Video material
A pan repaired using any of the above methods will last for a long time. In addition, the very feeling that arms grow from the shoulders gives a person confidence - if you succeed, you can repair anything.
Soldering stainless steel is a rather labor-intensive procedure, but it will not cause any special problems if you know all the features of its implementation. With significantly less labor, you can solder those that contain no more than 25% chromium and nickel. Moreover, soldering stainless steel with such a chemical composition allows you to obtain reliable connections of products from dissimilar metals, excluding alloys with magnesium and aluminum.
To minimize the risk of the formation of carbide compounds in the stainless steel structure during soldering, titanium is added to the alloy composition, and after the joint is formed, the product is subjected to heat treatment. You should be very careful when soldering cold-worked stainless steels, the surface of which may become cracked under the influence of heated solder. To avoid such consequences, it is necessary to eliminate the load on the parts being connected during the soldering process. In addition, it is possible to pre-anneal the products being joined.
The choice of solder with which to solder stainless steel is influenced by both the chemical composition of the alloy and the process conditions. So, if this process is carried out at high ambient humidity, then silver alloys should be used, which contain a small amount of nickel. Soldering in an oven, as well as in a relatively dry atmosphere, is performed using chromium-nickel and silver-manganese solders.
The most common type of flux used when soldering stainless steel is borax, applied to the future joint in the form of a paste or powder. Melting borax on the surface of the parts being joined contributes to uniform and most accurate heating of the area of the future seam to the required temperature - 850°. Only after the required heating temperature has been reached, which can be determined by the color change of the future joint to light red, is solder introduced into the joint between the parts.
After soldering is completed, flux residues are present at the joint, which are removed by washing with water or. To perform this procedure, you cannot use nitric or hydrochloric acids, which, although they effectively clean the flux remaining on the surface of the parts, have a negative effect on both the base metal and the used solder.
Repairing an aluminum pan
The situation is much more complicated with aluminum surfaces. Soldering them is very difficult. Of course, if you have argon welding (and such a device can now be bought completely freely) - there are no problems. But it only makes sense to buy such expensive equipment if you are going to do this all the time - it’s definitely not worth doing this just for one aluminum pan.
Is it necessary to throw away a damaged pan? Not at all. It can be used for a variety of purposes - for example, it is quite suitable in the garden. You can use it to collect fruits and vegetables, as well as carry water for irrigation. For repair you need:
- piece of aluminum;
- bolt with nut;
- drill;
- hacksaw for metal.
You need to make two patches from aluminum. They must be larger than the hole:
- Apply patches to the hole from the outside and inside.
- Fasten them with one or more bolts - the nuts should be on the inside.
Important! A steel pan can be repaired in any way - both soldering and patching.
Sealing an aluminum pan
Aluminum is difficult to solder due to the rapid formation of an oxide film. In addition, you will need a very powerful soldering iron - 100 W or more. There are difficulties with solder - bismuth is added to it, and it is not as easy to get as other metals.
Solder consists of two components:
- tin – 80-95%;
- bismuth – 5-20%.
Important! It should be kept in mind that bismuth is toxic. It’s hardly worth cooking food in such a pan, but it can be used for other purposes.
The following is used as flux:
- paraffin;
- stearin.
To avoid the appearance of an oxide film, you can try the following method:
- Clean the surface where the hole is located.
- Melt the rosin.
- Fill the hole with melt
- Apply flux.
- Apply solder to the tip and seal the hole from the edges to the middle.
Flux preparation
When soldering stainless steel, you should be very careful about choosing a ready-made flux or the recipe for making it yourself. The classic flux composition, which can be prepared at home, includes the following components:
- borax (70%);
- boric acid (20%);
- calcium fluoride (10%).
For soldering small-sized products, you can prepare a flux that will consist only of borax and boric acid mixed in equal proportions. Having mixed the components of the flux in dry form, it must be diluted with water and treated with the resulting solution at the site of the future connection.
To perform stainless steel soldering efficiently, you should use the recommendations of experienced specialists.
- The power of a soldering iron, which must effectively heat the metal being joined, is in the range of 60–100 W, but it is better to opt for a 100-watt device. To solder large parts, such as stainless steel pipes, you will need a gas torch rather than an electric soldering iron.
- When choosing an electric soldering iron, it is better to opt for models equipped with tips that do not burn.
- The most economical and universal type of solder, which makes it possible to obtain high-quality connections for stainless steel products, is tin-lead rods. If you are soldering dishes that will come into contact with food or liquids, it is better to use pure tin as solder, which does not contain harmful impurities.
- The room in which soldering work is carried out must be well ventilated.
- When performing soldering, be sure to use personal protective equipment so as not to harm your health.
Cleaning aluminum and steel cookware after repair
If you need to restore the appearance of aluminum cookware, simply clean it. The most common soda is suitable for this. Clean the pan and it will regain its former beauty.
Important! Every housewife knows how easily aluminum pans get dirty and smoke. But not everyone knows how to return kitchen utensils to their former appearance. Our blogs will help you understand this issue:
- How to clean aluminum pans at home.
- Aluminum is harmful to health.
- Cleaning stainless steel cookware.
- The best stainless steel pans rating.
In the same way, the spectacular appearance of stainless steel products is restored. In this case, you don’t even need soda - any dishwashing detergent is enough.
other methods
In some cases, it is better not to solder metal surfaces, but to glue them together. True, you won’t be able to cook food in sealed pans; this will only work as a bucket. But just in case, you need to know these methods. Adhesives suitable for you:
- BF-2;
- BF-4;
- epoxy.
BF-2 and BF-4
These adhesives are made from phenol-formaldehyde resin, so cookware repaired with their help is not suitable for cooking. The method of application is simple:
- Clean surfaces thoroughly to ensure no grease, rust or dirt remains.
- Treat the gluing area and patch with acetone or gasoline.
- Apply a thin layer of glue - it is more convenient to do this with a brush.
- Allow the item to dry for about an hour.
- Apply a second layer of glue.
- Let it dry a little.
- Place the surfaces against each other (for example, a metal plate to a hole), press.
- Place the product in the oven and heat for an hour.
Epoxy adhesive
This solution consists of several components. He has:
- epoxy resin;
- dibutyl phthalate (plasticizer);
- aluminum oxide or quartz flour;
- hardener
After the patch is glued, the product must be placed in the oven, preheated to 200°C and heated for about three hours. This is the best variant. If you don’t have an oven, you can preheat it to 120°, and then leave the pan alone for a day, after which it will be ready for use. You can store food in it, but you shouldn’t cook it.
Useful tips
Even if you manage to repair the hole and restore the coating, such dishes will still not last long. In addition, food cannot be stored in it for a long time and exposed to high temperatures. Therefore, it is better to initially keep the pots in their original form and handle them with care.
To ensure that the enamel retains its qualities for as long as possible, dishes with such a coating can be hardened. To do this, you need to fill the pan with water, add salt at the rate of 2 tbsp. for 1 l. water and boil. You can drain the water only when it has completely cooled down. If you follow these recommendations, you can ensure that the dishes will serve for many more years.
Source
Rivet
If you don’t have glue on hand, but you have a lot of metal working tools in your house, you can make a rivet. You need:
- a good hammer (it should fit tightly on the handle);
- hacksaw;
- chisel;
- pliers;
- vice;
- wire cutters;
- anvil;
- metal plate;
- thick wire - copper or aluminum.
The procedure for repairing a pan:
- Cut a piece of wire 10-12 cm.
- Clamp it in a vice.
- Using light blows of a hammer, flatten one end to form a cap - it should be larger than the hole.
- Insert the free end of the wire into the hole so that the cap covers it.
- Trim the free end.
- Flatten it so that the other side also has a cap covering the hole.