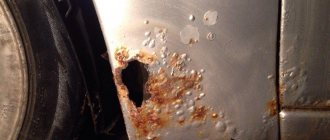
It often happens that before painting a used car, we discover a through hole formed due to corrosion. What can be done in this case, if we leave the topic of professional body repair and high costs. Is it possible to fix the hole yourself, and if so, how to do it? All this will be discussed below.
ATTENTION! A completely simple way to reduce fuel consumption has been found! Don't believe me? An auto mechanic with 15 years of experience also didn’t believe it until he tried it. And now he saves 35,000 rubles a year on gasoline! Read more"
Of course, the possibility of carrying out independent body repairs is related to the level of damage to the car. For example, if a through hole is noticed in only one place, and the entire body or its part is not completely rotten, you can begin to repair it yourself. In other words, if there is a partial problem, and not a set of defects, it is 100% possible to do without specialists.
Note. In addition, it is important to eliminate through holes with your own hands only if they are not too large. Otherwise, you will have to order a professional service.
Filling holes in the body with putty
As a rule, holes most often appear on the bottom of the car. And in this case, everything around is thoroughly cleaned, car cosmetics (rust converter) and many other kits are used. Degreasing and priming are also required.
The technology of direct application of putty, without the use of a patch, involves application from the back side of the lining area. In this way, it will be possible to significantly achieve maximum fixation of the composition. You can use a metal mesh instead of a lining as such. These are even sold in stores, you can make them yourself, etc.
The putty must be evenly distributed over the surface, filling the entire space of the hole. After the solution has dried, the area is treated with painting putty. Then, after drying, they paint and put on a protective film.
This option for eliminating a through hole in the body is the simplest. Experts, however, do not recommend using it, since the putty will begin to leak moisture over time and will collapse. This method is most suitable if restoration is urgently needed and there are no other alternatives.
Why seal your roof?
Sealing significantly increases the reliability and durability of the structure. Over time, any structure will inevitably wear out and collapse if you do not take care of its waterproofing in advance. The sealant has the following effects:
- stops the flow of moisture into the roofing pie,
- prevents the insulation from getting wet,
- protects the rafter system,
- prevents the appearance of fungus, rotting,
- protects unprotected areas from aggressive substances falling with rain,
- increases the overall service life of the structure,
- normalizes the thermal conductivity of the roof, insulates the house,
- eliminates leaks,
- is an adhesive substance for water vapor barrier.
Algorithm for carrying out the process of eliminating a through hole by applying a patch with a soldering iron
Here's what to do:
- To begin with, it is recommended to thoroughly clean the rust from the corrosive area. You can use attachments and a drill (also another set of tools).
- A patch is cut from a piece of metal sheet. An option is to use a can of auto chemicals, etc.
The patch must cover the entire hole on the vehicle frame element.
- A powerful soldering iron is prepared, with which the patch is applied.
It is also recommended to use anti-rust compounds, otherwise called orthophoric acid. Another help will be the use of tin solder.
- Now you need to tin the edges of the patch.
Particular attention is paid to the edges of the hole where the patch will be placed.
- A piece of metal is soldered with a continuous seam.
- It is checked by measuring whether the patch does not protrude above the surface of the body like a bubble.
You can diagnose the protrusion using a flexible ruler.
- The protrusion (if detected) is recessed with gentle blows of the hammer.
Once the patch is recessed, there is bound to be a small gap. It will need to be leveled using putty. We must not forget that the thickness of the putty layer should not exceed 2-3 mm. Otherwise, the layer will crack easily after drying.
- Before puttying, the surfaces are properly prepared: the rust is cleaned off with a metal brush, and then sanded.
It is better to use 120-grit sandpaper. We must not forget that the matting area should be larger than the area directly being puttied.
- An abrasive mark is applied to the surface. This is done so that the putty has something to hold on to.
- Now you need to treat all areas with a degreaser after sanding.
- The surfaces must be primed first. This is done no later than an hour after sanding, since cleaned metal without paintwork quickly undergoes oxidation processes.
It is better to take a phosphate primer as the first layer. This type of primer is a 2-component composition that is easily diluted with water.
Attention. It is prohibited to dilute phosphate primer in a metal container. The fact is that phosphate tends to interact with iron, and this is not good. It is better to use a glass or plastic container.
If you can’t find a phosphate primer, aerosol KSL primer in cans is also an option.
It is recommended to apply the first primer in 1-2 layers, directly onto bare metal. It dries quickly, but due to its liquid state it can cause smudges.
As soon as 10-15 minutes have passed after applying the first primer, you must proceed to treating the surface with acrylic. This type of primer is applied in 2-3 layers. The gap between layers is maintained for about five minutes.
Note. Again, acrylic primer can successfully replace the composition of an AER spray can. This is especially true if there is no compressor.
Acrylic dries completely within 3-4 hours. If it is possible to use INFR heating, the drying period can be significantly reduced.
How to eliminate a leak in a pipe: malfunctions of systems and products made of various materials
Depending on the location of the damage and the material from which the system or its individual parts are made, there are also the following ways to eliminate them:
Seal a leak in the heating battery (radiator)
- The main battery malfunctions are divided into the following types: formation of cracks in the case. Such damage can be repaired using cold welding (an adhesive consisting of two components prepared on the basis of epoxy resin). This glue is highly resistant to high temperatures and humidity. Before starting to apply it, you must turn off the system from the water supply and clean the surface using sandpaper or a file.
the malfunction is caused by poor sealing of the seams between the individual sections. In most cases, to solve the problem, you will have to replace the entire radiator, or a separate section of it (for multi-section collapsible batteries). But to urgently repair the damage, you can use the following method. Available tools will require alabaster, cement, water, medical bandage or gauze. Alabaster, cement and water are mixed in any container until thick. Then strips of bandage or gauze are dipped into the resulting mixture and applied to the damage in several layers (from 2). The radiator can be used only after the pad has completely dried.
- The leak occurs at the junction of the radiator and the pipeline. This problem is most often caused by poor installation of the product. During battery operation, the vulnerable spot is subjected to heavy load and, as a result, a leak occurs. Such a malfunction can be eliminated using a rubber gasket and a clamp (or regular wire). The gasket can be made from a piece of a car inner tube. The overlay is cut out with a “spare” and wrapped around the damaged area. Then it is tightened with a clamp or wire (using pliers).
- To eliminate leaks on polymer pipes, there are methods similar to methods for eliminating leaks on products made from other materials: a common way to eliminate damage on a straight section of a pipe is to apply a rubber band or a similar “tightening” material. Such a gasket is attached to the pipe using metal clamps (which may already contain a rubber gasket), plastic ties or wire.
- Very small cracks and leaks in a straight section can be solved by wrapping regular electrical tape in 4-5 layers. It is important to take into account that each subsequent turn should overlap the previous one by 2-3 mm.
How to fix a leak in a plastic pipe
How to fix a leak in a cast iron pipe
- To troubleshoot straight sections of cast iron pipes and at their joints, the following methods are usually used: for the work you will need a cement mortar (10:1 - 10 parts cement to 1 part water), a bandage or gauze. The first step is to clean the damaged area with a file or grinder. Then a bandage is dipped into the prepared cement solution and wrapped around the damaged area in 3-4 layers. Next, the remaining thick cement mixture is either compacted into the joint between the pipes (in case of damage at the pipe connection), or smeared over the surface of a bandage or gauze (in case of damage in a straight section)
How to fix a leak in a faucet
- Any mixer is a sealed device with a cavity inside. The main reason for a leaking faucet is the depressurization of its individual elements. Depending on what caused the leak, there are certain methods for eliminating the leak: quite often the cause of water leaks is small debris caught between the moving elements of the faucet. In this case, regular cleaning will help.
- The next common cause of faucet malfunction is the wear of rubber gaskets in its individual parts. In this case, it is necessary to determine the location of the fluid leak, disassemble the tap as much as possible, visually inspect and clean the gaskets. If the gaskets are very worn, even to the naked eye, they must be replaced.
- The main advice when a leak occurs in the mixer is to check the wear of the O-rings and gaskets in its individual parts and “scroll” all the screwed parts to the limit, thereby ensuring its complete tightness. If this does not help, you will most likely have to completely replace the faucet.
Before starting work, you should correctly assess the resulting damage in order to most effectively apply one or another method of repairing it.
Sources:
https://www.moscow-faq.ru/q/house/useful/zadelat-otverstiya-v-metallicheskom-bake-esli-net-svarki-70362 https://kuzovexpert.ru/kuzovnoy-remont/kak-zadelat -dnishche-avto-bez-svarki.html https://zen.yandex.ru/media/id/595e22991410c35451a5c9ba/59a66462a86731f8ef50c533 https://infokuzov.ru/remont/kak-zadelat-dyrku-bez-svarki https:// ribler.ru/vodosnab/kak-zadelat-tech-v-trube-ekstrennye-sposoby-bez-perekrytiya-vodoprovoda/
Other solutions
Recently, it has been possible to close the holes in other ways. One of them involves working with fiberglass.
- The surface of the body is also cleaned and degreased, as in the two cases described above.
- Overlays are cut out of fiberglass, the size of which should be 2 cm larger than the hole size.
- The area is pre-primed and the composition is given time to harden.
- The pad is applied to a completely dry surface.
- Fiberglass linings are fixed using an adhesive-resin composition.
First, one overlay is glued, then the second, third, and so on. Again, it is recommended to put a lining on the reverse side.
After the glue has dried, the body surface is treated and painted.
As you can see, holes on the car body caused by corrosion can be easily eliminated with your own hands. Visual examples can be seen in the video and photo.
Forget about fines from cameras! An absolutely legal new product - Traffic Police Camera Jammer, hides your license plates from the cameras that are installed in all cities. More details at the link.
- Absolutely legal (Article 12.2);
- Hides from photo and video recording;
- Suitable for all cars;
- Works through the cigarette lighter connector;
- Does not cause interference to radios and cell phones.
A source of through corrosion, or simply a hole, in the bottom of the car is the price to pay for comfort in the cabin. Its primary source is not anti-icing reagents acting outside, but moisture accumulating under the “pie” of heat, sound and waterproofing. Therefore, when eliminating it, work is carried out mainly from the inside.
If you follow all safety rules when welding, you must completely dismantle the interior, including the trim. This is always very time consuming. Therefore, the question of how to seal the bottom of a car without welding is very relevant. Moreover, most alternative methods do not give worse, but rather better results.
Cold methods of sealing holes in metal
There are two ways to repair holes in the underbody of a car without using hot work.
- Using composite materials - various types of polymer resins in combination with a reinforcing filler and a curing reaction accelerator. With high-quality surface treatment, in addition to restoring mechanical strength, they play the role of inhibitors - retarders of chemical and electrochemical corrosion reactions;
- Installing sheet material patches onto rivets.
General technological rules
Holes in the bottom are usually discovered from the outside, when inspecting the car on a pit or lift. Signs of through corrosion are local swellings, which, when you try to pick them out, crumble into dust.
If you find such troubles, you need to open and remove the pie of heat, noise and waterproofing on the floor in the cabin in the entire area where the sheet of iron forming the floor is welded to the power elements of the body - thresholds, tunnel and others. Then you will see the whole picture of the damage and will be able to take preventive measures in those places where corrosion has not yet become through.
Before the process of sealing the holes itself, you need to take measures to slow down the corrosion process (stopping it is an unattainable ideal to strive for). To do this, all iron rags are removed, and the edges that have residual strength are treated with sandpaper and a wire brush until shiny. The cleaned surface is treated with rust converters. For example, the “Tsinkar” composition. Work is being carried out inside and outside.
After completion of the work, the surface of the unprotected metal is covered with bitumen mastics, putty (acrylic, epoxy), paint or gun fat.
The work makes sense if the total surface of through holes does not exceed 15% of the floor area.
Fixing pinholes
If the source of through corrosion has a diameter of no more than 1 centimeter, it can simply be covered with a two-component polymer composition. Poxipol glue or a cold welding kit similar to plasticine gives good results.
A small hole makes it possible to use so-called cathodic electrochemical protection. Find an aluminum rod, make a rivet out of it and fill the hole with it. Within a radius of 20 cm from it, corrosion will stop. True, the rivet will gradually collapse on its own. But this may take five years.
Repairing large-scale damage
In this case, you will have to take care to restore mechanical strength. If the hole is on a flat area, then there is no point in messing around with epoxy and fiberglass.
TOP 5 sealants
Popular metal sealants from leading lubricant manufacturers.
Efele 133
Universal thread anaerobic sealant, which is used to seal and securely fix frequently disassembled pipe connections. Also used in water fire extinguishing systems. Suitable for threaded connections with a diameter of up to 3 inches, which are operated in environments with temperatures from –60 to +150 °C. The product eliminates loosening of bolts and nuts that occur under the influence of vibration or thermal expansion, preventing their self-unscrewing, prevents the formation of leaks, and increases the tolerance for machining.
Weicon AN 305-72
Anaerobic adhesive-sealant with high viscosity and medium strength, designed for processing pipe threaded connections. The product contains polytetrafluoroethylene, which provides reliable fixation and prevents self-unscrewing of fastening components. The substance protects products from fretting corrosion and can be used in gaseous and liquid media. All properties are preserved at temperatures from -60 to +150 °C.
Weicon Aqua-Flex
Weicon Aqua-Flex is a composition used for sealing pipes and water pipelines during the repair of ships and other objects of the marine and river sector. It is also used in construction for the restoration of roofs and drains, installation of PVC flooring in swimming pools. The substance is applicable in damp and wet environments and is suitable for food production equipment as it is food accessible.
Dow Corning 730 FS
A one-component fluorosilicone sealant used for sealing and bonding in areas where resistance to swelling from flammable substances is required. The mixture is also used for assembling and restoring aircraft fuel systems and tanks, gluing and sealing parts exposed to moisture, mechanical shock and vibration. The substance is resistant to solvents, hardens under normal conditions under the influence of air and moisture, turning into durable rubber. Features good adhesion. Stability and elasticity are maintained at temperatures from -65 to +200°C.
Is it worth soldering
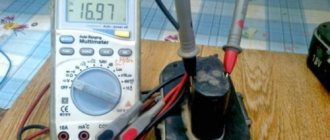
You can also seal holes in the bottom using soldering. However, ordinary household soldering irons are not suitable for heating metal with a thickness of 0.5 mm or more. Most likely, a hair dryer will not help you with this. You need to use a portable gas burner, for example, Super-Ego R355, which fits into a small - volume from 400 to 700 ml - cylinder for camping stoves.
Solder and flux are required for soldering. The solder used is low-melting, with a predominant content of tin or lead. Flux can be replaced with electrolytic acid. The connection is strong and can withstand high vibration loads.
Soldering has two disadvantages.
- It involves hot work, which increases the overall complexity of the repair. This can be neglected if your hands grow from the right place;
- The main material of solder - lead or tin - is a substance that has a lower electronegative potential than iron. Therefore, upon their contact, electrochemical corrosion occurs, in which iron will play the role of a “sacrificial anode” and be destroyed.
Now you have an idea of how to seal the underbody of a car without welding. If you are careful and persistent in cleaning the surfaces, then treating them and protecting them, then the installed patch can outlive the car itself.
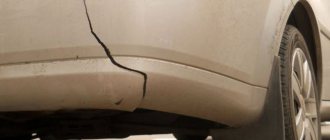
The first manifestations of through body corrosion in cars of the domestic automobile industry appear already in the second year of operation. In this case, it is not necessary to contact a car repair shop, since repairing holes in the car body without welding is quite simple. Craftsmen have come up with several ways to quickly patch small holes, such as arches or holes in the wing. However, methods without welding are unacceptable for repairing power elements.
Closing the crack
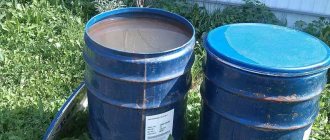
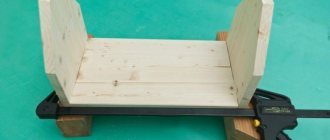
If cracks or holes appear in the bottom or side walls of the barrel, they can be repaired in several ways. It is necessary to coat the crack on the outside with melted resin or waterproof glue. Then you will need rubberized fabric or fiberglass, which is used in construction work. We place a small piece on the molten resin, and coat it with another layer of resin or glue on top. To make the patch more reliable, exactly the same operation is performed on the inside of the barrel, but before that the area being repaired must be thoroughly cleaned of rust.
Read also: If you crush a bug, will there be blood?
The leaky bottom of a metal barrel can be sealed with clay diluted in water. To do this, in the place where the container is expected to stand, you need to dig a small pit, which is subsequently filled with clay (you can knead the clay directly in this pit). After this, we install the barrel in the pit and place some weight inside so that the barrel fits tightly into the pit. Once the clay dries, it forms a durable layer through which water will no longer seep through. Having installed the barrel in this way, you will be able to use it for many more years.
Body repair with putty
This method is used when you urgently need to repair a small hole without welding or there are no other options for car repair. However, it should be understood that this is a temporary measure, since the putty will quickly crumble. To repair the damage, use a special putty with small, medium, and large glass fibers. When preparing it, you need to ensure that there are no air bubbles. To create an even layer, a lining is installed on the back of the hole.
A primer is applied to the prepared area of damage. After it dries, putty with large fibers is applied. Depending on the size of the hole, several layers are applied and each layer is completely dry. The total thickness should not exceed 2 mm, otherwise the patch will begin to crack. The last layer is applied with fine fiber putty. The repaired surface of the car is treated with fine-grained sandpaper.
Fiberglass and mesh
To repair more extensive damage, an aluminum patch mesh is used. A piece slightly larger than the hole is cut out of it and attached with masking tape. Next, sealing holes in the car body without welding is carried out in the following sequence:
- a thin layer of fiberglass putty is applied without touching the tape;
- after drying, the tape is removed;
- subsequent layers of putty are applied after the previous one has dried;
- the surface of the car is treated with sandpaper or a grinding machine until smooth;
- To strengthen the mesh, several layers of putty are applied to the back of the body.
Long-term auto patches are made from fiberglass and epoxy resin. Several overlays are cut from it, the first of which should cover the hole with a margin of 2 cm. The size of each subsequent piece is made larger than the previous one. The last overlay should cover all the metal stripped during the preparation process.
Popular brands
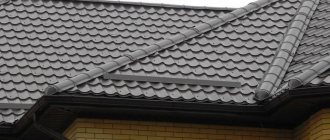
There are many products on the market that are suitable for sealing roofs. The most famous:
- “Titan” - easily withstands frost, can be used with any materials, perfectly seals flat and seam roofs,
- “Sazilast” - it can be applied even at sub-zero temperatures, after hardening it exhibits a high degree of adhesion,
- SOUDAL Aquafix - suitable for wet and underwater surfaces, allows repairs in rainy weather, ideal for metal tiles and gutters,
- Ceresit is resistant even at abnormally low temperatures, after curing it resembles plastic, therefore it is not used on deformable substrates,
- RoofPlast is based on bitumen and is considered one of the highest quality sealants.
Car body soldering
This method is used to seal small and large holes without welding. To work, you will need flux, which will protect the metal from rapid oxidation. Soldering acid, sold in radio stores, can successfully cope with this task. To achieve the required temperature, you will need a soldering iron with a power of 1 kW or more, or a version heated with a blowtorch, but it is better to use a gas torch. The solder is chosen to be refractory, since it can be used to repair a hole in the car body more reliably.
Small holes are simply filled with solder, starting from the edges and gradually fusing to the center. A large hole in the body is covered with a patch cut from tin from a tin can. It provides:
- strong connection, almost like welding;
- significantly longer service life than putty, but less than welding;
- possibility of sealing large holes;
- ease of implementation, repairs are accessible even to beginners.
The work is performed in the following sequence:
- A patch is cut to fit the size of the hole. The larger the area of contact with the body, the more reliable the connection.
- The soldered edges of the patch and the damaged areas are cleaned with sandpaper until shiny.
- Using flux and solder, the cleaned surfaces are tinned.
- After applying the patch to the repaired area of the car, it is heated to the melting temperature of the solder. In this case, you need to ensure the continuity of the seam so that there are no missing sections.
- After cooling, the remaining flux is removed, and the soldering area is washed with hot water and soda.
The disadvantage of this method is that the patch swells due to heating. If checking with a ruler confirms this, the bubble is removed with light blows of a hammer.
The resulting depression is leveled with putty:
- Marks are applied to the surface of the patch, plus a few millimeters from each edge, with 120-grit sandpaper. This is necessary for reliable adhesion of the putty to the metal.
- The cleaned surface is cleaned of dust and degreased with a solvent.
- To prevent the metal from becoming rusty, the primer is applied no later than an hour after preparation.
- The first 2 layers are applied with a phosphate or acid primer with an interval of 15 minutes.
- After waiting another quarter of an hour, apply 2 - 3 layers of acrylic primer at intervals of 5 minutes.
- It takes 3 - 4 hours to dry completely. The drying process can be accelerated using an infrared heater.
How to seal holes in a metal tank if there is no welding?
If you don’t have a welding machine, but you need to seal the holes in the tank, then use the so-called.
"cold welding". In stores you will find “cold welding”, usually of two types: 1) in the form of glue, 2) in the form of putty or a rod. Instructions for use will be included with the product, or you can read in detail on the Internet (there is material on this topic).
The choice of the type of “cold welding” is yours. I have experience using putty - the results are pleasing (the sealed hole does not leak - about a year has passed).
repair a hole in a leaky iron tank without welding
Good question. My plastic basin for soaking laundry is leaking. The crack is 20 centimeters long. I sealed it with epoxy glue, which is sold in any hardware store. Another thing is that if there is a very large hole in the metal tank and the rust continues to spread, then this will not help much. Rust thins the surface and the hole becomes larger and larger. See for yourself. I know that there is such a “cold welding” in the form of a rod. But I haven’t used it and don’t know if it has any effect.
Can be epoxy glue or cold welding
If the tank is for storing only cold water, then now it is possible to seal such a hole using a hot glue gun.
They are sold in stores and cost 400-500 rubles. Bonding occurs due to molten plastic. Several of these rods come with the gun. Also sold separately. Very convenient and fast. And most importantly, it glues securely. You just need to clean the surface well and fill everything with plastic. It grabs tightly (tested). It sticks to everything. Great stuff. He inserted the rod into the gun and plugged the gun into the socket. You only need to wait three minutes. A special nozzle heats up and the plastic begins to melt. You pull the trigger, melted plastic comes out of the tip and you fill the entire hole. Due to the trigger, the rod gradually moves forward, and the work is reduced only to pressing the trigger.
Be sure to buy it and enjoy it for your health.))
Any plumber of the 3rd (lowest) category used to know how to seal a hole in a pipe, and the tank is the pipe.
Holes in pipes were TEMPORARILY, that is, until better times, even under pressure, easily and simply always sealed in two ways.
Method 1 - with clamps (rubber is applied to the hole in the pipe wall, then secured and tightened with a clamp). If the hole is in the bottom of the tank, a metal flat plate is placed on the rubber, in which holes for the bolts are drilled; the bolts tighten the rubber and the leak is eliminated.
Method 2 - with wooden choppers (they cut a cone-shaped peg out of a piece of wood along the diameter of the hole and then hammer it into the hole with a hammer half its length).
You need to find time later, however, to turn off or drain the water from the tank and either weld the hole or replace the tank.
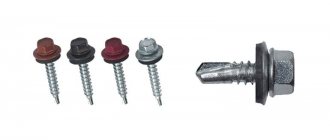
Rivets
This method not only repairs large holes in the car body, but also replaces parts (fenders, aprons) without welding. In terms of reliability, it is not inferior to welding. It is recommended to install rivets in an inconspicuous place. Since there is no splash of molten metal during operation, like welding, it is often used to repair car floors.
The riveter required for the job can be bought in a store (costs approximately 500 rubles). The technology is simple:
- The patch is cut so that it overlaps 2 cm around the edges of the hole.
- By attaching it to the body, it is given the desired shape.
- The locations of the holes for the rivets are marked.
- After drilling the patch with a drill according to the diameter of the rivets (4 - 6 mm), it is advisable to countersink the edges of the holes so that it fits more tightly to the surface of the car body.
- Having applied the patch again, the center of the first hole is marked and drilled.
- After riveting it and leveling it, the patches are tapped and the remaining holes are drilled in place.
- To ensure a tight fit of the patch to the car body, rivets are fastened from the center to the edges.
- To prevent moisture from getting inside, the joint around the perimeter and rivets is coated with sealant.
Final stage
Regardless of how the car body was repaired, they all end with putty. However, it absorbs moisture, which leads to rapid destruction. Therefore, it must be coated on top with an anti-corrosion or epoxy primer. Body repairs are completed without welding by painting. To do this, use a spray gun or aerosol cans, after covering the adjacent surface of the car with plastic film. You should not use a brush, as drips are possible.
The proposed methods will help to repair a car without welding in case of single damage. However, if a large area is affected by corrosion, it will be easier and more reliable to contact a car repair shop to replace the rusted area by welding. Most often this happens to the floor, so it is recommended to regularly check it from underneath the car using an inspection hole or lift.