Easy tool restoration
The main advantage of a cordless screwdriver is its mobility. These tools use a lithium-ion battery, which is protected from overload and complete discharge. In addition, there is protection against overcharging in the form of a separate circuit built into the element itself. The main power source (primary) is 220 V, and the battery is also recharged.
Depending on the model of the screwdriver, the battery receives a charging voltage from 14 V to 21 V. The battery output produces a supply voltage from 12 to 18 V. This type of battery lasts a long time, but if the tool is not used for a long time, the built-in discharge protection will not help battery cells: discharge occurs constantly.
To increase service life, it is necessary to constantly discharge and charge the battery. If for some reason it was not possible to “keep track” of the tool, a specific battery element often fails. There are basic ways to solve this problem:
- Replace the battery with a new one.
- Buy a new tool.
- Convert a mains-powered screwdriver.
When replacing the battery, please note that a new one is quite difficult to find. The tools are made in such a way that it is difficult to find spare parts for them. It is not profitable for a company to produce its product with high repairability, since it needs income from the purchase of products. You can only find a new battery at dealers. In addition, another option is possible: disassemble the battery and replace the faulty battery.
When purchasing a new tool, the user tends to buy a model of a higher quality, forgetting about the rules for using lithium-ion batteries. Basic rules that will help preserve the service life of the tool for a long time:
- When purchasing in winter, it is strictly forbidden to “launch” the tool immediately. You need to wait about an hour until it “warms up” to room temperature.
- Place the battery on charge.
- Perform the battery charging and discharging cycle about 3 times.
If none of the options for solving the problem are suitable, you need to start converting the screwdriver to a network one with your own hands. It's easy to do. There are many simple and complex ways. Changing the tool model has several positive aspects:
- There is no need to recharge the battery.
- The load on the mechanical part is reduced.
- Lots of power supply options.
- Increasing the quality characteristics of the product.
In addition, it is possible to maintain mobility by converting the charger into a block version for charging almost any battery.
Screwdriver device
This mechanism consists of the following parts:
- DC motor. It has the shape of a cylinder; instead of an excitation winding, the housing contains permanent magnets. This simplifies the design and provides sufficient torque at low speeds. The drive (sun) gear of the planetary gearbox is mounted on the electric motor shaft;
- Reversible speed controller. The adjustment circuit is assembled on a PWM controller and a field-effect transistor. Reversing is carried out by switching the polarity of the power connection to the motor brushes;
- Planetary reductor. Made in a separate building. It got its name because of its resemblance to the solar system. Consists of a ring gear, a central (sun) gear, satellites and a carrier. The ring gear transmits force through the spring-loaded balls of the load regulator. There are models with two-speed gearboxes. Increased speed is activated when using the device as a drill;
- Rotation force limitation mechanism. Serves to limit the force when tightening screws. Transmits torque through balls pressed by an adjustable spring;
- Removable battery. Consists of individual elements in one housing. The voltage in different models ranges from 9 to 18 volts.
Screwdriver device
Other Upgrade Methods
Radio amateurs offer many options for upgrading the instrument. Some of them are very simple and boil down to the use of ready-made power supplies, while others require knowledge in the field of electrical engineering and give the device versatility. Classification of methods:
- Power adapter for laptop.
- Connecting a computer switching power supply (power supply).
- Application: 12 V car battery.
- Assembling a homemade power supply.
Using a laptop charger is the best solution to the problem. In addition, you need to know the parameters of the screwdriver and charger (available for 12 V and 19 V), and also take into account the dimensions of the latter (for installation in the battery compartment). You need to solder the output of the laptop power adapter, to the terminals of which the battery is connected.
Where to start work
- To convert a screwdriver to be powered from a 220 V electrical network, first of all, you will need to solder an electric wire to the contacts of the charger. But since the wire has copper conductors, and the power supply has brass terminals, connecting them will be very difficult. But nothing is impossible in the world, so we use acid as a connector. It is necessary to treat the terminals of the charger with acid, and then solder the wire to the contacts. The connection must be of high quality, since the contact and functioning of the device itself depends on it.
- At the next stage, the old battery is rebuilt. To do this, it must be disassembled and the entire internal part removed from it. Although the manufacturer does not recommend doing this, we will need the battery design. When disassembling the battery, it is important to use protective equipment and not throw the internal contents in the trash, but rather recycle it. A weight should be placed in the battery case, which will act as a counterweight.
- After the inside of the battery has been removed, we begin the process of soldering the free contacts of the electrical cable to the battery terminals located in the inside of the case.
Important! During soldering, it is important to control the polarity, but if it is not observed, then nothing terrible will happen, only the device will function in the other direction. But with the help of a switch this situation can be easily resolved.
The electrical cable is inserted into the battery from the outside, making a special hole in the structure of the required diameter. After this, it is important to ensure that the cable is securely fixed in the battery housing structure. For this, you just need insulating tape, with which you should wrap the cable inside and outside, thereby making a lock. After this, insert the battery case into the screwdriver and use it for its intended purpose.
Schemes and their description
The option of self-assembly of the power supply must be made subject to knowledge in the field of radio engineering. In addition, before assembly you need to think carefully about everything, find a housing for installation and the corresponding radio elements.
A simple power supply option
A simple circuit of 1 power supply (screwdriver from a 220 volt network), consisting of a power transformer (diode bridge input), a rectifier and a capacitor filter.
Scheme 1 - Power supply for 18 V screwdriver
The transformer must be selected with a power of 300 W and above, the voltage on winding II must be in the range from 20 to 24 V and the current strength is over 15 A. For the diode bridge, powerful diodes should be used, selected for the current of the secondary winding. It will be more difficult to select the appropriate power supply for the screwdriver. At the output of the rectifier, it is necessary to install a capacitor with a capacity of 2000 μF (you can limit yourself to a capacity of 470) and a voltage of 25 V and above. Parts must be taken with a reserve of current and voltage. All radio elements are mounted on a getinaks board, which is mounted in the housing.
Universal power adapter
The proposed version of the universal power supply has excellent characteristics and can withstand a load current of up to 10 A. The output voltage is 18 V, although you can make calculations and make a power supply for a 12 V screwdriver. This power supply can be used as a battery charger and backup power source in case of network blackout (Scheme 2).
The adapter is assembled on a voltage stabilizer consisting of transistor VT3 and VD2-VD5 (zener diodes). Using toggle switch SB1, the power is turned on and relay K1 closes its contacts. The power goes to a transformer, which converts alternating current to the required rating. The output current from the transformer goes to the rectifier. Next, the rectified voltage is supplied to the stabilizer. There is also a current amplifier in the circuit, assembled on transistors VT1 and VT2. A load is connected to this amplifier. The battery recharging mode (backup power source) is carried out through VD6 and a limiter in the form of resistor R4. Using SB2 you can disable battery charging.
Converting an 18 V Screwdriver to Mains Power
How to convert a cordless screwdriver into a corded one - options for craftsmen
When the batteries stop working, some people wonder how to convert a cordless screwdriver into a corded one. It is impossible to repair batteries with damaged elements.
The price of new power supplies is almost equal to the cost of a screwdriver. It is rarely possible to find suitable elements; models are often discontinued.
But for caring and experienced owners, of course, the solution is to power the screwdriver from the network.
The converted instrument has one drawback: it is tied to an outlet. However, for indoor work this is not so significant. But there are more than just advantages. Now there will be no hassle about recharging the battery, there will be no downtime in the work. The current strength always remains measured and does not depend on the discharge of the battery, this means that the torque is always constant.
While you go looking for a power supply unit (hereinafter referred to as PSU), study the characteristics of the screwdriver, which are indicated on the case or in the passport. Look at the tension. A 12-volt tool is more common; finding a power supply for it will not be difficult.
If the tension is not easy, the search will certainly drag on. You need to know the current consumption, which is not indicated in the technical specifications. The purchased unit must produce an average current value (between the battery capacity and the standard charger). The data is obtained from the markings.
There are two main options for converting a 220-volt cordless screwdriver. The first is the process of using an external power supply.
Any rectifier capable of delivering the required constant voltage will do. Even if it is big and massive, there is no obstacle. After all, you don’t need to carry it around the room.
The block is installed near the outlet, and the cord to the instrument is made to the required length.
Remember that as the voltage decreases, the current increases if the power remains constant. This means that the cross-section of the low-voltage cord must be made more simple than from a 220 V network.
The second option is that the power supply is mounted in a housing from the battery. The only obstacle in the process of choosing such a method is usually the size of the transformer.
Mobility is maintained, the radius of use depends on the length of the power cord.
It is important to remember that the instrument is supplied with power , so the cord is reliable, and the input itself is made neatly and painstakingly insulated.
For an external source, available power supplies are used:
- charger
for car batteries; - PSU from an old computer;
- laptop charging;
- homemade power supply.
Converting a screwdriver to a network one
In the trade, of course, it’s cheap to buy an old charger. Nowadays, pulse chargers are mainly used, and old devices are often sold as unnecessary.
This particular charger, with the ability to manually adjust voltage and current, is perfectly suitable for any screwdriver, regardless of its operating voltage.
The whole modification consists of connecting a low-voltage cord to the output contacts of the charger.
The computer power supply is purchased from older models; it may have a shutdown button. It will not be useful, but this is exactly the version of the AT format that is needed.
On the radio market, a unit with a power of 300–350 watts is selected, which will ensure reliable operation of low- and medium-power screwdrivers. What remains for our client to do is the technical properties are indicated on the sticker on the case. The unit has a cooling fan and overload protection.
To convert a computer power supply at home into an external one for a screwdriver, we perform simple operations:
- disassemble the body;
- on the large square connector we find a greenish wire and at least some dark one;
- we connect both wires to each other and insulate them;
- on the other smallest connector we remove the wires to our client, leaving yellowish and dark;
- We solder a low voltage cable cord into the apartment.
To maintain polarity, you need to know: the yellowish wire is positive, the dark wire is negative. The tool operates with a voltage of up to 14 Volts from a computer power supply.
We power the screwdriver 18V from an ATX power supply
We power the screwdriver 18V
from an ATX
power supply
. I offer it to all owners of screwdrivers, usually those that have come out.
Converting a cordless screwdriver to a 220V network in homemade conditions
power unit
for
alteration
. AUTO ELECTRONICS-HERE-KITS.
Most laptop chargers have properties that allow them to be used as a power source for a screwdriver
. Chargers with an output voltage of 12–19 Volts are suitable. The only configurations that will need to be made are related to the output plug. It should be cut off, the wires should be stripped, and a cable of suitable length should be soldered into this list.
Persons who have an understanding of electrical engineering can make a homemade power supply. Its circuit is quite ordinary and includes a step-down transformer, a diode rectifier and two capacitors.
Our client is left with the parts they buy, as they call it, taken from old radio equipment. A transformer from a tube TV with an output of 24–30 V is suitable. The presence of a rectifying diode bridge is a must.
The capacitors used are not in short supply, from old equipment: one is 0.1 µF and the other is electrolytic at 4700 µF.
Attention! The structure must be enclosed in a housing. To protect against short circuits, it is imperative to install fuses at the input and output.
The mains power supply for the screwdriver is, of course, placed in the battery housing, as it is also called in the handle. Possible options:
- any PSU suitable in terms of features and size;
- Chinese 24 V power supply;
- homemade.
A power supply with suitable parameters is selected on the radio market. At home, you should carefully remove it from the case and place it in your own screwdriver, firmly securing it; all that remains for our client to do is to make the components.
If the wires are short, lengthen them so that they do not touch the iron parts. Place the transformer and the board separately. For better cooling, install additional radiators on the microcircuits.
It would also be a good idea to have holes in the housing to allow air to circulate and heat to be removed during operation.
Converting a cordless screwdriver to a corded one
In a radio parts store we buy a 24 V power supply, current 9 A. Screwdrivers operate on 12 or 18 Volts, so the task is to reduce the voltage to the required level.
To perform such work, little knowledge of radio engineering is required. The output voltage is maintained by resistor R10 with a nominal value of 2320 Ohms. Instead, you should install a 10 kOhm trimmer resistor.
How to configure the power supply is described below:
- remove the permanent resistor;
- set the resistance of the trimming resistor to 2300 Ohms for the device;
- solder the tuning resistor to the unchanged area;
- With the power supply turned on, adjust the voltage.
The design of a homemade power supply will be based on a 60 W Feron or Taschibra electrical transformer. You can buy them at an electrical goods store; they are designed for halogen lamps.
They do not require any modification. The removal of the secondary winding from the middle point made it possible to use two Schottky diodes instead of the usual 4. The operation of the power supply is controlled by the HL1 LED.
The diagram shows our client the necessary details.
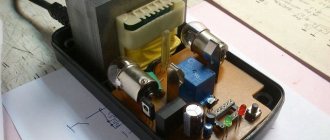
Transformer T1 is wound independently. A non-scarce ferrite ring NM2000 with dimensions 28×16×9 is used. Before winding, the corners are cleaned with a file, and the ring is wrapped with FUM tape. The manufactured block is installed on a 3 mm wide duralumin plate and not simply placed in the battery housing. It also performs the common wire function.
Operational reliability and safety depend on the reliability of the installation of the electronic part. A soft multi-core cable is used as a network and low-voltage cable. If the device is outdoor, the ends of the cable should be connected to its terminals.
We treat copper wiring and brass contacts with soldering acid, then they are simply soldered. Almost often special clips are used - alligator clips.
In the screwdriver itself, there is no way to do without soldering; the crocodiles do not hold so well that the contacts do not become disconnected during operation.
Making battery-based power supply
The best option is to use an old battery case. It is disassembled and the entire interior is removed. In this case, harmful substances are released, take care to protect the respiratory tract and skin. The body is washed with soda, running water and dried. On the inside of the contacts, solder the ends of the cable, observing polarity.
So as not to guess, we temporarily connect the cable, turn on the screwdriver and see in which direction the spindle turns, mark the wires. We make a hole in the bottom of the case and pass the wires through. Inside the case, the cord should be firmly fixed by wrapping insulating tape there. This thickening will prevent the wiring from stretching and breaking.
Then we solder the ends to the contacts.
We place a counterweight inside the body. The best material would be compressed rubber. It has the necessary features: the highest density, insulating qualities. So that the rubber does not dangle inside, we cut it out with a small overlap. To place the counterweight in the body, we bend the material a little and place it so that it will not oscillate and will serve as additional insulation.
To some of you, the counterweight may seem unnecessary, but not to that extent. The design of the screwdriver provides that the center of mass is in the handle. This loads the arm, but relieves the hand. When batteries are removed from the body, the center of mass shifts, increasing the load on the hand. Work becomes awkward and difficult. A homemade counterweight restores the center of mass close to the factory one.
Have you seen how easy it is to recycle a cordless screwdriver
online. The practice of craftsmen gave a hint of ordinary and useful tips for operation:
- after 20 minutes of work, you should give the screwdriver a five-minute rest;
- Fix the electronic cable on your hand so that it does not interfere with work;
- The power supply should be frequently cleaned of dust;
- do not use extension cords to connect the power supply to the network;
- The power supply must be grounded;
- It is prohibited to use corded screwdrivers when working at heights.
Compliance with these rules will extend the life of the refreshed instrument. Mobility has been lost a little, but the unit does not require recharging and works smoothly and confidently.
Source: https://vdiweb.ru/peredelka-shurupoverta-18-v-na-setevoe-pitanie/
Operating rules
If the screwdriver has relatively little power, you need to install a homemade power supply in the battery compartment. When assembled separately, all power supplies must be provided with cooling using a fan or motor with an impeller. The case should not be sealed, as overheating will occur (hot air will have nowhere to escape). When the power supply is ready, you need to check the screwdriver in combination with the power source. Basic requirements for using the tool to extend its service life:
- Working time: 30-40 minutes, after which you need to pause until it cools completely.
- Avoid working at high altitudes.
- Monitor the condition of the power cable, battery (if used), temperature of the tool and homemade power supply.
Thus, if the battery of an 18 V screwdriver fails, you can avoid unnecessary costs. If mobility is important, then it makes sense to purchase a new battery or the tool itself. There are many options proposed by radio amateurs to extend its service life. It is necessary to select the optimal one for the specific application of the device.
Originally posted 2018-04-18 12:15:52.
Precautionary measures
After remaking a screwdriver, it is important to adhere to the following precautions:
- Provide rest for the device every 20 minutes of operation, which will extend its service life;
- Do not operate the device at a height of more than 2 meters from the ground;
- Periodically clean the power supply from dust;
- Make sure that the electrical cable during operation is not pinched, strained or exposed to negative factors, which can lead to the creation of a short circuit current.
After the alteration, following the safety rules, the old screwdriver will last longer than the new two.
Design features of the screwdriver
Any modern screwdriver has a fairly simple design. It consists of several basic elements present in each model:
- electric motor,
- accumulator battery,
- start key,
- force regulator,
- rotation speed controller,
- planetary reductor,
- lever for changing the direction of movement.
The battery can be converted into a power supply so that the tool works from the network.
For the upcoming alteration, only the first three elements are important - the engine, the battery and the start button, and the rest will not be affected in any way. The task is to convert the battery into a power supply to operate from a regular electrical outlet. Batteries are the most expensive element - they take up up to 75% of the total cost of the tool, so this decision is justified.
What tools and materials are needed for manufacturing
People who understand electrics recommend placing the power supply inside the screwdriver in place of the battery. This will protect it from moisture, dust and dirt, and the tool itself will last longer.
Note! To open the battery case, you can use a regular knife, running it along the seam.
In addition, you may need the following tools:
- knife;
- soldering iron;
- insulating tape.
Important! The list of materials depends entirely on what kind of power supply needs to be made and what circuit is used initially. You can work with car units, or you can simply take a power supply from a computer, but this option will be more cumbersome.
Preparing tools for connecting a homemade uninterruptible power supply