When the furniture necessary for a comfortable life in an apartment or house has been selected, funds have been allocated from the family budget, a purchase agreement has been drawn up and the packaged elements of the coveted furniture have been delivered to the address, unforeseen circumstances may arise with its assembly. Suddenly it turns out that the contract does not contain a clause for free assembly of the purchased goods, and financial difficulties have already begun after a major purchase.
Or the store’s specialists can provide this service only in a few days, but you already have a date set for a meeting with family or friends in an apartment with an updated interior. This is where the situation comes when you have to assemble the furniture yourself. This sounds more than terrifying. But the one who walks will master the road.
In this publication we will try to help you perform all operations with maximum success.
Furniture fastening elements
The choice of fasteners is influenced by:
- the material from which the furniture is made;
- required joint strength in different planes;
- design requirements: hidden or open fasteners;
- Manufacturability - convenience and speed of connection.
The most common fastenings are using:
- dowels or dowels;
- corners;
- self-tapping screws and self-tapping screws;
- furniture ties, including confirms and eccentric connections;
- bolt-nut pairs;
- special shelf holders.
Some elements require installation skills and special tools. Violation of technology leads to damage to furniture.
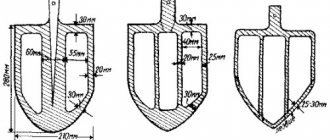
Dowels and dowels
Dowels are wooden or plastic cylinders with a diameter of 4 to 30 mm and a length of 15–200 mm.
The fastener serves for precise positioning of parts relative to each other and absorbs lateral loads. For example, dowels are used to install countertops or connect vertical walls to horizontal ones in cabinets and cabinets.
Longitudinal, transverse or helical notches are made on the surface of the fastening element. During installation, air escapes through them, and glue also accumulates in the notches.
A dowel allows you to connect parts in a hidden way. This is its difference from dowels , which are mounted through a hole in one of the parts.
Typically, the holes in both pieces are made by the furniture manufacturer.
If a table is being assembled , first install the fasteners into the end part , and if necessary, lubricate the surface of the dowel with wood glue. After this, apply the lid.
If there are no holes , they are made with a drill with a diameter 0.3 mm smaller than the diameter of the dowel . It is advisable to use factory or homemade conductors to eliminate through holes and sideways deviations.
Drilling holes for dowels
When making holes, the following conditions are observed:
- marking is carried out with a sharp object, and not with a pencil, this way the necessary accuracy is achieved;
- the holes are made with a wood drill - the thin tip prevents the drill from going to the side;
- A locking ring is put on the drill and fixed to make holes of the same depth.
When connecting, be careful not to apply excessive force.
Corners
An old and proven method of fastening - corner connection - is one of the most reliable. There are varieties:
For internal corners
For installation at the ends of parts
Fastening is carried out with self-tapping screws or self-tapping screws . It is important to choose the required corner size. Inserts for screws can be used , which simplifies installation and makes the structure more reliable.
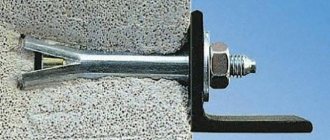
A separate type of corners is designed for mounting cabinets on the wall . Reliability is achieved by the fact that the corner is attached to the furniture using a bolt and nut, which prevents it from falling if the screws become loose. It is these compounds that are desirable to be used in kitchen furniture, where laminated chipboard loses strength and becomes loose due to constant moisture and high temperature.
The special shape of the hole allows you to remove and hang cabinets without unscrewing the fasteners from the wall.
Modern models of corners may have plastic linings that increase the aesthetics of the connection.
Andrey Peregubsky
Furniture handyman
Ask a Question
For critical connections where loads in different planes are possible, use angles with stiffening ribs made in the form of stamping or bossing at the bend point.
Bolt-nut fastening
The connection with a bolt and nut is most reliable.
A hole is made in each part into which a bolt is inserted, a washer is placed on the inside and a nut is screwed on.
Pros and cons of the bolt-nut connection
Easy to install
Reusable
A large assortment
Bolt heads visible
Only parallel parts can be connected
The principle of the “bolt-nut” connection is used in many types of furniture ties, for example, intersectional or for hidden installation . For example, this is how you can connect countertops .
Furniture ties
Furniture ties have been developed specifically for joinery and therefore have the most suitable properties for furniture. Fasteners are used to connect parts at right angles .
The simplest, single-element type is confirmat ; other names are often found: eurobolt or euroscrew. Products are made with threads and heads of different sizes, as well as with slots for a hexagon or Phillips screwdriver. There are 3 common sizes of euroscrews: 5x50, 6.3x50 and 7.0x50 (70) mm.
The threads closest to the blunt end are made in the form of a cone and have serrations , which simplifies the cutting of threads in the body of the part.
For manufacturing, high-quality steel , which has increased ductility, which allows it to maintain integrity when bending and eliminates breakage. All European screws have an anti-corrosion coating , which is important for furniture in the kitchen and bathroom.
For installation, use two drills of the required diameter: one to drill a hole for the threaded part, the other for the head. Currently, special combined devices have appeared that allow you to make the desired hole without changing the drill in the screwdriver.
On sale there are confirmations with a boss-tooth on the head for countersinking and products with a flat head .
Tighten the euroscrews manually or with a screwdriver at low speed . It is not advisable to use a drill; at high speed, the European screw may turn and the threads in the wood will be cut off.
Furniture on confirmed mats can be disassembled, however, after 2-3 cycles the hole acquires a larger diameter and the connection becomes less strong.
Seats for eccentric couplers are made at the factory or independently using a Forstner drill of the required diameter. The ties themselves consist of two parts: an eccentric and a pin.
The pin is screwed into one element of the furniture, and a blind hole is prepared for the eccentric in another element. After installation, the eccentric is turned and it tightly pulls the stud head.
The difficulty of self-installation lies in the correct marking; an error of 2–3 mm will lead to the inoperability of the entire structure.
Eccentric couplers can be assembled and disassembled several times; the only danger is the breakage of the silumin eccentric, which will have to be replaced with a new one.
The side racks of the cabinets can be fastened together with shelf holders with eccentrics . A pin is screwed into the sidewall, and a hole for the eccentric is drilled in the shelf. The parts are connected, the eccentrics are tightened, and the shelf is pressed tightly against the sidewall.
Shelf supports with eccentrics cannot serve as full-fledged fastening elements when assembling cabinets - under load they can be torn out of the wood. The main fastening is carried out with corners or confirmations.
Self-tapping screws
Self-tapping screws and self-tapping screws are similar in appearance, but have differences in the material of manufacture and functionality:
- The screw shaft is thicker than a self-tapping screw, and the threads are shallower. As a result, the screw can withstand heavy loads.
- Self-tapping screws are made of hardened steel; they break more easily. At the same time, the slots on the heads of screws are often cut off with a screwdriver.
- The thread on a self-tapping screw usually reaches the head, while a screw's part of the shaft remains intact.
- The thread tip of the self-tapping screw is sharper, making it easier to tighten. For a screw, a hole of 70% of the diameter is usually drilled, since a screw without such preparation is difficult to tighten.
Design features give screws advantages when working with wood, while self-tapping screws are also suitable for chipboard, plastic, metal and drywall.
Consumables and replacement attachments
For smooth operation of carpentry tools, you need to regularly replace their consumables. These include:
- Nozzles
- Cutting devices.
- Other accessories.
In order not to encounter a shortage of consumables during wood processing, it is better to take care of their supply in advance. Important consumables include:
- Jigsaw files. They are used when processing products made of chipboard and MDF and come in two types - cutting edges for fast and figured cutting. The first blades are equipped with a large tooth and are designated “T101B”. If you need to perform figured cutting, it is better to use models with the designation “T101AO”. Processing plexiglass, metal and other structures requires the selection of other types of hacksaw blades. However, their scope of application is limited.
- Sanding belts with different abrasiveness. Used to form edges and surfaces. In most cases, sanding materials with an abrasiveness of 80 (for rough grinding) and 120 (for finishing activities) are used for processing. Tapes with diagonal gluing demonstrate increased reliability.
Bits for fixing fasteners have different tip shapes. They are sold in sets or individually and are marked as follows:
- "PZ" or "PH". Used for Phillips head fasteners.
- "T". These bits are designed for screwing in confirms.
- With direct glitz. This type does not have a designation, but differs from others in appearance.
- Combined solutions. Provides two different ends. Suitable for devices with a cartridge.
Additional consumables that may be needed when making furniture at home include a magnetic holder. It is supplied with certain models of screwdrivers, while the element itself is sold in specialized retail outlets and is inexpensive. Using a magnetic holder, you can simplify the handling of electrical materials, which is especially useful when using bits.
For furniture production you will also need spiral drills and straight or edge cutters. When implementing specific tasks for processing and drilling holes, you need:
- Confirmed drills.
- Forstner drill.
- Bimetal core drills.
Initially, it seems that the carpentry equipment is quite extensive and requires several dozen devices and large financial costs. At the same time, for a novice furniture maker who is going to create primitive products, a basic set of tools is enough and only as the tasks become more complex, buy more professional tools.
Necessary tools for furniture assembly
The composition of the tool kit depends on the complexity of the assembly.
You may need:
- Tape measure for measuring parts, selecting them correctly according to the assembly diagram, as well as for the necessary markings.
- Level for checking the verticality of installation, carpenter's corner.
- A hammer or mallet for assembling furniture on dowels.
- Screwdrivers with suitable slots or a set of hexagons.
- A screwdriver for using a large number of self-tapping screws, screws, and also for drilling the necessary holes.
- Pencil for marking.
- Drill, grinder, jigsaw, if necessary, make additional holes for communications.
- Furniture stapler for attaching fiberboard back walls.
- Drill.
- A piece of spar, rope, or strong thread for measuring the diagonals of cabinet furniture.
Typically, such a kit is enough to assemble furniture of any complexity.
Selection of accessories
The most important element of a wardrobe, in addition to the usual furniture fastenings, is the door hanging mechanism. Possible options: 1. Monorail design: each door has its own path. 2. The product has a top guide, in which case the entire load falls on the ceiling.
3. The most common design is the bottom guide. The doors don't collide or fall. The choice of rollers is very important as they will need to support the weight of the doors.
You will need a set of 2 guides (top and bottom), rollers for each door, and plugs.
Technology for assembling standard structures and elements
The furniture assembly sequence may vary, but general conditions must be met:
- Carefully study the instructions and drawings , determine the purpose of each part.
- When assembling cabinet furniture, use a level and a corner to prevent distortions; before fixing the back wall, measure the diagonals.
- Assembly begins from simple to complex , for example, first attach small parts: hinges, fittings, strips, assemble the box, then the body, etc.
- If the method of installing fasteners is unfamiliar, it is better to watch videos , of which there are many on the Internet, especially for moving elements, hinges, closers and drawer guides; marking gas lifts is also difficult.
- to assemble large furniture .
When assembling furniture, there is a sequence, the observance of which allows you to reduce work time and avoid mistakes that require complete rework.
How to assemble a chest of drawers
A chest of drawers is a common piece of furniture; the difficulty in assembling is the installation of guides along which the drawers slide out.
If the chest of drawers is small, it is more convenient to start by installing guides on the side walls , since with the structure already assembled, the space will be limited and you will have to work in a closed space.
Usually the fastening points are already marked, the craftsman just needs to fasten the parts with self-tapping screws. The guides are secured through adjusting
holes.
The height of the drawers in the chest of drawers may vary. It is important to find the correct mounting locations for the guides; these parts should be located at the same level of both sidewalls.
Next, with the help of an assistant, connect the sides with the lid and base, attach the back wall, checking the diagonals.
Install the drawers, check the smoothness of movement and tight fit when closed. After complete assembly and adjustment, the parts are secured with self-tapping screws through the mounting holes.
How to assemble a bed
Assembly sequence for a standard or children's bed:
- A frame is assembled, consisting of side, rear and head elements. For fastening, use the supplied products: confirmations, corners and self-tapping screws.
- Mount the cross bars.
- Install the legs.
- The finishing elements of the sidewalls and headboards are attached.
- Lay the mattress.
If you need to install a folding mechanism, carefully study the instructions. There are many videos on the Internet on the installation of various types of transformation devices; as a rule, they are made according to the same principle and assembly is not difficult.
If the manufacturer has not made holes for the mechanism for folding out a bed or sofa, it is better to contact a specialist. Incorrect installation leads to their rapid breakdown due to increased loads during unfolding/folding.
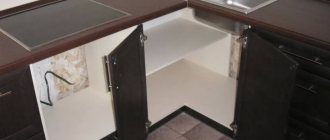
How to assemble a cabinet
Bookcases and wardrobes are assembled in a horizontal position if the height of the ceilings allows them to be raised later .
At the first stage, the side walls are fastened to the lid and base. Then the shelves-lintels are installed. Measure the diagonals and attach/screw the back wall. Mount the legs.
Further work is carried out with the cabinet raised:
- Using the legs, level the cabinet vertically and horizontally.
- Mount decorative elements.
- Hinges are hung on the doors, and the bases of the hinges are attached to the vertical sides.
- Install the doors.
- Adjust gaps and achieve tight closure.
Glass shelves and mirrors are installed last to prevent them from breaking.
How to assemble a wardrobe
When assembling the main cabinet,
special attention the verticality of the side walls and the horizontal position of the base cover . Minimal deviations will cause the doors to not fit tightly to the side walls, which spoils the appearance, allows dust to get inside the cabinet, and leads to spontaneous movement of the sliding doors.
The flaw can be partially hidden by adjusting the doors, but the flaw will remain visible against the background of other structural elements.
Andrey Peregubsky
Furniture handyman
Ask a Question
A cabinet with sliding doors can be aligned and fixed in the desired position to the wall. This makes it easier to adjust the doors and maintain the position for the entire period of operation.
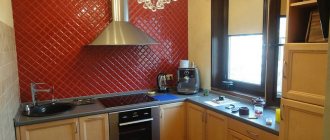
How to assemble a kitchen set
First, the lower part is assembled, then the upper part.
A large number of wall cabinets and tables makes assembling kitchen sets the most time-consuming task.
First, the lower storage system is assembled, the work is similar to assembling chests of drawers.
For installation, you may need an electric jigsaw to cut holes in the countertops for the sink and gas stove. The tool must be of excellent quality, otherwise the cut will be uneven or skewed, given that kitchen countertops have a thickness of 25 mm or more.
It is important to choose the right place to attach the shelf in the cabinet under the sink , providing sufficient space to place the siphon.
Once the individual cabinets are assembled, they are secured with intersection ties and the countertops are installed. Then the doors are attached and the drawers are installed.
Next, the cabinets are assembled and hung , for which you will need an impact drill, a hammer drill and dowels.
How to assemble upholstered furniture
Assembling upholstered furniture is not difficult, since the base, sides and mattress are supplied assembled.
Work algorithm:
- Assemble (if necessary) the base frame.
- Attach the back wall to the frame.
- The sidewalls are mounted, as a rule, the fasteners are made according to the “nut-bolt” scheme.
- Lay out soft parts: mattress and pillows.
After installation in a permanent place, the height of the legs is adjusted.
How to assemble transformable furniture
Assembly is carried out similarly to upholstered furniture, but before the installation of the sidewalls, a sliding mechanism is attached to the parts of the mattress and backrest. Next, the structure is attached to the base frame.
Only after this the sidewalls are installed, otherwise access to the mounting location will be limited.
Marking devices
By marking we mean auxiliary tools. There are rarely problems finding them, since the main part is already in your home from the very beginning. Even if you haven’t assembled furniture before, but have repaired, drawn, measured, screwed something, etc.
This section includes universal tools, that is, you will need them in different areas of home activities. There is no need to buy them specifically in order to assemble furniture with your own hands.
- To get started, take a tape measure. Moreover, choose a length of at least 3 m. It will allow you to know exactly what dimensions of a particular product, make an indent, etc.;
- Pencil. Where would we be without him? It is easy to wash, but can be marked. For furniture work, an HB pencil is suitable, that is, with a medium degree of hardness;
- Take a square. Without it, it is difficult to draw clear and even lines. Particularly relevant when working with fiberboard, chipboard and MDF;
- The awl will help in situations where you need to drill surfaces with sheathing, where there is a risk of wrapping around the drill;
- Good old sandpaper. Rubs out uneven surfaces. If you have a ready-made furniture structure, or components made of wood, chipboard and other materials, take fine grain;
- Sharp knife. Better stationery. Copes perfectly with cuts and removing unnecessary elements;
- Jamb-knife. Relevant when cutting PVC furniture edges;
- Classic pliers. Unscrew something, pull it out, etc.
I don’t think there will be any problems finding these components. Especially if you live in Minsk, Moscow or Kyiv.
When you have laid out the markings and prepared the materials for your furniture, it’s time to put everything together.
Now you can move on to the next set, which will be directly involved in the furniture assembly procedure.
How to avoid mistakes when assembling furniture
To complete the assembly quickly, take into account emerging problems that complicate the work:
- The tool is prepared in advance , its performance is checked, and placement is provided near the work being carried out.
- Assembly begins by studying the diagram ; if necessary, the parts are marked with a pencil, for example, the left or right side panel is indicated, the order in which the shelves are placed, and the hinges of different designs are separated.
- enough free space for work so that the furniture can be approached from any side.
- Drawers, shelves and facades are attached after assembling the main frame ; this will help to avoid distortions and displacements of parts.
- Before attaching the back wall, be sure to check the diagonals .
- If the manufacturer has separately identified the assembly procedure , they strictly follow it, and do not do it as it is more convenient for the master.
It should be remembered that errors in marking or drilling will be impossible to hide; the furniture will lose its attractive appearance and will require additional decoration.
Create a drawing
If you need to make a wardrobe with your own hands, drawings will be the first step towards your goal. You have to decide on the size, design, and configuration of the furniture. First of all, you need to decide what the handmade product will be used for and what its content will be. It is important to determine which compartments are needed, set their parameters and other features.
After this you need to measure the room. If there is a niche, then the distances between the side walls and then between the floor and ceiling are determined. It is also necessary to set the depth of the niche so that the cabinet does not protrude beyond its boundaries. Next, you need to choose the type of structure (cabinet or built-in), decide what kind of doors they will be, and decide on the finishing method. Having completed all the measurements, you need to make a drawing with your own hands in the traditional way (on paper) or in a special program.
If your ideas don’t come up, you can use a description or a ready-made solution borrowed from the Internet. It is important to take into account the characteristics of the material and compare them with your capabilities. The more complex the design, the more experience and skills will be required from the master. It is also important to think through all stages of assembly; there should be no unclear moments. Only then can you start working.