The use of a milling machine varies. Some can perform one function, some can perform several. However, purchasing it can be quite expensive for the average person. Therefore, if you want to save money, then the best option for you would be to make it at home with your own hands. In this article you will learn how to do this.
Typically, wood is processed along curved and straight contours. The main work is done by the metal head of the knife, which moves up and down at high speed.
Milling cutters can have different structural options (and each has its own pros and cons):
- Single-spindle (spindle installed in vertical position)
- Single-spindle with a movable spindle (you can change the angle of inclination)
- Copy version of phraser (top placement)
- Same as the previous one, only horizontal placement
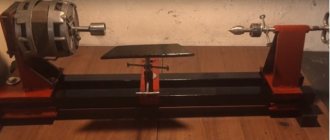
How to make a wood lathe?
Much easier than you think. But not without certain difficulties and nuances. It can be made from a drill or using an electric motor removed from another medium. The power, however, should not exceed 500 W. A drill is perfect for making a drive.
Before starting work, create a detailed drawing of the product. Pay attention to all the small details - they must be carefully drawn. Be especially careful with scale.
Of the materials you should have, you need to have:
- Metal frame
- Podruchnik
- Tailstock
- Electric motor
Carefully connect all the parts together as shown in the photo. That's all! The homemade machine is ready!
Drawings and diagrams of a circular woodworking machine
The frame of the machine consists, in turn, of two frames connected to each other at the bottom by supports for the engine, and at the top by crossbars. All these elements are from corner No. 4. The frame rests on the base beams, and at the top a work table is attached to it on the king beams. The beams are made of channel No. 6.5. Wheels are mounted at the ends of the base beams, thanks to which a fairly heavy machine (weighing about 100 kg) can be moved within a room or from one to another, adjacent room, even by one person. To operate, the mechanism is installed on wooden or metal supports using screw jacks, mounted here at the ends of the beams next to the wheels. An electric motor with a power of 1.5 kW (but more is possible) and a rotation speed of 1450 rpm is mounted at the bottom of the frame on a cradle that provides tension on the drive belts. (it is not advisable to install a motor with a lower number of revolutions per minute). To start and operate the electric motor, the circuit includes a block of capacitors, the box with which is fixed in the upper part of the frame.
The walls of the frame are partially covered with a 1.5-mm duralumin sheet, and an inclined tray is mounted inside, along which shavings and sawdust from under the cutting head are removed into a container or bag installed nearby. The sheets are riveted to the frame. The main part of the machine is the work table with the cutting head.
The work table is made of duralumin sheet 8 mm thick and consists of four plates, two small (middle) and two large (outer). The slabs are mirrored in pairs. All the holes in them for countersunk mounting screws are the same, and their location in paired slabs is also mirrored. The counter edges of the middle plates, facing the cutting head, are made with a 30° bevel inward. Under the rear plates (middle and outer) there are strips 1.5 mm thick, equal to the cutting depth when planing workpieces.
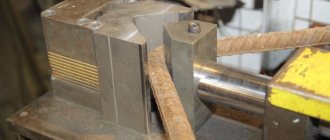
The cutting head is the main mechanism of the machine, on which the quality of workpiece processing depends. The design is not so complicated, but the quality of its manufacture must be high. If there is a lack of experience and if possible, it is better to order it (and at the same time the tailstock with the center) to specialists who have good metal-cutting equipment.
The most important part of the head is a rather voluminous and massive drum-shaft with cantilever ends in rolling bearings 80104. Four knives are mounted directly on the drum. The number of knives, the speed of rotation of the drum and the length of the work table in terms of the quality of processing ensure not planing, but already jointing of workpieces. All knives are the same - each has four cutting edges (blades). Structurally, the knives are secured to the drum in such a way that when one blade becomes dull, the knife is rearranged: rotated or inverted. Knives are rarely sharpened - only when all edges are dull. If necessary, instead of knives, you can attach emery cloth or felt to the drum instead of knives in a special mandrel and perform surface grinding or polishing operations on the machine.
A V-belt drive pulley is mounted on one end of the shaft. On the other, all kinds of tools and devices are mounted, providing the machine with multifunctionality. The main tool installed here is a circular saw. It is secured between two special washers (thrust and clamping) and a tightening nut. The nut and thrust washer, like the end of the shaft, have a left-hand thread M18x1.5.
What equipment do you need to have?
In order to make such a machine at home, you first need to have three stepper motors. They will determine the up, down and sideways movements of your machine. This is the basis of its functionality. You can take them from any dot matrix printer. In addition to them, be sure to have a couple of iron rods available.
Of course, it is not necessary to have exactly 3 motors - you can get by with the two available in a dot matrix printer. But if you want to adjust the angle of inclination, then you will definitely need a third motor.
In addition, the number of control wires significantly increases the number of operations that can be performed on the machine. It is also worth taking into account the degree of rotation at one step, the winding resistance and what voltage is supplied to the motors.
- DIY fan: how to make a homemade powerful fan. Basic parameters and properties of fans (130 photos)
- Why do you need a security alarm, what functions does it perform?
How to choose winter workwear and not make a mistake - recommendations from the pros
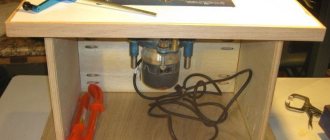
In addition to everything described above, there is another version of the machine that you can easily make at home. This is a grinding machine.
Usually they make a band machine - for processing parts when they are almost ready. Any craftsman can also make it. The main desire!
So, first, you will need a motor - you can remove it from an old washing machine. The bed can be made from a sheet of metal. Please note that the sides of the bed should be as smooth as possible.
Next you will need two shafts. You can easily make it from a piece of chipboard. One of them must have a direct connection to the electric motor, and the second must be mounted on an axis with bearing assemblies.
Then secure the tape to the shafts. They should be located exactly in the middle. The most optimal material for its manufacture is emery cloth. The material must be glued very close to each other.
- How to choose an air conditioner for your home or apartment
- Do-it-yourself bait - composition, application features and storage methods (115 photos and videos)
DIY sliding gates - how to build simple and automatic gates. Schemes, drawings and review of the best ideas (90 photos)
You can learn more about how to make a grinding machine with your own hands in the video at the end of the article. Thus, if you want to make some wood products at home, but do not want to spend money on expensive equipment, you can easily make everything at home.
Assembling the device
The main problem that often arises during manufacturing is the components. A multifunctional machine requires attention and scrupulousness from the master. Experts in this field advise purchasing factory-made mechanisms and parts. They are made of tool steel and are quite durable and reliable in operation.
Combined multifunctional woodworking machine
If it is not possible to order factory products, you should use improvised means, for example, a mechanism from a chainsaw or circular saw. In this case, it is worth considering that the parts will not be as durable, and homemade units will not have a high degree of safety.
After all the parts and necessary materials have been prepared and the machine assembly diagram is clear, you must proceed directly to the process itself. According to the drawings, first the frame is assembled and strengthened. Then the motor and rotor are attached.
Any woodworking machine can help the owner in everyday life. Pre-assembled and correctly machined parts will make assembly very quick. After installing all the necessary structures, it is necessary to check the starting mechanism and engine operation. And only after this it is necessary to install the necessary cutting part and try the machine in operation.
If all the points were observed with precision and all the component parts were manufactured and secured correctly, then homemade woodworking machines will not be inferior in functionality to factory ones. All that remains is to follow safety precautions and work on the machine for your own pleasure.
Photos of DIY woodworking machines
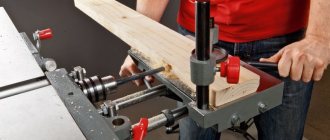
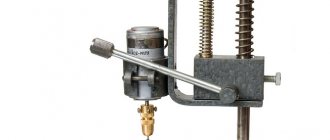
How to make a homemade elevator for a router
In addition to the above option, the guide can be made in other ways. The most common ones are:
- using a jack. Despite its cumbersomeness, this method ensures accurate adjustment of the milling depth. In addition, the jack can be equipped with an electric drive;
- driven by threaded rod. It is the simplest and least labor-intensive option. However, to set up, you must always keep a hexagon or screwdriver on hand to adjust the milling level;
- with chain drive. A complex but very effective lift for a router. In addition to the chain and drive sprockets, the assembly diagram contains guide pins, an electric motor and a lift position switch. Despite the very complex manufacturing process, such a lift provides the most accurate setting process.
Some models of manual milling cutters are equipped with a microlift, which ensures precise adjustment; its use increases the accuracy of the work.