For carpenters, boards and beams are the most common blanks, from which crafts and wood products are subsequently produced. And the first thing the material undergoes is sawing into pieces of the required length. At the same time, you should know how to saw off a board evenly, because performing this operation incorrectly can ruin the workpiece or significantly affect the appearance, and not for the better.
At large enterprises, the problem of how to saw off a beam or board evenly does not arise. Any serious production facility has high-precision equipment that performs this type of work. At home you have to make do with what you have on hand. At the same time, you still need to be able to use the tool or equipment correctly in order to saw off the board correctly, and the cut turns out without flaws.
Note that many enterprises that sell boards and timber provide cutting services. And for this they use the same specialized equipment, so the purchased material will be cut with high quality. But it is not always possible to use such a service, and it often happens that only one piece needs to be cut.
How to cut wood with a hacksaw
The saw must be driven, otherwise it will start “walking”. This needs to be realized practically. Wood is a living material, and its behavior is unpredictable. Hard annual rings, knots, cracks, high humidity and high resin levels can seriously complicate sawing.
For this reason, there is no universal tool that could take into account all the vagaries of wood, but there are many different special saws. The shape and order of alternation of their teeth are determined not by the material from which the saw blade is made, but by its purpose. Some equipment can be cut in a straight line, while others, on the contrary, are better able to cut in a circle.
When sawing, only the saw moves; the workpiece must be firmly secured. Therefore, you will need a stable support. For example, a workbench or sawhorses. The workpiece is secured with a clamp or held by hand, and especially large ones - additionally with a knee.
Sawing begins and ends by repeatedly lightly pulling the saw in the opposite direction, in other words, a “trace” is laid. At the end of sawing, you need to hold the remainder firmly so that it does not break off along with a piece of the main wood.
Sawing is one of the most common processes when processing wood. A clean, even cut is not a problem if you choose the right tool and know how to use it.
In the photo (from top to bottom): large and small hacksaws; saw with a “back”; saw with a narrow blade. Next to the left is a saw for finishing cutting.
Sharpening a hacksaw
Like any other tool, a hacksaw will work well if it is sharp.
With frequent use, the question of sharpening a hacksaw for wood very soon arises. A hand saw for wood becomes less sharp over time; the teeth wear down, becoming rounder on the sides and in front of the edge. Therefore, it becomes more difficult to operate the saw. To restore the previous sharpness of the teeth, it is worth sharpening them. Please note that before and after sharpening, the teeth must have their original height and angle pitch.
It is also worth considering the fact that not every hacksaw can be sharpened. For example, a tool that has small teeth should not be sharpened. In addition, hardened steel teeth cannot be sharpened. A large wood hacksaw lends itself best to sharpening.
Before you start sharpening, you should separate the teeth. To ensure free movement along the workpiece, as well as to avoid pinching the tool, the teeth must be moved apart smoothly as they deepen.
The alignment of the teeth must be bent in different directions to a specific distance. After this, the width of the cut will increase and will have a larger width compared to the thickness of the teeth. There are gaps on the sides. Upon completion of the layout, the hacksaw will easily move back and forth, and the blade will not touch the surface of the cut, as a result of which the master will freely remove the wood with each layer.
When setting, it is worth considering the fact that as the width of the teeth increases, the cut will widen. Therefore, you will avoid the hacksaw getting jammed. However, this does not mean at all that if the teeth are set excessively (increasing the width), a wide cut will be obtained; on the contrary, the teeth will tear the wood and the work will become harder. The optimal width of the teeth is one and a half to two times greater than the thickness of the hacksaw blade. For this reason, to cut raw wood, the teeth should be set aside by 0.5 - 1 mm, and dry wood - less than 0.5 mm.
A special tool called a setting tool will help you bend the teeth. This is a small metal or wooden plate with a small slot, the width of which is greater than the thickness of the hacksaw. Often the wiring is equipped with an adjusting screw, with which you can achieve an even bending pitch of the teeth.
Wiring procedure:
- clamp the saw in a vise so that only one teeth peeks out
- fix the vice on a convenient flat surface, for example, on a table
- bend the teeth using an adjustable device in the opposite direction
- do not bend the teeth completely, otherwise they will break
- at the end of the setting, you need to check that the teeth are at the same distance and do not look out.
Sharpening a tool can be called a real art, for this reason it is worth following certain rules:
- securely fix the hacksaw. The blade must be secured in a vice or other wooden device that is installed in a well-lit place and on a stable surface. High-quality sharpening will not work on your knees, chair or brick.
- use high quality tools. Don't save money by buying cheap tools. You should definitely buy a quality file
- For long service life of a hacksaw, it must be cleaned with a wire brush and rubbed with charcoal. This is necessary so that the hacksaw does not clog or become dull.
- The handle of the hacksaw should be held in the right hand, and the end should be supported with the left, pointing the file at the teeth. It is necessary to press the teeth smoothly, pointing the file in one direction. When returning the file, try not to touch the teeth.
- you need to try to remove the metal from the edge of the teeth evenly. For convenience, you can count the number of movements; for each tooth it should be the same
- A file that has a velvet notch will help you get rid of burrs from your teeth. The notches on the side edges of the hacksaw must be removed using a whetstone.
At the end of sharpening, you should definitely check the quality of sharpening and the sharpness of the teeth. A well-sharpened edge does not shine.
How to saw correctly
You should always cut from the cutting side, close to the marking mowing line. This applies to both rough cuts with a hacksaw and precise cuts with a saw with small teeth. Next, it is very important that the workpiece being processed has a stable support in the form of a workbench tabletop or an ordinary desktop. For large-sized workpieces, it is better to use sawhorses. During the sawing process, the part must always be held firmly with your hand (large-sized workpieces should also be held with your knee) - in other words, only the saw should move.
Sawing begins with the first small movements at an angle of 30 to 45 degrees. Only after the saw blade has entered the wood and is fixed in it, you can start working with the saw along the entire length of the blade.
At the edge of the cut, cut only in small, sharp strokes. This will avoid breakages on the underside of the workpiece.
Cutting along wood fibers is always a “critical” situation, especially if the tree species has a large strand. The saw naturally wants to follow the path of least resistance, and if it is not restrained, it will begin to “walk.” In other words, in such cases you have to press harder on the saw than usual, which, in turn, requires a very stable position of the workpiece.
When making huge cross cuts, an ordinary hacksaw can jam. In such cases, it is better to use a rip saw with very spaced teeth. Honor only needs that the cut strip be significantly thicker than the saw blade.
to saw fresh or damp wood if the saw blade is lubricated with wax or soap.
hacksaw for longitudinal cutting of wood
The workpieces are firmly pressed against the lintel, its right edge guides the saw.
Other varieties
There are other types of wood hacksaws. Among them there is a garden hand saw, equipped with a narrow blade, for the production of which chromium steel is used. It is armed with widely spaced teeth, inclined towards the handle. It is comfortable to work with such equipment in cases where you have to focus on yourself while cutting.
There is a two-handed saw that can be used to comfortably saw huge logs or cut down trees. Two people should work with it.
A chain hand saw is a short chain with hardened teeth and two handles at the ends. It is compact and suitable for use on backpacking trips. You can work with it either by one person or by two people.
A modern and universal tool is an electric hacksaw, with which you can perform a large volume of various works. In some cases, it completely replaces a circular saw. When changing blades, they use it to saw not only wood , but also plastic and metal.
Teeth and their shape
The capabilities of the saw depend on its shape and size of the teeth. A large number of teeth on a given length of blade means a fine cut but slow forward progress. A small number of teeth produces a rough cut.
Wood is made up of fibres, and when sawed they separate. This creates sawdust that needs to be removed. The finer the teeth, the faster the cut and the cutting edge of the saw become clogged with small sawdust - saw flour. The teeth can no longer grip wood to its full height. Sawing is becoming more and more tedious and, most importantly, unproductive. But large teeth almost never get clogged due to the greater distance between their tips and each other.
Almost any saw has teeth that are set apart, that is, their tips alternately deviate to the left and then to the right. The greater the angle of inclination, the wider the cut strip, and therefore it becomes less clogged with sawdust, and the saw jams less.
Over time, saw teeth become dull and need to be sharpened. In this case, the damaged wiring must be restored. Even for a specialist this is not an easy job. Therefore, we recommend purchasing saws with hardened teeth. They don't get dull as quickly, and they are easier to sharpen than the teeth of a regular saw.
You just need to put the saw blade on the table and use a sharpening stone to run it twice along the cutting edge from the end to the handle, then turn the blade over. The saw is sharpened, you can start working.
Steep teeth for rip sawing
This is how the teeth are positioned on almost all hand saws, including hacksaws and back saws.
The cutting edge of the teeth is located vertically. Suitable for longitudinal cuts.
rip sawing with a hand saw
When cutting longitudinally, the workpiece should protrude sufficiently beyond the workbench - this makes sawing easier.
The marking below the gap indicates where the saw deviates.
Main settings
The effectiveness of using a hacksaw for wood largely depends on its technical characteristics. The main ones are:
- the material from which the saw blade is made;
- length of the canvas and its shape;
- tooth size and shape;
- type of handle.
READ Replacing a Black and Decker Circular Saw Blade
When choosing a tool, you need to pay attention to each element of the characteristics. Only in this case you won’t have to regret the purchase.
Handle type
The type of handle and the material from which it is made largely determine the ease of working with a hacksaw on wood. It is best to work with a saw equipped with a solid plastic handle with rubberized finger inserts. The handle, made of two parts, is less comfortable, as it does not have sufficient rigidity.
There are also hacksaws with reversible handles. They are usually equipped with universal and bow saws, in which blades can be changed during operation.
Teeth setting
The teeth deviate from the plane of the blade in a checkerboard pattern, for example, all even ones to the left, all odd ones to the right. Only very experienced carpenters are able to position saws on wood “by eye.” This skill comes after several hundred diluted saws. Less experienced craftsmen are better off using a special tool - a setting tool. The simplest version of the tool is a flat plate made of durable metal with a slot into which the blade fits tightly, with minimal clearance. The saw blade should be clamped in a bench vice. The teeth should protrude slightly from the jaws. The teeth, one after another, are clamped into the groove of the plate tool and bent in the middle part. The wiring angle must be constantly monitored. First, bend all the even-numbered teeth in one direction, then all the odd-numbered teeth in the other. Once the wiring is complete, you can spread the jaws to the width of the wiring and stretch the fabric between them. If any of the teeth are bent more than necessary, they will hit the vice. They need to be fixed.
Teeth setting
Canvases with hardened teeth are not subject to routing.
Tsulaga
When processing small workpieces, the tsulaga shown in the pictures below can be of great help.
To make it, you will need a piece of wood slab approximately 20 x 30 cm in size and 2 mm thick, as well as two planed strips, which must be fixed to the slab as shown in the figure. To prevent the slab from bending and breaking, the planks must be positioned transverse to the direction of its core layer.
How to work with a circular saw
The lower bar of the tsulaga rests against the edge of the tabletop and thus sets the correct direction for the cut; the shortened upper bar ensures good centering of the saw.
If you have to saw long boards or planks, then a second tsulaga will not hurt, which will serve as a stop for the other end of the workpiece.
A piece of wood slab and two pieces of plank are enough to make a practical tsulagi.
Before starting sawing, the saw placed at an angle must be pulled towards you several times.
Adhesive tapes
To protect the back side of the plywood, tape is applied along the cutting line. This method helps prevent large pieces from breaking off, which is especially effective if you decide to use a manual or electric jigsaw. However, not every adhesive tape is suitable for these purposes. For example, masking tape in this case will be completely useless due to its small safety margin.
Before you start sawing , tape with fiberglass or aluminum reinforcement is glued to the surface. The requirements for its width are as follows: there should be a margin of 1.5-2.0 cm on both sides of the cutting line. It is better to paste by pressing the tape with a dry cloth, preventing the formation of wrinkles and gluing.
After the saw blade or electric jigsaw has stopped working, you should remove the tool, first unplugging it from the power supply. Then start peeling off the tape. In this case, great care should be taken so that sudden movements do not cause the tearing of small fragments of the laminated surface that inevitably form during cutting. Therefore, it is necessary to abandon the use of materials with a strong adhesive base. When choosing such a tape, you should take into account its adhesive ability and ease of cleaning from rough surfaces.
Presentation on technology on the topic “Sawing with a hacksaw” (grade 5)
Description of the presentation by individual slides:
Sawing wood Concepts: sawing, saw, teeth, cutting edge, miter box Yasskaya L.B., Municipal Educational Institution Secondary School. Krasnoturinsk
The log can be sawed lengthwise and crosswise manually or on special machines - sawmills. Sawing. one of the main carpentry operations
Sawing in industrial enterprises is carried out on circular sawing machines. Machine saw operators who operate these machines must be able to prepare them for work, cut material economically, and know what requirements the finished product must meet.
What tool is used for hand sawing wood? Blade Handle A carpenter's saw is used to cut wood by hand
What other tools are used to cut wood? Bow saws Circular saw For more precise sawing of thin pieces of wood or plywood, saws with fine teeth are used. Jigsaw
Based on the direction of cutting wood fibers, a distinction is made between transverse and longitudinal sawing. When cross-cutting, the cutting direction is perpendicular to the grain. When longitudinal sawing, the cutting direction is parallel to the grain.
By what other characteristics are saws distinguished? For cross-cutting, saws with straight teeth are used, and for mixed sawing and longitudinal sawing, with inclined teeth.
Cross-cutting When sawing across the grain, the workpiece is secured in a rear clamp or a backing board is used. The workpiece must be clamped so that it is located almost horizontally, and the cut point is located at the clamp.
Longitudinal sawing The rules for sawing wood along the grain have the following differences: 1) the working posture is slightly different than when cross-cutting 2) the body position is straight 3) the rhythm and pace of sawing is faster
The backing board is used to protect the workbench from cuts.
Sawing with a bow saw A bow saw is similar to a bow, that's why it's called that. Bow saws come in different designs. These saws are designed for rip and cross cuts, depending on the shape of the teeth, just like hacksaws. Do not forget that the quality of the sawn workpieces depends on the accuracy of the markings and the accuracy of your work.
READ How to Cut a Countertop Without Chips
Fastening workpieces When sawing workpieces, special attention is paid to their reliable fastening. Before sawing, you need to make a cut using a block. This will protect your fingers from injury. When cutting a cut, use any block, which is held firmly with your left hand so that the end of the block is aligned with the marking line of the cut.
When sawing, the saw blade rubs against the walls of the separated parts of the wood. And so that it does not get pinched in the cut, the saw teeth must be set apart (tooth set), that is, alternately bent in different directions. This makes the cut a little wider and makes sawing easier.
Wires come in different forms. The figure below on the left(a) shows the main types of wiring. In figure b and c. shows correctly set teeth for transverse (b) and longitudinal sawing (c).
This is how they work with a hacksaw. The marked workpiece is placed on a board (1) on a carpentry bench that has a stop (2). With your left hand you press the workpiece against the stop, and with your right hand you make a cut. In this case, the hacksaw is pressed against the stop and several short smooth movements are made towards you. After sawing, the hacksaw is moved along its entire length, aligning it with the marking line of the cut. By moving the saw along the line, an incision is made, then the block is removed and the part is sawed off. At the end of sawing, the pressure on the saw is eased so as not to break off the wood fibers at the exit of the saw.
Square The quality of sawing can be checked using a square. While sawing, constantly check the sawing line with a square
Miter box Often there is a need to cut bars and boards at different angles. A miter box is used for precise sawing.
What device is used to accurately cut a block? For precise sawing of bars at angles of 90, 60, 45, a miter box is used. A miter box is a saw box with cuts in the side walls made at certain angles.
The miter box has a grooved shape. It consists of a bottom 1, two sidewalls 2, between which the workpiece to be cut 3 is clamped. The sidewalls have cuts made at the desired angle. Saw blade 4 is inserted into these cuts and sawing is performed at the desired angle.
The use of a miter box eliminates marking of the part, increases the accuracy of sawing, reduces the time spent on marking the part, thus increasing labor productivity. The use of a miter box is especially effective in the mass production of parts. The miter box may look like the one shown in the photo.
For ease of sawing, tsulaga is used. Tsulaga is very quickly made from a sheet of plywood or board and two bars. Thanks to the lower bar, it is easy to press it to the tabletop, and the upper one serves to support the workpiece. The tsulaga can be made with a movable stop for sawing off a large number of identical parts.
What devices are used when cutting (notching) a cut? When cutting (notching) a cut, a stop or block is used.
Sawing plywood Plywood blanks are easier to saw by changing the sawing angle. The smaller the cutting angle, the better the cutting will be done.
Wires come in different forms. The figure below on the left(a) shows the main types of wiring. In figure b and c. shows correctly set teeth for transverse (b) and longitudinal sawing (c).
Safety rules: Securely secure the workpiece when sawing. To guide the canvas, use wooden blocks and special stops. Use stops, miter boxes and other devices. Sawing only with a serviceable, sharply sharpened saw. Do not allow the saw to skew when sawing. Do not make sudden movements with the saw. Do not keep your left hand close to the saw blade. At the end of sawing, release the pressure so as not to chip the wood fibers. Place the saw on the workbench with the teeth facing away from you. Do not blow away sawdust or sweep it away by hand. Use only a brush.
Remember! When sawing workpieces, the markings retreat from the mowing line by 2-3 mm. The hacksaw blade should move at right angles to the workpiece. Sawing control is carried out along the markings of the mowing line. It should remain to the left of the sawing point on the workpiece.
Practical work Tools and materials: Blank, square, ruler, pencil, hacksaws, miter box. Procedure: Practice sawing techniques on waste material. observing safety regulations. We cut wooden blanks to the given sizes. We drank the preparation in a miter box.
Gift certificates
Responsibility for resolving any controversial issues regarding the materials themselves and their contents is taken by the users who posted the material on the site. However, the site administration is ready to provide all possible support in resolving any issues related to the operation of the site. If you notice that materials are being used illegally on this site, please notify the site administration using the feedback form.
All materials posted on the site were created by the authors of the site or posted by users of the site and are presented on the site for informational purposes only. Copyrights for materials belong to their legal authors. Partial or complete copying of site materials without written permission from the site administration is prohibited! The opinion of the administration may not coincide with the point of view of the authors.
Sources:
https://zodchi42.ru/brjovna/kak-raspilit-brevno-vdol-vruchnuju.html https://superarch.ru/materialy/kak-raspilit-brevno-vdol-benzopiloj https://infourok.ru/prezentaciya- po-tehnologii-na-temu-pilenie-stolyarnoy-nozhovkoy-klass-502591.html
How to cut plywood without chipping with a circular saw?
It is recommended to cut on a flat floor. The plywood sheet is laid on wooden blocks of equal thickness, placed perpendicular to the cutting line. Full support from below ensures that no corner of the sheet breaks off at the end of the cut. A metal or wooden guide is installed on top, which is fixedly fixed with clamps.
In order to cut laminated plywood accurately and without chipping, you need:
- Setting the minimum cutting depth. On the opposite side of the sheet, the teeth should protrude 2–3 mm. With this setting of the cutting depth, the blade does not chop, but carefully cuts the wood.
- Choosing the right circular saw. For gentle cutting, a blade with a minimum size and a large number of teeth is selected (for example, No. 140).
- Low feed speed of the cutting blade when moving without stopping. In this case, the teeth do not cut, but gently cut the wood without chipping. To properly cut laminated plywood, it is also recommended to adjust the blade speed to maximum. Disadvantage of the method: the carpenter runs the risk of overheating the canvas.
- Laying adhesive tape in place of the cut. To do this, it is recommended to use masking tape that does not leave marks on the surface of the sheet. Upon completion of the work, the tape is removed at an angle of 90°, moving towards the cut.
If you have to process laminated plywood, it is recommended to also tape the sole of the circular saw. This avoids scratches on the front surface of the sheet.
Both an electric jigsaw and a circular saw are suitable for cutting such material. The first option is indispensable in the case of a figured cutting path.
To cut thick plywood without chipping with an electric jigsaw, it is recommended to use any of two types of blades:
- finishing series CleanWood (Bosch);
- on metal.
A regular circular saw is also suitable for even cutting of a sheet of plywood. It is enough to install a blade with a fine tooth (for example, No. 140), adjust the cutting depth within 12–13 mm and lay the sheet on even wooden blocks. It is recommended to make the cut along the guide, with a low tool feed speed and without interruptions.
If the front surface of the sheet is laminated, then the cut area is preliminarily covered with masking tape.
For anyone who doubts which saw is best to cut plywood, we recommend contacting a specialized company with laser cutting and professional cutting equipment.
When producing various finishing works or making furniture, the use of plywood is a common practice. At the same time, home craftsmen are faced with a choice: how to cut plywood and how to achieve a perfect cut without chips. When cutting such material, some difficulties arise: the sheet is large in size, and the structure of its base creates difficulties when sawing. Knowing some features, you can achieve excellent results when working with an electric jigsaw, hand saw or circular saw. The main condition is to ensure reliable fixation of the plywood.
READ What parts does a hacksaw consist of?
Plywood is a material that is practical to use and easy to process.
Hand electric saw
- Saber. It is an alternative to a jigsaw, but is more suitable for quickly cutting off excess without forming an even and precise edge.
- Disk. It is used most often because it allows for large-scale work. The disadvantage of the device is that cutting is only possible in a straight line.
A reciprocating saw is not designed for precise cutting, so it can only be used for rough cutting of plywood, while a manual circular saw is considered one of the best options for such work
It is better to cut plywood to specified sizes using the latter option, taking into account some application features:
- The ability to adjust the insertion depth minimizes edge damage.
- Small discs made of carbide material with frequently spaced teeth are suitable for the job.
- Ease of use. The tool weighs little and does not require a special installation site.
When choosing a suitable disk, you need to pay attention to the tooth alignment: a slight discrepancy is convenient for thin material, a larger discrepancy is suitable for thick slabs.
How to set a saw and what it is
Sharpening a hacksaw is not a complicated procedure that begins with a process called setting the teeth. This procedure is carried out with one simple goal - to provide free movement of the blade when working with the tool. The lack of routing leads to the fact that the tool will get stuck in the thickness of the workpiece being cut, which will cause inconvenience in work.
Setting the teeth of a hacksaw is a procedure that involves straightening the teeth in different directions. The main thing is that each tooth is bent the same amount as the previous one. The greater the deviation of the tooth from the plane of the blade, the greater the width of the cut. The greater the width of the cut, the higher the process of removing chips from the cut, which means the faster the useful work is done.
The possibility of jamming of the blade depends on the width of the teeth. The greater the width of the routing, the less likely it is that the blade will jam inside the workpiece being cut. Not many people know what the tooth spread should be. However, this parameter must be taken into account, since the quality of the tool’s work depends on it. The size of the tooth set primarily depends on the thickness of the steel blade. This parameter is usually from 0.5 to 2 mm. It all also depends on the type of wood (dry or wet) with which you plan to work:
- For raw wood, the deflection value should be in the range from 0.5 to 1 mm. The thicker the canvas, the greater the bend should be
- For dry wood, the deflection value is from 0.3 to 0.5 mm
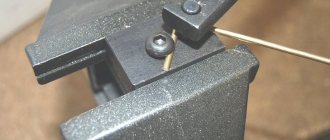
To determine the size of the wiring, a special device is used - a template, which you can make yourself from a piece of timber. A photo of such a device is shown below.
Number 1 shows the template, 2 is the tooth set value, and 3 is the hacksaw blade.
When you know the amount by which you need to set the teeth, you can get down to business. To implement the action, special devices are used. It is not necessary to use these devices, as a regular screwdriver with a wide blade will do. The disadvantage of a special device for setting the teeth of a hacksaw is that the price of such a device in the form of pliers is quite high.
Instead of special pliers, you can use adjustable plates. This tool is designed with manual adjustment and stop. The straightening process begins with the fact that the blade needs to be fixed in the jaws of the vice, and then get down to business. First you need to go along one side, and then repeat the procedure on the other. Moreover, you need to bend the teeth not at the cutter itself (the base or sharp part), but from the middle.
This is interesting!
As soon as the teeth are straightened to the same distance, you will also need to carry out the procedure for leveling the height of the cutting parts. To identify which teeth have a greater height in relation to others, you should press the blade with the cutting part to a sheet of paper. An imprint will be displayed on a piece of paper, from which it is not difficult to identify which teeth need to be shortened. To shorten them, you can use a flat file.
How to cut plywood at home
Determining the optimal device for cutting wood panels is not the most difficult task; standard equipment can be used for the process.
Jigsaw
This device is the optimal solution when it is necessary to cut plywood into parts. When choosing such a tool, you need to consider some nuances:
- It is recommended to abandon cheap models, since they do not achieve the desired result and significantly slow down the cutting process.
- A power switch is required. This allows you to adjust the jigsaw to slabs of different densities.
- The ability to adjust the stop plate ensures leveling for an accurate and straight cut. If the device does not have this function, then the sole should not be curved.
The main factor determining the quality of the cut with a jigsaw is considered to be the pitch and size of the tooth, and only then come the local settings of the tool itself, such as turning off the pendulum stroke and adjusting the frequency
The correct choice of file is carried out taking into account the following conditions:
- Preference is given to branded blades designed specifically for sawing plywood. They provide the highest quality results.
- The nozzle may have different tooth directions. Depending on the position of the cutting part, one of the sides of the slab will be completely free of chips.
- An alternative option allows you to use a metal blade. But this solution has disadvantages: the work is carried out very slowly, and small teeth become clogged.
It is with the help of an electric jigsaw that you can quickly and efficiently cut plywood at home. The tool makes it easy to do the process yourself.
Attention! The device is suitable for complex shaped cuts. Difficulties arise when processing thick sheets: the nozzle is quite thin, so it collapses, which requires additional preparation of the fragment.
The procedure for performing preparatory work
To cut a log lengthwise , you need to perform the following sequence of actions:
- Take two straight boards and attach one to the other at right angles. The result is a strong guide line.
- To support the manufactured ruler, you need to make stops from boards.
- Moving the trunks must be done using a tilter.
- The log should be placed on a comfortable base.
- You need to secure the frame to the chainsaw bar using nuts.
- The supports of the leading ruler must be attached to the ends of the log, checking the horizontal position with a level.
- Self-tapping screws must be used to secure all brackets and structural elements. Nails are not suitable for these purposes, since they are difficult to remove in the future without causing damage to the structural parts.
- The leading ruler needs to be attached to the supports using brackets and its height adjusted taking into account that the cut will not go along it, but approximately one centimeter higher.
- The log needs to be turned and the second board secured so that it rests on the ground and supports the log .
How to cut plywood with a hacksaw
Installation of laminated veneer sheets involves varying degrees of processing. The greatest difficulties arise when cutting is necessary; cutting plywood is more labor-intensive due to the layering of the material. To achieve a high-quality result, you need to choose the right device, which will allow you to avoid problems and obtain parts without chips.
Hand saw
When cutting plywood with a hand saw, physical effort is required due to the significant density of the material. This tool is used when it is necessary to cut a sheet of plywood into identical fragments.
A hand jigsaw is considered the best tool and allows you to decide in advance how to cut plywood without chipping, eliminating the need to purchase electric tools. It can be used to produce a small number of elements of complex shapes. Having certain skills in working with a jigsaw, you can make a neat cut, however, due to high labor costs and low productivity, this method cannot be called optimal.
If you don’t have electric tools or a simple jigsaw at hand, you should resort to using a simple hand saw. To make cutting a sheet convenient and to avoid chipping, the tool blade must have a large number of small and well-sharpened teeth. The angle of the saw to the plywood sheet should be sharp. It is recommended to avoid jerking and make even movements with strong pressure.
Tip: The cut of a regular saw is rough, so it is recommended to sand the end parts after finishing the sawing.
Sharpening a hacksaw
- vice;
- hammer;
- calipers;
- pliers;
- emery block;
- sandpaper.
You should also have the following types of files in your arsenal:
- flat and diamond-shaped with a medium-sized notch;
- triangular file;
- triangular with velvet notch;
- needle files with notches of different calibers.
For sharpening, a special device is used that allows you to fix the blade at angles of 45 and 90 degrees. If you need to sharpen a cross saw, proceed as follows:
- the canvas is fixed at an angle of 45 degrees;
- sharpening is carried out with a triangular file with an apex angle of 60 degrees;
- the file is directed onto the hacksaw tooth at an angle of 60 to 75 degrees;
- first, with several movements of the file away from you, the left edges of the odd teeth are processed;
- After this, the hacksaw is turned over and the left edges of the even teeth are processed.
When sharpening a longitudinal hacksaw, proceed as follows:
- the canvas is fixed vertically;
- for sharpening, a rhombic file with a fine notch is used (needles can be used);
- during sharpening, the file is directed strictly parallel to the table;
- otherwise the process is similar to the previous one.
Burrs that appear on the edges of the teeth must be removed using an emery block or a file with a velvet cut.
The process of sharpening a saw for the first time is quite difficult, so it is better to carry it out in complete silence and with maximum concentration. It’s worth doing this a few times, and then things will become habitual and go “like clockwork.”
A saw is often used to process wooden blanks and change length and shape. This tool is represented by a combination of a working part and a handle. In this case, the working part is represented by a metal plate with cutting elements, which are located in a certain sequence relative to each other. Only with proper and timely maintenance can the possibility of product wear be eliminated. An example is the setting of the teeth, which is performed from time to time to ensure smooth movement of the tool along the resulting cut.
The advantage of sawing logs with a chainsaw
Cutting into boards can be done using tools such as an electric chainsaw and additional accessories designed to simplify the work. When choosing certain products, you need to focus on the amount of work expected. Stationary sawmills are expensive and are purchased only if you plan to organize a business to create boards.
The most accessible tool for the job is a chainsaw. Such devices have several advantages over electric ones:
- the chainsaw can be used anywhere, regardless of the availability of an electrical outlet;
- the tool is suitable for working in conditions of high humidity;
- professional chainsaws are significantly more powerful than electric ones;
- You can use the chainsaw continuously for an hour.
To cut logs into boards, a special frame is used together with a chainsaw, which is attached to the device and allows you to create boards of the same thickness. A device is also needed to secure the log in one position. In addition, you will also need a guide.
READ Miter saw Practyl 1400w 210x30 mm
Since household gasoline saws are not designed for heavy loads, it is worth using professional tools for sawing logs. When choosing, you should pay attention to devices with a power of more than 7 horsepower. Before work, the fixed frame is adjusted in accordance with the selected width of the boards. To create a frame, you can use legs from a school desk or metal corners.
Hacksaw - simplicity and safety
A hacksaw is a simple tool that is quite suitable for the job. And although the cutting speed is low and considerable physical effort is required, such a saw is the most acceptable option for home use.
to cut wood correctly The main condition for a high-quality cut of the material is to make the cut correctly. To simplify the task, you can use a regular flat block, which is used as a guide.
The question often arises of how smoothly with a hacksaw at an angle. For this purpose, a special carpentry device is used - a miter box. Moreover, it will help not only to make a cut at the desired angle, but will also allow any beginner smoothly .
You can also saw off the timber with a hacksaw. The only problem when working with such a workpiece is that you have to put in a lot of effort.
The last option is to use an angle grinder with a wheel with teeth installed for the work. But since the “grinder” is not intended for cutting wood, this method can only be used as a last resort: attempts to cut a board can result in serious consequences. It’s better to use a hacksaw - it’s labor-intensive, but safe.
All my life will now take place in my VKontakte group, https://vk.com/club37090442 here I only post videos, without discussions or comments.
Serge_msv:
Well damn…
Mila Solovyova:
exciting film. Myocardial infarction!!)))) (according to TO) And so - super!! Thank you!
How to determine when a hacksaw needs sharpening?
People with extensive experience simply determine this moment by the sound made by the equipment during operation, also by the change in the color of the teeth. Newcomers need to pay attention to the following signs:
- working with a hacksaw becomes difficult and requires enormous physical effort;
- it becomes very difficult to make a perpendicular cut of wood;
- it becomes difficult to hold the blade along the mowing line during operation, it begins to deviate in different directions;
- The hacksaw blade often jams.
Wiring
Before restoring the sharpness of the saw, it is necessary to adjust the teeth, in other words, move them apart. Setting is the installation of cutting teeth at a certain angle relative to the blade and each other. If you look at the set saw, you can see that they, alternating, deviate to the right and to the left from the blade itself. This configuration gives the hacksaw freedom in the deepest cuts. It doesn’t get stuck because it doesn’t touch the walls with its entire plane.
To set the correct angle for each tooth “by eye”, you need a lot of experience, which not every carpenter has. It comes after many 10s of sharpened saws. For the least experienced carpenters, there is a tool called a setting tool. A simpler version is a flat iron plate with a slot. A hacksaw is inserted into this gap with the smallest gap, into the tension.
The wiring process looks like this:
- Secure the hacksaw in a vice like this. It is necessary to ensure that the teeth protrude 2 cm above the jaws.
- The teeth are clamped in the groove and then bent in the middle.
- First you need to bend all the even teeth in one direction, then bend the odd ones in the opposite direction.
- At the end, you can spread the jaws of the vice according to the calculated width of the spread and try to pass the saw between them.
- An excessively bent tooth will hit the vice. Use pliers to bend it a little further.
How to cut a board lengthwise
For carpenters, boards and beams are the most common blanks, from which crafts and wood products are subsequently produced. And the first thing the material undergoes is sawing into pieces of the required length. At the same time, you should know how to evenly , because performing this operation incorrectly can ruin the workpiece or significantly affect the appearance, and not for the better.
At large enterprises, the problem of how to saw off a beam or board evenly Any serious production facility has high-precision equipment that performs this type of work. At home you have to make do with what you have on hand. At the same time, you still need to be able to use the tool or equipment correctly in order to saw off the board correctly, and the cut turns out without flaws.
Note that many enterprises that sell boards and timber provide cutting services. And for this they use the same specialized equipment, so the purchased material will be cut with high quality. But it is not always possible to use such a service, and it often happens that only one piece needs to be cut.
A chainsaw is a multifunctional tool!
In order to perform this type of work with a chainsaw, you don’t need to take much action at all! But this is not for beginners. For those who are starting to do this type of work! And you have to do this practically from scratch; it would be best to purchase a machine. You can read about how to make it in my article here.
You will need it in order to fix the logs, you also need a cutting guide and attachment frames - all this is used for the same purpose! No, you, of course, can try to make all these products yourself, with your own hands, but remember that the equipment will be under heavy loads, so at the most important moment some trouble may happen with homemade devices that could threaten your life and health.
First of all, it will be necessary to make guides: fold two neat boards and fasten them in the shape of a half-Tee. Then we use various pieces to create stops for the half-Tee guide! It seems that everything is clear and simple so far!
We lay the log on a flat platform, which we will prepare in advance, then we roll the object from place to place; this can be done quickly and conveniently using a tilter. We secure the frame to the tire with nuts very tightly, so that it does not fly off even in the event of an earthquake. We fasten the supports, they are needed in order to press the ruler to the ends of the logs!
The ruler itself is needed for the worker to see the width of the board. We will secure all the fasteners with self-tapping screws, so that nothing will fly off on you at the most crucial moment! Then the most interesting part of the work begins, because all the preparations, for the most part, have already been completed.
All that remains is to check the cutting line, it should be 10 millimeters above the ruler! So, holding our breath, we start the saw and make the first cut. Then you will have to free the log from any pieces of iron - stops and rearrange the structure to the next cutting line, but this must be done as carefully and precisely as possible, so that the first cut is perpendicular to the first cut!
Then we turn the log again and fix it with boards to the stops that are on the ground! We start the unit and saw...saw. we saw, enjoying our work.
Yes, cutting at home is hard work, but you can do everything efficiently and on your own! Just remember, for this task you need more than one such device, it is better to make a right angle on the trunk, and then you will be able to prepare boards of any width.
Circular saw – high performance and ease of use
A circular saw is the best option for performing the work. It has excellent productivity and allows you to cut a considerable number of workpieces in a relatively short time, and with high quality. In addition, such a saw allows you to make a longitudinal cut of the material, but you need to know how to cut the board straight along .
One of the most important criteria when choosing a circular saw is the maximum depth of cut. There are devices on the market that cut materials with a thickness of 30 to 130 mm. That is, you can choose a machine both for cutting only thin boards and for sawing bars.
Recipe. how to cut straight with a simple hacksaw
It is also worth paying attention to the cutting tool itself. Discs with a large number of teeth will provide a neat, high-quality cut, while the cutting speed will be low.
On a band sawmill - the fastest!
There are a huge number of techniques that can help you cut logs. To study them, I recommend reading my books on woodworking.
Now I’ll tell you the technique for doing it on a band sawmill. First you need to form a carriage.
To do this, you need to make cuts on two sides, or on four, but this is in special cases! The next stage is the creation of a map, which is needed so that the process of cutting the workpiece can be carefully prepared; it is at this stage that we indicate the dimensions of the board.
The determining parameter in this work is the direction of processing the log; it is especially important to pay attention to the movement of the edge that cuts the tree relative to the annual rings! It is by this criterion that various lumber with unique properties is formed. The aesthetic qualities and price of the board depend on the work performed at this stage.
There are several types of cuts that you need to know about: radial, cross, rustic and tangential.
Radial is the highest quality, because in the end you get an almost perfect board: uniform in color and texture! It does not deform under any conditions, it is clear that the price of such a product is quite high!
The tangential method is a little worse, because the boards are not so strong, but the pattern remains good, sometimes you get fancy patterns! Radical is also not bad, but it differs significantly from radial and tangential in the quality and beauty of the design! Rustic is the most unreliable, because boards of this type are heterogeneous and fragile.
It would be more expedient to talk about the simplest cutting method. It's called circular. They remove the first slab, then turn the log one hundred and eighty degrees, place it on the edge, then you have to turn it many, many times! And so you will definitely succeed!
Cutting boards at home
You can cut a board at home using the following tools and equipment:
- a circular saw;
- hand saw ;
- angle grinder (“grinder”).
Each of these options has its own specifics, which are important to consider before starting work, that is, you need to know how to cut a beam or board with one or another tool so that the quality of the cut is acceptable.
Lightweight nozzle
Such devices are often used, but they should only be used when creating boards for fences or sheds. This is due to the fact that the attachment is secured to the tire only on one side.
Attachment for longitudinal sawing
When using this attachment, sawing occurs in a horizontal direction. It is fixed to the rail using special clamps and allows you to create boards of equal thickness. After the work is completed, the boards are dried and can then be used in construction.
Sources:
https://ingener-pto.ru/2019/12/12/kak-pilit-faneru-nozhovkoj/ https://stroyvoLGa.ru/%D0%BA%D0%B0%D0%BA-%D1%80% D0%B0%D1%81%D0%BF%D0%B8%D0%BB%D0%B8%D1%82%D1%8C-%D0%B4%D0%BE%D1%81%D0%BA%D1 %83-%D0%B2%D0%B4%D0%BE%D0%BB%D1%8C/
What will you encounter when cutting logs?
Centuries and millennia pass, new materials and technologies appear, but wood, stone and metal have been and remain the main materials used by humanity for its needs. Products made from them surround us everywhere, wherever we are, wherever we go.
Particularly noteworthy is the wood, which creates an atmosphere of coziness and comfort everywhere. Metal and stone are colder and more laconic, but wood is even warm to the touch. That is why the first two materials are used more often in the form of load-bearing structures, and wood is used in interior decoration, however, after being brought into the appropriate form.
Before you cut a log , you need to inspect it. If there are no significant flaws on the outside of the tree, then processing can be done quickly and with virtually no loss of wood.
Logs must be sawed in such a way that the resulting materials have equal density. And to do this, you need to remember that the wood on the north side of the trunk has a higher density than on the south. Cutting a log lengthwise begins with removing the slab; this part is removed from both sides of the tree to create a beam that will not roll.
We place the resulting timber on one cut side, and the other looks up, and the cutting will begin from there. Now you can cut the remaining log into appropriate lumber or boards of equal thickness. The result is a set of unedged boards, in which the raw edge (sometimes even with tree bark) must then be cut with a handsaw. Now we can consider the work completed.
READ How to Properly Sharpen Band Saws