The Homius editors receive not only articles from our readers about various repair methods. Some reviews are striking in their ease of performing unusual work, which at first glance is impossible to do at home. And today we present to your attention one of these articles, which was sent to the “Stories” section by Sergei Borisovich Kasatonov from the city of Yakutsk. In it, he talks about the simplest method of transferring a design onto a knife blade and etching metal without any chemicals.
Recently I became interested in such an activity as etching various designs on metal. After all, even a kitchen knife can be made exclusive if you put in just a little effort. However, if etching of a highly artistic drawing is required, drawing experience and a steady hand will not hurt. The initial application of it will not be a problem, but preparation for engraving by electrolysis will be quite problematic for some people. But, in order not to frighten in advance those who want to understand the whole technology, I will begin my report on the work done.
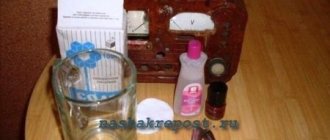
What you need to apply a design to metal
Everything is quite simple here. In addition to the knife itself, it is enough to have a regular laser printer and some other tools and materials in the apartment, namely:
- a small amount of alcohol;
- ice water in a basin;
- iron.
Naturally, the blade of a kitchen knife should be thoroughly washed and dried. The best way to cool water is to use ice.
Everything you need to apply a design to the blade
A little about “Etching”
Hi all!
Well, as promised, I’m posting a detailed tutorial.
I already finished the second blade, but I didn’t have time to sit down and write a lot of text and insert a photo.
In general, I'll start in order.
Since I etched the blades almost simultaneously, I filmed the process along the way.
Don’t blame me too much for the photo, it took almost a week to work and I took the photo at different times and in different places
I even forgot to take a photo of some things. But I think everything will be clear anyway.
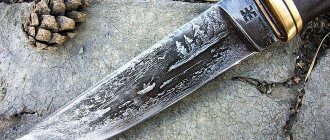
The steel on both blades is CH1, I took it because of the interesting damask pattern, which together with the picture looks very good.
There are 5 etching stages on the blade with Falcons.
On the blade with Boars 4.
All the operations I have performed are how I do them and I do not claim to be the ultimate truth. Just my way.
1. Initially, on a well-polished blade, up to 1000g, I select a pattern. Sometimes I put it on paper in advance to make it easier to arrange the design on the blade later. I don’t use any kind of transfers, but apply the drawing directly with a brush. It is worth paying attention here, since choosing and selecting a good brush is not an easy task. I use a synthetic brush, but I went through a bunch of brushes so that I can more or less apply an accurate small design. You can also correct it with a needle after drying, but it is best to try to apply an accurate design from the beginning.
The first layer of etching is the layer that will be the deepest and darkest in the overall relationship of the entire drawing.
It is not necessary that this will be the very background of the entire drawing; here it is worth thinking through in advance all the future shades and how it will look in the end.
After the varnish has dried well, I correct some points with a needle.
I dissolve ferric chloride at the rate of one can per liter of water. The water is about 40 degrees. I add a new, fresh solution to each blade.
The first etching takes about 45-50 minutes. Then, using a soft brush, I wash off the varnish with turpentine. I rinse it in water and go over it with 1000 gr sandpaper.
This photo shows the blade with Falcons after the first stage of etching, but the blade with Boars after the second... I forgot to take a photo after applying the varnish.
2. Stage two.
All the same. I apply varnish to those places where the design requires.
Also, after the varnish has dried, I correct it with a needle in the HJ. Subsequent times the cold liquid has already cooled down and I do not heat it again.
The second time I bait takes about 40 minutes.
See the result with falcons and wild boars above.
3. Stage three.
In principle, there is nothing special to comment on here, we just look carefully at the places that are painted over and the result.
Etching for the same 40 minutes. Result.
4.Fourth stage.
Let's look at the photo carefully.
Etching for 35 minutes.
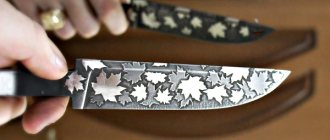
In principle, that's all. Since for the wild boars this was the last stage, but the falcons left to film the fifth stage.
But if you look carefully at the final result, you will see what else was added there...
You can even conduct an attentiveness survey here! Who will notice and give the correct answer!
What else would I like to add? After each wash off of the varnish, I always used 1000 gr sandpaper (already clogged). So that less of the results of the chemical process remain and the varnish adheres better to the surface. Well, plus you shade the right places.
And one more small point. Some stages of etching, for me, come out during the process. More precisely, I notice that something is missing and here I have to improvise on the fly, as happened with the blade with falcons.
With that, thank you all for your attention!
If you have any questions, ask.
Well, here’s the final view of both blades again.
We begin to apply a pattern to the steel blade of a kitchen knife
First you need to find a drawing on the Internet that can be placed on the blade. In any graphic editor, it should be reduced to such a size that it fits on the blade and printed. Use scissors to cut out the image.
Next, a small amount of alcohol is poured into the saucer, sufficient for the printed image to be completely immersed in it. The drawing should lie in the alcohol until the paper is saturated. This will be noticeable in the image that appears on the back of the sheet. Don’t be afraid to keep it in alcohol - nothing bad will happen to the drawing, even if it sits in a saucer for a day, it won’t flow or blur.
The drawing must be thoroughly soaked in alcohol before transferring it to the blade.
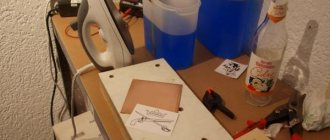
Using an iron: this requires caution
The part of the blade to which you plan to transfer the image must be poured generously with alcohol. After this, carefully take the piece of paper with the image and place it on the knife blade with the printed pattern facing down. At this time, you can still correct it without fear of smearing it. What you should take into account here is that once you start working with the heating device, you won’t be able to correct anything.
We place the drawing in the right place on the blade, correct its position
When the pattern is laid out as needed, we begin to warm it up with an iron turned on at maximum temperature. When performing this work, you should be extremely careful not to move the sheet. The fact is that even slightly heated paper, if you move it, will smear the image, ruining it.
Warming up is carried out for 3-4 minutes until the sheet is completely dry. In this case, it is better to overdo it, warming up the blade longer than to stop working with the iron when the paper is still half-raw.
Heat the drawing with an iron until the alcohol dries completely
Cooling the blade and removing unnecessary paper
When the alcohol has completely evaporated and the blade has warmed up, it is necessary to cool it as quickly as possible. It was for this purpose that I had a basin of water, which was cooled with ice. The knife blade is lowered into ice water for 20-30 seconds. It is necessary to monitor the paper, waiting until it is completely saturated, now with ordinary water. After this has happened, we begin to slowly move our finger along it. The paper rolls and peels off.
In this case, there is no need to rush - there is a high probability that the blade has not cooled completely and the design will be damaged.
The blade is cooled in ice water, after which the paper is carefully removed from it
I am sharing my personal experience in this seemingly simple matter. Because As an amateur radio enthusiast, I often make printed circuit boards using the LUT (Laser Ironing Technology) technique. Recently I was asked a question by a fellow biker: is it possible to pickle steel to make different fuses and how exactly to do it. On a whim, I was convinced that a solution of ferric chloride in water eats up not only the copper on the PCB, but also almost any iron. What I was able to verify when it spilled on my balcony galvanized sheet and the very next day I observed decent holes there... In short, I thought, purkua wouldn’t even work... So we need: Ferric chloride 200g (70 rubles) Water 0.5 liters ( from the tap) LASER printer black and white. A sheet of paper with text and a minimum number of pictures from the magazine “Popular Mechanics” or “Iron”. For some reason, the printer chews paper from “Liza” and other magazines... Iron. A computer with Word or any graphic editor who likes it. I did it in Word, where it’s easiest to stretch the drawing as you like. Sample drawing - taken from tattoo sites. Technology. Choose a drawing and stretch it as you like. We take a knife or piece of iron and clean it with sandpaper. We print the drawing onto the area with the text of the prepared sheet. Place it on the knife and iron it with a hot iron until it sticks and the toner slightly bleeds through the paper. If necessary, do the same on the second side of the knife. We put the knife under water (in a basin or ladle) for 5-10 minutes. We begin to rub our finger across the paper. The paper rolls off and the toner remains on the metal. If the toner has peeled off, then we sand it again and make new drawings and iron it harder and longer. After this, we protect the rest of the surface of the knife where there will be no etching, either by painting it with paint, NC varnish, or bitumen varnish. In my immense laziness, I completely wrapped it in tape... So that’s it. IMPORTANT. If you want the etching to be of high quality, you will have to go over the drawing from above or with a marker and paint. Those. “strengthen” it with something, because the toner sticks with small holes and there will be marks. The same applies to minor flaws when translating a drawing. We put the object with the pattern into a solution of 200 g of ferric chloride in 500 ml of water. (Do not dissolve everything at once, but in parts - it heats up). Periodically we take it out and pass it under running water with a paint brush. After a couple of hours we get noticeable etching of 0.3-0.5 mm. Then we rub everything down with sandpaper and polish it or don’t polish it... Depending on laziness Sample of the result from below. As I said, it turned out to be undercuts, but it gave the ornament, so to speak... an old-fashioned look... Of course it turned out so-so, but for the first time it’s not bad PS/ Any etching and the inscription makes the knife less durable and it usually breaks along the etching line. Good luck to everyone. 73!
What will happen in the end: how high quality will the drawing be?
If everything was done correctly, the drawing will be no different from the one on paper. At the same time, the quality of the image does not depend on its complexity and the number of small details. If etching is not important, then you can leave the drawing as it turned out. Of course, such an image is not very resistant to aggressive cleaning agents and high temperatures, but in the absence of such factors it can last up to six months. I decided to leave this image of a tiger as a simple drawing.
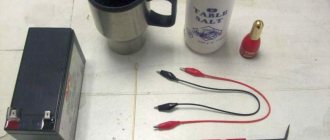
What you need to etch a design on metal
To etch any image on metal you will need:
- water with table salt dissolved in it (3-4 tablespoons per 0.5 l) in a glass jar;
- power supply (charger) from any phone or other gadget;
- 2 pieces of wire;
- nail polish, preferably colorless;
- a regular bolt or metal plate that will fit in a jar.
It should be noted that the speed of electrolysis, and therefore the appearance of the pattern on the metal, will depend on the output current of the charger. The higher the adapter current, the less time it will take to operate.
Equipment
You need to take a power supply or transformer that can output from 4 to 7 V. In addition, you will need a dielectric bath; it must contain the necessary part and a second metal object that is connected to the anode.
To etch a pattern on metal, it is necessary to use a solution of ferrous sulfate as an electrolyte. If the design is needed on a copper or brass surface, then use copper sulfate. You can also use ferric chloride. The main thing is that the water is distilled.
Preparing metal for applying a relief pattern
First, the entire blade must be varnished. It doesn’t have to be nail polish; a composition for coating wood is quite suitable. But here it is worth remembering that feminine chemicals dry out almost instantly. Considering that the metal will need to be coated in 2 layers, this is a serious reason to use a quick-drying composition.
The design, if it is not too complex, can be applied after the varnish has dried. But, if it is necessary to etch an image similar to what I applied to the previous knife, it is better to use the transfer method using an iron and alcohol, and then coat the steel with colorless varnish.
For etching on one of the kitchen knives, I chose not too complex Arabic script. It was applied after the varnish had dried, after which the coating along the lines was removed. In other words, I just scratched it with a needle. I note that the edges of the strips need to be carefully trimmed - during etching, electrolysis will eat away unprotected areas, which means that all irregularities will remain on the metal without the possibility of subsequent correction.
The Arabic script has been applied, the varnish coating has been scratched across it with a needle, you can start etching
Cleaning the part
To begin with, the part where the image is planned is cleaned with fine sandpaper and degreased. When the surface is ready, you need to seal the place where the design will be applied with adhesive tape or something similar. After this, the entire remaining surface, where chemical etching should not affect the metal, is painted over. It can be of any color, as long as it is resistant to White Spirit.
Once the paint is dry, you can remove the adhesive tape. Beneath it is clean metal, ready to create a design on it. Now you need to apply an image onto this “mini-canvas”. It is made using resin, which is dissolved in White Spirit until it becomes liquid, like paint. Use it to paint the desired image using a brush. What’s good about this kind of improvised paint is that if something doesn’t work out in the drawing, you can remove it by moistening a cloth or cotton swab in White Spirit. If there are very small details in the drawing that did not turn out well with a brush, they can be corrected with a needle, scraping off the excess after drying.
In this way, you can etch a knife, keys, in general, any metal object. Now that the drawing is completely ready, you can begin the etching itself.
Power connection: electrolysis etching principle
Power is supplied to the elements as follows. A wire with a bolt at the end is lowered into salt water and connected to the negative output of the charger. A positive charge is applied to the blade itself. The principle of electrolysis is as follows. The varnish coating does not transmit electricity, but the area of the metal where it is absent reacts with salt water under the influence of voltage. As a result, the metal is corroded exactly where there is no varnish.
The bolt is wound to the wire and lowered into the water
Many will be interested to know that in this way you can even apply a pattern with copper. To do this, a similar preparation of the blade is performed. The difference is that the polarity of the connection will be reversed - plus on the bolt, and minus on the knife. Instead of salt, you need to dissolve copper sulfate in water. In a similar way, you can either apply an image or completely cover the part with copper.
Everything is ready, you can apply voltage by plugging in the adapter
Etching: some nuances to consider
When power is applied to the wires, it will become clearly visible how electrolysis occurs. Gas bubbles will begin to emerge from areas of the blade unprotected by varnish. It is this process that “gnaws out” metal particles. It is necessary to carefully monitor the temperature of the charger - it can rise sharply. To avoid failure of the adapter, do not keep it turned on for more than 15-20 seconds, giving a break of at least 10 minutes. This way, the work will be extended, but at the same time you will maintain the functionality of the charger. In total, etching a small design takes about a minute of constant work. It turns out that in 3 passes the image will be ready.
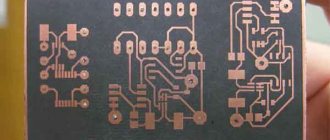
The photo example shows how the inscription appears on the metal under the influence of the electrolysis reaction. After the work is completed, all that remains is to clean the unnecessary varnish coating and polish the blade.
The process has begun - it can be observed with the naked eye
During operation, a dirty-brown oxide layer will form on the surface of the jar. This should not scare you; the process involves such deposits.
Metal etching at home
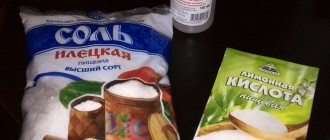
I decided to share with you a fairly simple method of etching metal at home using a blade as an example. So, we will need:
- in fact, the piece of iron itself (in my case, a forged blade for a knife).
- Marker or pencil.
- nail polish (you can rummage through your wife’s purse or buy the cheapest one at the supermarket).
- solvent.
- copper sulfate (100-200 grams).
- sandpaper (80, 400, 1200 grid).
First, take a blade, go over it thoroughly with sandpaper and solvent.
After this, we sketch a sketch of the proposed design on it with a marker.
Use nail polish to carefully paint over your sketch. If the varnish protrudes beyond the sketch, it’s okay, all this can be easily etched in further operations.
Please note: The varnish forms a film that protects the metal from etching.
The surface under the varnish will not be etched.
In addition to the design itself, it is worth protecting the ends of the product, and in my case, also the blade’s surface.
Let the varnish dry for a while, then we begin to adjust the drawing and correct the jambs. For adjustments, you can use an awl or a regular needle. We remove unnecessary mistakes and correct the lines so that they look smoother.
Now the chemistry of the process begins: For etching we need a solution of copper sulfate and salt.
I used 100g per liter of water. salt and the same amount of vitriol.
It is better to take hot water for the solution (freshly boiled) to reduce the reaction time.
We lower our product into the solution and wait. Estimated etching time is 25-40 minutes. It all depends on what etching depth suits you. To speed up the reaction, you can increase the concentration of vitriol.
During the process, a red coating forms on the blade, which interferes with the further course of the etching reaction, so periodically it is necessary to remove the blade and rinse it under a warm stream of water. No brushes or metal sponges, otherwise you will strip the varnish from the product. You can check whether we have etched deep enough by touch. The solution itself is harmless, as is the plaque, so feel free to check it. (The only danger is that you might get your hands dirty)
Here, it is worth noting one more point: make sure that your piece of iron is not etched too deeply, otherwise the solution will begin to eat not only the unprotected surface, but also bite into the side under the varnish, unless you need the effect of artificial aging.
As soon as we have decided that the metal has been etched deeply enough, we take the craft out of the solution, rinse it well under pressure of water, wipe it with a solvent, sand it and polish it with sandpaper in increasing order, starting from 80 grit, ending with 1200 grit. If you have a burr on hand, it would be a good idea to use it to sand down the unevenness of the pattern.
At the end, you can walk with felt if you think it’s necessary.
All that remains is to make the handle and polish the blade to a mirror. Unfortunately, I don’t have an image of the finished blade with a scabbard, because... These photographs were taken a long time ago and for other purposes, but I decided to use them for the master class only now.
Thank you for your attention. I hope it was useful to someone.
The final stage of the process, cleaning and polishing the blade
Upon completion of the process, the power is turned off and the wire is unhooked from the knife. To remove the varnish coating, you can use a stationery knife or regular acetone, which will easily do this job. Polishing is carried out on a sharpening machine with a felt wheel. Of course, this work can be done manually, but in this case it will take much more time.
As for the unevenness of the drawing strokes, they do not always interfere. For example, when applying Arabic script, as in my case, they even give a certain charm to the inscription, as if it was made several centuries ago. But if the image requires precision, like the tiger previously transferred to a knife, you should scratch each line extremely carefully. Of course, this work cannot be called simple; attention to detail and perseverance are required, but the owner will be sure that the design will not be erased from the blade, regardless of the aggressiveness of cleaning agents or temperature.
Final part
Do-it-yourself engraving like this will add an unusual touch to kitchen knives. They will turn from ordinary consumer goods into exclusive products that will surprise your friends and acquaintances. And given the fact that not a penny will be spent on performing such work, the owner is guaranteed satisfaction from the drawings applied by electrolysis.
I would like to hope that readers will adopt the methods of working with metal that I have described. If any of the above remains unclear, I will be happy to explain. You just need to write about it in the comments to the article. There you can also express your opinion about what you read. I will be glad to hear anyone - I treat criticism quite adequately, of course, if it is justified. I will try to respond to every review as quickly as possible.
The Homius editors invite home craftsmen and craftsmen to become co-authors of the “Stories” section. Useful first-person stories will be published on the pages of our online magazine.
The process of metal etching has been known to people since the 16th century. The most famous masters lived in Italy and Germany. Today, anyone in the world can do knife etching at home. The availability of reagents and many methods allows you to do this without special experience. But it’s definitely worth studying the topic of knife etching.
Electrolyte preparation
After making sure that all the necessary varnish has been removed, we proceed to preparing the working solution. During this time the protective layer will have time to dry completely. As a substance in which steel products are etched, a solution of table salt is most often used at home. To prepare it, you need to dissolve the crystals in clean water in a ratio of two tablespoons of salt per 0.5 liter of liquid.
Instead of sodium chloride, you can use another quite accessible chemical called copper sulfate. It is not difficult to purchase at any hardware or garden store.
The essence of the method
The key factor is the effect of acidic environments on the metal. Due to the interaction of the aggressive environment and the product, a chemical process called etching occurs. To apply a pattern to the blade, areas of the surface not intended for etching are covered with a protective layer.
It must be resistant to the etching substance. The depth of metal dissolution depends on the time of exposure to it. Since the 16th century, several effective methods for etching knives have been identified. They will be discussed below.
Actions during a chemical reaction
During the reaction, a plaque forms, which will become more and more numerous. It slows down the whole process, so you need to periodically wash it off with water. You should not do this using various brushes, brushes and other tools, because you can damage the paint. But it seems to hold the entire design, and it would be a shame if, while etching a knife, for example, you inadvertently damage the design on it. This is a very delicate work that requires a steady hand and patience.
Read also: Magnetic starter PME 211 connection diagram
The depth of the pattern directly depends on the time during which the metal remains in the solution. There are no exact criteria, so each master must observe the progress of the chemical reaction himself. And only after doing this several times will it be possible to say with confidence how much time is needed to develop the desired pattern to the intended depth.
Metal etching methods
Acids in the etching technique are used depending on the type of metal. A certain alloy requires its own aggressive substances. The speed and quality of the process depends on this. There are several ways:
- a process involving the use of an electrolyte with current passing through it. They call it electrochemical. Its features are: precise drawing, saving time and working fluid solution. No harmful fumes;
- a process that does not require complex equipment and is incredibly simple - chemical. But the use of liquid acidic solutions is characterized by emissions of fumes harmful to human health into the air;
- A production method that requires expensive equipment is the ion plasma method. Used in dry environments in the field of microelectronics.
The first two methods are widely used for etching knives at home. The components are commercially available and do not require complex manipulations.
Electrochemical etching of metal
We need to protect areas that should not be etched. To do this, you need to apply a special mastic to these surface areas. It is made from three parts of wax and two parts of rosin, they are melted in a tin can, stirring. After everything turns into a homogeneous mass, it is allowed to cool and divided into fragments. Each of them is placed in gauze so that later, when pressed, as much mastic as necessary can seep through it. After this, the workpiece that we will etch heats up. Now we take the created mixture, which was placed in gauze, and rub the surface with an even layer.
After cooling, the mastic becomes hard. The top is coated with light water-soluble paint. This can be watercolor or gouache white. After which the coating should dry. Then you can apply the design; it will stick well to the paint. It can be depicted using a pencil or translated using carbon paper. Then this outline needs to be scratched with a needle all the way to the metal.
Now the etching of the metal by electrolysis begins, we connect one rod to the anode - plus, the other to the cathode - minus. We connect the part on which the image will be applied to the first, and any steel plate to the second. After this, the process of etching the metal begins where the image was scratched.
If you need to create a multi-level drawing, everything is done in the same way as described above. Only the contours are checked each time, and when the smallest of them have been etched to the required depth, the part is removed and painted over with heated mastic using a brush. When it hardens, everything is repeated again until the next level of the drawing. In this process, an image is gradually created.
In this way, metal is etched at home, after which the surface is washed with turpentine and then polished, giving the product a finished look.
Preparing metal for drawing
It is necessary to prepare the blade for drawing and for the etching process itself. If the knife is collapsible, be sure to disassemble it. Freeing the blade will make it easier to work. In a one-piece product, the handle must be insulated.
It doesn’t matter what material it is made of, an acidic environment will harm anyone. Electrical tape as an insulator will work perfectly. The surface of the blade to be treated must be thoroughly wiped with acetone. The intended design will fit well on a degreased surface. We try not to touch the workpiece with our fingers.
Drawing methods
A pattern made from various materials serves as a protective layer; the metal not covered with it will be etched. There is a similarity to a film negative when a photograph is developed. There are plenty of options for protection: electrical tape, stickers, nail polish, vinyl, metal marker and many other polymers.
Nail polish
A popular material among amateurs. But professionals don’t disdain them either. Good resistance to aggressive environments makes it a leader in use. After applying it to the product and letting it dry, it is possible to correct the design with sharp cutting objects. Achieving a clear pattern and smooth lines.
Primer or bitumen varnish
The product is completely covered, then the contours of the design are transferred over the layer with a marker or brush. Having sharpened a thin wire, you need to scratch the sketch down to the metal. The primer is used GF 021 or XB 062. When scratching a sketch, there is a risk of chipping off the dried primer or bitumen varnish. This is a disadvantage of this method.
Glossy paper
It is a good method that is gaining momentum among masters and has many positive aspects. The required sketch is printed in real size on glossy paper using a laser printer. Applying the side with the pattern to the surface of the blade, you need to iron the paper.
After the product has cooled, it is placed in water. Having brought the paper to a soft state, it peels off, and the toner from the printer remains on the product. You just need to treat the surface around the design with nail polish. The method allows you to transfer the smallest details of the image.
The principle of etching using electrolysis
For metal products, two methods are used: acid (liquid) and electrochemical. They are used to remove scale and oxide films. Compliance with the etching rules: holding time and solution concentration are the key to a successful process.
It is important to thoroughly degrease the part. A small greasy stain will render all the work of the master unusable. When working with varnishes, you must be careful; they are highly flammable. This also applies to the process itself. In any form, it is unsafe. It must be treated with caution and care.
Solutions used for pickling steel
The process for different alloys requires different etchants. Based on the atomic structure of the metal lattice, a specific solution is selected:
- alkaline solutions etch aluminum and its alloys well;
- nitric, sulfuric, hydrochloric and phosphoric acids are used in the etching of copper and its alloys. To increase the reaction rate, chromium and nitrogen are added;
- For durable titanium, a double etching method is used. Initially processed in alkaline solutions, then in high concentration acidic solutions;
- an aqueous solution of hydrogen peroxide and formic acid is ideal for nickel and tungsten;
- for other solid metal compounds, mixtures of nitric and acetic acids are used;
- A mild sulfuric acid solution works well on cast iron.
Preparing the part for etching
In order for the etching to be uniform and in the right places, the part must be cleaned of dirt and also degreased. For more convenient work, copper wire is soldered onto the part with tin; it will be convenient to hold the object by it. To clean the surface, you need to dip the object to be converted into 10% sodium hydroxide, the temperature of which is 50°C, then into a 15% sulfuric acid solution and hold it there for two minutes, then rinse it in hot water. When the procedure is completed, the surfaces of the object will be completely cleaned, and of course, you cannot touch them with your hands.
Read also: Slingshot antenna for TV
Instructions for liquid etching of a knife
The chemical method is simpler and does not require batteries. A strong aggressive environment is required. It has already been stated that the method is dangerous due to its gaseous emissions. Opening a window or getting a good hood is a must. Safety equipment:
- latex gloves;
- respirator;
- protective glasses;
- smock.
Avoid contact with mucous membranes of the body. Washing with water will not do. A chemical burn is a terrible thing. We've sorted out the equipment, now it's a matter of materials:
- insulating tape;
- nail polish, marker;
- grinding machine;
- distilled water in a container;
- Plastic container;
- solvent, acetone;
- ferric chloride supply;
- cotton swabs and disks, toothpick;
- sandpaper of various grains.
The knife must be prepared in advance. On a solid product, protect the handle with electrical tape; on a collapsible product, disassemble it and work with the blade separately.
Creating a protective layer
The pattern that needs to be transferred to the product must be outlined with a protective layer. Considering that in the coated area, the reaction will not take place, and the metal will remain light. Initially, make a sketch with a marker and then cover it with nail polish. This is the best option. The varnish can then be adjusted to ensure evenness of the lines and the pattern itself.
Don’t be shy about fantasizing; the uniqueness of the work performed also depends on the personal qualities of the master. Use varnishes of various shades; they are clearly visible on the surface of the product.
Preparation of the solution
We make sure to use personal protective equipment. When working with acid, you need to have a solution of soda on hand; it will come in handy if an aggressive substance gets on your skin. The rule of all chemists is to pour acid into water, never in the reverse order:
- The ratio of ferric chloride and water should be 50/50. This is the best option, but to speed up the reaction, other proportions can be used.
- The plastic container should not be filled entirely; be careful when placing the product there. After pouring a little distilled water, pour in the same amount of ferric chloride.
- Label the container with the words "Acid" and be careful with it. A metal container is not suitable; there is a possibility of it reacting with the solution.
Please note that the diluted liquid will serve more than once; you can actually process a dozen blades in it. Once dilution of the solution is complete, proceed to the next step.