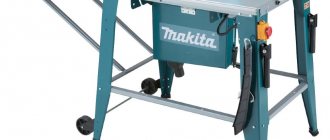
When renovating or building, making furniture, and in other situations that require processing lumber, you may need a circular saw. Craftsmen who work with wood note that a sawing table is much more convenient and safer to use compared to a hand saw. Moreover, the accuracy of performing actions is much higher. You can make such a machine with your own hands - it is often more profitable and faster. In addition, a self-made design will more accurately meet the requirements of the master.
Design Features
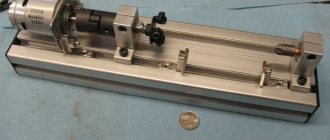
Structurally, a homemade sawing table looks quite simple. The machine consists of a supporting frame for mounting the motor, a transmission unit and a work table with a slot for the cutting disk. The design is equipped with stops for guiding the workpiece and a protective screen that prevents chips from entering and also increases work safety.
Mandatory requirements for a sawing table:
- rigid, stable design;
- smooth surface of the tabletop;
- secure disk mounting;
- fencing protecting the operator of the machine (table);
- easy access to the control device (start and stop buttons).
The equipment must be installed on a frame supported not on solid sheets, but on legs. This improves ease of use, although it makes the saw table less stable. To increase durability, the frame can be made of metal or reinforced with metal elements. Safety is ensured not only by the protective screen, but also by securing the disk from the bottom (inner) side. Additional requirements depend on the specifics of the work - auxiliary elements help to process parts more accurately, saw longer boards, as well as thick logs.
By making a saw table with your own hands, you can get a number of advantages - from reduced costs to the ability to change the design as the master needs it. If desired, you can replace some of the parts with more economical ones, or use materials left over from repairs or construction. The only disadvantage of a circular saw independently fixed to the machine is a decrease in the accuracy of workpiece positioning. But this moment still largely depends on the skill of the performer himself.
Rigid, stable construction
Smooth countertop surface
Secure disk mounting
Guard protecting the operator of the machine (table)
Classification: what are they?
There are several types of these machines, differing in design:
- Vertical;
- Horizontal;
- CNC centers.
A vertical format cutting machine uses up working space most efficiently, because... has a smaller size. This is achieved due to the fact that the workpiece for processing is installed vertically, while maintaining the ability to work with large-sized material. As part of large-scale production, CNC machines are common. Technologies of this kind make it possible to obtain high-quality, high-precision output products.
The equipment described above can be conditionally classified into 3 main price categories:
- Budget machines. This is, first of all, low power and meager capabilities. Often this is the basic equipment of the initial line of models.
- Business class machines come with more advanced features and options. This allows you to increase the convenience and level of work performed. Now, thanks to the presence of powerful drives for circular saws, it is possible to carry out batch cutting work. Increased strength and power means you don't have to worry about stress on the machine.
- Machines with top characteristics are leaders in the level of implemented technologies, especially automatic control systems. They allow their use on a large production scale. They provide the greatest possible increase in working time efficiency and a reduction in time spent per unit of processed products.
Materials
When assembling a cutting table from chipboard with your own hands, you should maintain an optimal balance between functionality, safety, time and money. This can be achieved by selecting parts and materials with the necessary parameters. It is possible to reduce costs by using old parts of other structures - furniture, frames of wooden houses and outbuildings.
Tabletop
The main requirements for a saw table are resistance to heavy loads, shocks and vibration. The tabletop must be smooth enough to move and not bend under a weight of 50 kg or more. Suitable options might be:
- Metal (steel or duralumin) 3–5 mm thick. The advantages of metal countertops are high strength, almost unlimited service life, the disadvantages are heavy weight, decent cost.
- Laminated chipboard or moisture-resistant plywood with a thickness of at least 2 cm. The cost of this option will be the most profitable, but the strength is noticeably reduced.
- Textolite 15–20 mm thick. The material is more durable than plywood, but inferior to metal. In terms of cost, textolite countertops are also between metal and plywood sheets.
Plastic, chipboard or OSB are not recommended as countertop materials. A structure made from this raw material will be unstable to vibration from the saw. It is possible to make a table entirely from natural wood, but it is too expensive.
You can reduce costs while increasing strength by using combinations of materials—for example, thick plywood covered with sheet metal.
Metal
laminated chipboard
Textolite
bed
At the base of the table for sawing boards there can be wooden beams, secured under the lid to increase rigidity. Elements with a cross-section of at least 5 x 5 cm are placed at a distance of 50–90 mm from the edge of the tabletop. For the sawing table, it is recommended to choose bars made of hard wood - beech, hornbeam, oak. The advantages of wood are low cost, easy installation using self-tapping screws. Disadvantages - less strength and service life, high probability of fire.
The upper part of the table frame for cutting chipboard and other materials is often made by hand from the same sheets that were chosen for the table top. For the legs of a wooden structure, it is recommended to use timber, securing it with metal corners. The pros and cons of wooden supports are similar to the features of a frame made of the same material.
The basis of the table for cutting and sawing boards can be metal. Stability increases when choosing metal corners or channels with sides of 25–50 mm. To save money, they are purchased at scrap metal collection points or replaced with profile pipes. The frame parts are connected by welding. The use of bolted connections is not recommended due to the possibility of loosening due to vibration. The reasons for choosing a metal frame are maximum strength, reliability, and easy maintenance. Disadvantages: high cost, need to use a welding machine.
Metal
Wooden beams
Plywood
laminated chipboard
The best panel saws
Filato FL-3200B
Country of origin: Italy. The model is designed for longitudinal, transverse and angular cutting. It cuts sheet blanks of varying texture densities equally well. The metal frame of the machine is welded from rectangular pipes. It has increased strength and is resistant to deformation.
To dampen equipment vibration during operation, the body of the Filato FL-3200B is reinforced with steel sheets having a thickness of 3-4 mm. The cylindrical type guides are also made of steel. An aluminum carriage moves along them. The machine control buttons are located in the electronic unit, located in a convenient place for access.
Characteristics:
- overall dimensions – 3300x3100x900 mm;
- weight – 1050 kg;
- maximum cutting height – 110 mm.
Advantages:
- the presence of an electronic display and an emergency stop button for the machine;
- reliability;
- durability;
- ease of maintenance and operation.
Flaws:
- high price;
- Difficulties in setting up the carriage.
Bosch GTS 10 XC
Country of origin: China. The model is equipped with a braking function, has a starting current limiter and an overload lock. Designed for small furniture production. The work table has retractable elements that allow you to cut large sheets of material of varying densities.
The design has a well-thought-out slab feeding system, which ensures accuracy and ease of cutting the material. Reliability of sheet fixation is ensured by a parallel stop. The maximum tilt angle is 47 degrees. The machine can produce clean and even longitudinal and transverse cuts. The machine can cut plastic and aluminum profiles.
Characteristics:
- overall dimensions – 635x343x768 mm;
- maximum cutting depth – 79 mm;
- weight – 35 kg.
Advantages:
- smooth start;
- structural strength;
- reliability in operation;
- capacious corner stop;
- the presence of a dust collector and an adapter for connecting a vacuum cleaner;
- ease of setup and maintenance.
Flaws:
- the possibility of backlash;
- high price.
Holzmann TS 315VF-2000
Country of origin: Austria. The model is considered the best professional machine in its class. Designed for longitudinal and cross cutting of slabs. The design of the machine allows you to cut complex configurations from sheets. It features fast, accurate and neat cutting of material.
The machine is intended for equipping furniture and carpentry shops. Can cut chipboard, MDF, fiberboard, plywood, acrylic, composite and other materials. The aluminum carriage has high adjustment accuracy. The stops and marking rulers are made of the same material. The work table is made of vibration-damping cast iron. The body has a welded structure.
Characteristics:
- overall dimensions – 910x741x104 mm;
- maximum cutting depth – 100 mm;
- weight – 263 kg.
Advantages:
- increased security;
- effective cleaning of the working area from dust and chips;
- fine adjustment;
- high quality cut.
Flaws:
- high price;
- Can only saw small slabs.
ZENITECH FR 1800
The country of development is Switzerland, the manufacturer is China. The model is designed for longitudinal, transverse and angular cuts. The machine is professional equipment. Equipped with a powerful three-phase motor. Provides high cutting accuracy. Can cut wood-based materials of various densities, as well as plastic and composite materials.
The desktop has a sliding structure made of cast iron. The frame is made of the same material. Despite the powerful engine, the machine is quiet in operation. The carriage is made of aluminum. The air cooling system prevents equipment from overheating during operation.
Characteristics:
- overall dimensions – 936x756x1040 mm;
- maximum cutting depth – 100 mm;
- weight – 300 kg.
Advantages:
- high power;
- cutting accuracy;
- high quality cut.
Flaws:
- high price;
- You can only cut one slab.
FDB Maschinen MJ 61232Z-B
Country of origin: China. The model is equipped with a powerful three-phase electric motor. Belongs to the group of heavy professional machines. It has a cast iron frame, which dampens even slight vibration during equipment operation. The desktop is made of the same material. Aluminum carriage. The machine can cut large slabs.
Characteristics:
- overall dimensions – 3250x3150x900 mm;
- maximum cutting depth – 80 mm;
- weight – 790 kg.
Advantages:
- high-quality cutting;
- high performance;
- ease of adjustment and maintenance.
Flaws:
- insufficient thickness of the carriage;
- large mass;
- high price.
Selection of dimensions
It is worth choosing the size of the sawing table depending on the square footage of the workshop. The small area of the room allows you to use a tabletop of 50 x 50 cm. Making the sawing table smaller does not make sense - it will be difficult to use it when processing long workpieces. The universal size, ensuring convenient sawing of laminated chipboards, is 80 x 80 cm.
The maximum recommended dimensions of the sawing machine are 120 x 120 cm.
To comply with safety requirements, it is recommended to place the saw in the middle of the tabletop at a distance of at least 25 cm from the edge - it is this indicator that leads to the minimum width of 500 mm. The location of the saw blade also depends on how it will be used. There are three types of design:
- for longitudinal sawing;
- for cross cutting;
- universal.
The depth and location of the disk installation depend on the workpieces processed on the machine. For boards and plywood, it should protrude above the tabletop by 50-80 mm, for logs - by 110-125 mm. The height of the upper part of the frame made of sheets of plywood or chipboard can be in the range of 35–40 cm. If you make the frame only from timber, this parameter depends on the cross-section. The remaining part of the structure consists of wooden legs, the size of which craftsmen usually choose to suit their height. The overall height of the sawing table is about 1.0–1.1 m, but can be reduced to 900 mm.
Create a drawing
The first stage of creating a machine for processing wood is drawings of a sawing table. You don’t have to compile them by choosing the appropriate option on thematic sites or forums. But it’s better to make at least the simplest diagram yourself, taking into account the available materials and the selected sizes.
The drawing notes all the nuances that will be needed to prepare the materials, indicate the mounting locations for the supports and their angles of inclination if the table legs are not perpendicular to the table top. In the figure it is also worth noting the place for attaching the unit to turn the saw on and off. When drawing up a diagram yourself, maintaining scale and exact proportions is not necessary. The main thing is to correctly indicate the dimensions of all future parts for the sawing machine.
Manufacturing stages
Before assembling the machine for cutting boards, logs and blanks, you should prepare all the necessary materials and tools. To work you will need:
- moisture-resistant plywood;
- sheet material suitable for making the body;
- elements for the body and legs (bars 40 by 40 mm).
Fastening will be done with self-tapping screws using a screwdriver. All necessary parts are cut with a jigsaw. A saw with a disk of suitable diameter is also prepared.
Algorithm for creating a table:
- Sawing all parts into pieces with the required dimensions.
- Marking the mounting areas for the saw and legs on the table top.
- Making a case, which is usually a rectangular box without a lid or bottom.
- Installation of countertops.
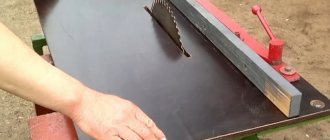
- Cutting a hole that should be 5–10 mm longer and 4–6 mm wider than the disc.
If you cut the material at a certain angle, the resulting slot should resemble a trapezoid (inverted) in shape. For smooth sawing, a regular hole is made. Before cutting out the groove, you should apply a saw and adjust the marks.
Sawing all parts into pieces with the required dimensions
Marking the mounting areas for the saw and legs on the tabletop
Case manufacturing
Installing the countertop and cutting the hole
Preparing to install the saw
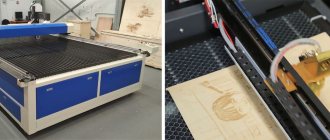
MDM – techno solves any production problems
MDM-TECHNO offers are able to satisfy the needs of any client. We have equipment for laser cutting of plywood, as well as:
- machines for format cutting of chipboards, including installations with a movable carriage;
- many types of vertical class saws;
- automated centers for cutting sheet wood materials;
- band saws for cutting chipboard;
- cross-cutting machines for end cutting of workpieces;
- double-sided format trimming units;
- equipment for shaped cutting of plywood with different levels of capabilities.
The online store of the MDM-TECHNO company presents functional, modern technical solutions at an attractive price. The variety of offers allows each client to make the best choice. It is easy to buy machines that can effectively solve the problems facing furniture production.
How to install the saw correctly
The next step is to properly position the saw on the top surface of the saw table. To do this, the contractor must perform the following actions:
- Install the tool so that its working part fits into the pre-prepared groove.
- Mark the locations for the M8 plowshare bolts with countersunk heads (they will be used to secure the saw blade).
- Drill the plywood from the top to make equal holes with a diameter of about 8 mm.
- Make a countersink to countersink the bolt heads.
- Carefully install the metal saw blade and carefully tighten the bolts from the bottom using nuts and lock washers.
The work of making a machine requires great concentration and concentration. The slightest mistake can lead to having to start all over again.
After securing the structure to the table, you need to install a block to turn the circular saw motor on and off. A hole is cut in the housing, the switch is secured with bolts and universal glue. There should be two separate cables coming from the unit. One to the instrument, the other to the nearest electrical outlet.
When assembling such a unit yourself, it is worth taking into account the performance of the motor, as well as the maximum power of the electric motor. In this case, experts advise choosing a motor whose power does not exceed 1000–1200 W, otherwise operation may be unsafe. And a more powerful saw means a heavier and more stable table.
Install the tool so that its working part fits into the pre-prepared groove
Mark the locations for the M8 countersunk plowshare bolts
Install the metal saw blade and carefully tighten the bolts from below
Install a block to turn the circular saw motor on and off
conclusions
The best panel saws are machines that are, first of all, easy to use. In such machines, the emphasis is placed not only on quality, but also on the comfortable work of the staff. In many models, for example, working elements are additionally protected from dirt and dust.
To make the final decision when purchasing equipment, you must first decide on the goals and objectives that you set for it. Then you should look towards the manufacturer.
Finally, I’ll give you a few tips that you can follow to extend the life of your equipment:
- Regular blowing and cleaning of machine elements from dust and dirt;
- Providing a normal area for working with the machine. This includes space for loading and unloading raw materials, space for convenient work and machine maintenance;
- Providing high-quality instruction or courses on how to operate the machine, or allowing only qualified employees to access the equipment;
- A separate panel cabinet for power supply to the machine, the mandatory presence of a grounding bus and protective power switches in the event of a breakdown on the frame, a short circuit or exceeding the maximum permissible values of current consumption;
- Fix the machine only on a solid reinforced concrete floor in a strictly horizontal position.
And of course, it is necessary to strictly follow the labor safety instructions when working on woodworking equipment.
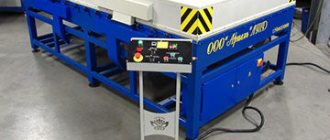
Making stops
The last stage of making a sawing table with your own hands is installing stops. A standard part of most circular saws is a rip guide. Traditionally, the stop is made from an aluminum cornice or a wooden block. Its size is chosen so that the part runs across the entire table - parallel to the saw and from edge to edge.
Cross stops are also often used on sawing tables. They are used to cut parts at an angle of 90 degrees and trim boards. To make a stop, follow these steps:
- Prepare an ordinary plywood sheet 1 cm thick.
- Secure a block at least 2 cm high to it.
- Attach a second rail perpendicular to the first on the bottom side of the base.
- Cut off excess base.
The transverse stops are attached to the workpieces using clamps or fastening devices made from wooden washers. Such homemade clamps provide fastening of guides to parts of almost any width. If you fix the block on the underside of the base at an angle of 45 degrees, you get a corner stop. After all work is completed, the surface of the circular table can be treated with a grinding machine and coated with a layer of protective varnish. This will protect it from various mechanical damage, and in general will extend its service life.
Perhaps such a table does not look as attractive in appearance as a factory one. However, from a technical point of view, it is in no way inferior to it, so even a novice carpenter can safely take on its manufacture.
Prepare parts for the longitudinal stop
Assemble mounting brackets
Place the bar on the table
Clamp the crosscut pieces together
Attach the cross supports using clamps
Cross stop is ready
Additional options
To improve accuracy, automatic control and regulation systems are being introduced into woodworking machines, the ability to install the necessary operations using software, debugging systems and control of the work process.
One of the configuration options:
- Electrical locking of the main saw;
- Motors with additional power;
- Inverters for controlling the rotation speed of saws;
- Lubrication systems;
- Clamps for processed raw materials;
- Electrical and mechanical protection elements;
- Tools for programming and automatic configuration.
Among other things, there are some other interesting additions:
- Rotating ruler with a scale for cutting slabs and workpieces at an indirect angle. It has a particularly precise reading scale from 0 to 45°. Can be installed directly in the sawing area;
- Double corner stop. Comfortable to use for miter filing. The rotation angle ranges from 0-45°;
- Electromagnetic sensor-clamp of the stop. A fairly cheap component with an electronic scale, it allows you to use only 1 stop on the carriage ruler. It can be installed in just a few seconds with an accuracy of 0.5-1 mm;
- Built-in carriage deflection sensor. It is used as an element of a software control method and as a separate device that provides information about the level of deviation of the carriage movement path above the specified parameters;
- Vibration sensor. Informs about exceeding the vibration values of the spindles of the sawing unit. May indicate saw wear or improper sharpening;
- Induction sensor for carriage movement. Monitors the accuracy of the carriage movement in relation to the axial position of the main saw blade. Protects the machine from saw distortion. Misalignment can lead to chips along the edges of the processed material;
- Movable cassette for slabs and workpieces. Designed for intermediate storage of raw materials of various sizes. Is foldable. When not in use, it takes up very little space, and in operating mode it makes it easier to load the formatting machine with the saws being processed. Plus, it reduces the number of employees for support work.
- Dust and chip protection system. Creates high air pressure at the points of contact between the moving elements of the carriage and the guides, preventing chips and dust from entering them.