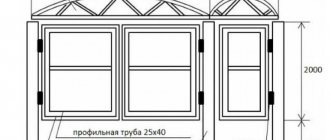
Construction of houses is a responsible matter for every family. You need to think in advance about what to build a house from; the construction time and the costs of building housing depend on this. Today we will not discuss construction with ordinary bricks; we will consider the three most popular types of building materials after brick, log house, blocks and vulture panels.
Features of making a tool box
Things often get lost. It's better if they have their own place. Then they won't get lost. And all the necessary things will always be at hand.
- The boxes can be made in different ways. They can have different shapes and colors.
- It's easy to do. Almost everyone can do it themselves if they wish.
- It doesn't require a lot of money to make.
- Plywood is easy to process.
- You can put heavy things. After all, it can withstand a heavy load.
- Thickness may vary.
- You can store both small and large things.
- Boxes can be of different sizes.
You can decorate them as you wish. They can be of different colors. Suitable for any interior.
Original double-walled box
Making such a box is much more difficult, but we will help you figure it out.
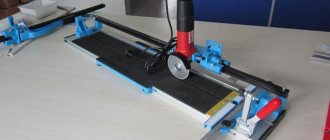
Step 1. On the pre-processed workpiece, you need to draw cut lines with a pencil. And here one important point should be taken into account: when transferring the sketch, it is imperative that the longitudinal orientation of the fibers be observed!
Step 2. An even longitudinal part is cut from the workpiece (its thickness should be 1.5-2 cm). This part will serve as the cover of the product in the future.
Step 3. Next, change the inclination of the saw table. It is necessary to change the angle literally by a few degrees.
Step 4. After this, the part is cut into 2 parts and the internal waste part is cut out. Thus, a conical cavity of the product is formed.
Step 5. The halves are glued back together. Thanks to this, by the way, internal stress is also relieved and cracking and deformation of the product are prevented. The glue should be applied in a thin layer, and all excess inside should be carefully removed.
Step 6. The glued parts are placed under the clamps. In this case, you need to carefully ensure that there are no distortions or displacements.
Step 7. The table returns to the horizontal position, a couple of slices are cut from the waste part. This will be the bottom and cover of the future product.
Step 8. The interior of the box is painted. It is more convenient to carry out painting at this stage, while there is free access from both sides.
Step 9. The table returns to the inclined position, after which cuts are made along the outer contour.
Step 10. A thin layer of glue is applied to the ends of the bottom, then it is inserted into the lower part of the product (you need to press it with your fingers until it stops).
Step 11. The lid elements are glued to the workpiece, cut off at the initial stages of work.
Step 12. When the glue has dried, the main outline of the lid is outlined, after which this part is cut out.
Note! The technique described above is universal, because it makes it possible to experiment with shapes and designs, making original and beautiful boxes with your own hands.
Box making process
You need to understand what size the box will be. The drawer will have sides measuring 19.5 cm by 13 cm. The bottom of the drawer will measure 19.5 cm by 31.5 cm.
- Then they draw a drawing of the box.
- Draw patterns for the components of the box on sheets of plywood. The bottom of the box will be six millimeters thick. And to make the sides you will need plywood eight millimeters thick.
- The elements are cut out using an electric jigsaw or a hand router. There should be five parts in total. Four side walls and a bottom. If necessary, also cut out the lid. The walls can be in the shape of a cone if the box has a lid.
- Once the parts are prepared, the box is assembled. The walls are placed at the bottom of the box.
- The seams are glued with a special glue for wooden products. Excess glue is then removed with a regular rag. After gluing the box, place it under a press so that the parts stick together better.
- Then connect the parts with self-tapping screws.
- Then they make holes for the handle of the plywood box lid.
- You can make internal partitions in the box. But a box with partitions is suitable for experienced craftsmen. For novice craftsmen, it is better to make the box simple, without internal partitions.
If the box is large, then special wheels can be attached to the bottom. This will make the drawers easier to move around the room.
Choice of shape and size
A wooden box does not have to be as simple as possible, having a standard square or rectangular shape. The product can be made more original and interesting. Everything here will depend on the wishes and project of the master who makes the accessory. Thus, models designed for various accessories and jewelry can have medium or small sizes. They often have soft inner lining.
For the latter, materials such as velvet or suede are ideal. Such additions protect expensive metals from accidental damage and scratches on the wooden surface of the box. Typically, these designs have wider compartments designed to store necklaces, beads and special rollers for fixing bracelets.
Wooden boxes designed for storing all sorts of household little things - keys, small documents and other similar trinkets can have similar sizes. Larger boxes should be made with drawers. They make a kind of mini-chests of drawers.
The size of the box being made directly depends on what exactly it is being made for. If you plan to store a lot of medium or large items in it, then its dimensions should be appropriate. If the box is made to contain all sorts of little things, then it can be made compact and neat.
The shape of a wooden box can be absolutely any. Here home craftsmen are not limited in anything. Of course, most users make classic models with a rectangular or square structure, but a more interesting option can be made.
Wooden boxes with the following shapes look vibrant and bright:
- chic options in the shape of a heart;
- elongated oval or round options (look especially interesting if complemented with carvings);
- curved options (in the shape of the letter “C”);
- in the form of an original wooden gramophone (this way you can make a music box);
- in the form of a luxurious royal casket;
- in the form of a complex mechanism with many small parts (difficult to implement options).
Today, unusual boxes with non-trivial shapes are especially popular. The accessory can be made in the form of a baby grand piano/upright piano, a safe, a book, or a treasure chest. The design of the product can be completely unexpected.
Often, at first glance, nothing in these items gives away the box - they seem to be just an interesting souvenir, but in fact the souvenir turns out to have a secret, and there is a place in it to store all sorts of things.
Plywood box finishing
- After making the plywood box, we begin to decorate it.
- You can paint it with varnish. The entire box is varnished. This not only adds beauty, but also extends the life of the plywood box.
- The box can also be decorated with special overlays.
- It is also better to cover the outside of the box with color. This will give a beautiful appearance to the box.
- Before decorating the box, all holes must be filled with a special product for wooden products. The putty is applied very easily. Dries within three hours. After puttying, the box can be varnished.
- Afterwards, the plywood box is sanded using sandpaper. You can also putty a plywood box using a sanding machine.
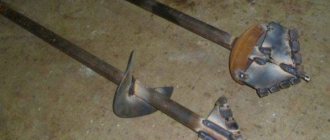
Log houses
Dwellings have been built with logs since ancient times; they also remain a popular material now. Log houses have good heat resistance in winter and coolness in hot weather, environmental friendliness, and sound insulation.
Disadvantages: flammability, shrinkage, various types of destruction by external environmental factors, for this it needs to be treated every year from rotting and various kinds of rodents. The cost of log house housing will be 18,000 - 80,000 per m2, depending on the type of wood.
Plywood box with sliding lid
- You will need plywood 0.5 cm and 1.5 cm thick.
- Parts are cut out. The back wall should be 20 by 15 cm. The front wall should be 18 by 35 cm. The lid should be 34.3 by 33.3 cm. The bottom of the drawer should be 33.8 by 33.4 cm. The handle of the drawer will be 5 by 2 cm. These parts are cut from plywood with a smaller thickness. The side parts of the box are cut from other plywood. Their size will be 33.8 by 33.4 cm. There will be two such parts.
- Using a saw, the parts of the future box are cut out.
- Then the parts must be sanded using fine paper.
- Grooves measuring 0.6 cm are made on the sides of the box.
- It is necessary to make holes 0.4 cm in size on the walls of the box. This is necessary so that they can then be connected to the side walls of the future box using self-tapping screws.
- First, the parts are connected using a special glue. You can use both wood glue and PVA glue.
- Remains of glue are removed with a regular rag.
- View the edges whether they are suitable or not.
- Check whether the cover moves along the grooves. If necessary, process using sandpaper.
- The handle is glued to the lid using glue. You can also attach it to the lid using a special stapler.
- After everything is dry, it is better to sand the box again on all sides.
The top can be coated with special paint or varnish. The color of the box may vary.
How to decorate with carvings
Carved boxes look much more original and interesting, but such work requires certain skills and knowledge. For beginners who decide to try their hand at wood carving, experienced craftsmen recommend starting with simple geometric shapes and large patterns. With a certain amount of patience, even a novice master will be able to cope with such a task.
The drawing is applied to the surface with a pencil, each line is well drawn. After this, the pattern is carefully cut out with an oblique knife or chisel in strict accordance with the applied markings. Small flaws and irregularities can be corrected with a file or fine sandpaper.
Tips for making a plywood box
The thickness of plywood may vary. When making a plywood box where toys, clothes, and food will be stored, plywood with a thickness of 0.5 cm is suitable. And, if the box is to be stored outdoors, then the thickness of the plywood should be more than one centimeter.
- Before you start work, you need to understand whether the drawing is made correctly.
- You need to buy or rent the necessary tools to make the box.
- When purchasing plywood, you need to carefully examine the appearance of the material. There should be no chipped pieces or other defects on it.
- To ensure that the place where the plywood is cut is clear. You need to use tape to glue the place where the plywood will be cut.
- It is necessary to apply varnish to the plywood box. It gives not only a beautiful appearance, but also protects from various external influences.
- It is better to choose fine sandpaper for sanding a plywood box.
- If you need to make several identical boxes, you can make a template for the side walls.
- It is better to paint boxes in neutral colors.
- If the boxes will be located outdoors, it is prohibited to paint them with bright colors. After all, in the sun the color of the box will quickly fade.
- It is better to remove excess glue with a wet cloth.
What will you need for work?
Selecting materials
Naturally, to make a box with our own hands, we first of all need plywood:
- The quality of veneer should be maximum (first or second grade). Blisters, knots, resin streaks, etc. are not allowed on the surface of the sheet.
The higher the grade, the better the result!
- It is very important that the veneer sheets are glued over the entire area of the workpiece, especially if the walls of our box are carved.
- Before work, plywood should be dried, since raw material often leads to tool breakage.
- The color of the veneer will only play a role if we leave all surfaces without painting or varnishing. If any processing will be used, then it is better to focus on selecting plywood according to quality, and achieve the required color through the use of pigments.
- The thickness depends on the dimensions of the product. As a rule, plywood with a thickness of 4-6 mm is used for decorative desktop drawers.
To connect individual parts together, small nails with hidden heads, self-tapping screws, or furniture glue can be used. Also, for the final processing of the plywood box, we will need paint or varnish. Photo of an easy-to-make model without varnishing
Tools
Working with plywood does not require powerful and bulky tools. Here, rather, devices for “fine” work would be appropriate:
- Jigsaw (manual or electric, but always intended for figured carving).
- A supply of jigsaw files.
- Wood saw for rough processing of workpieces and cutting plywood sheets.
- Screwdriver (if self-tapping screws will be used).
- Hammer.
- Set of wood files (round, flat and triangular).
- Sandpaper for sanding.
- Paints, rollers and tampons for finishing the product.
When all materials and tools have been purchased and prepared for work, you can begin making our plywood box.
Photo of a homemade plywood box
How to decorate?
For a homemade box, it is important to think about beautiful decor so that it looks more interesting, brighter and richer. There are many ways to decorate this accessory. The most popular solution is to decorate the product with carvings. Carved caskets look very beautiful and solid.
It is not recommended for a novice craftsman to immediately begin applying intricate and complex carved patterns to structures. You should start with simple shapes or large lines. A master with minimal experience can handle such work, but you need to be very careful and patient to avoid mistakes.
To add carvings to a product, you should apply a certain design/pattern to its surface with a pencil. Each line must be drawn as accurately and noticeably as possible. Next, you need to take a special knife or chisel.
These tools carefully cut out lines and patterns in accordance with the applied design. Small imperfections and defects can be removed with a file or sandpaper.
If you don’t want to waste time carving the product, you can turn to a simpler solution - paint the casket or coat it with a special varnish. The color of the accessory can be absolutely any - it all depends on the ideas of the home craftsman. Caskets decorated using the decoupage technique look interesting and stylish.
The final design of the box can be anything:
- products are often complemented with precious/semi-precious stones and beads;
- the design can be effectively painted;
- attach a flower arrangement to the lid;
- create an aging effect using the craquelure technique;
- attach pearls (natural or imitation) to the lid.
Simple walnut box
A similar sequence of actions underlies the next project - a four-wall wooden box. Thanks to its unusual curved shape, its design looks stylish and modern.
Drawings for making a travel bag
The first and most important stage of any master’s work is preparing a drawing. The diagram of the future casket can be found ready-made or sketched on a sheet of paper. The following points must be noted on the drawing:
- Dimensions of the accessory itself, including the height of the walls, width and length of the bottom. The lid is depicted as a separate element, since its width must exceed the dimensions of the base.
- In addition, the plan diagram should indicate what type of cover is planned to be made (folding or removable model).
- Don’t forget to display the shape of the decorative toiletry case.
The best solution would be a separate image of the accessory as a whole, and sketches of each detail.
Option #3. Simple walnut box
The same steps must be followed when making another project - a wooden box with four walls. Having an unusual design and curved shape, such a box will look really modern and stylish!
A simple walnut box Drawing of a walnut box
Stages of making a box This box was made from walnut
Decorating a wooden box – what is worth knowing?
Despite the attractive design and shape, the box will look truly original only after decoration. The technique of relief carving provides in this case almost limitless scope for creativity.
You can decorate the box in different ways
Using key carving techniques, you can create original textures on the box. We can talk about both simple textures and complex ornaments or geometric shapes.
Chisels for applying relief
- A semicircular chisel used to texture the product with small dimples.
- Forming grooves with an angled chisel on the surface of the box lid.
On a note! In the photo below you can find more complex examples of decoration that use complex textures and geometric patterns.
Options for decorating boxes
A few more decoration options
How to create a beautiful box?
There are many options for boxes, each person tries to create the design they need. But the decorative item is unique and is used in many ways. The main thing is that the process does not require additional knowledge or extensive construction experience. The box is spacious and can be used for different needs. It is better to decide on the dimensions before starting work and draw up a rough diagram of the future structure. The outer walls are cut out with a jigsaw. In order not to make mistakes with the size and not spoil the material, it is better to make blanks from thick cardboard. After this, transfer them to plywood and cut them out. It's also easy to make interesting lines, giving the drawer special patterns.
To prevent unpleasant odors from accumulating in the box, it is worth making ventilation holes in the bottom. They are also cut out neatly (can be symmetrical or chaotic). Now, when creating pens, everyone will be able to realize their fantasies, especially if they have all the necessary tools, this will not be difficult.
Interesting ideas for decorating a product
The structure of the tree is beautiful in itself. You can simply varnish the product, but it will become truly original after creative decoration, for example, using the technique of relief carving. Using different techniques, you can create unique patterns or compositions on the surface:
- using a semicircular chisel you can make small dimples on the wood;
- An angle chisel will help make the grooves.
Advice! A wooden box must be coated with protective compounds. For light wood, any oil, for example, linseed, is best; for dark wood, wax. You can experiment with the color palette using water-based stains with different pigments.
About carved boxes
To perform this type of woodwork, you should prepare:
- oblique knife;
- pencil;
- pen knife;
- compass;
- ruler.
Oblique knife
If you need to cut out oblong-shaped parts, use a feather knife for the job. It is more convenient to cut geometric shapes and straight lines with an oblique knife.
On a note! The required pattern must first be applied to the wood, for which you can use a ruler with a compass or a stencil. If a piece cannot be cut with a knife, then stripping will be required. Having finished cutting, all that remains is to sand the product with sandpaper.
Carved wooden box
Preparation of tools and materials
One sheet of plywood is not enough for the job. We recommend preparing all the necessary items, materials, and tools in advance. Then the process will go quickly and easily. You won’t have to be distracted by searching, shopping or visiting neighbors.
What you will need for work:
- pencil, marker or chalk;
- drawing paper;
- tape measure, a long ruler will do;
- hacksaw, jigsaw, file;
- hammer;
- sandpaper;
- nails, screws, self-tapping screws;
- screwdriver, drill.
The set of materials and tools depends on the chosen box model, the complexity of the design, and the method of connection. You may need a glue gun, additional bars, or planks.
If you need a drawer
In general, a wooden box with a drawer is made in the same way as the classic version, but there are a number of features.
A simple rectangular shape of the lid and bottom will spoil the appearance of the product. It is better to make the long sides of these elements wavy using an electric router. In addition, by choosing this option, the lid and bottom are not placed inside the body, but left outside.
The walls are made of different heights. In particular, the back part and ends are made of the same height and glued together. For the front wall, cut out a die half as wide as the back part. This element is not recessed between the ends, but is installed overlapping and fixed with glue.
The box consists of two parts: the box, which fits freely between the walls, and the front part, which is similar in size to the top die. The elements are also mounted on wood glue.
A partition is installed between the upper and lower parts, which will serve as the bottom of the upper compartment of the box. Inside the retractable and stationary drawers, you can make partitions from thin plywood, delimiting the internal space into several compartments. The lid is installed on decorative hinges, the wood is covered with several layers of furniture varnish.
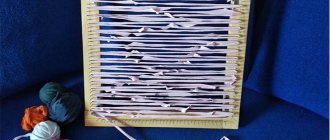
How to make an unusual miniature box with your own hands from a reel of tape
If you want to please your loved ones with a small box to store jewelry or small items for handicrafts, you won’t find a better material than a spool of tape. You can make an absolutely stunning product out of it. No one will guess what served as the basis for creativity.
What you need to prepare for work
For our amazing box you will need completely accessible materials:
- a spool of tape 4 cm high;
- corrugated thin cardboard from biscuit;
- thin cardboard for the bottom;
- screw cap from a jar of suitable diameter;
- glue “Moment” and PVA;
- white acrylic paint;
- 2 single-layer decorative napkins;
- decorative paper, you can take it from a candy box;
- colorless varnish.
Master class on making a box from a tape reel
- Coat the edges of the reel with white acrylic paint. Cut cardboard from under the roll 4 cm wide and cover the inside of the reel with it. Press well so that the strips do not fall behind on the sides
- Cut the bottom out of thin cardboard according to the diameter of the reel, and you can also use the cardboard that is inside any screw-on lid
- Glue decorative paper on one side of the bottom with PVA glue
- Glue the bottom to the bobbin with Moment glue with the decorative side inward
- Glue white decorative paper to the outside of the reel and to the top of the lid
- Cut out decorative elements from a single-layer napkin
- Glue the elements with PVA glue to the inside and outside of the lid, as well as on the sides.
- Decorate the bottom and sides of the bobbin in the same way.
- After the adhesive composition has completely dried, coat the workpieces 2 times with colorless varnish
- These boxes are made from an ordinary reel of tape
Useful tips and tricks
If you decide to make a beautiful and high-quality wooden box with your own hands, then you should take on board some useful tips and recommendations.
- If you are making a box for storing jewelry, it is advisable to decorate its interior with soft, velvet fabric, and glue a small mirror under the lid. With such components, accessories will not be scratched, and they will be very convenient to try on.
- If desired, you can make a casket “with a secret”, in which, for example, you can store cigars. An interesting solution is a model in which pleasant music plays when you open the lid. Such products are difficult to implement and require special tools. It is better to do such options under the guidance of a more experienced master.
- You can make a box using pieces of wood of different species that have beautiful textured patterns.
- It is necessary to cut out all the details of the future design as accurately and clearly as possible. You should not violate the boundaries of the drawn blanks, otherwise it will be very difficult to assemble the product in the end.
- It is recommended to clean small parts with fine-grained sandpaper. This item will be especially relevant in the process of decorating carved elements on the casket.
- If you are making a chest not for jewelry or small trinkets, but for sewing accessories, then it is advisable to provide several separate compartments in it, and add an easy-to-carry handle to the top part.
- If the box is made of beautiful, dark wood, then its texture can be effectively emphasized by waxing. If the model is made of lighter wood, then it is best to coat it with linseed or other oils (if you have chosen this finishing method). To experiment with colors, you should turn to high-quality, water-based stains with coloring pigments.