Cutting, cleaning and grinding are the three main functions of an angle grinder. The technology involves performing work while holding the tool in your hands. To reduce the load, stationary devices for various purposes are made on the basis of the grinder. They are obtained through design refinement and modernization, which significantly expands the functionality of the tool. Special devices for grinders and attachments are sold in retail chains, but most craftsmen perform them themselves. They allow the tool, which is in demand in production and at home, to be used to perform diverse operations on materials for various purposes during installation and construction work. The modified design can work as a cutting, trimming, milling, sharpening, grinding machine, wall chaser, pendulum saw, miter box, etc. To manufacture the device, you need to purchase the necessary attachments, components and fasteners from the retail chain. You can make a device with your own hands if you set such a goal and understand the intricacies of the design that you plan to create. This will expand the capabilities of the grinder, make it easier to work with the tool, reducing the load on your hands, and make the process of performing many operations more productive. On the Internet you can find a large number of drawings, photographs and videos that will help you realize your plans. It all depends on the capabilities that a person has, his thinking and flight of fancy. Let's consider the nuances of converting an angle grinder into the machines, devices and devices presented below.
Required tools and materials
When starting to manufacture a cutting machine, you should understand that the accuracy of its operation is directly related to the stability of the structure.
Therefore, the choice of a material of a certain thickness is dictated not so much by the requirements for the strength of the body, but by the need for its rigidity. Before you start working, you need to prepare:
- square profile pipe (25x25x2.5 mm);
- profile pipe “rectangle” (40x20x2.5 mm);
- metal sheet 4–5 mm thick;
- ball bearings No. 202, 203 or 204 – 2 pcs.;
- calibrated rod with a thickness equal to the diameter of the hole in the inner race of the bearing (up to 100 mm);
- rod with a diameter of 8–10 mm;
- metal tire (20x4 mm);
- bolts and nuts with M8 or M thread.
Tools you will need:
- Angle Grinder;
- drill or drilling machine, set of drills;
- a set of dies for cutting metric threads;
- open-end wrenches;
- welding machine.
To make a machine, it is better to choose an angle grinder from a well-known manufacturer.
The main component of the cutting machine is the angle grinder. It is not recommended to use a “small” grinder designed for cutting discs with a diameter of up to 125 mm and a power of up to 500–600 W. Remember that the larger the diameter of the cutting wheel, the more versatile and reliable the machine will be.
The careful selection of power tools is also due to the wide variety of angle grinder designs available on the market. Since such equipment is not unified, the cutting machine is built for a specific model and size of angle grinder. If the equipment is unreliable, then if it fails, it will be difficult to install another angle grinder in its place without the need to rework the mounts and pendulum. That is why it is better to choose products from trusted manufacturers - Makita, Bosch and so on.
Manufacturers
The most common and popular attachments are cutting discs. Bosch also produces good wheels for metal. The best diamond bits are produced by Hitachi (Japan) - such discs are universal and can successfully cut any material.
Sanding attachments from DeWalt from America are highly valued. They differ in the material from which they are made; they can be: sponge, fabric, felt.
To work with stone and metal, special abrasive attachments are used. The highest quality specialists are considered to be products from DWT (Switzerland) and Interskol (Russia). The products of the latter company stand out due to their combination of price and quality. The above companies also produce good grinding discs that are coated with diamond.
In addition, DWT produces high-quality angle grinder attachments called cutters. They are used to remove old paint, cement, and primer.
It produces a variety of turbine nozzles of very good quality. Prices for nozzles from this appeared on the market relatively recently, but it has already gained a good reputation and authority.
from China (Bort) also makes good attachments for grinders. As you know, products from Chinese manufacturers are traditionally low in price.
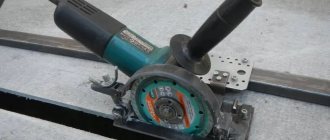
Milling machine
- with a movable angle grinder. In this case, the tool is securely attached in a vertical plane to a special frame, which allows you to move the grinder relative to the milled workpiece, which is fixed motionless;
- with a rigidly fixed angle grinder. With this design, the workpiece moves in the desired direction, and the grinder is motionless.
In both cases, you need to think through the design, purchase everything necessary for its assembly, and also buy a collet-type cutter holder or make it yourself from a hexagon. The picture shows a simple, quickly manufactured design of a milling cutter made from an angle grinder.
Protractor for grinder
By using such devices, you can easily calculate the cutting angles of workpieces. And this has a positive effect on the speed and quality of work performed. In addition, this device is suitable for cutting metal profiles.
- This type of design is widely in demand when working on wall and floor tiles.
- They are also used for cutting and processing flooring and baseboards.
By making a protractor for an angle grinder with your own hands, you will no longer need to purchase special tools, which are often expensive and large in size. A homemade protractor is not suitable for industrial use, but for home use it will be an excellent replacement for store-bought tools.
The operating principle of a homemade protractor design
install guide angle
Then you need to press the workpiece tightly against the shelves of the corner. After this, the user must set the cutting angle he needs.
Next, you can proceed to cutting the material.
When performing this action, it is necessary to take into account that when cutting it is necessary to press lightly on the disc. No serious physical effort required
A homemade protractor for an angle grinder has a design consisting of the following elements:
- Corner.
- Loops.
- Bolt used for fixation.
Note that making such elements with your own hands is quite difficult. Therefore, if you are not sure that you can cope with such a task, then it is better to purchase ready-made models of protractors in the store.
The grinder is a fairly popular tool among builders and repair specialists. It can be used to cut various materials and process workpieces and parts. However, sometimes specific operations are required. Therefore, experts purchase special attachments for the grinder. They can be found in stores without any problems.
The use of such devices allows you to expand the number of options for using this tool. However, it is not always necessary to buy them in hardware stores. If you wish, you can make them yourself. To do this, you just need to have free time and know how to properly make attachments for an angle grinder.
By following the recommendations of experts and completely following the instructions, anyone can make attachments for this tool, which will make the grinder a universal tool and make the work easier.
Protractor for angle grinder
A convenient option is when the machine for cutting metal from an angle grinder is additionally equipped with a protractor. This device allows you to make the most accurate cuts if a person is working, for example, with a metal profile. Thanks to the protractor, the required cutting inclination is set. High precision must also be observed when working with various finishing materials, including porcelain stoneware and other tiles.
Factory protractor for an angle grinder machine Source ebayimg.com
The design of conventional transport consists of a corner. This element is a guide part. It is better if it has a pad that prevents movement and scratches on the surface of the part being fixed. The design also includes hinges and a fixing bolt.
To use a protractor, you must first press the workpiece firmly. Only after this is the desired angle adjusted. At the last stage, the workpiece itself is cut directly using a power tool.
Types of devices, their advantages and disadvantages
There are two types of designs of cutting machines, differing in the location of the grinder, which can be made at home.
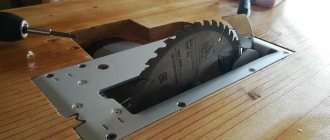
The first installation is a frame with an angle grinder rigidly fixed underneath it. Only the cutting disc is visible on the working surface, which fits freely into the table slot. Cutting a metal profile or sheet in this case is completely identical to cutting wooden blanks using a circular saw. Despite the very simple design, this scheme is not particularly popular. Those who have made such a device note that it is inconvenient to use due to the need to move the workpiece. This significantly reduces the accuracy of the work and makes the process unsafe. The only advantage of a machine with a bottom angle grinder is the ability to quickly cut thin metal sheets.
A cutting machine with a lower angle grinder can be used both for cutting metal and as a circular saw
The second scheme, in which the part remains stationary and the cutting wheel itself moves, is more convenient. The so-called pendulum saw, placed above the tabletop, allows you to cut the workpiece exactly at the required angle, and it becomes possible to make the required number of parts of the same type. Due to the location of the grinder on top, cutting workpieces does not require effort, and operation of the unit becomes simple and safe. The undoubted advantages of the design include the ability to quickly dismantle the grinder for traditional use. As for the disadvantages of this method, the weak link can be considered the hinge joint, which complicates the design of the machine.
A machine for cutting metal with an upper angle grinder has a more convenient design and makes it possible to cut workpieces at the desired angle
Basic information
Using a conventional angle grinder is not always convenient. After all, at least you have to hold it with your hands. However, a properly selected angle grinder attachment will allow you to use the tool more conveniently and get the maximum benefit from it.
Important! The rotation speed of the grinder is 12,000 rpm. Therefore, regardless of its use, all safety measures must be observed.
The use of specially designed and created additional structures allows you to expand the functionality of the power tool. At the same time, the grinder always remains the main working mechanism, and the devices are accessories. They are available in specialty stores. Their production is even ordered from specialists.
The grinder is a non-volatile tool for installation, construction and repair work. It was originally designed to cut, grind and deburr various materials.
Reliable grinder from a Russian manufacturer Source zubr-russia.ru
Additional accessories allow the angle grinder to be used for trimming parts and performing milling work. The improved design is used for sharpening operations, creating grooves, making even cuts at the required angle and as a pendulum saw.
Important! Any well-thought-out attachment for an angle grinder allows you to increase the productivity of the work performed.
The choice of a specific additional accessory for an angle grinder depends on the area of use of the tool. The scope of its application affects the type of working disks. After all, manufacturers produce them in various designs for working with metal, concrete, and wood. Moreover, there are separate discs for grinding and polishing operations. However, they differ in grain size.
Discs for working with metal Source stroy-market63.ru
Store-bought accessories allow you to quickly improve your angle grinder. However, not every factory-made accessory has the necessary quality, which will ensure, for example, cutting accuracy. Therefore, it is not always advisable to purchase ready-made options. Sometimes the best solution is to order a so-called device from craftsmen who not only know all the intricacies of manufacturing, but have also personally tested the effectiveness of its use.
Of course, you can buy a grinder machine in a specialized store. After this, there is a possibility that it will turn out to be of poor quality and will not be able, for example, to firmly fix a power tool. Next, all that remains is to throw it away or give it to a specialist so that he can improve the device. With any of the options, a person will lose a certain amount of money.
Not all shop machines for angle grinders are of high quality Source 24aul.ru
Bench grinder for grinder
Required equipment and materials:
- grinding device with an abrasive disc;
- racks (16 mm);
- a small piece of scrap (square or rectangle from 12 to 25 mm);
- plywood (6.5 mm);
- hand saw;
- drill with sorted drill bits;
- reciprocating saw or coping saw;
- optional, but highly recommended.
Step 1: Design. This model is designed for a cheap grinding machine. Think through all the details.
Grinding machine from grinder
- Step 2. Getting started. You will need a base and some support items to get your angle grinder up high enough to clear the wheel. Processing can be done using a hand saw.
- Step 3: Support. Mark and cut the 2 side supports, then forward and secure them with screws, pre-drill them (dimensions may vary).
- Step 4: Drill and Mount. Next, you need a bolt that fits the hole for the handle of your angle grinder.
- Step 5: Restoring the fixture. Now you need 2 sides. Where scrapers will make the circuit stronger, but if you don't have one, it will work without them.
- Step 6 Tongue. A tongue is a depression or groove in the edge of a piece of work material for attaching another board. There are several ways to add them. The easiest way would be with a table saw, but if you don't have one, another method is possible. Method 1: Mark where you want the tongue to be, clamp the piece and use a saw to carefully cut along the side of the line. If you want to make it easier, you can take a piece of wood and place it on the side of your line to make a barrier. You can continue making cuts along the side until you get to the end and then cut out what is left of the excess material.
- Step 7: Method 2. This method is much faster and more accurate if you have a router, you can make a small table for it.
- Step 8: Combine the elements. Now mount your 2 sides and measure the dimensions of the top of the product, cut out the required cover and install.
- Step 9: Strap. One bolt is not enough to hold an angle grinder. The bolt is subject to flow on it, so find some strapping material, duct tape. Such products will work if you have absolutely nothing. You can use a small strip of metal.
Materials and equipment for making attachments for an angle grinder
Angle grinder wheels and discs can be made from a number of materials. However, in general, a diamond blade will provide maximum precision and polish. Wheels are available in a range of abrasion (or sand) levels. Use a higher abrasion accessory for rougher polishing surfaces.
However, despite all this, many people still decide to create components for the grinders with their own hands. If you decide to create accessories for a working angle grinder yourself, then before starting work you need to prepare the necessary tools:
- An electric drill, preferably.
- Set of drills.
- Discs must be selected with a diameter of 125 mm.
- Wooden blanks.
- Metal corner.
- Steel plate.
- Self-tapping screws.
When it is necessary to use an angle grinder for specific tasks, in this case many craftsmen opt for ready-made applications. They can be bought without problems at a construction supermarket. The cost of the devices is not very expensive.
The advantage of a homemade circular saw
A circular saw has a list of advantages:
- There is no need to spend a lot of money on purchasing an industrial stationary machine. High-quality professionally assembled equipment can put a significant dent in your budget. The Bulgarian is much cheaper.
- Converting an angle grinder (angle grinder) into a circular grinder is quite easy. It is necessary to use only ready-made electrical equipment and make a base - these are the main works.
- The grinder is a device with high productivity, since the number of revolutions of its disk can be nine thousand rotations per minute. This is enough to cut most raw materials efficiently.
- If you dismantle the angle grinder from the machine, then it can be used again for its intended purpose.
It is highly not recommended to constantly remove the grinder from the table, in particular when the machine is made of wood. This will certainly provoke loosening of the components of the structure.
Do-it-yourself wall chaser from an angle grinder
A wall chaser made from an angle grinder allows you to do your own tracing on all building materials in absolute safety and in the absence of dust. This wall mount tool is very useful when you need to make cuts for installing piping, placing cables for electrical systems and for installing pipes for hydraulic systems.
The saw blade mounted on the shaft is the main element of the device. To ensure safety, the discs are mounted inside a special housing, which prevents fragmentation and personal access when sawing.
Do-it-yourself wall chaser from an angle grinder
Depending on the properties of the material and density, it is recommended to choose the motor power for a wall chaser made from an angle grinder with your own hands. A modest block is enough to furrow the cable. For a long groove for a pipe, it is advisable to purchase an angle grinder with a power of at least 2000 W. Some high-performance models are capable of achieving speeds of around 6200 rpm, which guarantees the ability to cope with industrial scale.
But the design of the grinder is such that it cannot be used due to the active formation of dust. They often resort to upgrading the device.
You can design a device with two disks. Installing a machine from a suitable angle grinder with your own hands of this type will cost more. The first disk is attached as usual, and the second is mounted. A second nut is required, which has an additional ring for fixation. When working on a wall, the sanding attachment must be in the protective cover.
Cutting machine
A cutting machine is used for cutting and cutting metal and profiles, obtaining blanks of the same size, cutting to a certain depth, cutting ceramic tiles, etc. You can purchase a ready-made design in a retail chain, which costs a lot of money. You can make a device that will perform the same functions at home and small workshops from an angle grinder with a power of 0.9 kW or more.
The figure shows that to manufacture such a device, you only need to think through the design and reliable fixation of the angle grinder. To do this, you must first determine the dimensions and secure them in 2-3 points so that the tool does not move during the cutting process.
And this is very important
The grinder can also be located at the bottom of the table top. In this case, it will not only cut different materials into pieces, but also work as a circular saw.
Machine for porcelain tiles
Cutting porcelain tiles with a grinder requires skills and knowledge of the structural features of the material, since it is difficult to draw an even line while holding the tool in your hands. The work requires a special approach: it is necessary to ensure movement without deviations and control the depth of the cut during the operation. Any violation leads to damage to the material, the appearance of chips and unevenness. This leads to additional costs, and porcelain tiles are not cheap. In order for the grinder to move without deviations, you can make a special device with guides. The figure shows a manufacturing option for such a device, where the main material is plywood and fasteners.
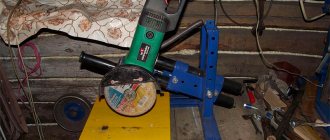
Wall chaser from an angle grinder
Using an angle grinder with a power of 1.2 kW or more, it is not difficult to make a device for making grooves (grooves) in the surfaces of walls, floors and ceilings. The main task is to install two disks on the shaft. After all, they are the ones who cut a groove of the same width and depth for laying cables, wires, and pipes of small diameter. The size of the original angle grinder shaft does not always allow them to be installed there, and even at a certain distance. In this case, you have to make bushings in order to secure the discs to them to the required size using spacers of different widths. Since the protective casing of the angle grinder is designed for one disc, there is a need to manufacture a new protective casing that would protect the worker during the operation. It often becomes necessary to equip such a protective casing with a pipe for removing dust and small waste to the vacuum cleaner. More advanced craftsmen install angle grinders on special rollers (from 2 to 4) in order to reduce the load on their hands while moving and move it effortlessly across the surface. It would not be superfluous to have a unit for adjusting the immersion of disks into the surface, the design of which also needs to be thought through.
When working with tools based on an angle grinder, it is necessary to observe safety precautions. Under certain circumstances, they can harm human health, cause injury and even death. Before starting work you must:
- wear protective clothing and personal protective equipment (mittens, safety glasses, dust mask, earplugs);
- check the reliability of fastening of all components of the device;
- check the integrity of the electrical cord and plug;
- make sure that the disk of the required diameter is installed, without flaws and suitable for the work being performed;
- Check the operation of the device at idle speed.
- make sure that the electrical cord is not twisted or pulled;
- do not remove waste while the grinder is working with your hands;
- the material to be processed must be securely fixed if this is provided for by the technology for performing the work;
- do not work with the device if there are signs of its malfunction;
- Replace the disk with a new one or a failed one only after its rotation has stopped.
Upon completion of work, the device must be disconnected from the electrical network.
In the video you can clearly see devices where the angle grinder is a mandatory element of the design. They will help home craftsmen facilitate the performance of many operations, increase the quality and productivity of labor, and expand the capabilities of the grinder.
Miter box from a grinder
A miter box made from a grinder makes working with the device much easier.
Material:
- iron plate 1×200×100×2 mm;
- iron rod 2×150×30×3 mm;
- iron rod 2×40×30×3 mm;
- iron rod 2×30×30×3 mm;
- 1x8x80mm screws;
- 2x8mm nuts;
- 2×8 mm washers;
- screws 2 × 7 × 30 mm;
- screws 1×7×50 mm;
- 3x7mm nuts;
Miter box
How to do:
- Step 1: Create the base of the stand.
- Step 2: Preparing the material Adjust the dimensions of the metal plate 200×100×2 mm so that the sides are at right angles (90°);
- It is necessary to cut 2 pieces of iron beam 40×30×3 mm;
- Mark the center and drill a 10mm hole on one side. The hole should have a diameter of 7 mm;
- Cut two pieces of iron 150 mm;
- These blanks require 3 holes. The hole must be located 10 mm from the edge;
- The holes must match the bolts;
- The rods must be molded according to the grinder to fit the profile of the machine;
- Cut one piece of 30mm iron rod. Drill a hole with a diameter of 7 mm.
- Then screw these parts into the machine and adjust them. One will be fixed in the right side hole and the other will be fixed in the top hole;
At this stage it is important that the final part is at a right angle
- Step 4: Base Take 2 pieces of 40x30x3mm iron bars and place them on the sides on both sides and replace the screw to connect them and make soldering easier.
- Place the attached set of brackets and sides on the plate so that it is more offset to the right. There should be a slight difference on both sides.
- Then you need to weld the elements of the device (give only one soldering point) on both sides. Make any necessary adjustments. There should be no excessive displacement.
- To facilitate movement, two washers are cleverly installed between the side and the handles.
- After checking alignment, perform final welding.
Step 5: Completing Assembly Observe whether you move freely and the angle can reach - 90º. After checking alignment, perform final welding.
Step 6: Processing the base. Mark the cut. Start by gluing the corners and trim using a saw. Step 7: Base with sander installed. Take advantage of the handle support that already accompanies the hardware and replace the originally installed screw. Step 8: Screw Depth Hole. Screw allows you to adjust the depth of the cut
Pay attention to the alignment of the disc in the longitudinal and transverse directions. Step 9: Reminder. Please remember that these instructions are for an angle grinder with three factory holes.
This made it possible to fix the machine in the support, and the third hole regulates the cutting depth during operation.
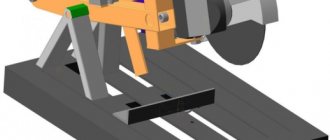
Pendulum saw
- Step 1: Create the Angle Grinder Bracket. You can use the threaded holes in the angle grinders as support points for the bracket. There are many ways to approach creating a handle, depending on the type of grinder you decide to work with. Critical measurements are necessary to compose a functional design that allows the grinder to be easily separated for manual work. Five pieces of flat metal rod were required to assemble the device. Welding them together created a custom bracket. It is necessary to weld a short piece of reinforcement as a rod to attach the wooden handle.
- Step 2: Create a clamp that will hold the sanding head handle firmly against the head of the adjustment bolt.
- Step 3: Next, you need to attach the leg to the front end of the rods to secure the angle grinder arm, enabling the hinge feature that allows the sander to pivot to the cutting table.
- Stage 4: Creating the Foundation. It is possible to use a simple frame using tubes and mounting them with two pieces of iron. It is necessary to form a flat platform for attaching the slider mechanism.
- Stage 5: Assembly.
- Step 6: Adding a cutting table. The cutting table consists of a steel plate. After all parts are assembled and adjusted, level the vertical surface of the cutting wheel.
- Stage 7: Final testing.
Pendulum saw
To make a cutting machine, you will need the following materials:
- profile pipe 40 x 20 mm – 0.32 m;
- profile pipe 20 x 20 mm – 1.38 m;
- profile pipe 15 x 15 mm – 0.34 m;
- strip 40 mm – 0.14 m;
- strip 20 mm – 0.16 m;
- bearings 100 series – 16 pcs.;
- M10 bolts for hexagon 75 mm – 8 pcs;
- nuts M10 – 12 pcs;
- washers 10 mm – 32 pcs;
- long nuts M12 – 3 pcs.;
- long nut M10;
- M12 bolt with full thread 200 mm;
- bolts M10 40 mm – 2 pcs.;
- 70mm full thread hex bolt;
- plugs for profile 20 x 20 mm – 6 pcs;
- plugs for profile 40 x 20 mm – 1 piece;
- profile pipe 50 x 50 mm, for a guide – 2 m or more.
The following photo shows the process of making a homemade product.
First of all, let's make a roller carriage for the linear guide. A profile pipe with a cross section of 20 x 20 mm will be used as its basis. You will need 4 blanks 300 mm long.
Then, in the workpieces, you need to drill through holes for the future connection of parts. Their centers are located 25 mm from each edge of the profile pipes. You will need a drill with a diameter of 11 mm.
We turn the coated profile over to the other side, and having retreated 50 mm, we drill similar through holes on each side. To hide the bolts used later when assembling the carriage, the through holes in the workpieces need to be completed. To do this, one wall of each profile needs to be drilled using a drill with a diameter of 17 mm. In this way, all 16 holes are completed, the remaining 16 adjacent to them remain untouched.
Let's make a shoulder for attaching the grinder, cut a profile 40 x 20 mm, 300 mm long.
You will also need to make a knot to adjust the cutting depth when cutting. It is made from a profile pipe 20 x 20 mm, 160 mm long. Its ends are cut at an angle of 45 degrees. From a profile pipe with a cross-section of 15 x 15 mm, you need to cut small spacers 40 mm long. A total of 8 pieces are required.
We assemble the structure. An M12 bolt with a solid thread 200 mm long will be used as a connecting loop. 3 long M12 nuts are screwed onto it. Having secured the bolts with nuts with clamps to the table, you need to attach blanks from a pair of profiles 20x20 mm, and one 40 x 20 mm. The pipes must be welded to the nuts.
Then, from a strip 40 mm wide, you need to cut 2 pieces 50 mm long. In the center, closer to the edges, we drill a hole with an 11 mm drill.
These plates will serve to fasten the grinder into the standard holes used to attach the handle. In some tools, these holes can be made for M8 bolts, which will need to be taken into account. For reliability, the M10 40 mm clamping bolts must be equipped with nuts. The bolts are screwed into the gearbox through the plates and tightened with nuts.
Now, stepping back a little from the fastening of the plates, the previously made workpiece from a 20x20 profile with a length of 160 mm is boiled down. A plug is welded onto its free end from the same strip as the mount for the grinder. A hole is drilled on the protruding ear of the plate, and an M10 nut is welded onto it. To strengthen the structure, an additional steel strip 160 mm long, also sawn at 45 degrees, must be welded onto the side of the profile.
After painting the parts, we assemble the carriage. To do this, you will need M10 hex screws 75 mm long. It is necessary to tighten the 20 x 20 mm profile pipe blanks together. At the same time, a pie is formed between them: washer, bearing, washer, spacer, washer, bearing, washer. By repeating this 7 more times, the result is a finished carriage.
Assembling the mount for the grinder.
On the table, install the guide and roller carriage. Its height is adjusted by lining it with wooden blocks. The tool is attached to the edge of the table. The workpieces for cutting are pressed with a pair of metalwork clamps. For convenience, you can carry out cutting in several passes, each time adding the depth of the cut.
Homemade cutting machine from a grinder, ready for work.
The machine makes smooth and precise cuts.
The result is a convenient cutting machine for metal.
We also recommend watching a video that shows the process of making a cutting machine from an angle grinder and testing it.
How to do it yourself?
Before making, for example, any machine using an angle grinder (the device is quite simple), it is recommended that you familiarize yourself with the drawings and diagrams that can be found on the Internet or in specialized literature. They will help you better understand the principle of construction of the grinders themselves, as well as how the various attachments that may be required are made. The nodes will have to be selected empirically, focusing on the actual dimensions of this particular turbine model. Such a unit can be ideal for cutting and trimming various workpieces.
There are dozens of different attachments that can be of different sizes, so you should select the parameters of the working elements when you have this specific model in front of your eyes.
Creating a machine for cutting wood
Two pieces are cut from the corner (45x45 mm). More precise dimensions should be looked at by the dimensions of the angle grinder gearbox unit. 12 mm holes are drilled in the corners (an angle grinder is screwed to them). If the factory bolts are too long, they can be trimmed later. Sometimes studs are used instead of bolted fastenings; this does not in any way affect the quality of the connection. Often the corners are welded; this type of fastening is the most reliable.
A special support for the lever is made, the unit is attached to it, for this you should select two sections of pipes so that they fit into each other with a small gap. To make the marking more accurate, it is recommended to wrap the fragments with adhesive mounting tape and draw lines with a marker. A cut is made along the line; the pipe element with a smaller diameter should be smaller in size (1.8 cm). For the internal diameter, you will need to find two bearings that are inserted into a larger pipe, then a pipe with a smaller diameter is inserted into a larger diameter pipe. The bearings are pressed on both sides.
The mount is placed in the bearing; be sure to install a lock washer in the bolt mount. After the rotating unit is prepared, a small fragment of the corner should be fixed.
The vertical mount for the rotary unit is made from a 50x50 mm corner, the segments must be the same size. The corners are fixed with a clamp and cut off.
It is recommended to immediately drill the corners, and then with the drilled holes they can be attached to the swivel unit using nuts.
Now you need to figure out how long the lever will be needed - the angle grinder will be attached to it. A similar action is carried out using selection technology, and the parameters of the turbine should be taken into account. Often, parts are first laid out on a flat plane and analyzed, then the configuration and dimensions of the product become clear. The pipe most often used is square with a size of 18x18 mm.
After precise adjustment of all elements, they can be fastened together by welding.
The pendulum assembly is easy to install on any plane. This could be a wooden table covered with a metal sheet. A more rigid fastening is ensured by welding two small fragments in which holes are drilled.
During installation, one of the main working points is setting an angle of 90 degrees between the plane of the disk and the supporting surface (“sole”). In this case, you should use a construction square, which is attached to the abrasive wheel (it is mounted on the angle grinder). For a craftsman, welding a fragment at an angle of 90 degrees is not difficult; it will take a little time.
You should also make sure that the workpiece is firmly secured during operation. A vice is often placed on a flat surface, which provides reliable fastening. After all operations performed, a protective coating (casing) should be made. It is recommended to take the disk size into account here. Before starting work, you should cut out an exact template of the future part from cardboard.
The protective screen can be made from two pieces of tin. An aluminum corner is attached to one of the blanks; it will allow you to securely fasten the protective screen using a cross member. Such accessories are necessary for normal operation, since the angle grinder is a tool with increased injury rates.
Small holes are made on the screen, and the prepared fragment is secured using nuts and bolts. The protective casing can be painted with oil paint, and if it is made correctly, it will serve for a long time and reliably protect the worker.
The base-stand for the machine is sometimes made of silicate or red brick.
Metal grinding machine
There is another option that will allow you to process metal parts. To do this, take profile pipes (2 pieces) and attach them by welding to a rectangle made of a steel sheet 5 mm thick. Holes are drilled in the posts and arm, and the dimensions can only be determined empirically.
Stand for grinder
No matter how skilled a craftsman is, he needs the perfect tools to get the job done. The angle grinder stand is provided as an excellent accessory for perfecting these corner pieces.
DIY stand for an angle grinder
The grinder stand allows you to grind at perfect angles of 115 mm-125 mm. If the stand is made of aluminum alloy, this allows you to have a device that will undoubtedly last a long time.
Get more out of your angle grinder with a convenient holder. Angle grinders are dangerous devices. Homemade grinder tools will allow you to have more control over them, but we still need to use all the necessary safety equipment, such as safety glasses and gloves.
What you will need:
- Woodworking accessories.
- A piece of hard plywood 300×100×20 mm.
- A piece of hard plywood 150x100x20 mm.
- 1 M12 screw, 30 mm long.
- 2 M12 washers.
Holder for grinder
The design is very simple, you only need to form a part 150X100X20, adapt it to the shape of the grinder.
Making your own devices
To make working on an angle grinder easier, all sorts of designs have been invented that increase its functions. The presence of equipment makes it possible to use angle grinders as a belt grinding machine. It is not difficult to make accessories for an angle grinder with your own hands, and it will also cost much less.
Accessories for grinders
- Tripod
- Retainer
- Fraser
- Miter box
- Wall chaser
- Extension
A tripod is a device that frees one hand. The angle grinder is held with only one hand, and with the other hand it is possible to support the metal and turn it if necessary. In addition, it makes it easy to set the desired cutting angle. It allows you to do work efficiently and safely. The frame is made of metal profiles, a shock absorber, and sometimes even plywood is used. Such an improvement is only permissible for a machine with 125 mm discs; with a larger size it is dangerous, since you have to remove the casing. You can take different options as a basis or make your own drawing. The main thing is that the tool is securely fastened. The most convenient way is when the angle grinder is attached to the protection casing. You only need 2 10mm bolts and 2 nuts, which are attached to the outer part of the casing. There are 2 more plates and a pipe onto which everything is screwed. And the switch should be made not fixed, you can use a foot pedal, then in an unusual situation it is easy to stop the machine. If the design for cutting metal is strong, then you can use it for sawing wood.
Clamp – there are many clamps, but the best option for fastening an angle grinder is a vice. They hold firmly and there is no need to support with your hand, thereby reducing the risk of injury. Rotary vice increases the capabilities of the machine (oblique cut). When you install the desired disk or file in a vice, you get a sharpening machine, but after unscrewing it, you can do the work manually. And by attaching stops with a slot across the disk, very precise processing can be achieved. The most popular option is a band sawmill made from an angle grinder. You just need to have a reliable frame and strengthen the machine well.
A milling cutter is another device for an angle grinder. The machine has a powerful engine, so it can be converted into a milling cutter. To do this, you should take the shaft into the opening of the workbench and put a chuck with heads for milling on top. The resulting homemade device for an angle grinder is used to process hard wood.
It is important to remember that the device is not designed for this type of work, so you need to take care of your safety.
A miter box is a rotating surface for a grinding machine. Using this device, it is easy to cut plinths, baguettes, profiles at the desired angle
You just need to install the desired disk, then the surface is fixed at an angle of 45 degrees, and the machine is ready for work. You can cut any platband for a wooden house or paving slabs.
A wall chaser is a necessary device for an angle grinder. Used for laying wiring by hollowing out recesses in the wall. However, this is not safe. When making an attachment for an angle grinder that works on a dense base, it can be used to cut walls along the entire diameter of the disk. With a good sole for an angle grinder, its guiding movement is carried out smoothly, without much effort.
Extension cord – used for plumbing and plumbing work in hard-to-reach places.
Clamp for grinder
The second most popular way to add convenience when working with an angle grinder is to fix the tool motionless on a workbench or in a vice.
By installing the appropriate disk, you can get an excellent sharpening machine, or just an emery machine. The Bulgarian herself never ceases to be such. At any time, unscrew the mount and begin manual work.
If you attach a strong stop with a slot across the disk, you can process parts with high precision while holding the workpiece in your hands.
The most popular is the circular sawmill made from a grinder. Having made a strong frame and securely fastened the angle grinder under it, you get a seasonal sawing machine that can be easily disassembled if necessary.
At the same time, you still have a grinder and a great workbench (albeit with a slot in the middle of the tabletop).
How to make a frame for an angle grinder
It is obvious to everyone that it is extremely difficult to hold a heavy instrument for several hours. Therefore, to facilitate their work when performing an operation, many craftsmen make special devices called beds. When an angle grinder is equipped with such a device, cutting work can be done using only one hand.
To make a frame, you first need to make a wooden box. You can get by with only one side on which the tool will be attached. All other walls can be removed, and legs of a special design can be attached instead.
But in order to achieve the effectiveness of using an angle grinder with such a device, it is necessary to make some changes to its design.
The first step is to dismantle the casing of the angle grinder. After this, you need to put a disk on the instrument. When this action is completed, it must be pressed against the side wall of the device.
It is necessary to mark where the gap was made for the movement of the nozzle or disk. Its width should not be too large, otherwise foreign objects may get inside the structure during work.
If desired, the gap can be increased. The need for this arises in cases where it is necessary to replace the nozzles without completely disassembling the entire structure. Samples of wooden blocks can be used as support elements. After this, you can begin cutting workpieces.
What can be made from an angle grinder: 14 homemade products
zen.yandex.ru There are crazy ideas for an angle grinder, like using it as a lawn mower. You can also use it to build a quadcopter, ride a bike, pump water, and many other useless but extremely exciting things. We will look at those options for using an angle grinder that are really useful and sometimes help get out of a situation where there is a lack of specialized power tools. 1. It happens that you need to cut a sheet of iron evenly. With the help of this device it is easy to do this by aligning it with a ruler.
2. You don’t always have a sharpener on hand for threading drills. But with the help of an angle grinder this can also be done.
3. Now let's move on to cutting the wood. You can quickly make a simple device out of wood that turns an angle grinder into something like a circular saw. 4. A more capital device is metal. More like a real circular saw. 5. This is a wall chaser. “Russian Technician” has a separate article about it with drawings. 6. With a special cutter you can do wood carving. 7. Or you can attach a chisel for wood carving.
8. There is also a special device with a felt roller for processing metal surfaces. 9. Drill chuck for an angle grinder – original. You can install not only a drill, but also a large number of different attachments. 10. Only an extreme person can decide to do this. Don't try this again. 11. At the speed at which the grinder works, you run the risk of sharpening the knife by half in one moment. 12. And with such a device it is easy to polish metal railings 13. Perhaps this device is intended for sharpening something. In any case, there are doubts about the functionality of this mechanism. It is very doubtful that the tape will not slip on the shafts. 14. It looks beautiful, but also raises serious doubts about performance, functionality and a more or less acceptable resource.
Scope of application of cutting machines
Cutting disc machines are widely used in metalworking, mechanical engineering, woodworking and furniture industries. The units have also found their application in the household: they are used as a convenient tool for performing various tasks in the workshop and garage. The cutting machine is convenient to use to solve a number of problems:
- dividing the metal profile into segments of the required length;
- cutting sheet metal;
- obtaining a large number of similar blanks in a short time;
- cutting ceramic tiles;
- cutting parts at any angle, obtaining cuts of the required length, depth, and so on.
Due to their relatively low cost, universal units have a quick payback period, so they are profitable to use in small industries and small workshops.
In the household, a cutting machine is used irregularly, so purchasing a factory-made tool is irrational. It is better to make a special stand for an angle grinder. This will increase the versatility of the grinder, turning it into a small-sized cutting machine.
Briefly about the main thing
The grinder is already called a universal electric tool due to the ability to use it together with various devices. They are the ones who expand the scope of application of angle grinders.
The devices are available in retail chains in factory-made versions or their production is ordered from craftsmen. Bolkarka can serve as the basis for a cutting, grinding, milling machine. An angle grinder is used in the same way as a pendulum saw or wall chaser. An angle grinder even allows you to cut porcelain tiles evenly and quickly.
For an angle grinder, a protractor or miter box is purchased in ready-made wine or made to order. They allow you to cut workpieces at the desired angle. Cutting machines for angle grinders often have guides in their design.
Work technology
triangle shaped cutout
Next, six holes should be drilled in the plate structure. The diameter of each of them should be 4 mm. Subsequently, it is in these holes that the self-tapping screws will be installed. With their help it will be possible to fix the handle, corners and timber. All holes must have special recesses for screw heads.
To securely fasten the beam handle, a few self-tapping screws are enough. The fasteners used during this work must have dimensions of 3x35 mm. This will result in an L-shaped part.
After this, all the elements together with the plate are assembled into a single structure. The created tool fixture must be secured using 3x20 mm self-tapping screws.
So, the basis of the future structure has been made. Next, you will need to install metal corners. You should have several of these items available. They must have the following dimensions:
- 75x30x55 mm;
- 45x60x60 mm.
Please note that the first corner must be bent to 60 degrees. If you don’t do this, then you won’t be able to achieve your main goal - to attach the manufactured structure to the angle grinder.
When the installation of the metal corners is completed, the tool itself is attached directly to them.
To connect the tool and structural elements, use a separate handle on one side, and bolts with nuts on the other side. The latter are necessary so that during work the screw of the structure does not unscrew.
If desired, you can refuse to install the nut on the handle, since it will be held by the hand of the master during work. At this point, the work on creating a cutting structure can be considered complete.