Benefits of use
A tripod for an angle grinder is a practical and convenient tool. If you need to cut large quantities of metal products with a grinder, then a tripod becomes indispensable. Thanks to him, an ordinary grinder becomes a real machine in the form of a mounting saw. The resulting design allows you to securely fix the angle grinder. This gives higher precision when processing parts and speeds up the production process of the product.
Among the advantages that allow us to classify the purchase of a tripod for an angle grinder as a profitable acquisition are:
- The workpiece is placed on the rack as accurately as possible. This is very important, especially for cutting parts of a certain size.
- The overall level of safety when working with the tool increases. This ensures the accuracy of the disc movement.
- The pace of work thanks to the device becomes faster. The pressure on the workpiece increases, which makes it possible to produce it with higher quality.
The result is a very interesting and convenient multi-profile machine, with which you can process and cut parts in volumes sufficient for mass production. An angle grinder is an indispensable tool in the work of various construction companies, including large-scale construction sites.
Stand for angle grinders Caliber 96211 - a convenient device for an angle grinder
I strongly welcome all readers of the Live blog from iXBT!
A small test report of the rack for angle grinders Caliber 96211.
This is a convenient device that turns a simple grinder into a cutting and trimming machine.
Can cut quickly and accurately at various angles. and the universal mount is suitable for most angle grinders with a disc diameter of 115 mm and 125 mm.
Link to lot: 96211 Stand for angle grinder-115/125mm.
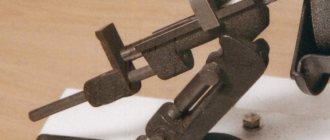
The appearance of the stand is a base with an installed stand for clamping a tool, a handle and a part fastening.
Accordingly, I received everything quite quickly (about 8 days) from stock from a warehouse in Moscow.
The package weighs almost 2 kg.
There is information about the model.
Inside are tightly packed parts of a disassembled rack.
The set is in the photo. To assemble, you will need to install the stand on the base, plus screw on the handle.
Large parts are tied with plastic ties.
There are instructions for assembly and operation.
Guide and handle in a separate package.
Mount for angle grinder. Mounting bolts are present.
There are two types of bolts and two screws with rubber caps for fixing the body of the angle grinder.
Stand base for stand. There is a workpiece clamp.
Kit before assembly.
The size of the stand is approximately 28 cm (square).
From the bottom side you can clearly see the nuts pre-installed in the grooves.
Warning sign: don't get involved - it will kill you! You need to configure it with the equipment turned off.
Assembly proceeds without any problems.
Install the handle.
Install the angle grinder holder.
The nuts are fixed on the reverse side by the shape of the grooves; you only need a hex wrench to tighten the screws.
The stand itself is assembled. Checking the tilt mechanism.
The tilt mechanism in the stand is spring-loaded.
After pressing, it returns to the vertical position.
More photos of the stand.
It goes down almost all the way. With the grinder installed, the vertical travel of the stand will decrease.
Construction details.
Guide and eccentric clamp for the part.
On the stand there is a kind of vice formed for fixing the workpiece to be cut, from a fixed and a movable part.
The fixed part allows you to set the desired cutting angle.
The moving part in the form of a clamp with an eccentric allows you to quickly grab parts of any size.
Tighten the nut as necessary, and turn the handle to secure the clamp.
A few words about fixing angle grinders in a rack.
The tool body has threaded holes for installing a handle.
First remove the handle from the grinder, align the holes with the holes in the mount and tighten the bolts. The second pair of bolts is needed to secure the housing. Plus, horizontal screws with rubber tips allow you to level the body of the angle grinder. First, we align everything and try on whether the cutting disc fits into the groove intended for it in the base. If necessary, you can move the stand to the left or right.
The rack is now ready for use.
I used a stand + angle grinder to cut calibrated guides and 8 mm lead screws for a CNC machine.
The diameter is 8 mm, but a good end cut is important.
We install a small grinder.
We try it on and set the required length of the segment.
The cut should be smooth and perpendicular.
We cut it.
Be careful with the tool and follow safety precautions. It is highly advisable to use glasses and also have the power switch handy.
The resulting segments were used to assemble homemade machines. The ends were additionally sanded.
Kind of like a homemade machine.
or something like this:
Conclusions:
This is a very useful and unusual device: Stand for angle grinder-115/125mm.
The universal mount allows you to use almost any small grinder, and the convenient clamp allows you to quickly fix the workpiece for cutting at the required angle.
Purchased from the Kalibr Store, which is the official representative office of the Calibr brand.
on the Aliexpress platform.
If you want to repeat my experience of self-assembling a CNC or have questions, ask in the comments.
Good luck to all!
Main parameter
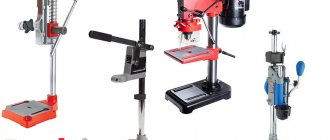
When choosing a stand for a grinding machine, the main parameter is the diameter of the disc of the grinder used. The importance of this parameter lies in the fact that the diameters of the frame and the disk must correspond to each other.
There are models that can only work with one disc parameter, for example, 100 millimeters. But most often it is possible to purchase a device that can work with two types of grinder discs, for example, 115 and 125 millimeters. The choice based on the specified parameter is made based on the client’s personal preferences.
The main element of the bed and what it is
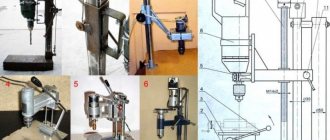
The main element of the frame should ensure convenient sawing of metal with a grinder, since it is this element that turns a conventional angle grinder into an end grinder. To put it simply, you need to use some kind of pedal. To avoid a lot of explanations, we suggest taking a look at the photo below.
PHOTO: YouTube.com This is what the main element of the frame for an angle grinder should look like
In fact, if there is nothing similar among the parts in the garage or workshop, you can make such an element yourself. Similar designs are also found on limit switches of industrial guillotines and other similar equipment.
Where to buy
Stands and tripods for such machines are sold in specialized stores, as well as on relevant Internet portals. You need to look for this product in the section auxiliary tools or additional devices for electrical equipment. The average cost of racks ranges from 1500-2000 rubles per piece.
To buy a product, you first need to select the device you need and add it to your cart. Go there and place your order. Provide all necessary information, including contact information, payment and delivery methods. The seller will contact you to clarify the product and its delivery time.
In addition, these racks are available in large quantities on the construction markets. The advantage of buying in these places is that it is possible to purchase a high-quality and inexpensive rack that has a high degree of reliability and will bring corresponding benefits. Also, when purchasing a stand on the market, you can ask the seller in great detail about the characteristics of the product and how to use it.
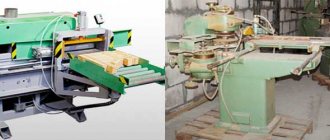
Sheet steel cutting machine
The main parts of such a machine:
- Base. Ideally, it should be no smaller than the sheet that is supposed to be cut with a grinder, or allow the entire cutting area to be laid on it. It is necessary to use steel as a manufacturing material so that it absorbs heat, preventing the steel cutting line from overheating.
- U-shaped stand. This structural element serves as a guide for pulling the angle grinder through. The length of the section between the legs of the stand should be sufficient to place a sheet between them, plus allow the body of the angle grinder to fit freely.
- The carriage is a movable element that moves along a U-shaped stand on bearings. A pendulum console and a depth limiter for lowering the cutting disc are attached to it.
- The pendulum console serves as a mechanism for lowering the angle grinder to the level of the working position. Also attached to it is a tool control handle.
Flaws
Reviews of a stand or tripod for a grinding machine depend on the specific product and experience with use. Common disadvantages include:
- Can only be used as a device in an amateur workshop, not suitable for professionals.
- Mostly of Chinese origin, which leaves certain questions about the quality of workmanship.
- Relatively dangerous due to simple protection when working with products.
- Due to the simplicity of the design, backlashes soon appear, and connections and clamps become less strong.
Also criticized is the low quality of the materials from which the stand is made, the short service life, the insufficient reliability of the structural components and of grinder discs Another point concerns the price of the device, since high-quality racks can be sold rarely and at a relatively high price of 3,000 rubles. Some advise using homemade devices, since their reliability is sometimes higher than that of purchased designs.
Stands for angle grinders are considered a fairly convenient tool. If you need to choose a quality product, then look not only at the reviews, but also at the quality of the materials and their technical characteristics. The quality of trimming the desired products and the final result will depend on how well the choice is made.
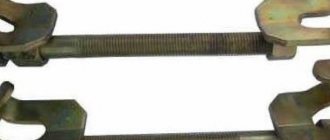
Required design elements
Among experienced craftsmen, there is a universal copy of the bed, which consists of several parts:
- Return mechanism.
- A support frame that can later be installed on any flat surface or even a workbench. To manufacture this system unit, you can use profile pipes that have increased rigidity and are well resistant to possible vibrations.
- A durable table, which must be made of thick sheet metal with all mounting holes.
- Convenient swivel lever with tool holders.
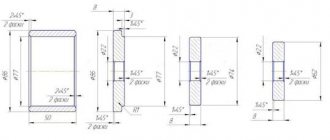
- A high-quality universal prefabricated device of a round shape, which is equipped with 9 mm grooves. These devices will be able to support a tool whose weight does not exceed 10 kilograms. A rotary table with a screw control mechanism (reading dial and handwheel) is installed on the USP. Experts say that a regular hub from any passenger car can be used as a turntable. All dimensions must be taken into account.
- A vertical stand to which the grinder itself will be attached.
- High-quality vice for fixing workpieces. It is worth considering that this device should be installed cantilevered, so that in the future it will be possible to balance the overturning moment that comes from the USP.
- For comfortable work, the turntable can be equipped with a regular ruler, which will measure all linear as well as angular movements. Instead of a factory line, you can use a home-made device, which must correspond to the parameters specified in the drawing. In order to properly make a desktop at home, you need to provide in advance for radius fastening of the corners. The moment when it is possible to move the bench vice without disturbing the overall alignment is considered mandatory.
How to make a start button for a pendulum machine from an angle grinder
The angle grinder works when you press a button. Moreover, the spindle rotation speed depends directly on the pressing force of the button. This means that an adjustment mechanism is built into the button, the operation of which facilitates the operation of the tool. When operating an angle grinder on a stationary machine, it is necessary to consider the starting system so that you do not have to hold the handle with one hand and press the button with the other.
If the tool is equipped with a regular button, which automatically locks when it is turned on, as for example in the first version of the machine, then no difficulties arise here. First, the tool is turned on, and then you can perform work. However, most angle grinders are equipped with self-off buttons that must be held by hand while operating. There are two ways out of this situation:
- Use ties (for example, plastic) or clamps of the appropriate diameter. They fix the button in the pressed position. In this case, it is also necessary to take into account the latch, which is responsible for turning the tool on automatically. Both the latch and the button must be tightened with a clamp, tie or other similar materials. In this case, the principle of operation of the device will be as follows - if you need to start the tool, you need to plug the plug into a socket or make a switch
- It is rational to remake the starting system if the tool is planned to be used more often as a cutting machine than as a stand-alone angle grinder. To do this, it is necessary to route the wires from the angle grinder to a separate switch, which will turn the tool on and off if necessary.
The power button, if it is displayed, is best located on the handle. A homemade machine does not require large expenses for its production, which, in fact, is its main advantage.