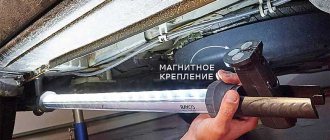
Getting to know the element
Making a homemade knife is actually quite a labor-intensive process, but home craftsmen are not afraid of this. The main reason is to satisfy one's creative potential. Using available tools, you can make any type of knife.
And often, handicraft production is in no way inferior to factory production, and in some cases can even surpass it. Among other things, this is a good cost savings. Making a knife at home will require the master to strictly adhere to order and rules.
The most important stage in making a knife is the formation of slopes on the blade. These elements are made by milling flat blanks. They will greatly influence the piercing and cutting properties of the finished product.
Components of a knife
Product from Chrysostom.
The main parts of a knife are the blade and the handle. These parts cannot exist separately; they complement each other and interact in the logic of functionality and purpose.
A good knife has a durable and flexible blade. But it must also be wear-resistant and resist corrosion well.
The secrets of the masters are hidden in these simple characteristics of the blades. Knowledge accumulated over the years is sometimes protected from prying eyes. In modern Russia, the production of knives received a good boost after the crisis in 1998.
Then all kinds of small private enterprises and metalworking handicraft industries began to appear. But then they became very popular among the people. Cities such as Zlatoust, Vorsma, Pavlov became traditional centers for the production of knives.
Deep knowledge of the laws of metalworking and the properties of steel allowed blade craftsmen to raise the bar for metal processing to the proper level. Masters became recognizable by their individual designs and blade designs.
A little theory
There is no one perfect solution for all types of knives. Descents are performed for blades with specific tasks.
You can try to find a middle ground, but the thickness of the blade and the thickness of the blade will not give the knife ideal parameters.
To understand the principle of cutting a knife, you should take a closer look at the process. First the cutting edge comes into play, and then the trigger comes into action. Thanks to its qualities, it pushes the material that is being cut apart. It turns out that the thinner the bevel, the faster the cut will be.
But due to this, the strength of the blade suffers. With a more massive descent, the strength of the blade increases, but the cutting speed decreases. When making a blade, you have to sacrifice something. The purpose of the knife plays a role here.
Blade descents.
Side profiles of blades
There are many types of side profiles. The following are considered the main ones:
- The blade intended for cutting and stabbing has a straight spine.
- Blade with a lowered spine line (drop-point). This product cuts and stabs well, the tip is located on the axis of force application. It is slightly lighter in weight than a blade of the same length with a straight spine. A false blade is often made on this part.
- Blade with an increased trailing point. This shape provides a long cutting edge, which is quite convenient when cutting durable materials.
- Bowie wedge (clip-point). The shape is very similar to a wedge with a lowered butt line, but the tip is thinner. A special bevel of the blade brings the tip closer to the line of application of force during a piercing blow. This bevel is sometimes sharpened; this type is popular in America.
- Goat leg type blade. The product is designed for thin and precise cuts, which is facilitated by a straight blade. The knife is quite safe and cannot be used to stab.
- Tanto type blade. Many historians claim that this shape originated from Japanese knives. But in reality it was invented in America. And classic tanto knives had a straight line of the spine. The product is convenient for cutting actions, and with a forceful injection, the tip is less likely to chip.
- Spear-shaped wedge. Most often these are double-edged products with the tip located on the midline. These knives are more suitable for stabbing. Most often, daggers are made this way.
Blade profiles.
Basic shapes and characteristics of descents
For a beginner, the task is often to choose the right trigger for the blade. The question may arise even when making an ordinary kitchen appliance. But don’t worry, let’s look at the most popular types of descents:
- The easiest to manufacture and most popular escapement is the wedge-shaped one. It is often used on kitchen knives.
- Also a wedge-shaped descent, with a transition to the cutting edge. But when sharpened, such a blade will automatically switch to type number 1. During sharpening, the cutting edge will be formed separately from the trigger. You can sharpen the entire trigger, but this is very problematic for the average person.
- The shape is typical for many knives. The descent begins from the middle or slightly higher to the butt, while the blade is flat. Easy to sharpen.
- A fairly commonly used option is wedge-shaped bevels and a cutting edge. Such blades have a good cut and sufficient strength. The slopes and the edge are in good harmony in the work.
- The double wedge forms the cutting edge. The material between the cutting edge and the bevels has been removed. The blade has an excellent cut, but is difficult to sharpen. Only professionals can handle it.
- Lenticular concave slopes. The cutting edge acts as a continuation of the edge between the blade and the bevel towards the tip. Such descents can start almost from the butt. This type of sharpening is called razor sharpening and is used for straight razors.
- Chisel one-sided sharpening of the blade. Sharpening a knife is not difficult. The bevel should be on the side of the working hand, and such a knife can be wielded with only one hand.
- Its shape resembles number 3, but there are practically no descents. Straight blade and straight cutting edge. This is how items for cutting are sharpened.
- Lens-shaped convex bevels smoothly transition into the cutting edge. This sharpening has a second name - bullet-shaped. It is difficult to cut with a knife; it gets stuck in the material, but has excellent chopping characteristics. This option is difficult to manufacture and is suitable for professionals.
The easiest to manufacture are options No. 1 and No. 3. They can be made for ordinary household knives. You should start making other options only after experiments with simple descents.
Basic forms of descents.
How to correctly set the overall cutting edge angle
This is important: if we are talking about a knife with symmetrical slopes, then the sharpening angle will be twice as large as the one under which we place the sharpening stone. For example, if we prefer to sharpen our hunting knife at 30 degrees, then there should be an angle of 15 degrees between the blade and the block.
From this we derive two concepts:
- full angle, which is the sharpening angle (in our example - 30 degrees);
- half angle is the one at which we place the blade in relation to the block (in our example - 15 degrees).
We determine the angle itself based on the purpose of the knife.
Special, particularly delicate cutting tools
By these we mean surgical instruments, shaving devices, blades, etc.
The sharpening angle for delicate instruments is 8–10 degrees.
The expression “razor sharp” arose for a reason - the angle of approach of the razor is one of the sharpest among all cutting tools
Knives for working on soft materials
These are mostly kitchen knives: fillet knives, vegetable chopping knives, etc.
The sharpening angle for fillet and vegetable knives is 10–20 degrees.
Fillet knives work with soft materials, so their approaches can be brought at a fairly sharp angle, up to 20 degrees
Universal kitchen knives
Chef's knives for various purposes can work on both soft and hard materials - cartilage, small bones, frozen fish or meat.
The sharpening angle of kitchen “universal” is 20–25 degrees.
“Universalists” have to work both with soft meat and bread, and with cartilage. We take the approach angle for them at a medium angle, up to 25 degrees
Knives for hunters, fishermen, survivalists. Tactical knives
Such tools are often found not only with soft camping products such as sandwiches, but are also designed to cut branches and fishing lines. Sometimes they are even used as sling cutters.
The sharpening angle of “street” knives is 22–25 degrees.
Hunting, tactical (pictured) and survivalist knives encounter hard materials and require a larger approach angle
Knives and other tools for working on hard materials
This includes kukris, machetes, garden knives, tourist and ordinary household axes.
The sharpening angle of knives for heavy work is 20–40 degrees, sometimes up to 50.
Machetes, kukri and other tools that work for striking and chopping need to be sharpened to 40–50 degrees
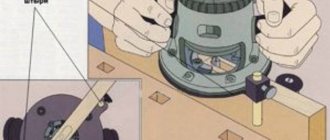
Trims with a grinding machine
The sharpening machine is a fairly simple design. This is an electric motor with an abrasive wheel mounted on a shaft. Surely many have seen him in workshops. But some points should be taken into account when making descents on such a device.
There are different circles, you should not take the first one you come across. To perform descents, we recommend a circle marked 25A, this indicates its composition of white electrocorundum. This wheel is inexpensive and works great on hardened steel.
It is advisable to have a tool rest on your sharpening machine. This is a small area in front of the circle; it will allow you to use various devices for proper work.
It is recommended to use the machine with good speed.
Otherwise you will have to suffer for a long time. If the machine is low-powered, the circle may stop when the blade is pressed hard against it. The process will thus slow down greatly. Choose a machine with a power of 450 W or more.
Examples of sharpening machines.
Handle types
An important element of any knife is the handle. For a good cut, you need to hold the blade comfortably in your hand. The shank, which is located inside the handle, is made by knife makers in accordance with future installation. Let's look at what types of handles there are:
Horseback
A very common type of installation, especially from well-known manufacturers. Considered very reliable. The blade shank is inserted into the handle to the middle of its length.
Through
The most reliable installation option, but quite labor-intensive. The blade's tang runs through the entire handle.
Overhead
The shank itself serves as a handle; other materials are applied to the side surfaces and secured with rivets.
Welded
This method is used when installing metal handles, which become a monolithic structure with a shank.
Belt grinding machine for making bevels
In addition to the expensive grinder, you can find small grinders on the market that also use a belt. To make descents using such a device, you will need to additionally build the structure yourself.
It will allow you to firmly fix the machine in a vertical position, thus creating a miniature grinder. But these machines use a wood processing tape. You should find a suitable steel tape or tinker with the one you have available.
Belt grinder.
Classification of knives by purpose
The meaning of the classification is clear from the name, let's figure out what purpose knives can have:
How to make bevels on a knife using a grinder
How to make descents on a knife at home using an angle grinder? The question is quite sensitive and ambiguous. Experienced craftsmen, as one, argue that beginners should first try making descents by hand.
You can choose for yourself any homemade device that the Internet is replete with. There are plenty of tips on how to use such devices. But the manual method is recommended to learn to feel the metal.
Special devices will help save time. But for a beginner this will only be a hindrance. To achieve the best cut, it is necessary to achieve harmony between the bevels and the cutting edge. Let's try to consider the option for more or less experienced craftsmen to make bevels using an angle grinder.
Expert advice
Read this material so as not to make irreparable mistakes when working. They mainly concern the instrument. Cut the workpiece in accordance with the template from a sheet of metal using a circle with a thickness of no more than 7 mm.
When using a cutting wheel, the steel may overheat or break.
Small grooves may also appear. Grinding wheels are quite suitable for this job; those from well-known manufacturers perform especially well.
The cost of such circles is not high. Having learned how to use such material, you can move on to cut-off ones, but their thickness should be at least 2 mm. The disadvantage of such circles is vibration under lateral loads.
The entire instrument begins to shake. This can cause the disc to rupture and cause all sorts of injuries. Beginners who do not follow this advice still end up returning to the roughing circles.
Examples of Bulgarians.
Preparatory stage
In order not to run around the workshop and look for the right tool, you should collect the necessary things closer to you. Do not forget about safety precautions when working with an angle grinder. Under no circumstances is it recommended to remove the protective cover. In addition to the grinder you will need:
- the preparation of the future blade itself;
- cardboard template of the future knife;
- metal corner;
- not a bulky grinder, aka angle grinder;
- good and reliable vice;
- screw clamp;
- bucket with water.
The main tool for work is a grinder. Choose not large sizes, maximum 125 disc, otherwise you will be physically very tired. You won't need an overly powerful tool. 1000 W is enough. Work must be carried out with gloves and glasses.
Have you already tried making descents yourself?
Many times already! Not yet...
Cutting the workpiece
To cut the workpiece, follow these tips:
- Using a marker, the knife template should be transferred to the metal from which the blade will be cut.
- Cutting the workpiece should be done clearly, in accordance with the line of the template. Be very careful with the butt of the product; this part of the blade cannot be covered.
- Drawing the butt lines, this should not be done with a thick line, but clearly visible.
- The metal corner should be clamped in a vice and the already cut workpiece is pressed against it using clamps.
For high-quality clamping of the tip of the future knife, it is better to use two clamps. If you have one, then it should be gradually moved around the place where the blade is processed. The blade should adhere to the corner very tightly. The processing location should face the master.
Cut out the workpiece.
Chamfering
After the preparatory work, the chamfer should be cut. The purpose of this element will become clear later. The grinder should be positioned strictly perpendicular to the workpiece. If there are uneven surfaces, do not deviate from the original position.
It is not recommended to press the disk tightly against the workpiece; on the contrary, you need to try, slightly touching the metal. So you should remove a small chamfer along the cutting edge of the blade. This should be done carefully and it is necessary to maintain a distance of 0.2 mm from the line to the middle of the knife.
The process does not require speed; it requires patience and accuracy. During the process, it is necessary to cool the part, water it with water from a bucket. Overheating can have a significant negative impact on the finished product. You need to chamfer along the entire cutting edge; this will be a clear boundary that cannot be crossed.
Descent work
After completing the chamfering work, you should start working on the slopes. The direction of movement of the abrasive will be towards the butt to the marked line.
Carefully control the process; the descent will begin near the heel of the blade.
The grinder should be moved left and right with a small amplitude. It should be 15-20 mm, so the metal will be gradually removed. The abrasive must be strictly perpendicular to the cutting edge. Don't forget to cool the workpiece.
Do not deviate from the specified parameters, otherwise the disc may stand on its edge, which can lead to a big headache. The step-by-step process will not allow you to ruin all the work with one wrong move. You should not put pressure on the grinder; its weight is enough.
Blade sections
The functionality and convenience of a knife is determined primarily by the profile of the blade, which is specified during its manufacture. The main components and concepts of the blade are:
- 1 – cutting edge;
- 2 – descents;
- 3 – ribs;
- 4 – golomen;
- 5 – butt;
- A – blade width;
- B – web width;
- C – width of slopes;
- D – inlet width;
- E – butt thickness;
- F – Thickness of slopes at the inlet.
All these parameters can be seen in the picture below.
Blade cross-section diagram.
Making descents by hand
Manual sharpening was touched upon at the very beginning, it’s worth returning to this method. It is recommended for very beginners. The process will help you understand and feel the steel itself. It is very labor-intensive, and you will have to shed a hundred sweats to make the descents manually.
All work is done with files, only abrasive stones will be required at the end. To understand how much you need to grind off, you will answer for yourself when you make cuts more than once. You shouldn’t be lazy; in fact, it will be very cool to do descents manually.
Folding knives
The structure of a folding knife allows you to hide the blade in the plane of the handle.
Some products are equipped with an axis of rotation of the blade perpendicular to the plane. According to experts, such models look much more efficient than classic ones, but are less reliable. In general, in folding knives, in the open position, the spine of the blade is in line with the handle.
Special structural elements secure the blade. In the first models of folding knives, fixation was carried out with a special protrusion on the butt of the blade.
Structurally, the products were similar to a straight razor. Today there are several types of locks. The most common among them are three versions:
- back up, the knife blade is equipped with a lock;
- liner lock, lock in the form of a strip;
- axis lock, folding device with axial lock.
Folding knives.