A do-it-yourself belt grinder (grinder) was conceived for such tasks as finishing grinding and polishing parts made of different materials. It can be used to process, polish, grind wood surfaces, and various other coatings. This device is mainly used in furniture production, as well as in blacksmith shops.
Such a machine will also be useful in a home workshop, but factory-made models are usually quite expensive for the average plumbing enthusiast. A much more profitable and realistic solution is to make a grinding machine yourself. It is assembled from an electric motor of 550 W, 2400 rpm, with a belt of 15 m/s, which is a very good result. The machine is based on a 120 mm channel frame, and standard 30 mm wide wheels are also used. To make a spring-loaded holder rod, a profile pipe with a square cross-section is taken. The sanding belt is tensioned by a spring.
List of materials used:
• electric motor 550 W, 2400 rpm; • channel 120 mm; • wheel, width 30 mm – 2 pcs.; • bearing; • sanding belt.
List of tools:
• welding machine; • Bulgarian; • spanners; • screwdriver.
Step-by-step description of the work on manufacturing a grinder (grinding machine)
Drawings, diagrams, prototypes, which are taken as a basis.
We bore the flange on the electric motor using a lathe.
Grinder (English) literally – crusher. Meat grinder is a meat grinder, rock (stone) grinder is a stone crusher; stick (wood) grinder – garden crusher of branches and twigs into chips. But there is also a completely unambiguous meaning of the word grinder: in mechanical engineering and metalworking it is a grinding machine. A useful household item. For example, it is impossible to guide a dull meat grinder knife on a whetstone manually. On a manual knife sharpener - somehow possible, having solid working skills. And on the grinder - no problem. The same applies if you need to polish a part of a complex shape without disturbing its profile. Or just sharpen scissors or a professional knife. It is best to edit various types of wood and metal cutters on a grinder. It is quite possible to design and assemble a grinder with your own hands, without having complex equipment and skills to work with it. In terms of money, this will mean savings of 50-90 thousand rubles. up to 3-6 thousand USD.
To make a grinder yourself, you will need to order a maximum of 4-5 turned parts, and it is often possible to do without external turning at all. For example, how to make a simple grinder literally out of trash, see the video below:
Homemade grinder with a washing machine engine
When using commutator motors from next-generation washing machines, you cannot do without a separate speed controller, since their rotation speed usually lies in the range from 11 to 18 thousand revolutions per minute. These compact and powerful devices have their drawback: with constant use under load, their brushes quickly wear out.
Disc or tape? And drive
There are almost more types of grinding machines used in industry than lathes. The emery known to all craftsmen - a motor with a pair of grinding wheels (or one wheel) - is also a grinder. For yourself at home, it makes sense to make either a disk end grinder (plate grinder) or a belt grinder. In the first, the abrasive is applied to a rotating hard disk; in the second - on an elastic band running around a system of pulleys and rollers. The disc type is more suitable for grinding simple wooden parts and coarse or medium clean metal parts. Using a belt grinder, it is also possible to produce precise and clean finishing of profiled parts of complex shapes, incl. large-sized, see below.
A disk grinder is very easily obtained from the same emery or a motor of suitable power, see below. You need to order an adapter from the electric motor shaft to the shank of a metal-based grinding disc. Or under a clamping chuck, then on the same motor it will be possible to build a mini lathe, see figure:
Homemade disk grinder
A worn-out “plate” is suitable: a disk made of thin (4-6 mm) fibrous plastic is glued to the edge of its side, and an abrasive is placed on it. How to make an end grinder, see next. video clip.
Video: homemade end grinder
Note: a 100-200 W drive uses a mini belt grinder (see below) for precision knife dressing, grinding/polishing jewelry, etc.
A drill or screwdriver as a grinder drive is also convenient in that it allows you to quickly change the speed of movement of the abrasive (see below) using a standard speed controller. You just need, firstly, to make a holder for the drill that rigidly fixes the tool. Secondly, an elastic transition coupling from the drill to the disk shank, because It is difficult to achieve their precise alignment without special equipment, and runout will negate the accuracy of processing and can damage the drive tool.
Drawings of a drill holder for using it as a drive for a home metal-cutting machine are given on the left in the figure:
Drawings of a drill holder for driving a grinder (grinding machine)
Since shock and irregular alternating loads on the drive in a grinder are an order of magnitude lower than, say, in a lathe, the drill holder for it can be made of hard wood, plywood, chipboard, MDF, on the right in Fig. The diameter of the mounting (large) hole is along the neck of the drill. It is highly advisable to use a drill without an impact mechanism and with a steel shell on the neck (for installing the front handle).
coupling
For the adapter coupling, you will need a piece of steel rod (not necessarily turned) of the same diameter as the shank of the grinder drive shaft, and a piece of PVC-reinforced hose (garden irrigation) with a clearance such that it stretches tightly over the rod and shank. The length of the “free” hose (between the ends of the rod and the shank in it) is 3-5 cm. The length of the protruding part of the rod should be sufficient for reliable clamping in the drill chuck. After assembling the coupling in place, the hose on the shank and rod is tightened tightly with clamps; can be wired. Such a coupling completely counteracts the misalignment of the drive and driven shaft up to 1-1.5 mm.
Read also: Why are there three speeds on the heating pump?
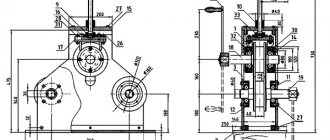
Drawings of a belt grinder. Full set with dimensions
In this article we present you with a complete set of drawings with all the overall dimensions of our belt grinder for a 915mm long sanding belt.
This grinder model is intended for a small workshop or for semi-professional use. The belt grinder is mounted on AIR 71B2 engines with a power of 0.75 kW/1.
1 kW, as well as for AIR 63B2 engines with a power of 0.35 kW/0.55 kW in a flange version.
Contents of the belt grinder kit Host for self-assembly
| List of the main set of working drawings for the MG-915 belt grinder OWNER. | ||
| Sheet | Name | Note |
| 1. | Common data. | |
| 2. | Belt grinder frame. | |
| 3. | Support mechanism. Retractable crossbar. The table plate is retractable for the belt grinder. | |
| 4. | Support table. Thrust plate, belt grinder ears | |
| 5. | Belt grinder drive pulley. | |
| 6. | Straight belt grinder roller 2 pcs. | |
| 7. | Roller barrel of a belt grinder. | |
| 8. | Rolling bushing for belt grinder. | |
| 9. | Threaded axle of belt grinder 4 pcs. | |
| 10. | Assembly view 1. | |
| 11. | Assembly view 2. | |
| 12. | Assembly view 3. |
The main elements of the belt grinder (retractable crossbar, main frame and rotary mechanism) are cut from metal 10 mm thick. We recommend assembling the material of the frame and main elements of the grinder from metal with a thickness of 10-12mm; to make the structure lighter, aluminum of a similar thickness is also suitable.
For this, we recommend using laser or waterjet cutting; a plasma cutter or milling machine is also suitable.
Drawing of a belt grinder frame
In the absence of access to this equipment and a certain experience and perseverance, using the basic dimensions in the drawings, you can assemble a belt grinder with your own hands using an angle grinder for cutting metal and a drill for drilling holes. The easiest way to transfer grinder drawings to blanks is to print them in 1:1 format and glue them.
Drawing of the crossbar and frame of the belt grinder
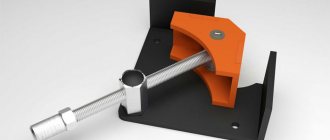
The material of the belt tensioner mechanism for the grinder is made of 8 mm thick steel. To assemble this unit, you will need M6x1 taps, holes with a diameter of 5.2 mm, in the drawing for a 6x1 thread. We recommend lubricating the rubbing elements with any available technical lubricant. For further stable operation of the grinder belt tensioner, it is recommended to lubricate it regularly.
Drawing of the belt grinder tensioner
The support table and thrust platform of the Host belt grinder are made of 6 mm thick steel using welding and subsequent grinding of the seams. You will also need an M8x1.2 tap; the holes for this thread are marked with a diameter of 6.8 mm. As a thrust element of the grinder, we recommend using porcelain tiles; they have proven themselves better than high-alloy steel or cast iron, because... its density and durability are higher.
Drawing of a table for a belt grinder
It is best to entrust turning work to an experienced turner, because... The rollers and pulley of the belt grinder are high-precision parts, difficult to manufacture and require the use of turning equipment and various types of cutters, as well as a band saw for cutting workpieces. This is the main element of stable operation, smooth running of the grinder belt and safe operation of your machine. All dimensions and tolerances of grinder rollers are indicated in the following drawings.
Drawing of the belt grinder tensioner bushing Owner
To assemble the grinder rollers, you will need 6000RS bearings, 6 pcs. In case of imprecise turning, I recommend gluing them onto thread sealant, this will allow them to last longer and avoid unpleasant situations with collapsed rollers. We use CNC turning on our machines, which allows us to produce parts with an accuracy of .01 millimeters.
For a better understanding of assembling a belt grinder with your own hands, below we attach assembly drawings and views of the assembled grinder.
Assembly drawings of a belt grinder
Assembly drawing of a belt grinder (View 1)
Assembly drawing of a belt grinder (view 3)
Assembly drawing of a belt grinder (view 2)
All the fasteners used for assembling the belt grinder with your own hands are laid out in the specification file.
Specification of fasteners for the drawing of the belt grinder
- Thank you for reading this material, we are posting a link to the drawings of the “Host” tape grinder in vector format for printing in good quality as a separate file
- Belt grinder drawings in dwg format with dimensions
- Send us your suggestions, questions and wishes by email, we will be happy to discuss or help with any questions you may have.
- Call, write!
Tape is still better
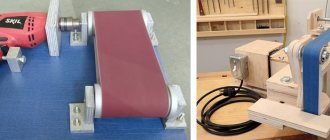
A belt grinder allows you to do everything a disk grinder can do, and much more. Therefore, next we will focus on how to make a belt sanding machine with your own hands. Amateurs, focusing on industrial designs, sometimes make very intricate grinders, see figure:
Homemade belt sanders
And this is justified: the design and kinematics of the belt grinder are very flexible, which makes it possible to successfully use scrap materials and old scrap metal. You just need to follow 3 principles:
- Do not do as in the second photo from the left: the abrasive side of the tape should only touch the workpiece. Otherwise, the abrasive will eat both the guide rollers and itself. The accuracy and cleanliness of processing during one work operation will be unpredictable;
- The design of the machine must ensure uniform tension of the belt, regardless of the nature of the operation performed;
- The speed of the belt must correspond to the nature of the operation being performed.
Kinematics and design
As mentioned above, there are many designs of grinders. When considering what and how to build a grinder for yourself, it is better to focus on industrial designs designed to be fully mechanized for precise and clean grinding of large-sized profiled parts: once it “sands” the blade of an airplane propeller or wind turbine properly, it can handle any other work.
Kinematic diagrams of grinders for the specified purpose are shown in Fig.:
Basic kinematic diagrams of belt grinding machines (grinders)
Pos. A is the most complex and perfect, with three rocker arms. If the length of the tension roller rocker arm is approx. 2 times less than the working one, then by adjusting the tension of the springs, it is possible to achieve uniform tension of the tape when the working rocker moves 20-30 degrees up and down. By tilting the bypass rocker, firstly, the machine is reconfigured for belts of different lengths. Secondly, in the same way you can quickly change the belt tension for different operations. The working branch of the belt can be any, except for the one running from the drive pulley to the tension roller, i.e. A grinder with 3 rocker arms is both horizontal and vertical.
The scheme with one misaligned rocker arm is used quite rarely in industry, because in principle, it does not allow achieving uniform tape tension. However, it gives accuracy that is quite sufficient at home and allows you to build a very good simple grinder.
What's good for what?
Now let's see what is possible to “squeeze” out of this or that circuit from the point of view of an amateur master. And then we’ll try to figure out how to make a grinder belt ourselves and do without custom-made turned parts.
3 rocker arms
Competent amateurs build their grinders exactly according to the scheme with 3 rocker arms, on the left in Fig. below. Not all propeller blades can be ground, but in this case another advantage of this scheme applies: if the grinder is used as a vertical grinder, then the working branch of the belt is elastic. This allows a skilled craftsman, for example, to guide cutting edges and blades with literally micron precision.
Homemade and industrial-made tape grinders
In industrial grinders for home use, the 3-rocker design is also widely used (in the center) for the same reasons. Repeating them yourself in most cases is quite possible. For example, the drawings of the KMG grinder, popular abroad, can be downloaded from the link.
The dimensions are, however, inch - the machine is American. For the drive, in any case, it is possible to use an angle drill-grinder (on the right in the figure, quite suitable in terms of power) with a homemade pulley and rollers, see below.
Note: if you are making a stationary drive, try to get an asynchronous motor at 2-3 speeds from an unusable washing machine with a horizontal tank. Its advantage is low speed. This makes it possible to make a large-diameter drive pulley and thereby eliminate belt slippage. A belt slip during operation is almost certainly a damaged part. Most washing machines with 2-3 speed asynchronous motors for 220 V are Spanish. Shaft power – 600-1000 W. If you come across one, don't forget about the standard phase-shifting capacitor bank.
Coaxial rocker
Amateurs do not make pure grinders with a coaxial rocker arm. A coaxial hinge is a complicated thing; you can’t make an elastic band yourself, and store-bought ones are expensive. Grinders with a coaxial rocker are most often used at home in the version for small precision work from a table, i.e. with a rigidly fixed horizontal rocker arm. But then the need for a rocker arm as such disappears.
An example is a mini grinder, the drawings of which are given in the figure:
Drawings of a mini-grinder for small precision work
Its features are, firstly, an overhead bed for the tape (item 7), which significantly expands the possibilities of use. For example, the plane iron is straightened on this grinder with an angular stop literally by itself. In this case, the grinder works, so to speak, like a self-propelled whetstone (emery block). Having removed the bed, we get a grinder with an elastic band for precise grinding/polishing of rounded small parts. Secondly, the tension shaft (item 12). By clamping it to the groove with nuts, we get a relatively fixed tension of the tape for working with the bed. And after releasing the nuts, we switch the grinder to the gravitational belt tension mode for fine work. Drive - not necessarily through a pulley (pos. 11). You can screw it directly onto the drive shaft shank (item 16) from the drill through the adapter coupling, see above.
A specialized tool grinder (for example, for guiding and straightening turning tools) generally loses any semblance of the original design. A high-speed motor is used for it (200-300 W is enough power). The drive pulley is, accordingly, of small diameter. The bypass pulley, on the contrary, is made larger and heavier for inertia. All this together helps reduce tape runout. The tension roller for the same purpose, plus for greater uniformity of belt tension, is moved further away and spring-loaded with a long, not very strong spring. How to make a grinder for processing incisors, see the video below.
Video: grinder for making cutters
One rocker
In amateur practice, grinders with a misaligned rocker arm are good because they do not require precise parts at all. For example, hinges can be made from card loops. At the same time, the processing accuracy remains sufficient for ordinary amateur requests.
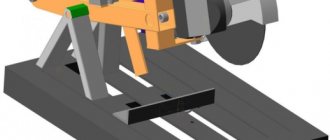
In this case, the original scheme is also modified: the rocker arm is turned 90 degrees, moved up and spring-loaded, on the left in Fig. It turns out to be a simple vertical grinder. And, importantly, it works without problems with homemade non-stretchable tape. A tension spring (in the center) or a compression spring can provide tension to the tape. Its strength is not so important, as long as the tape does not bend excessively during operation. No adjustments are required during use.
How a simple vertical grinder works
Grinder for 610 mm belt. — DIY community on DRIVE2
Hi all! I present to you another of my crafts. This is Grinder! I am passionate about making knives, but I can’t do without it. This is the last project this year, I want to finish it. It's 4.08 am, and I'm sitting and typing. Well, okay, let's go.
For the base, take a sheet of metal 7 mm thick. I got 200 by 300 mm. The engine from the washing machine is automatic, it is quite powerful and very resourceful. The turner machined a drive roller with a diameter of 55 mm, it was installed on the motor shaft and secured with an M6 bolt.
I cut out a stand from the same metal and welded it to the base, reinforcing it with a gusset.
The tension unit consists of a 6mm thick plate. It has a hole drilled on one side and a nut welded. An adjusting bolt is screwed into it. When twisted, it rests against a plate with a roller screwed to it.
The plate is made of 2.5 mm metal and is screwed with M6 bolts through growers. The roller has a slight barrel shape that allows it to hold the tape. Everything is visible in the photo. This entire assembly is screwed to the rack through a support bearing.
A tension spring is installed at the rear.
Full size
Tension unit
The engine is mounted on 5mm thick plates welded to the base with M8 bolts. For the pressure pad I used a piece of channel No. 10 cut lengthwise. We cut it not in the middle, but so that one half is larger and the other smaller. We'll need it later. We cut grooves in the larger piece, and drill holes with a diameter of 10 mm in the rack.
Full size
Pressure adjustment
In a smaller piece of channel we drill two holes side by side and remove the jumper with a file so that the hole becomes oval. Now we connect the two halves with a bolt. Next, we will weld the plate itself, mark the place where the parts join, draw the center and weld them in this position. This design will allow you to adjust the platform relative to the tape and set it in the desired position.
Now the table. . I had in stock a plate of a suitable size with a thickness of 10 mm. Let's clean it a little of the rust. In order for the table to be able to move and tilt at an angle, it was decided to weld a plate with a hole at the bottom, and a plate with an oval hole at the base. The table is fixed with an M10 bolt and nut.
Full size
Table mount
After all the manipulations, I took it apart and spray painted it.
Tests have shown that the engine has enough power. Not enough revs. But this is easily solved. I tested on a controller that sits on a lathe and a band saw. There, the speed is limited to 4000 rpm. I was too lazy to take it home and connect it to the computer.
Next year, in January, spare parts will arrive from China, and I will make a detailed tutorial on assembling this controller. I’ll assemble it for the grinder, and set it to the required speed, somewhere around 6000-7000 rpm. It will be just right.
Traditionally, a video with a more detailed assembly process.
Happy New Year, everyone! I wish you health, good luck and success. Bye!
Source: https://www.drive2.ru/c/520281206755950705/
Consumables and parts
The only consumable material for a belt grinder is a tape (not counting grease for bearings and hinges. The tape can be ordered to the desired length (see at the end), but you can also make it yourself from textile-based emery cloth. It is highly desirable - flexible, unimpregnated. In general The procedure for making a grinder belt with your own hands is as follows:
- We cut the workpiece - a strip of the required length and width.
- We prepare a mandrel (not necessarily round) with a length along the generatrix slightly less than the length of the tape.
- We outline the mandrel with the workpiece inside out.
- We bring the ends of the workpiece exactly end to end and securely fasten them.
- Place a piece of glue stick for a hot glue gun on the joint.
- Heat with a construction hairdryer until the glue melts.
- We apply a patch of thin fabric to the joint.
- Press with something hard through the Teflon film until the glue hardens.
Read also: What types of production are there?
There are three significant points here. The first is to use a rough PET film with a thickness of 25-50 microns (sold) instead of fabric for the patch. It is very durable, but just try running your finger across a PET bottle. Not very slippery? Rough PET film cannot be stretched under tension even over polished metal. And instead of a patch, it is better to seal the back of the tape with a continuous strip of PET film with an overlap of 2-3 cm. The runout of the tape will be no more than 0.05-0.1 mm. This is less than from the thinnest calico and even less than the error in the thickness of the blank skin.
Second, insert the finished tape into the machine and grind something indecent with it without strong pressure. The scar on the seam will be sealed, and the tape will become no worse than the branded one.
But the most important thing is that in terms of elasticity, the best adhesive for gluing grinder tape is not expensive and difficult to use, thermal or assembly, but ordinary PVA. If the tape is covered with a lining along the entire length of the back, then its PVA strength will be more than enough. How to glue PVA grinder tape, see video
Video: gluing grinder tape with PVA glue
The generatrix (side surface in cross-section) of the grinder drive pulley must be straight. If you use a barrel pulley, the belt will bend like a trough along its entire length. The rollers prevent it from slipping, see below, but the generatrix of the pulley must be straight.
A pulley for a grinder that is not intended for particularly precise work, firstly, does not have to be turned. In a scheme with 3 rocker arms, the beating of the belt from its misalignment will go out on the rollers before it reaches the working branch. In a simple vertical grinder, the beating of the belt will be sufficiently damped by the tension spring. Therefore, it is quite possible to make a pulley for a grinder without a machine, see video:
Video: drive wheel on a grinder without a lathe
Secondly, the pulley, rollers and, in general, all the parts of a home grinder can be made from plywood. In production, this is certainly not an option, even if a plywood grinder is offered for free with an additional payment: the grinder needs a salary, and the wooden grinder in the workshop will completely wear out before it pays for it and itself. But you won’t be running a grinder at home every day in 3 shifts. And no tape slips along the plywood pulley. Incl. homemade. So you can safely make a grinder pulley from plywood:
Video: pulley for grinder made of plywood
Table for calculating the speed of the grinder belt based on the diameter of the pulley and motor speed
Fortunately, for most abrasive-material pairs, the permissible belt speed limits are quite wide, so choosing a pulley for the grinder can be easier:
Video: what wheel is needed for a belt grinder
Rollers
The rollers of the grinder, oddly enough at first glance, are its most important parts. It is the rollers that keep the tape from slipping and ensure its uniform tension across the width. Moreover, there can be only one video in kinematics, see, for example, the video above about the grinder for incisors. Only barrel rollers can cope with this task, see below. But the “trough” of the belt after any roller must straighten before it reaches the working area.
Rollers with flanges (sides, edges) will not hold the tape. The issue here is not only and not so much with the misalignment of the roller axes: the grinder belt, unlike the drive belt, must withstand the loads from the parts being processed without slipping. If you make videos with flanges, then if you barely touch the tape with something, it will creep onto the flange. In the grinder you need to use Type 3 barrel rollers (highlighted in red on the left in the figure).
What should the grinder videos be like?
The dimensions of Type 3 rollers are also given there. It is advisable to take the diameter of the rollers no more than 0.5 of the width of the tape (so that the “trough” does not go far), but not less than 20 mm for turned steel and not less than 35-40 mm for plywood. The tension roller (the probability of the tape slipping from it is greatest), if the working branch of the tape does not come off it, can have a diameter of 0.7-1.2 its width. Plywood rollers are made in the form of a thick shell into which the bearing is pressed; then the roller is mounted on the axle (in the center in the figure) and processed cleanly, see e.g. track. video:
Video: barrel roller for grinder
Not every turner can turn a profile roller barrel exactly according to GOST even on a machine. Meanwhile, there is a way to make videos for the grinder without significant difficulties. The same PVC-reinforced garden hose will help out, on the right in Fig. previously. A section of it is pulled tightly onto a roller blank with a straight generatrix and cut off with a margin along the edges to the thickness of the hose wall. The result is a roller with a complex profile of the generatrix, which holds the tape even better and gives it a smaller “trough”. Don't believe me? Try to get to an airplane or missile graveyard and dig around in them. You will find rollers with exactly the same generatrix profile. It’s just that mass production of complex profile rollers is much more expensive than Type 3 barrels.
And another option
All critical parts of the grinder - a solid belt, pulleys with a coating that prevents it from slipping, rollers - can be purchased separately. They won’t be that cheap, but still not thousands of foreign ones and not dozens of native leather jackets. The remaining parts of the grinder, either flat or from corrugated pipes, are made using a regular tabletop drill or drill. Here's where you can order parts for the grinder:
The grinder is an indispensable tool in the workshop. It allows you to grind products made of wood, plastic, metal, and also process any surfaces. The choice of material depends on the choice of belt - a hard abrasive allows you to process denser products. In this article by the Homius editors, we will look at how to make a grinder with your own hands using ready-made drawings with dimensions, and consider options for assembling flexible manual machines for surface treatment.
What is a grinder and what is it intended for?
The grinder, unlike the usual stationary machine, is a more versatile tool. It allows you to grind parts at an angle and is a tool for finishing, for example, as sanding elements of wooden furniture. A grinder can easily remove rust from the surface and sharpen a knife.
Belt tension mechanisms and a rotating working platform allow you to arbitrarily change the sharpening angle
How to position the machine correctly
After the final check of the operation of the grinding machine, it should be optimally placed in the workshop or garage
In this case, you should pay attention to a number of parameters:
- Convenient working area near the machine. The processed part needs to be placed somewhere.
- Distance to the outlet and length of the network cable.
- Convenient tabletop height for long-term work of the master.
- Possibility of protecting children from the working structure (height, protective casing and screen).
- Availability of light sources and their location (above the grinder or on the side of the structure).
When choosing an installation location, they also focus on fire safety requirements. There should be no flammable liquids or surfaces near the installation.
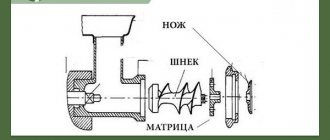
Schematic diagram of the grinder design and the principle of its operation
In order to correctly understand the structure and operating principle of the grinder, let us turn to its structure. The main task is to find a powerful motor that will need to be equipped with a drive.
Important! The torque is transmitted to the rollers, which drive the abrasive belt.
So, the main elements of the grinder, in addition to the engine, are:
- Straight roller with pulley.
- Tension rollers.
- Abrasive tape.
- Base.
- A device that fixes the tension of the belt and rollers.
- Table for fixing the part (in some models it can be rotary).
Read also: Do-it-yourself tulip usb adapter diagram
After connecting the device to the network, the rollers set the abrasive belt in motion. Moreover, the position of the rollers can be shifted to control the tension of the abrasive belt.
In some cases the table can be rotated 180°
When assembling the grinder yourself, it is important to position the rollers strictly perpendicular to each other to avoid distortions of the belt, which can lead to its breaks.
Advice! Before deciding on the size of the belt and the width of the rollers, figure out what surfaces you plan to process, their dimensions and volume of work.
The speed and quality of product processing depends on the choice of tape. Most often, the following belt sizes are used in machines of this type: 610, 915, 1230, 1600, 1830 mm in length; in width there are only two options - 50 and 100 mm. The bottom fabric should be elastic.
Characteristics that a belt for a sanding unit must meet
Selecting an abrasive strip is an important step when assembling a mini-grinder with your own hands. First of all, you need to decide on the length of the tape and its width. The geometric parameters of the strip are influenced by two main factors:
- grinder dimensions;
- purpose of the unit.
Fabric base withstands surface tension better
Endless abrasive strips are also classified into grit types. The length of the sanding strips can be different (from 610 to 1830 mm). Such tapes have a width of 50 or 100 mm. The first option is most often found in units assembled by hand at home.
A high-quality abrasive strip must have an elastic fabric base
When choosing the right tool, you also need to pay attention to how many revolutions the strip can withstand. It is recommended to purchase products that can operate at 1500 rpm. This option is best suited for making a do-it-yourself belt grinder
The drawing drawn up earlier must contain information about the dimensions of the abrasive strip and its other characteristics
This option is best suited for making a belt grinder with your own hands. The drawing drawn up earlier must contain information about the dimensions of the abrasive strip and its other characteristics.
A good tape must have high abrasive resistance. The wear resistance of the tape depends on this indicator. For homemade machines, it is recommended to use belts whose length is no more than 123 cm. The abrasive strip must not only be resistant to wear, but also have good resistance to high temperatures generated during friction against the workpiece during operation.
It is worth noting that short-length tapes are much more susceptible to wear than longer products.
Experts advise paying attention to pictures depicting finished products. Photos of the machines allow us to answer the question of how to make a grinder with your own hands. The drawing of the device can be significantly simplified if ready-made elements purchased separately are used in its assembly
The design of the device can be significantly simplified if ready-made elements purchased separately are used in its assembly.
The speed and quality of product processing depends on the choice of tape.
And finally, special attention must be paid to the place where the abrasive tape is glued. The junction of the two ends of the strip should be as neat as possible, without any defects or protrusions
How to glue the tape for the sanding unit yourself
Belt grinders contain a spring, which performs a very important function: it tensions the belt that has sagged due to wear. The belt is changed several times even when processing a small workpiece. This should be remembered.
When assembling a grinder with your own hands from plywood or metal, you can make an abrasive strip yourself. Gluing such tape is a complex undertaking that does not tolerate mistakes. There is a lot of advice on the Internet on how to properly glue tape, but many of them are incorrect.
The gluing process is as follows. First you need to select a fabric-based sanding material. Then you should prepare both ends of the abrasive strip. To do this, they are cleaned. The seam on the strip is made exclusively using the butt method. Experts definitely recommend reinforcing the glued tape from the inside with a thick strip of fabric, which is fixed with a special adhesive composition.
Gluing tape is a complex process that does not tolerate mistakes.
In order to connect the ends of the abrasive strip, you need to purchase a special adhesive composition. The best option is to use elastic glue. There is no point in saving money, since cheap products, as a rule, are not of good quality.
Before gluing, it is necessary to prepare a strip for sanding tape. A do-it-yourself grinder (from scrap materials) needs a reliable abrasive strip, which is difficult to do at home. The process is carried out using a glue stick, which is installed on hot-melt guns. First, the composition is heated. To do this, you can use a regular hairdryer, which is found in every home.
Grinder “from Chapai” - a brief overview
Andrey Chapai developed his own version of the grinder. The model was so loved by the craftsmen that its name soon became a household name. The craftsman even developed a whole line of devices, which today are scattered throughout workshops all over the world.
Grinder “from Chapai” is a universal machine with a rotating pressure table that allows you to process different surfaces
For your information! The most common models of grinders: “GCh-10”, “GCh-12”, “GCh-16” (professional series), as well as new mobile versions of the grinder 610 series “GCh610-63” and “GCh610-71” - are made with zinc coating.
Additionally, the package includes a disc. It is installed instead of the main roller for sharpening knives and removing rust. One of the most popular grinder models is No. 16. It is made on a reinforced rotating base. The bed is equipped with two racks. The base for the frame is two metal sheets 12 mm thick.
Mini grinder made from a belt sander
An ordinary grinding machine is indispensable for a garage or workshop. But when you need to grind off the edges of a small product or clean a small workpiece, it is not always convenient to use hand-held power tools. A mini grinder with a turntable will come to the rescue.
For example, let’s assemble such a table and a frame for holding a sander. For this you will need: an electric drill, an angle grinder (grinder), a welding machine, several small tubes (of different diameters), a metal plate, pieces of rectangular and square pipes, a spring, washers, several bolts of various lengths and nuts.
Everything is assembled very simply by welding. First, let's make a plate (aka a holder for the typewriter). We measure the length we need, cut it off, and weld the nuts according to the distances between the holes in the body. Next, we weld a tube of smaller diameter to the plate.
Mini grinder manufacturing process
At the next stage we proceed to the manufacture of the frame. We weld a square pipe of the required length perpendicularly to a larger diameter tube. We make a hole on the reverse side and weld a nut (it will serve as a stopper for the inner tube).
We weld a plate to this pipe on the back side, which will play the role of a table for mounting on a workbench.
Making a turntable will not take much time. A tube parallel to the installed machine is welded to the machine holder. We insert another tube into it (after welding a nut to one part of it, and another tube to the other part at an angle of 90 degrees to the edge).
Having connected these parts, we install the spring and tighten it with a bolt through a washer. We also install a lock nut for the bolt in the perpendicular tube. We weld a piece of a rectangular pipe to another tube; this is our table.
We assemble the mini grinder and it is ready to go. The rotary table allows you to work at the desired angles. For more detailed manufacturing and assembly, watch this video.
Rate this post
Do-it-yourself grinder at home - text and video instructions
Now let’s look at step-by-step instructions for making a grinder with your own hands.
What can a grinder drive be made from?
The question is far from idle. After all, the speed and quality of work depends on how powerful the motor of your tool is.
Homemade grinder with a washing machine engine
Alternatively, you can use a motor from an old washing machine. Such models can be assembled with your own hands. In our case, we will assemble a grinder for a standard tape size - 75 mm × 457 mm. Our power will be 180 W, 2750 rpm. So let's get started.
| Illustration | Description of action |
| We use a regular commutator motor from an old washing machine, a shop door closer, and a specially machined header for the shaft. | |
| We screw the pre-machined workpiece onto the shaft. We secure the drive roller with a bolt; there is a special hole for this. While we fix the motor on a rigid stand. | |
| We measure the width of the shaft to select the width of the abrasive belt. The length we got was 610 mm, width 45 mm. | |
| Cut off the excess part of the bolt. Just in case, we make a slot in the bolt in case we need to remove the shaft. | |
| To reduce vibration, we attach a wooden “cushion” to the frame. | |
| Now let's deal with the electrics. We spread the wires: brown and red - to the starter, gray ones to the brushes. | |
| We check the position of the rotating shaft with a laser. We align the position of our “closer”. It is important to ensure that it is properly fixed to the frame. | |
| We attach a 10-piece to the handle with a bolt, attach the adjusting nuts and the rollers themselves to it, and install the bearings. We select them according to the width of the tape. | |
| We tighten the position of the tape using a closer. And now our grinder is ready! Such a device can easily cope with sharpening knives and minor grinding work. |
Important! Don't forget to use a protective mask and goggles!
Grinder for drill
A grinder for a drill is a special attachment that allows you to easily process small parts and perform simple work.
There can be a lot of options
In addition, a stationary structure can be created based on a drill. Such tools are practically no different from professional ones.
Stationary grinder made from a drill on a wooden base
Do-it-yourself grinder from an angle grinder
Such grinders very often appear in the everyday life of home craftsmen, because the grinder itself is a mini grinding machine.
Such designs are often used for grouting welding seams and sharpening small parts.
Homemade mechanisms for angle grinders
In order not to look for ready-made attachments, you can try to make them yourself. There are different options for making such devices, which will be discussed below.
From plywood
First of all, let's consider the option of how you can make a simple grinder from an angle grinder with your own hands. The simplest version of a grinder is made from an angle grinder, two rollers, a tension mechanism and a plywood base.
The most difficult part of this design is making the rollers. It’s good if your home workshop has a milling machine or a hand router. To do this, a suitable blank is turned from plywood with a milling machine, processed on a grinding machine, and bearings are pressed into place.
A base is cut out of the same plywood, in which a hole is cut for the grinder. Places for the rollers are marked, after which the angle grinder is secured and the wheels are mounted. You must first treat the sanded wheels with varnish. After this, the entire system is assembled, and the grinder is ready for use. The design of the device is clear from the presented photograph.
Sheet metal
If the workshop has a welding machine, and a turner you know can grind out the necessary rollers, then you can make a polishing machine from leftover metal.
Such a device will be no worse than the factory one. It will take a lot of time to make, but it's worth it. Before you start work, you need to develop working drawings or download them from the Internet. By assembling a mechanism not according to the drawings, you may not achieve the desired result, or the resulting device may turn out to be a source of increased danger.
First of all, it is necessary to accurately mark the bed. As an example, we use the following device drawing:
Using a milling and drilling machine, drill holes according to the markings. Then you need to prepare the tension bar, as shown in the photo.
Grind the rollers, and only then begin assembling the mechanism. The result is a universal attachment, as the power unit of which you can use not only an angle grinder, but also another suitable electric motor. The finished look is shown in the photo below.
From the remains of a professional pipe
Having the skills of a welder, you can easily convert the grinder you have in your home workshop into a grinding machine. Enough for this
- weld scraps of a corner or square pipe in the shape of the letter y;
- Attach suitable rollers to the ends;
- Screw the drive shaft to the shaft of the angle grinder;
- mount the sanding paper, and the device is ready for use.
This grinder can perform various operations:
- clean up metal irregularities after welding;
- perform complete grinding of the part;
- process wooden products;
- carry out final, finishing processing before coating the part with varnish;
- handle uneven concrete walls.
How to make grinder rollers with your own hands
Preparing videos for the grinder is one of the most labor-intensive stages of work. For a grinding machine, most often, four rollers are made with different sizes - from 70 to 150 mm. Typically steel, titanium or duralumin are used. It is also possible to turn parts from wood.
Drawing of a homemade turnkey grinder
Important! When turning, it is necessary to give the rollers a “barrel” shape so that they do not fly off the belt.
Manufacturing process
For the manufacture of power parts of the machine, it is necessary to use sheet metal 10 mm thick. To draw the contours of such parts for their further cutting, you can refer to the drawing. There is no need to follow the dimensions exactly, since only the dimensions of the parts that you are going to process on the belt grinder will depend on them. You can draw the outlines of the parts on a sheet of metal with a marker, and use a grinder and a jigsaw to cut them out. It is much easier to cut out such parts using a plasma cutter, but not everyone has such equipment at home.
Base, machine body parts and engine before assembly
To make the base of your homemade grinder more reliable, it is better to use a 12 mm thick sheet of metal for its manufacture. You can use screw connections to assemble the grinder base, but then you will have to drill a lot of holes, which will significantly weaken the entire structure. It will be much easier and more reliable to assemble the base of your machine using electric welding.
The semicircular grooves on the parts of the belt grinder, which ensure the rotation of the platform on which the rollers are placed, will require a lot of time. To make such grooves yourself, you will need to tinker with a drill, cutters and a file, and also use a drill. You can make your task much easier if you entrust the making of such grooves to a qualified milling machine operator.
Model of the machine made of plastic: thanks to the rotating unit, the grinder can be in a vertical position...
To make the rollers of your homemade mini-machine, it is best to use titanium or duralumin (D16). If it is not possible to find blanks made from these materials, then steel can also be used, but then the rollers must be made as light as possible by choosing metal from their inner part. To make rollers for a homemade machine, you will need the help of a qualified turner, just make sure to prepare a drawing for it.
In any case, the largest roller of the belt grinder, which will be fixed on the electric motor shaft, will need to be made of steel, since a titanium blank of this diameter is very difficult to find, and duralumin may not withstand significant loads. For the entire homemade machine, you will need to make 4 rollers, the dimensions (diameter) of which are: drive roller - 150 mm, tension roller - 100 mm, two small ones - 70 mm. If you are going to make a mini-machine, then the diameters of the rollers may be smaller.
...as well as horizontally
When you assemble your homemade machine with ready-made rollers, it is very important that they are positioned strictly in one line. Otherwise, you will constantly experience tape jumping off.
The width of the rollers depends on what size sanding belt you intend to use on your equipment. When you make a drawing for the manufacture of rollers, be sure to keep in mind that they must be barrel-shaped, this will ensure that the sanding belt is securely held on them during operation. In order to give the rollers this shape, a small bevel is made from each edge: 1–2 mm.
The finished rollers of your homemade belt grinder should have a smooth surface; you need to tell the turner who will make them about this. The bearings on which they will rotate must only be of the closed type, otherwise they will quickly become clogged with dust generated during the operation of the grinding machine. In order for your homemade equipment to work for a long time and without failures, you must choose bearings for it that have a class of at least 6. The rollers of the grinding machine rotate at high speed, so the bearings for them must be of very high quality.
Ready-made grinder in a horizontal position with an additional table
Review of models and prices
If you want to purchase a ready-made machine, we suggest you study the prices of the most popular ones.
Grinder "Lefty"
Characteristics: motor – 1.5 kW, belt length – 1250 mm (up to 1600 mm); The model is interesting for its additional equipment (wheel, contour), which is included in the kit.
Appearance of the “Lefty” grinder
Grinder-sharpener “Kraton” BG 14-05
Characteristics: the device is used for sharpening metal tools and wooden parts; power consumption – 2 kW, movement of the sanding cloth – 14 m/s; disc diameter – 150 mm; tape width – 50 mm. Features: rigid cast base, adjustable stops and protective screen.
Model cost from 6000 rubles
Grinding machine BISON ZShS-330
Characteristics: machine type - disc-and-belt; circle – 125 mm; speed – 2950 rpm; tape size 762 mm × 25 mm; power - 330 W; belt speed – 810 m/min. Cost – 5490 rubles.
Grinding machine BISON ZShS-330
Sharpener METABO DS 125
Characteristics: sharpener type - with sanding belt; circle - 125 mm × 20 mm × 20 mm; circle diameter - 125 mm; circle thickness - 20 mm; landing diameter – 20 mm; speed – 2980 rpm; power - 200 W. The cost of the model is 7679 rubles.
Sharpener METABO DS 125
If you have experience creating hand grinders, tell the readers of our online magazine about it. What do you think, is it worth carrying out the work of assembling such units, or is it better to buy a ready-made structure?