Author: the most reliable
29 March 2022 23:34
Community: DIY!
Tags: how to make knives with your own hands, tips
35755
30
Hello to all knife lovers, and those who like to make something with their own hands! The fact is that one of my very good friends in Chishki brought me blanks for knives and pieces of wood for handles from the beautiful city of Kazan. So I decided to give him a gift. further - I will more or less try to tell you what and how I made the knife...
Heat treatment of the blade
During all the previous stages, the steel of the blade was quite soft and easy to process. After heat treatment, the purpose of which is to reveal all the best qualities of the knife, the material will no longer be so pliable. Therefore, right now you should make sure that you are satisfied with everything in your product.
Heat treatment is performed in two steps:
- the first step is to increase the strength of steel;
- the second is a slight weakening.
The required temperature to which the metal must be heated in order to harden it depends directly on the grade of steel and is calculated in special tables.
Before starting the main process, be sure to stock up on gloves made of thick material (welder gloves).
The blade must be heated evenly on all sides, periodically changing its position. After some time, due to the high temperature, the steel will begin to change color.
When it turns deep red, we check it with a magnet. If the material is magnetic, then we heat it up further; if not, the temperature is appropriate.
After heating, the metal must be cooled; used engine oil is usually used as a coolant. Be extremely careful, as when you lower a hot knife into the oil, a flame will burst out of it.
The size of the container into which the liquid is poured must completely accommodate the blade. It is not necessary to harden the end of the shank in a kitchen knife.
Heat treatment of the blade.
The next stage of heat treatment is tempering. This process reduces the brittleness and hardness of the blade, but increases its flexibility. The ratio of hardness and flexibility depends on the heating and tempering time.
To achieve the required values, you can use special tables. Hardness is measured on the Rockwell scale; for a kitchen knife, the normal value would be 60-64 units.
After the holiday, we carry out final polishing with a small-grain abrasive.
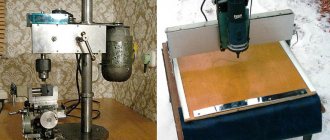
What tool will you need?
When planning to make a knife yourself, you need to prepare for the fact that you will have to purchase some equipment. Some technologies may require special devices that are not always included in the basic set of tools available to the master at home.
To make a good knife by hand forging, you will need the following equipment:
- Coal.
- Bake.
- Forging hammers - large and small.
- Blacksmith's tongs.
- Pliers.
- File.
- Sandpaper.
- Adjustable wrench.
- Grinding and grinding machine.
- Grinder drill.
- Anvil.
After preparing a set of tools, you can begin to work.
Rules for sharpening the finished product
Sharpening knives is a stage that affects the ease of use of the product. The roughing has already been done, the final part is done using a sharpening device or sandpaper. The blade is coated with a compound to protect it from corrosion.
Angle Features
To sharpen the cutting part of a knife, you will need a set of sharpening stones with different degrees of grit. In the process, it is important to maintain the correct angle, which determines the future capabilities of the product.
For different types of products, the following angles are created:
- 30º - severe operating conditions;
- 16-20º - average conditions;
- 15-20º - products for fine work.
Start sharpening by using stones with large grains, gradually moving to fine-grained ones.
Knife sharpening angle.
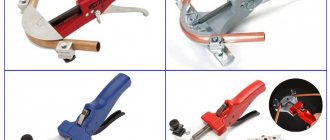
The process of creating a handmade sheath
A handmade sheath is a decorative element, the creation process of which is simple, and the result is surprisingly practical. The knife blade must be wrapped in a piece of cotton fabric and covered with paraffin. A piece of leather, previously well soaked in water, must be placed so that the two opposite ends of the piece of leather close on the sharpened side of the blade. Use clamps (any kind will do, even stationery ones) to fix the position of the leather case clearly along the contour of the blade. The product must dry well.
Homemade leather scabbard
After the leather blank has completely dried, you need to remove the clips and, following the contour that appears, stitch the future sheath. To do this, using an awl or a drill with a small drill diameter, it is necessary to make many holes at the same distance from each other, through which a needle with a strong thread is sequentially passed. Having completed the sewing part of creating a handmade sheath, you need to trim off the excess leather using a sharp knife. Treat the edges of the sheath with abrasive sandpaper. If necessary, determine the location of the hanger for the sheath, cut it out of leather and secure it to the sheath with glue. To add a decorative shine, the sheath can be treated with shoe polish to match the tone of the leather from which it is made.
Necessary materials
Before you start working on your future knife, you should design it.
The main part of the instrument is the blade. Various technologies are used for its production. This part of the knife can have any shape, so when choosing a handle you should carefully consider its appearance. It is recommended to prepare a drawing that will take into account the nuances of the future product.
According to manufacturing technology, all-steel and all-iron knives are considered the simplest. Welded blades can be made of steel and iron.
The raw materials for the handles are:
- Plastic.
- Tree.
- Birch bark.
- Leather.
- Various artificial materials.
The handle should be easy to use and visually attractive.
Steel selection
The type of knife determines the conditions in which it can be used. Materials must be selected that can withstand the loads during use of the knife.
When choosing iron or steel, you need to consider the following properties:
- Hardness is the ability to prevent the penetration of foreign particles into the structure of the material chosen for the blade. It can be obtained after heat treatment using the required mode.
- Impact toughness, which is responsible for resistance to fracture and minimizes chipping.
- Corrosion resistance, which is necessary for possible contact with liquids and for working in special conditions.
- Wear resistance is an important property at increased loads on the blade, increasing resistance to deformation and abrasion.
For handmade blades, damascus and damask steel are considered the best options. But their use requires professional blacksmithing skills. You can purchase a blank, but it has a high price. More often, in order to make a simple knife, alloy steels are used, which are more convenient for processing.
What can be used for the blade
The main thing you need to pay attention to before making a knife with your own hands is the choice of materials for the blade.
Let's consider several of the most acceptable options:
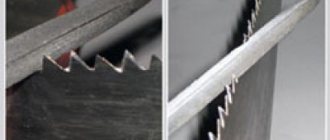
- High-speed steel used in the production of hacksaw blades. The material holds an edge well, but, unfortunately, has the property of quickly rusting and crumbling from strong impacts.
- A steel wood planer blade is a great option. The metal is highly polished and processed. After annealing, the steel can be easily sawed with a file. The blade is easy to shape and sharpen. After the blade takes its final shape, it must be quenched in oil. Otherwise, the blade will rust.
- File. After firing, the file is easily processed to give the required shape and size.
- Wood saw. It has good elasticity properties. It can be easily adapted to make a blade for a kitchen knife.
- Car spring. With proper heat treatment, spring metal is excellent for creating a strong blade that is easy to sharpen.
- Large size drills. When heated to a soft state, the drill is easily transformed to the desired shape and size of the blade of the future knife.
When making wooden knives (for example, for a souvenir or toy), you only need a sheet of plywood.
High speed steel
File
Hacksaw for metal
Drill
Advantages of homemade knives
Among the models presented in stores, you can find one that suits your purposes. But there is always a chance of getting a blade of poor quality or a model that does not meet your wishes.
Sketch of a knife.
Forging a knife with your own hands has the following advantages:
- You can choose the type of product to your liking.
- Provide all the necessary properties that will allow the knife to serve for a long time.
- Select materials that can give the desired characteristics to the product.
- Select a suitable hardening mode for the metal, which will help ensure the required elasticity, ductility and hardness.
- You can create the handle of the product in accordance with your ideas about decorativeness.
- The master will be able to avoid mistakes that happen when making knives in large batches.
The nuances of making a product from a file
If a file blade is used as a blank for a knife, the craftsman will need a hammer for the work. This will help remove excess thickness from the workpiece. Using forging, you can obtain a product with high strength and elasticity, resistance to mechanical damage.
It is better to abandon the figured blade and the fancy shape of the knife. The rougher the outline, the easier the processing will be. It is worth considering that such material requires special equipment. If it is not there, you can use simple tools, but in this case they will be subject to accelerated wear.
Step-by-step instructions for making a knife with your own hands
When making knives yourself, you must act according to pre-prepared instructions. You can use the guide, which outlines the entire process step by step.
Before manufacturing, it is necessary to prepare a drawing or sketches. Using them, a template is made for the future product. You can use a photo of your favorite model as an example. After manufacturing all elements of the product, assembly, sharpening and polishing are carried out.
If the production of knives is not on stream, the craftsman has little experience, and difficulties may arise with preparing the blade. When planning to make a handicraft knife, you should pay attention to such metal products as files, scythe fragments, cutting elements of lawn mowers, drills of a suitable diameter. They are well suited for blanks.
Cutting the base profile
After preparing the material that is planned to be used to make a knife, a template is applied to it. It is better to use thick cardboard for it. After cutting, the template turns out solid, you can take it in your hand and roughly see what the product will look like when the work is completed.
The template must be transferred to a metal strip to create a blank. Then it is cut around the edges using a grinder. Before this, the workpiece must be securely secured using a clamp.
It is not difficult to trim along straight lines, but when working with curves you will have to put in more effort. To efficiently cut curved sections, you will need to make transverse slits, and then remove excess material by sector.
We cut out the profile of the future knife.
First grinding
After the workpiece is cut, its contours should be sanded. To completely remove excess fragments from the blade, you need to use a sharpening machine.
The contour is processed using a belt sander. To process bends you will need a drill. It is better to use sandpaper as a processing element.
Forming bevels
Bevel processing is necessary to form the correct angle for sharpening the blade. First you need to mark the workpiece using a caliper. It must be visually divided into halves - this facilitates the stitching procedure. When drawing a line, use a drill whose diameter matches the thickness of the blade.
Using a file, mark the boundary where the bevel of the blade ends. After this, the excess layer of metal is removed using a grinder with a sanding pad. The surface is processed with a belt sander, the bevel is cleaned with a file. Final sanding is done using sandpaper. Finally, the surface can be polished.
We prepare the knife for forming bevels.
Drilling holes
The next step is to drill holes in the handle of the workpiece intended for the pins. Their number is determined depending on the handle - the wider it is, the more holes will be needed. On average, 4-6 pieces are required.
If large holes are needed, you must first mark them using a smaller diameter drill. When working with hardened steel, carbide tools are used. To make the process easier, you can apply lubricant to the drill.
Drill holes in the knife handle.
How to properly harden a workpiece
To harden a blade, you need a forge furnace. If this is not available, you can use a powerful hair dryer to fan the coals. Hardening methods are chosen depending on the grade of steel.
A sign that the metal has been sufficiently hardened is that it cannot be processed with a file. It is also necessary to temper the material so that the knife does not become brittle. After cooling, you need to remove the oil from the blade. To do this, you need detergents that dissolve grease and running water. For polishing use fine-grained sandpaper.
Etching Features
To give the knife an original appearance, a pattern can be applied to the blade using the etching method. To do this, you will need a solution prepared from copper sulfate and salt 1:1. The water for dissolution must be hot:
- The image is applied to the surface of the blade with a marker.
- Areas not to be etched must be varnished.
- The prepared product is placed in the solution for 30-40 minutes.
During etching, a reddish coating forms on the surface; it will need to be washed off from time to time under running warm water.
When the process completes:
- The workpiece is removed from the solution.
- Wash with warm water.
- Wipe with solvent.
- Treat with sandpaper.
We apply the design to the blade.
Making the handle
The handle for a knife can be of any shape; wood is often chosen for its manufacture. Other materials are also suitable, but wood is considered more convenient for processing.
For the handle, two blanks are made, which must be tightened using clamps and two holes drilled - at the beginning and at the end of the parts. They must match those drilled in the metal.
Epoxy glue is applied to the surface of the workpieces, then they are connected using clamps and clamped in a vice. Now you can insert the pins.
Wooden knife handle.
Handle grinding
After the glue has hardened, the vice is unclenched and the handle is ground on a machine. The pins are trimmed using a hacksaw or filed with a file. Then the surface is leveled by grinding with tools. The same procedure is performed for the outline of the handle.
Finishing
A polishing attachment is installed on the drill. The surface is treated until it begins to shine. Then the same is done for the outline of the product. For areas that cannot be polished, use fine-grained sandpaper.