A home workshop is far from uncommon in the yard of any zealous owner. When arranging it, there are some features that must be observed. Our review will help you select and make homemade machines and devices for your home workshop, as well as understand the technology of their manufacture. Each owner can independently select the necessary equipment. And if you know the technical features of the structures, then you can arrange the room on your own. When arranging equipment, it is important to plan for sufficient space. It is better if the workshop is equipped in a separate room.
The quality of work and comfortable working conditions depend on the functional arrangement of a home workshop.
Crafting table
Dimensions of the workbench
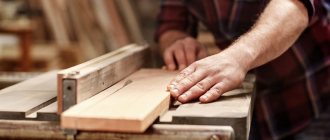
The height of the surface of the tabletop should be such that a worker can operate tools and equipment while standing. The workshop owner determines the height of the workbench himself - according to his height. The height of the desktop ranges from 75 cm to 80 cm.
The size of the countertop is determined by the area of the utility room. The table should not impede free passage around it.
Workbench material
- Tree. A wooden table is often used. The workbench is made of timber and boards. The legs of the table are secured with diagonal crossbars for reliability.
- Metal. The most reliable workbench design is a workbench welded from a metal profile. Manufacturing a welded product requires having a welding machine and experience working with it.
The table top is made in the form of a shield from knocked down boards using pieces of timber. The shield is rested on the legs of the table and fastened with nails or screws. The connection parts are made from angle steel.
The options for assembling a wooden workbench are different, but they have one thing in common - the table structure must be stable and withstand static and dynamic loads.
If the surface of the workbench will be subject to accidental impact from cutting and sharp tools, then the tabletop is covered with tin or a metal sheet is placed on top.
The supporting frame and table legs are welded from steel angle and strip. For auxiliary parts, pieces of reinforcement are used.
The table top is made of metal sheet, 8 - 12 mm thick. A thick sheet will significantly increase the weight of the workbench, which will make it difficult to move.
Support frame base
The bed is a frame that allows you to connect all the parts into a harmonious mechanism. The strength and reliability of such a support directly determines the stability and durability of the entire device. It is better and easier to use a steel angle to make the frame; another suitable material is a rectangular profile.
First of all, it is necessary to mark the dimensions of the assembled automatic sharpening machine. These parameters are determined by what exactly this machine will be used for. As a rule, a stand for an apartment or garage modification does not exceed eighty centimeters in length.
Stool
Making a stool with your own hands is quite simple:
- 4 supports, 50 cm long, are made from timber 40 x 40 mm.
- The legs in the middle of the length are fastened with crossbars.
- Grooves are made in the supports using a chisel.
- At the ends of the transverse planks, protrusions are cut out using a chisel to fit the grooves.
- The protrusions are lubricated with wood glue and inserted into the grooves.
- While the glue dries, the supports are tightened with a belt.
- The seat is cut out with a circular saw from a wide board 30 mm thick.
- A seat measuring 300 x 300 mm is nailed or screwed to the legs of the stool.
Use of building materials
- Planed timber is considered a universal building material for making a desktop. The size of the legs of the structure is usually 7x10 cm.
Workbench legs made of planed beams
- An old unnecessary door can serve as a workbench cover. The thickness of the boards used for the tabletop should be about 5-6 cm.
- Before making the device, you need to decide what type of workbench will be - stationary or collapsible. Based on this, the fastening is selected (bolts, screws, nuts, nails).
- It is advisable that the workbench has several vices. One can be installed on the side and the other on the front. Vices are convenient because they fix products intended for processing. The universal width of the vise jaws is 5 cm.
Attaching a vice to a workbench
Mini vise made of metal loop
When performing small operations, small parts often need to be clamped. To do this, use a mini vice made from a one-piece door hinge.
Matching holes are drilled in both hinge flaps.
A bolt of suitable diameter is threaded through them. On the other side, a wing nut is screwed onto the bolt thread. The parts are inserted into the opening between the doors and clamped by tightening the nut. The device can be used as a clamp.
Cutters of different calibers
Cutting attachments are sold in every major hardware supermarket. At the same time, it is possible to buy both single cutting parts and sets.
With a wide selection of cutters available, the turner will create any complex and intricate configurations, including
- Grooves;
- Chamfers;
- Cones;
- Dashed lines;
- Edging;
- Wavy lines.
Hammer upgrade
A common occurrence is a wooden handle falling out of the hammer socket. One of the ways to create a reliable handle fastening is to make a cut in the upper end of the handle. The holder is inserted into the hammer socket. The cut is filled with Moment glue. A wooden wedge is driven into the groove.
In order not to look for nails while working, and especially not to hold them with your teeth, a round magnet is glued into the bottom of the hammer handle. Magnetic nails will always be at hand for the worker. It is dangerous for the hammer to accidentally fall out of your hand at height. To prevent this from happening, a hole is drilled in the handle through which the cord is threaded. The worker's belt is threaded through the loop.
How to make a cutting machine step by step with drawings: 4 reasons in favor of implementing the project
In order not to doubt the correctness of the decision made, study the following facts:
- without reliable fastening, the workpieces vibrate, increasing the risk of damage to the disk;
- it is difficult to manipulate a heavy tool with high precision while maintaining the perpendicularity of the cut;
- difficulties increase when processing thick products, when creating a large batch of similar parts;
- Using both hands significantly increases the likelihood of injury.
A high-quality machine is necessary to solve the noted problems and improve productivity. It is created according to the following algorithm:
- clarify the purpose and scope of work;
- study drawings of factory analogues and homemade products, choose the appropriate option;
- compose a set of design documentation with a list of necessary purchases;
- carry out assembly according to the approved plan with performance testing.
Pipe bender
A device for bending metal pipes is a metal rod welded to the frame. I make the rod from a piece of reinforcement. The pipe is placed on a pin, and on the other side a long piece of reinforcement is inserted into the pipe. By pressing the lever, the pipe is bent at the desired angle. The device is suitable for small sections of round pipes.
Making a pipe bender with your own hands
- Two axles are welded to a metal frame from pieces of smooth reinforcement, onto which old car hubs are placed.
- Protruding chamfers are removed from the hubs so that the side surfaces of the rollers are smooth.
- The channel is placed in the opening between the hubs with the shelves facing up.
- The same profile, smaller in width, with the flanges down, is placed into the channel.
- An axle is welded to the top of the inner profile, onto which the third hub is placed.
- A vertical shelf made of steel sheet is welded to the frame.
- A hole is cut in the vertical bar and the bearing is pressed into it.
- A nut is secured to the middle channel by welding.
- One end of the screw rod is screwed into the nut.
- The screw shank is threaded through a bearing in a vertical bar.
- A rotary handle is welded to the shank on the back side of the bar.
- A swing arm is welded to the axis of the drive hub.
The machine is ready for use. A profile pipe is inserted between the rollers and clamped with a screw. The rotary lever drives the rollers, which pull the pipe, bending it. The bending radius is set using the rotary handle of the screw.
A pipe bender made from car hubs is one of the device options. There are many designs of bending devices. In some models, the drive roller is coaxially connected to the motor shaft.
Main components
The most important components of such a device include
- Bed;
- Electric drive;
- Front and back headstock;
- Stand for accessories.
Impact screwdriver from starter
There are situations when it is impossible to unscrew a rusted bolt or screw with a conventional tool. An impact screwdriver does this job perfectly. The tool is made by hand from parts of a car starter:
- The shaft and bushing are removed from the starter housing.
- Part of the shaft is cut off, leaving a splined rod.
- A piece of pipe of suitable size is placed on the sleeve.
- A piece of bolt of equal diameter is welded to the end of the pipe.
- The end of the shaft is ground into a tetrahedron shape, onto which heads of the required size are placed. For screws, a bit is inserted into the head.
When you hit the head of the bolt with a hammer, the shaft slides with beveled splines inside the sleeve, performing a rotational movement. The stronger the blow, the more force the shaft rotates.
Homemade bow saw
A bow saw is a convenient tool for cutting tree trunks and lumber. The design of the saw is simple; making a hand tool with your own hands is not difficult. To do this you need to prepare tools and materials:
Tools
- drill;
- hacksaw;
- chisel;
- hammer;
- knife.
Materials
- cord;
- wooden slats 20 x 40 mm;
- cotter pins – 2 pcs.;
- stalk ø 10 mm;
- saw blade;
- stain;
- wood varnish.
Step-by-step instructions for making a bow saw
- The lath is cut into three parts (two vertical side strips and a middle horizontal strip).
- Grooves are made in the side handles using a chisel.
- At the ends of the centerpiece, protrusions for grooves are cut out with a chisel.
- The centerpiece is connected to the side handles.
- Through holes are drilled at the joints. Wooden cotter pins are driven into them.
- Cotter pins form hinge joints. This is necessary for the mobility of the lower ends of the side slats when the canvas is tensioned.
- Cuts are made at the lower ends of the sidewalls - parallel to the middle.
- Short bolts are inserted into the holes of the saw blade and tightened with nuts.
- The blade is inserted into the cuts so that the bolts are on the outside of the structure.
- Circular grooves are cut out at the upper ends of the handles.
- Loops are made at the ends of the double cord, which are placed on the grooves.
- A handle is inserted between the strings of the cord, the long end of which rests on the mullion.
- The saw string is twisted using a handle, achieving the desired degree of tension on the saw blade.
- The wood is covered with stain and two layers of varnish.
- After the varnish has dried, the saw is ready for use.
Bend
Probably almost all of you have seen such beautiful tables and chairs with bent legs. It looks very impressive. If such legs are cut and sawed out, they will turn out to be much less durable, because the longitudinal integrity of the fibers will be damaged. It is best to achieve this shape by bending the wood. To prevent workpieces from breaking, you must first increase their ductility. In production, chemical plasticization of wood is used, and amateurs usually have only one method available: first moisten the wood and then heat it, after which they can gradually bend the workpiece.
Homemade folding stand
A very original idea for a folding stand for hand tools. Everyone is in their place. It doesn't take up much space. The design is based on furniture guides. The clamp holds the stand in the upper position. Neodymium magnets prevent instruments from falling out of their stocks. A great idea for DIYers who love to do everything with their own hands.
Cheap homemade grinder
The most budget version of the grinder, created by the Samodelkins. Plastic bottles are used as rollers. They are mounted on bearings. The belt on the rollers is adjusted using thumbwheels. The tension is adjusted with a bolt. The structure is driven by a drill. You can slightly improve Samodelkin’s design by replacing plastic bottles with polypropylene tubes.
Useful hammer upgrade
When working with a hammer in an inconvenient place, you often have to take nails with you in your pocket or even in your teeth. Agree, this is not very pleasant.
By installing a small but powerful magnet on the hammer handle, you can at least partially solve this problem. The upgraded hammer will carry the nails itself and you can safely work without holding the next nail in your teeth. It's convenient, and your teeth don't get damaged.
Homemade soldering iron stand with your own hands
Many offline and online stores sell good and quite convenient stands for soldering irons, and inexpensively. But if you wish, you can make them yourself. It will be cheaper, plus you can adapt the stand to your own needs.
There are a lot of ideas for making them, so we decided not to limit ourselves to just one, but to make a selection of the most interesting, in our opinion, homemade soldering iron stands, made with our own hands.
Profitable and promising business
Having gained some experience in the production of decor, it will be possible to move from banal savings to a profitable business. This could be the production and sale of chess pieces. If you sell them through online auctions or retail chains, then an additional source of income will appear in the family budget.
Handmade items quickly find demand, especially if they are offered for sale at a reasonable price.
In the future, this hobby will develop into full-time commercial employment, giving you a chance to acquire professional tools and start earning very good money.
We make a carpentry workbench with our own hands according to the drawings: video instructions and photo examples
Among the common tools for a do-it-yourself carpentry workshop is a workbench. A durable and dimensional table that allows you to securely fasten the workpiece is useful for high-quality cutting of wood and creating various elements from it.
Example of a carpentry workbench
The device package includes:
- Working surface. Hard wood is used for it to increase the life of the device. The thickness must be at least 6 cm.
- Supports. Assembled from wooden beams or metal plates. The main task is to ensure the stability of the entire mechanism.
- Vise for securing the product. If the table is long, you can install two vices at once.
- Tool box. A useful recess or pull-out design that provides quick access to needed small parts.
Purchased folding workbench for work
To assemble a carpentry workbench for your workshop yourself, you should choose a drawing and purchase materials for the work.
Instructions for assembling a wooden workbench with your own hands
You can buy a wooden workbench in a store or through online catalogs, but it’s cheaper to make it yourself. Let's take as a basis a simple option with typical tabletop dimensions: length - 150-200 cm, width 70-120 cm.
The manufacturing work will include several stages:
| Image | What need to do |
| Make the top cover from thick boards to create a shield with a width of 70 to 200 cm. You fasten the elements with long nails, and you need to drive them in from the outside and carefully bend them from the inside. The working surface of the workbench is made only of wood or chipboard. | |
| Make the top cover from thick boards to create a shield with a width of 70 to 200 cm. You fasten the elements with long nails, and you need to drive them in from the outside and carefully bend them from the inside. The working surface of the workbench is made only of wood or chipboard. | |
| Sheathe the lid along the lower perimeter with a 5 by 5 cm beam. This will make it more convenient to attach the vertical supports. The location of the supports depends on the size of the tabletop. It is better to make them from thick rectangular timber at least 120 by 120 mm. | |
| The carpentry workbench must be installed correctly. Be sure to secure it firmly. If it will be mounted outdoors under a canopy, dig holes for supports. Indoors, use other fastening methods. |
Workshop machines
Below we will describe the general principle of assembling machines for a workshop, which can be taken as a basis, and assembly can be done from available materials.
Wood and metal lathe
It is worth saying right away that on such a lathe in a home workshop it will be possible to process only small metal workpieces. An important part of the machine for the workshop, which will ensure stability of processing, is the bed. You can make it yourself or use a factory one. For self-production, you can use a profiled pipe or a durable corner. The two elements are placed at a suitable distance and securely secured to each other by transverse elements. Examples of machine designs for a home workshop are visible in the photos above and below.
As a motor that will rotate the part, you can use a unit from an old washing machine, pump or some kind of machine. A powerful drill chuck can be used as a tailstock. In this case, it will be possible to insert a cone or drill into it, if required during processing. The headstock can be purchased factory-made or made according to the model in the photo.
In this case, a metal axle will be required, it is better if it is made of hardened steel. You need two holders with bearings for the axle. On one side, a pulley is fixed, and on the other, a chuck into which the workpiece will be clamped. The engine on such a workshop machine is installed next to the headstock, and the force is transmitted through a belt. The speed can be varied by using a frequency module or by moving the belt over a pulley. You will also need a support element, which is made according to the schematic drawing below.
A video about self-assembly of a wood lathe is below.
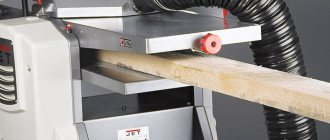
Milling machine
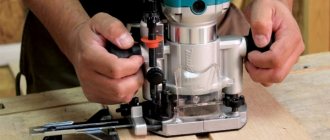
A milling machine for a home workshop is also quite easy to assemble. One option is to use a ready-made hand router, which is indispensable for an owner who likes to make something out of wood in his workshop.
For a manual machine, you can make a special workbench for your home workshop. The photo shows an example of such a table. At its core, it is a small table in which there is a hole for a cutter and a mount for the router itself. If you wish, you can do this in the workshop and on a ready-made workbench. It is important to choose the most convenient place to fix the router. During fastening, it is necessary to correctly calculate the maximum overhang of the cutter. When working this way, you will need to lift the factory support completely on a hand router. Switching on and off can be done via an extension cord with a switch. The disadvantage of this method is the need to manually adjust the speed directly on the router itself. A video about a homemade milling machine is below.
Advice! If you have an engine of the required power and a frequency converter, you can build a stationary milling machine in the workshop.
To do this, the motor is attached to the bottom of the table. A cutter chuck is mounted on the motor shaft. The connection is made through a frequency converter, which will vary the speed.
Drilling machine
A drill can be used as a drilling machine in the workshop. But for this it needs to be properly fixed. This can be done using a holder, which can be stationary for the workshop or portable. There are many different options for assembling this drill holder for your workshop. One of them is shown in the video below. Assembly will require materials that are within walking distance in every hardware store.
A circular saw
A stationary circular saw for a workshop can be made in a similar way as a holder for a hand router. It is enough to make a slot in the countertop for the slab sheet and mount it when required. The only drawback of this solution is the reduction in cutting depth. This can be corrected by installing it on a metal tabletop that is smaller in thickness. A video of the assembly of this design is below.
Making a carpenter's vice for a workbench with your own hands
Professional “homemade workers” assemble not only tables for work, but also vices with their own hands according to drawings. Any design of such a clamp will include several elements:
- Supports, where each one has a sponge for clamping.
- Moving jaw.
- Metal guides. The sponge moves over them.
- Lead screw for moving elements.
- Collar. Necessary for rotating the screw.
When making a homemade vice with your own hands, you can use various available materials. For example, there is a design option made from a profile pipe. To do this, prepare several pieces of pipe of different sizes, a steel stud with large threads and double nuts.
Instructions for creating a bench vise from a profile pipe:
| Image | What need to do |
| The largest pipe acts as a body. Supports are soldered to it from below. A 3-4 mm steel flange is put on the back side. A hole for the running nut is drilled in the center, and a rear jaw is welded opposite the front support. | |
| The largest pipe acts as a body. Supports are soldered to it from below. A 3-4 mm steel flange is put on the back side. A hole for the running nut is drilled in the center, and a rear jaw is welded opposite the front support. | |
| A front steel flange is welded onto the internal moving part. A stud is mounted in it, with lock nuts attached to it. Thrust washers are placed on both sides of the flange. The last element is a movable tube attached to the front jaw. |
DIY metal workbench drawings
A metal workbench does not differ much from a carpenter's workbench. It is based on a rigid metal rather than wooden frame. A vice is attached to it, and the entire workbench is designed to withstand the force of a sledgehammer.
Option for a home metal workbench
Do-it-yourself metal workbenches can have one, two or three cabinets, and also not have shelves or drawers for small parts. In terms of strength for working in a garage, you can make a regular table made of metal up to 5 mm thick and a reinforced structure where sheets from 10 to 30 mm are applicable.
Here are some useful plans for making a metal workbench for your workshop:
A simple version of a mechanic's workbench
Dimensions of a homemade tool
Combining a workbench and a work table
Fixed vice
Installation of the second clamp
The purpose of the rear analogue is to support the conditional cylinder to be sharpened and provide it with freedom for rapid rotation. The more firmly the tailstock holds the workpiece, the better the final result will be.
- An indispensable condition for proper installation of the second clamp is maintaining alignment with the first.
- Faced with great difficulties at this stage, it makes sense to significantly simplify the task by purchasing a completely finished unit.
The use of an electric drill chuck will allow you to significantly modify the engineering solution. A shaft is clamped in it, the end of which must be pointed.
Knife sharpening device
No home is complete without a knife in the kitchen. It is quite difficult to sharpen correctly without special tools: it is necessary to maintain the desired angle and achieve the ideal sharpness of the blade.
Option for a home device for sharpening blades
For each knife, a certain sharpening angle must be observed:
- A razor and scalpel require an angle of 10-15⁰.
- Knife for cutting bakery products – 15-20⁰.
- Classic multifunctional knives – 25-30⁰.
- For hunting and hiking, take a device with a blade angle from 25 to 30⁰.
- If you want to cut hard materials, then sharpen at an angle of 30-40⁰.
In this way you can adjust the sharpening angle
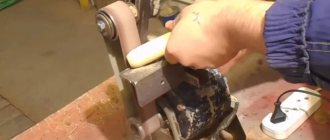
To ensure the desired angle, it is worth buying or making a sharpening device. For example, you can assemble a sharpener from washing machine motors with your own hands.
If you do not use sharpening every day, then 1000 rpm is enough for high-quality results and a long service life of the device.
To assemble such a machine, you will need a motor from a washing machine with a power of 200 W. To create a sharpener from a washing machine engine, prepare:
- the motor itself;
- metal for the casing with a thickness of 2 to 2.5 mm;
- flange tube;
- sharpening stone;
- nuts;
- trigger mechanism;
- cable for connecting to the electrical network;
- a metal corner or a wooden beam for the frame.
There are simple do-it-yourself sharpening machines without motors. For example, you can make a device from bars. To do this, prepare two abrasive stones of the same size and a sharpening stone.
An easy version of the “homemade” sharpener
The progress of work on creating such a simple device will be as follows:
- Sand the wood blocks with sandpaper, removing any burrs. Make markings depending on the desired angle.
Materials for work
- Attach a stone to the drawn line to give the blade a sharp edge. To do this, attach it to the block and mark its width. Then, make cuts on the markings, up to 1.5 cm deep.
- Attach abrasive stones to the resulting recesses so that the grooves coincide. Then, install the sharpening stone by screwing it onto the bolts.
Ready-made sharpener option
There are many ways to make a homemade knife sharpener. Choose the one that suits you and try to create a convenient and useful tool for your home.
Device for sharpening drills for metal
They make their own not only a sharpener for blades, but also a machine for sharpening drills for metal. Here are a few drawings useful for work:
Convenient option for everyday use
Expanded drawing
Ready home machine
Another convenient option
Selecting an Electric Powertrain
When choosing a motor to power the turning system, it is necessary to clarify how powerful it is. For the construction of a homemade self-heating unit, an indicator in the range of 1.2 - 2 kW is quite sufficient. In this case, you should find out exactly what scheme the connection is made according to.
For desktop woodworking, a motor from a household centrifuge is sufficient. Although he is not able to provide turning of a massive workpiece, he will definitely master the processing
- Miniature souvenirs;
- Kitchenware;
- Various types of furniture accessories.
DIY garage press options
Homemade garage presses allow you to process various products and materials under pressure. Structurally, the equipment consists of cylinders. In the garage, such a machine is useful for straightening or fastening various elements, as well as for bending sheets of metal or pressing cardboard.
An example of a homemade press
For private use, a capacity of 10-15 tons is sufficient. Most often, a bottle jack is used with a provided hand pump, which acts as the main structural element.
Here are some interesting options for homemade garage presses:
Option from scrap materials
Rails will also come in handy
Ready purchase model
Convenient homemade press