Factory drilling machines are commonly used in industrial and assembly shops. Well, it’s understandable - high productivity and quality of work are required there.
But it makes no sense to purchase such serious units for a home workshop.
Firstly, it is expensive - not everyone can afford it. Secondly, factory machines, as a rule, are large in size and take up a lot of free space.
On the other hand, using a conventional electric drill or a screwdriver cannot achieve high drilling accuracy.
Therefore, we offer an alternative option - to assemble a tabletop drilling machine with your own hands, using affordable and simple components.
To assemble a home-made structure, they usually use corrugated pipe, thick sheet metal, cutting corners and channels, as well as various car parts - steering rack, rack, etc.
As a drive, you can use a drill, a screwdriver or a motor from a washing machine.
We have selected the simplest and most interesting ideas that can be found on the Internet, and we want to share them with you.
Steering rack drilling machine
The idea of making a homemade drilling machine from a drill and a steering rack belongs to the author of the YouTube channel khám phá và sáng tạo.
Necessary materials:
- sheet metal;
- round pipe (steel);
- car steering rack;
- steel round timber;
- metal strip;
- electric drill.
We start by making the base. From sheet metal 2-3 mm thick, cut a rectangular blank of the required size. We round off sharp corners using an angle grinder.
Next, cut a piece of metal strip 30-40 mm wide.
We weld it to the bottom of the base, and immediately bend it along the contour of the workpiece. The bend area must first be heated with a gas burner, or you can first bend the strip to size on a bending machine.
Using a grinder with a petal wheel, we process the outer part of the base so that the edges are flush with the welded strip of metal.
After this we need a steel disk. We attach it to the base and fix it with welding. Then the author drills three holes to install the bolts - tighten them with nuts.
Now we need to make a vertical stand. A round pipe is used as the starting material. Use a grinder to cut the workpiece to the appropriate length. Using welding, we attach it to a metal disk.
Additionally, you need to strengthen the rack in the lower part with the help of three or four jibs cut from thick sheet metal.
Next, from a pipe and a pair of steel plates, you need to make a tightening clamp that fits onto the rack. It is needed to rigidly secure the working support table.
Two metal plates with holes are welded to the top of the rack, which are needed to secure the steering rack of the car.
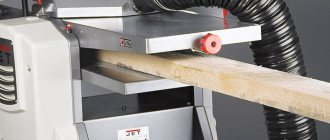
A section of professional pipe is welded to the end of the rail, to which the master welds a homemade metal clamp, with which the electric drill will be rigidly fixed.
Now we need to make a support work table (we cut it out of a sheet of metal) and a flywheel to lower and raise the drill.
We clean the weld seams with a grinder with a flap wheel, after which the surface of the metal must be painted - it will last longer and be more beautiful.
Step-by-step instructions and a diagram of how to make a drilling machine for a drill with your own hands for a home workshop are shown in the video.
Hướng dẫn làm máy khoan bàn mini tuyệt đẹp từ phế liệu
The design turned out to be quite inexpensive and easy to use. It is very convenient that a drill is used as a drive - if necessary, it can be removed and used for other purposes.
Why is a machine more efficient than a drill?
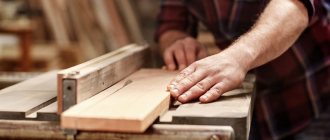
As a rule, at home, if it is necessary to drill holes, a hand or electric drill is used.
The use of these tools is justified only if there are no special requirements for the accuracy of the hole being drilled. When trying to drill holes with a drill, the drill may move to the side, resulting in either a defect or a product of low quality. It is generally impossible to make a deep hole in a strictly vertical or strictly horizontal direction without a machine. It is very difficult to drill in any material not a through hole, but a hole to a given depth (blind hole) using a drill, since this tool does not provide for the use of a ruler during drilling. A drilling machine can handle this task very easily .
When working with soft materials such as wood or plastic, the machine can be used to create milled holes or recesses. It is impossible to perform such operations with a drill.
Drilling machine from a washing machine motor
We bring to your attention another budget option for a homemade drill. Only in this case, instead of an electric drill, the motor from the washing machine is used as a drive.
The idea of this homemade product belongs to the author of the YouTube channel Elias Maximiliano.
Necessary materials:
- round metal pipe;
- steel corner;
- strip of metal;
- Electrical engine;
- gas lift (shock absorber);
- plywood pulleys;
- belt for belt drive.
First we make a reinforced stand. Usually a profile pipe is used, but in this case it will not work. Instead, we will use a round pipe and a corner.
We take a grinder with a cutting disc to cut the workpieces to the required length. We weld the parts together and clean them with a grinder. Next, we weld the reinforced stand we made to the frame.
We would like to immediately draw your attention to the fact that the base must be heavy and stable enough to support the weight of the electric motor and metal parts.
From sections of corner and strip it is necessary to make a movable structural element that will lower and rise along the rack. Essentially, this part is a carriage with a mechanical feed mechanism.
Next, you need to make a mounting platform on which the motor will be placed. It is welded to the carriage made earlier.
Now you need to make a spindle with a chuck for fixing the drill.
To do this, we need a threaded pin at the end, which will act as the spindle shaft. We put the bearing on it and secure it with nuts.
We cut off a piece of the tube and place it on the pin. We install the second bearing on top of the tube.
We prepare another piece of pipe. We cut it along the entire length. Place it on the installed bearings. The longitudinal cut must be welded tightly. We screw the cartridge onto the shaft.
We weld the spindle body to a metal plate, and the plate itself to the moving part.
To be able to lower the spindle, a lever must be installed.
Instead of a return spring, the author decided to install a shock absorber (gas lift).
Now we are making a work table on which the workpieces will be placed. To do this, you will first need to make a small slider that will move along the rack.
We weld a round table to it (the author uses an old circular saw blade). Additionally, you need to make a retainer.
We machine two pulleys from wood or plywood. We install one pulley on the electric motor shaft, the second on the spindle shaft. We tighten the belt.
All the parts of the drilling machine need to be painted, and then we assemble everything into a heap. Install the on/off button.
You can watch the step-by-step process of making a drilling machine with a motor from an automatic washing machine in the video below.
TALADRO DE BANCO CASERO-HECHO CON CHATARRA// HOMEMADE DRIIL PRESS FROM SCRAP
Unlike the first option, this design turned out to be quite cumbersome. But such a machine will definitely be more powerful than a drill stand made from a drill.
Multi-spindle drilling head
multi-spindle head
An additive machine of any type certainly contains this element.
The head consists of spindles installed in a row at equal intervals of 3.2 cm. This is a standard for furniture equipment that almost all manufacturers adhere to.
Differences are possible for special devices, for example, those that make holes for façade hinges. Drilling parameters depend on the characteristics of the hinges.
The movement from the electric motor comes through gears located inside the head. The head, depending on the number of spindles, can be equipped with a pair of electric motors. A similar scheme determines the rotation of the spindles in different directions. Therefore, drills with right and left screws can be used as executive bodies. Spindles rotating from the same motor are marked with the same color.
The spindle speed is maintained within 2700 rpm. Most often, multi-spindle heads contain 21 or 27 spindles. The gap between the outer drills in such devices is 64 and 83.2 cm. Drills with a diameter of 5 mm and 10 mm are easily inserted into chucks.
The head feed mechanism consists of a pneumatic drive and guides. You can adjust the drill feed rate along the axis using electronic sensors or stops; it varies from 4 to 9 cm and determines the depth of the holes in the workpiece.
Drilling machine from a screwdriver
This design option is ideal for those craftsmen who have neither a drill nor an electric motor for a washing machine. And in general, this is a cool idea if you want something simple and compact so as not to take up a lot of space on your desktop.
This interesting idea belongs to the author of the YouTube channel “Alexey Chezganov”.
First we make the base. The material used is corrugated pipe. The master decided to make the base not solid, but lattice.
First of all, a rectangle is welded, then profile pipes with a small gap need to be welded inside. A stand is welded to the base at a right angle (90 degrees).
Let's start making a homemade carriage to which the drive will be attached (in this case it's a screwdriver).
We take a grinder and cut the pieces from the corrugated pipe to size. You also need to make a mounting clamp to secure the screwdriver.
We weld two L-shaped parts from profile pipes. We weld a clamp at the end.
We cut off two more pieces of profile pipe, which will be required when assembling the carriage. We prepare hardware and bearings, and then proceed to assembly. All parts must be painted first.
The author made a carriage movement limiter from two pieces of profile pipe, studs and nuts. We install it at the bottom of the rack at the required height. Then we put the carriage itself on the rack.
The author decided to use a gas lift as a return mechanism so that the carriage with the screwdriver automatically rises up after drilling is completed. But you can make some changes to the design and install, for example, a spring instead of a gas lift.
The last stage of work is cleaning and painting the metal. We insert the screwdriver into the clamp, clamp it, and then you can begin testing the homemade product.
The step-by-step process of assembling a mini drilling machine with your own hands is shown in the video.
Stand for drill or screwdriver
In general, the design turned out to be quite easy to use and inexpensive. Thanks to its compact size, it will not take up much space on your desktop. We advise you to take note of this idea.
Main nodes
Regardless of the complexity caused by the need to solve certain technical problems, each homemade drilling machine contains in its design the following main components:
- bed;
- electric motor;
- drill chuck;
- transmission mechanism;
- controls and measuring equipment.
The main structural element of any machine tool is the bed - a massive structural unit to which all other parts are attached.
As a rule, a massive metal or wooden plate is used as a frame. The chuck functions as a drill holder that will be used when drilling holes of various diameters.
An electric motor, powered from a household network, is designed to create torque and transmit it to the cartridge through a transmission mechanism.
The transmission mechanism allows you to reduce or increase the speed of rotation of the cartridge when moving the drive belt in it from one pair of pulleys to another. The pulley for the drilling machine can be taken from industrial equipment or made independently.
The controls are the on/off buttons for the electric motor, as well as a lever through which the rotating drill is driven into the workpiece.
The measuring equipment is a ruler that is mounted on a vertically moving part of the machine. In this case, the reference point is located on the stationary part, and the ruler moving downwards together with the drill indicates the depth of drilling the blind hole.
Homemade plywood machine
A drilling machine made of metal is durable and reliable. However, not every craftsman has a welding machine.
Therefore, we offer an alternative option - to make the frame and main parts of the drilling machine from plywood.
The idea was shared by the author of the YouTube channel SF Crafting.
Please note: to assemble a homemade drilling machine, the author uses MDF, but it is better to use plywood.
Necessary materials:
- plywood;
- furniture guides;
- edged board;
- plastic legs;
- fastening clamp;
- metal plate.
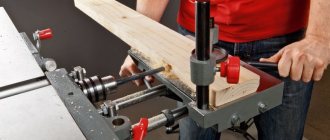
First of all, we take two furniture guides, and after removing the internal movable slats, we screw them to the plywood blocks. The bars themselves will need to be secured to a wide piece, as shown in the photo.
Next, we take another pair of furniture rails - we screw them to the plywood platform between the side rails (we also remove the internal movable strips).
We make a mount for a drill. You must first cut off a metal plate and weld a clamp to it. Additionally, we make reinforcement using round or square rods (this is the only operation where welding is used).
Now you will need to make a movable platform. We saw off a piece of plywood of the required size and screw the internal strips of the furniture rails to it. We connect both parts of the structure together.
Another plywood board must be screwed to the movable platform, to which a metal plate with a clamp is attached.
After this, we cut out the base of the drilling machine and screw plastic legs to its lower part.
Next, we install a stand made of edged boards. The previously assembled structure must be attached to the rack.
Install the return spring. We fix the electric drill or screwdriver in the clamp.
You can watch the video for details on how to make a drilling machine from plywood and furniture guides.
How to make Drill Press Machine at HOME | How to Build a Drill Press Machine | homemade drill guide
The design turned out to be quite inexpensive and easy to manufacture. Every home craftsman can do it with his own hands. By the way, if you change the method of fastening the clamp, you can completely do without welding.
Purpose of filler machines
drilling and filler machine
The holes made by drilling machines are needed to accommodate fasteners and fittings: pins, screws, screws, handles, hinges, hinges. The possibility and quality of assembling parts into a single whole depends on how accurately the holes are located. The size and location of the holes on the workpiece are strictly regulated; if they do not correspond to the drawings of the furniture body, it is impossible to assemble it. Often large batches of workpieces are returned to the factory due to mismatched fasteners. The error allowed is within 0.4 millimeters per 64 cm.
The additive machine operates on an aggregate principle - several tools of the same type are simultaneously involved - countersinks, drills, counterbores, mounted in a multi-spindle head.
Drilling machine from car pillars
We bring to your attention one of the simplest designs of a homemade drilling machine to manufacture.
Necessary materials:
- construction corner;
- car rack;
- sheet metal;
- spring - for automatic lifting of the rack.
The idea of this homemade product belongs to the author of the YouTube channel Alex DIY.
A metal pallet is used as the base of the machine. If a pallet is not available, it can be made from sheet metal (to do this, cut the blank to the required size, bend the sides, and scald it).
It is clear that the base is quite flimsy, so it needs to be strengthened. Inside the pallet, the author places steel corners and a piece of sheet metal. We weld all the parts together and weld them to the pallet.
Next, you need to make two clamps from the metal strip. We connect them together by welding them to a piece of profile pipe.
A car stand is used as a machine stand. We put a paired clamp on it and tighten it with a bolt.
We drill a hole in the base, install the stand, putting a spring on it, and secure it with a nut. We install an electric drill in another clamp.
You can learn more about making a homemade drilling machine from a drill with your own hands in the author's video.
Just a great homemade product for your drill!
Among the advantages of this design, first of all, we can note the ease of manufacture and low cost (you can use scrap metal scraps).
But the scope of application of the machine is limited - it is only suitable for drilling wood and sheet metal. For more serious and responsible work, where high precision is required, this machine is no longer suitable.
Types of filler machines
According to their purpose, the equipment of this group is divided into:
- universal;
- specialized;
- special.
Universal drilling and additive machines perform complete processing of holes from drilling to final processing with a turning or milling tool. They are used in series production and are equipped with many functions. Compact, low-power models are designed for home construction enthusiasts.
Specialized equipment operates automatically, processing several holes simultaneously. It can be reconfigured to perform various operations. Most manufacturing drilling and attachment machines fall into this category.
Special machines are created to work with certain types of workpieces. Most often, it is impossible to reconfigure them for other types of operations with your own hands.
Based on the number of functional traverses and spindles, machines are distinguished:
- semi-automatic drilling and filler;
- positional drilling and filler;
- drilling and filler machines with numerical control;
- additives for hinges.
To come in
Already registered? Sign in here.
There are currently 0 users on the page
There are no users viewing this page.
Those who have ever used an electric drill have encountered difficulties when it is necessary to make a bunch of holes. It's a disaster if there are holes in the board, but making holes in the metal? For this purpose, the industry came up with a drilling machine. Those who have it are very lucky, and those who don’t have it - prepare your pockets.
Personally, my pocket is small, so I can’t afford a factory drilling machine. Well, Chinese, made of tin, I can certainly afford it, but it’s bullshit. Soviet, semi-complete ones are unreasonably expensive. In principle, I didn’t consider magazine racks for drills, they were too childish. Wandering around the Internet I found a lot of homemade products, but the availability of turning work stopped me. You can order a couple of parts from a turner, but no one wants to share normal drawings, and when you design a part yourself, a mess will always come out. If a jamb comes out, run back to the turner and ask him to fix it. But one day I came across an interesting video from Zhelezjaka about a homemade drill stand. Simple design, repeatable and versatile. At the time of watching the video from Zhelezjaka, there were no analogues of this design yet.
I was going to make this stand for a whole year, maybe more. After going on vacation, I finally started work. I made some adjustments to the design; they do not fundamentally change the machine, but they unify the materials and reduce the manufacturing time of some elements. I tried to use the minimum amount of purchased material, I tried to use the garbage that I had. But we still couldn’t do without shopping. From the main one, I bought an additional pipe for the guide, a corner and a strip, 1 meter for each position.
Now let's look at the manufacturing process. Actually, my guide for the carriage is also made of a square pipe 40x40x3 mm. I bought the iron in a small hardware store; the rolled metal there is stored practically in the open air and is not particularly high in quality. But there is one advantage to this: you can touch everything there and choose better. And so it happened. From the beginning I wanted to take a pipe with a wall thickness of 2 mm, but the seller and I were unable to choose an even piece. I took a wall thickness of 3 mm; thick-walled pipes are much smoother. Steel is steel and traces of corrosion are an integral part of it. Therefore, I had to clean almost the entire rental, especially the guide. I did not bring him to a state of cat pride.
I forgot to say that in advance I prepared a set of preliminary drawings, according to which I made the basic elements. A set of final drawings will be posted at the end of the article. Blank to size mode. Here is the first deviation from the author's project, I took a corner for the carriage and bracket 45x45x4 mm. A 40x40 pipe fits perfectly into it, there is no need to cut anything and an excellent installation gap is formed (seen in the photo below). I tried to repeat the author's manufacturing technology.
I put some sandpaper on it, clamped it on the guide with clamps, and welded everything together from the heart. And then remove the figurines, clamping it so that “mother, don’t worry”! I was able to remove the rack bracket only by knocking it against the rest of the 45th corner. Next, I cut the entire corner, welded the carriage, put twice as much sandpaper and that’s it…. I can no longer remember how many swear words were wasted, cigarettes were smoked and everything that moved nearby was cursed, and it was impossible to separate one from the other. How the author makes everything so simple, I don’t know. And the technology, in my opinion, should be as follows: put double-folded sandpaper -> compress it with clamps -> weld the edges on all four corners -> completely boil one of the edges -> let it cool completely -> try to remove it from the mandrel. If it comes off the frame, then weld the second edge. If it doesn’t work, then cut off the tacks on the uncooked edge and lightly remove the guide. In the photo below there are already welded blanks; the smallest one will not be used.
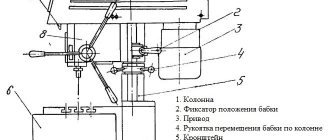
I made Stanina out of what I had. And I had almost a meter of channel 8. I adjusted the length of the bed to the length of the rest of the square pipe that remained after making the guide. Below is a picture of the installation process of the rack bracket. To be honest, this bed design is not very good. The shelves of the channel are all crooked, one piece is concave, the other is convex. Horror, not rental. He pretended to set it at a right angle, although it was unclear to what plane. I will deal with perpendicularity later.
I scalded and added a couple more details: legs, front panel blank
and back. The rear panel has two threaded holes. These holes will serve to secure the machine in a horizontal position when processing wood.
And fasteners to secure the stand in a vertical position. A single bolt is welded to provide grounding. The holes for the wires are not visible here, but they are in the drawings.
About the adjustable feet. By some chance, there were no standard legs from a refrigerator or washing machine, I’m just amazed. I had to make it from a bolt and an enlarged washer, the price was a couple of kopecks. But I had those things into which the legs are screwed, but tall nuts would fit perfectly in their place.
The drum is the one that will spin the cable. I took a creative approach to making this part. It works exactly the same, but is designed differently. Steel bars larger than 10mm in diameter are difficult to find in a home shed and my shed is no exception. Plus, I immediately resolved the issue of the removable handle. As an axis I used an M10 bolt with a short GOST thread. Cutting off the excess from it I got a smooth axle. The bolt head will serve as a kind of element for engaging the axle with the handle. The outer part of the drum will serve as a water pipe. If you do not have such a pipe in your metal waste, then you can replace it with a pipe purchased at the nearest plumbing store. To center the axle, we had to make bushings, so to speak, manually, without a lathe. To do this, I clamped two M10 nuts on the remaining bolt scrap (don’t throw away the scrap, it will come in handy later), inserted it into a drill and sharpened the entire structure using an electric sharpener. Since there are no threads on the bolt trim, the threads in the bushings also need to be drilled. The bolt head has a hole with an M5 thread for attaching the handle. It turned out pretty good.
Read also: Compressive strength MPa what is it
In the picture below, I have already welded the bushings to the axle, the main thing is not to forget to put on one of the eyes first. There are holes in the outer race of the drum through which the race will be welded to the bushings. All dimensions and clearances are indicated in the drawings.
Carriage. There’s not much to tell here, we’ll assemble everything according to the drawings. Just one addition. In the original, the carriage is locked with one of the adjusting bolts. After all, they are adjustable, so as not to touch them, so after welding all the parts, I made an additional threaded hole specifically for the locking bolt. I made the threads for the adjusting bolts only with a rough tap, in order to prevent spontaneous unwinding.
View from the other side. Sorry about my welds, I cook as I can.
The handle is also a lever. After looking at the photo, don’t throw tomatoes. In my design, the lever is made from a 17-size open-end wrench. It had a broken cap, so I gave the short spanner a second life.
On the one hand, I welded a homemade washer from a strip onto the cap part of the key.
Next, an element that is not in the original design is the stop. This stop is attached to the top of the guide post and is used when securing the machine in a horizontal position. The holes for mounting to the stand are not made coaxially to minimize rotation of the stop.
Another new detail. I called it "table". Since there is no plane on my bed, I had to twist around. It is made from a piece of laminated chipboard, not the best option, but so far. With the help of screws I have the opportunity to set the working plane perpendicular to the stand.
This is what it looks like. The photo also shows an auxiliary carriage on which a ruler and a tool for woodworking will be placed.
And here you can see the table adjustment element.
It's time to make a bracket for attaching the drill. And again the materials that I had were used. Clamp made of strip 25x4 mm, extension from pipe 30x30x2. This strip fits perfectly inside the pipe, making it easier to attach one to the other. And this rotation of the clamp ensures perfect alignment. The clamp is made by tapping a strip around a pipe with a diameter of 40 - 42 mm.
And brew it carefully. I was worried about the quality of these seams, since this is the weakest place in the entire structure.
Let's put the welder aside for a while and get to the drill. As I already said, I had been planning to make the machine for a whole year. During this time I acquired a drill, which I don’t mind. It was given to me as a non-working one. The wire was simply crushed inside and over time it burned out in this place. I corrected the wire, but the drill, apparently, is very tired and full of backlash. The first thing to replace was the cartridge and rolling bearings. The shank bushing was also broken.
To be honest, I would tear off the hands of these designers who added a ratchet function to a simple drill. There is no sense, the bearings are broken and the axial movement of the cartridge adds to all the delights. The most interesting thing, at least in this drill, is that the ratchet unit is the same size as the outer race of bearing No. 608. My attempts to knock the ratchet out of the silumin cage were unsuccessful; I had to cut off the teeth with a hacksaw and go to the market to look for a bronze bushing. And at the market they charged an absurd price for this sleeve, which I was very offended by and basically left with nothing. In place of the bronze gold bushing, the inner race from the same 608 bearing fits perfectly in size. One bad thing is that this is a one-time replacement; next time you will have to change the bushing along with the cartridge shaft. Let's see how long he lives. To eliminate the axial movement of the shaft, instead of a repelling spring, I installed a bushing made from a plumbing fitting, and placed a machined washer on the other side. The bearings have been replaced, the backlash has been eliminated, and the mechanisms have been lubricated.
Attention, the faint of heart, please do not look at the next picture! Since this drill was specially reserved for the machine, I tried to make it so that it could only work in this machine. I cut the handle. From the barbarian... The start button was removed, the reverse lever remained in its original place, the cut was covered with a neat lid.
And what did I get in the end? I placed the button in the cavity of the frame, made a threaded hole in the front panel and tightened the adjusting screw there. Thus, I received a remote speed control unit. You tighten the screw, it gradually presses a button that changes the speed of the drill. Separately mounted a toggle switch for turning on the machine.
Below is the process of assembling the spindle bracket. I attached a guide from the printer to the chuck, which made it possible to relatively accurately align the axis of the tool perpendicular to the table.
Here is the welded bracket. I immediately made a hole in the table and bed. I cut a thread in the bed to screw in the center to hold the wooden workpiece during turning work. Then he began to prepare parts for the manufacture of a tool rest (Podruchnik is a stand for a cutting tool on a lathe).
And here he is ready. It has simplified functionality; there is no height adjustment. I have never worked as a woodturner in my life, or metal lathe either, I will learn and try.
And in principle, the machine is ready; almost the maximum load was chosen for the test. The first serious hole was made with a 13 mm drill in the front panel of the machine to install the toggle switch; let me remind you, the panel is made of a 4 mm thick strip. The result exceeded all expectations, without preliminary drilling and a minimum of effort, without even straining, I drilled a hole in a matter of seconds. I was glad, the state of euphoria passed and noble traces of young rust began to catch my eye. I was in a hurry to assemble everything and didn’t bother to paint it in detail. Now we have to take everything apart.
Read also: Burning wood with a welding machine
As always, I waited until it got colder to start painting. Therefore, I had to paint in the barn, it’s not a pleasant pleasure, paint on the street. I chose the color green, this association has been with me since childhood - if it’s a machine, then it’s green.
Painting the bed. I was too lazy to take out the wire, a collective farm is a collective farm.
The paint has dried and here is the result of the work:
On the other side:
And in the lathe position:
Here are the promised drawings. I ask all norm inspectors and very smart people not to comment on the drawings, or even look at them :)) just a joke. Enjoy it for your health! I even drew up a specification according to which you can estimate the volume of materials needed. But I must warn you, do not blindly believe the drawings, double-check, I am not a robot and can sometimes make mistakes.
The result is a great tool. I cannot yet fully evaluate the turning option, since I only have a chisel instead of cutters. But as a drill there are a couple of “buts”:
- Try to make a frame like that of the author Zhelezjaka, the design will be simpler, lighter and smoother.
- One shoulder handle is terribly uncomfortable, it’s hard to explain why it’s inconvenient, but it’s uncomfortable. I will remake it into a three-armed one. In my version it’s simple, I unscrewed one and screwed the other. If you do it according to the original version, then pay attention to this.
- The handle is placed, as it were, behind the machine, which increases the required free space. In the future I will move it closer to the spindle using a chain drive.
- The front center (the toothed thing that rotates the wood piece) does a very poor job of holding the piece. The design needs to be changed.
And do not forget to use personal protective equipment when working. Do not violate safety requirements, no matter how stupid and ridiculous they may seem.
Every home craftsman has in his tool arsenal many different devices that allow him to bring his creative ideas to life. There are not only the usual sets of keys, screwdrivers, needle files and files here. A self-respecting specialist must have machine tools. This is a device for sharpening cutting tools, a small lathe for wood or metal, a milling machine or circular saw, and a welding machine. Even a novice home craftsman can make a drilling machine with his own hands.
Design selection
When choosing a design, you need to decide on its dimensions. If equipment that processes a part will be installed on a coordinate table, then its dimensions must be taken into account. If it is needed to fix the workpiece, it is mounted on the frame of the drilling equipment, and its width and length will be about 35 x 35 cm.
Tables are also distinguished by the type of fastening:
- When making a coordinate table with your own hands, the structure is equipped with a mechanical fastener. This is the simplest solution in terms of implementation, but it has a number of disadvantages. For example, it often leads to processing errors, and there is a risk of deformation of the product surface.
- Vacuum fastening is considered the best option. With its help, precise positioning of the workpiece on a horizontal plane is ensured. When an air stream is supplied into the gap between the tabletop and the workpiece, the pressure in this area changes. Thanks to this, it is possible to perform processing more efficiently (without mechanical damage to the product).
- Workpiece weight clamping is suitable when using a drill press to machine heavy parts. Due to its mass, the base product remains in the same place even with strong impact.
The functionality of the table depends on the number of degrees of freedom:
- If there is only one, then the workpiece can only be moved in one direction (this is a good option for processing flat products).
- If there are two degrees, it becomes possible to move the workpiece along X and Y coordinates.
- If there are three of them, then the part can move up, down and along the Z coordinate.
If the table is made for home production and processing of parts, then using two degrees of freedom is more than enough.
When making a coordinate table with your own hands, it is important to decide for what purpose it will be used. The parameters of the manipulator are selected in accordance with the dimensions, weight and shape of future workpieces. To work with various parts from metal and wood, a complex multifunctional mechanism is made. Usually, home craftsmen have enough capabilities of a small-sized table with mechanical fasteners and two degrees of freedom.
Mechanical
Vacuum
Fastening under the weight of the workpiece
Advantages and disadvantages
Homemade furniture machines, like any other tools, have advantages and disadvantages. The benefits include:
- ease of use;
- simple design does not require special skills when working;
- obtaining holes without defects;
- increase in productivity;
- relatively low cost of production;
- The equipment does not require much space to operate; a small area of the desktop is sufficient.
Drilling on a machine
Despite its positive aspects, homemade equipment has disadvantages:
- the ability to use only one type of drill;
- low speed during tool operation;
- there is no possibility of multifunctionality; processing requires the use of additional equipment;
- insufficiently automated device;
- You cannot switch modes.
The disadvantages of drilling devices are not noticeable when making furniture at home, since in this case it is not necessary to produce large volumes. The equipment ensures smooth holes, resulting in high-quality and durable furniture.
Making a furniture unit with your own hands is not difficult; you do not need to have special knowledge and skills. Everything is done from improvised means. The result is drilling equipment, which is indispensable when creating structures for your home yourself.