This article discusses homemade machines and devices for the home workshop. Here we describe in detail the features of the most popular and necessary DIY tools, as well as tools for a workshop or garage, step-by-step technologies for their manufacture and other useful recommendations on this topic.
Many home workshop owners create the equipment they need with their own hands.
How to securely secure a workpiece
Wood is a capricious material: it easily splits, chips and wrinkles. Most often, a trident is mounted in the headstock - this holder is universal and is most often equipped with household machines and many homemade ones.
The only thing is that it is extremely difficult to make a trident yourself, so it is better to purchase one. In addition to the trident, there is also a screw chuck and a clamping chuck, which is a tube with screw holes along the radius; clamping screws are screwed into the holes and firmly fix the workpiece.
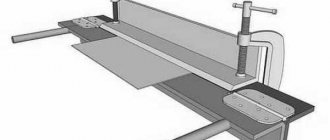
Often the faceplate is made independently from plywood 12–16 mm thick. So, the washer is assembled from two layers of plywood and, on the one hand, attached to a steel sheet about 2 mm thick. In such clamps, through holes are drilled and spikes are inserted there; the points of nails can play their role.
Scheme for creating a wood grinding machine with your own hands
Recommendations for making a consumable belt sanding machine with your own hands:
- The optimal width of the sanding belt is 20 cm.
- The sanding cloth of the tape is cut into strips.
- The abrasive tape is applied end-to-end.
- To strengthen the seam, you need to place dense material underneath.
- It is not recommended to use low-quality glue, as it will cause the material to tear along the seam.
- The diameter of the tape shaft in the center should be 2-3 mm wider than at the edges.
- To prevent the tape from slipping, it is recommended to wind it with thin rubber (a bicycle wheel).
Calibrating - wood grinding machines belong to the group of drum structures. This category is broad and includes many varieties of equipment.
To make a drum sanding machine for wood with your own hands, you can choose the following designs:
- surface grinding – the workpiece is processed within one plane;
- planetary - with its help a flat plane is formed on the workpiece;
- cylindrical grinding – it is used to process cylindrical workpieces.
From the video below, you can learn how to make a grinding machine with your own hands.
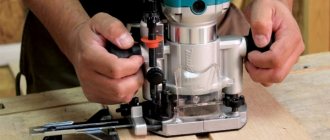
Pneumatic and electric tools
In Canada there is a settlement of Old Believers who live by their own laws: they do not use electricity, do not ride bicycles or cars. But this does not prevent them from having a carpentry workshop and using compressed air instead of electricity. To achieve this, all rooms are equipped with air ducts from a huge compressor; each workbench has a connection point for pneumatic tools. Using various carpentry tools, Canadian craftsmen are quite capable of making furniture without electricity.
The workshop has huge windows, as electric lighting is not used. All machines operate from compressed air. The external design of the machines does not change, only a pneumatic motor is installed instead of an electric motor. The workstation provides operation of pneumatic screwdrivers, drills, and milling cutters.
Sawing machine
The high speed of the grinder allows it to be used with a saw blade for wood processing. Without some protection this is very dangerous. The craftsmen have come up with a very useful and original homemade device for do-it-yourself carpentry, which allows you to safely use an angle grinder as a sawing machine.
For this purpose, special protection is made, similar to the standard casing that comes with the tool. It has a slide, two handles and a rotating device. The slide looks like a plate measuring 200 x 120 millimeters, with a slot for the saw blade to exit.
Two handles are welded to the casing to hold the sawing machine during operation. It is very convenient to cut and saw thin lumber, and the high speed of the machine on the joiner makes it easy to cut material up to 30 millimeters thick.
Vertical drilling model
The frame can be made from pieces of angle 50x50 millimeters and a steel sheet 5 millimeters thick. To do this, weld two corners along the edges of the sheet along the entire length; they will serve as legs. Table size 350 x 200 millimeters. Weld a bracket from a square pipe 80 millimeters high on top to attach the rack.
The stand or guide for the drill is made of a square pipe three millimeters thick. A section of water pipe eight millimeters long is welded into the upper hole. A cable tensioning mechanism is inserted into it. The height of the stand is 700 millimeters. The stand is inserted into the bracket and crimped with four bolts - two on two sides of the square pipe.
The carriage is a movable unit on which the drill is attached. It is made of 50x50 corners welded together, the height is 170 millimeters, the eyes are made of strip three millimeters thick. An axle is inserted into the eyes, around which the cable is wound.
The carriage drive consists of an axis on which a cable and a handle are wound. One end of the cable is fixed to the bottom bracket. The upper end of the cable is fixed in the pipe at the upper end of the rack. A special bracket with a seat for an electric drill is attached to the carriage. The drill itself is tightened with a special clamp made from a strip 2 mm thick and 40 mm wide.
Homemade turning device
- drive unit;
- bed;
- tailstock;
- handyman
The only difference is in the choice of drive. Whoever has any electromechanical devices is installed on the product:
- electric drill;
- Bulgarian;
- milling cutter;
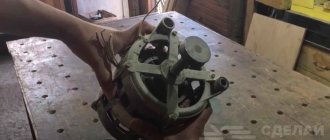
- electric motor from a washing machine.
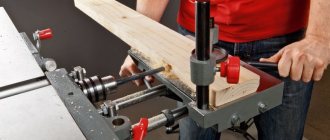
You can improve an already made metal-cutting structure by adding additional functions to it. For example, you can place a drill press horizontally on a workbench or table. The drive is an electric drill. The tailstock will be a work table in which a hole is drilled along the axis of the drill in the chuck and a thread is cut for screwing the fixed center.
Additionally, install a hand rest, securing it to the movable bracket of the rack. The workpiece is fastened with one end in a trident clamped in a drill chuck, and the other end in a fixed center. For a small number of simple parts - a quite good homemade woodworking machine with devices and equipment for the manufacture of shaped parts obtained by turning.
The list of tools and mechanisms for a workshop or garage is limited only by the area of the room and the financial capabilities of the owner. Despite the fact that many products are made from waste, the costs of purchasing parts and tools required for assembly are quite significant.
DIY knife sharpening devices: drawings and recommendations
To make a sharpener from a washing machine motor with your own hands, you can limit yourself to a motor from an old Soviet design, for example, SMR-1.5 or Riga-17. A power of 200 W will be enough, although you can increase this figure to 400 W by choosing a different engine option.
The list of parts needed for a DIY sharpening machine includes:
- tube (to grind the flange);
- a nut for fixing the stone on the pulley;
Homemade knife sharpening device
- metal for making a protective casing for a sharpener with your own hands (thickness 2.-2.5 mm);
- whetstone;
- an electrical cable cord having a plug;
- starting device;
- a corner made of metal or a block of wood (for the frame).
The diameter of the flange must match the dimensions of the bushing on the motor. In addition, a sharpening stone will be placed on this part. On one side, this element is threaded. The indentation should be equal to the thickness of the circle multiplied by 2. The thread is applied with a tap. On the other hand, the flange must be pressed onto the motor shaft using heat. Fixation is carried out by bolting or welding.
The working winding of the motor is connected to the cable. It has a resistance of 12 ohms, which can be calculated using a multimeter. The starting winding for a DIY knife sharpener will have 30 ohms. Then the bed is made. It is recommended to take a metal corner for it.
Assembly drawing of a homemade universal knife sharpener
Some people need a chainsaw chain sharpener. You can make such a structure with your own hands from a frame with 3 supports, two spindles, a stepper motor (2 kW) and pipes used as holders.
Which welding inverter to choose?
Choosing a welding inverter begins with determining the tasks that it must solve.
The key factor here is uptime.
For a home where infrequent short-term work is planned, a budget device that can withstand welding for at least 10 minutes is suitable.
In this case, a beginner will only need a device like MMA.
A professional for whom welding is part of his daily tasks will need a model that can also work in TIG and MIG-MAG modes, especially if welding non-ferrous metals is expected.
Well, now a little about the features of the devices.
Features of welding inverters
Welding current and electrode diameter. The latter is selected depending on the thickness of the metal being welded and is described separately for each model of the apparatus. So, for example, working with metal up to 2 mm thick requires 1.6 - 2 mm electrodes, and for parts 15 mm thick you need a 5 mm electrode. The correct diameter will allow you to make precise and clean seams. For different thicknesses of electrodes and depending on the characteristics of the task, different rated welding current is required. In most cases, it is enough that the device has a smooth regulator installed, which allows you to set the current value to 150 - 200 A. Ease of operation. This item primarily includes the dimensions and dimensions of the device, since it will have to be somehow delivered to the work site. A significant role is played by the length of the power cord, which, together with the plug, must withstand increased loads during the welding process. It should be remembered that connecting the inverter through extension cords, even specialized ones, will lead to a loss of its power in proportion to the total resistance of these same extension cords. In addition, you will have to constantly monitor the reliability of the contacts of the “garland” of plugs and sockets. In reality, there are cases when even the maximum current is not enough for normal arc formation when connected through extension cords
In addition, it is important to understand that household appliances are powered from a 220 V network, while some professional, as well as all industrial options, require a three-phase source with a voltage of 380 V. Warranty. Whatever welding machine, according to the manufacturer or the users themselves, is reliable, it must come with a warranty card from the manufacturer
Even famous brands have defects. In this case, the only salvation is the service center. You should make sure in advance that there is one nearby so that an inverter that suddenly fails does not have to be taken to another area for warranty service or repair. A good welding inverter allows both beginners and professionals to perform high-quality welding, for which it is equipped with optional additional functionality.
Additional functions
The presence of the following functions will increase the speed of welding with an inverter, the quality and safety of work:
- Hot start (Hot-Start). The essence is a short-term supply of the highest current value at the initial stage of operation, which leads to instantaneous ignition of the electrode at the moment when it makes the first contact. In fact, the system ensures efficient ignition of the electrode.
- Anti-Stick is a function that primarily ensures operator safety. Designed to prevent “sticking” of the electrode, shortening the arc at moments when the latter approaches the metal. So, if you remove the electrode from the surface of the workpiece, there is a decrease in the current strength, and when it gets too close, its readings go to zero, due to which the electrode is easily separated from the metal.
- Arc-Force – serves to provide increased stability during a short arc stroke. The automatic system, if required, independently increases the current, the maximum value of which is set by the master. The function allows you to eliminate “sticking”, overheating of the device during a short circuit, and also ensures the correct welding depth.
- Light indication - necessary to notify the master about malfunctions of the welding machine. So, for example, one of the lights lights up when it is connected to the network, and the other when it overheats.
- The parameter display is another way to monitor the operation of the device. The display shows the current current and voltage. All this allows you to select the appropriate operating mode.
- Automatic shutdown when overheating is perhaps one of the most important functional additions that should be present in inverters. The fact is that during welding you can miss the activation of the indicator light, which will lead to damage to the device if it does not have the automatic shutdown function installed.
To make it easier to carry the device, it is usually equipped with a plastic handle. It is relevant if the block really weighs little.
For those models whose weight reaches 7 kg or more, it makes sense to pay attention to the presence of a belt. It will allow you to carry the welding machine by throwing this belt over your shoulder, which is much easier
It will allow you to carry the welding machine by throwing this belt over your shoulder, which is much easier.
Lathe workbench
The main element in a lathe workbench is the bed. The convenience of working on the machine, as well as its stability, depends on it. The part can be made from either wood or metal.
When drawing up a drawing of a workbench, you need to think about the engine option. Most often, its speed is 1500 rpm, and its power is 200-250 W. If you plan to process large objects, then the power should be greater.
Another element of a do-it-yourself turning and copying machine is a manual milling cutter. It is mounted on a plywood platform. The thickness of the plywood is 12 mm with dimensions of 20x50 cm. Holes are made in the base for mounting the cutter and for fasteners. Supports made of bars will also be attached to the router - they will ensure greater stability of the structure.
Furniture
Living room furniture in a classic style is designed to emphasize the atmosphere of luxury. Massive or sophisticated products made of expensive wood with exquisite fittings are used as decoration items. All of them are located strictly symmetrically.
Satin, silk, and cotton are perfect for upholstering sofas and chairs. Armchairs or large sofas will benefit from having leather coverings.
For a classic design, choose a sofa, a carved table, armchairs, cabinets with mirrored or glass doors.
Creating a homemade forging machine
As for the placement of templates, you need to place them so that they are at a distance from each other, but you should not place them too close, crowding them together. During the forging process, parts may shift due to lack of space, and if the parts are too far apart, the forging process can become significantly more difficult.
The nozzles can be changed using a rectangle-shaped slot. It will be possible to put models into it for forging for replacement.
They must be attached to metal strips, which, in turn, will have the shape of a rectangle. As for the nozzles, they will be secured using regular bolts.
Simple design
A woodworking machine of simple design is made as follows:
- A shield is made from thick boards (0.7×2 m). To connect them, nails are used - they are driven in and bent on the reverse side.
- To prevent tools from rolling down during work, a small border is installed around the perimeter of the working surface. To do this, bars with a cross section of 50 x 50 mm are nailed from the end side.
- For the installation of supports, choose bars with dimensions of 12x12x130 cm. The height of the supports must be adjusted taking into account the requests of the master who will work at the machine. The main condition for this is comfort. It should be taken into account that after installing the cover, the height of the machine will increase by 8-10 cm. Next, you need to make markings on the ground and deepen the bars by 20-35 cm.
- Crossbars are attached to the supports, which are wide slats 20-40 cm from the ground level. Connections are made with wood screws. A pre-prepared wooden shield is installed on top.
You should not fasten the cover with nails; it is better to use self-tapping screws, since driving in the fasteners can damage the lower frame of the structure.
Cold forging machines: description of functionality and areas of application
The capabilities of the products and their scope of application help to make the right choice under any circumstances. Changing the shape of the metal and increasing its strength due to pressing is the main function performed by any type of this equipment.
Such functions are most useful for the following areas:
- Creation of decorative items for the interior, edged weapons and furniture. This applies to both factory-made and home-made products.
- The mechanical engineering industry involves the development of parts based on rolled metal pipes, sheets and rounds.
- Production of construction parts with different levels of complexity. Pictures of a cold forging machine help you understand what certain devices look like.
Manufacturing of cutters
Blanks for the manufacture of cutters must have adequate strength and a hard edge responsible for the thread, and be securely inserted into the clamp.
Suitable for making cutters:
- Small pieces of steel rods corresponding to the dimensions of the parts and having a square cross-section.
- Failed files and rasps that do not have strong chips or cracks.
- Car springs. The workpiece is first given the shape of a square - using welding or autogenous.
To install cutters on a machine, you need a specially modified housing with parts for installation. All elements must be made of high-strength material that can withstand heavy loads.
After the cutter is made, it is sharpened. To increase strength, the cutting part is hardened by heating to the desired temperature and dipping into machine oil. By repeating this process several times, a durable tool is obtained.
DIY country shower
Before installing it, you need to make a shower stall. If possible, you can make it out of wood, installing this small structure on the base. Install a wooden door or limit yourself to a shower curtain like this.
There are also simpler options. If you have oilskin fabric, then use it.
After the end of promotions, banners remain. You can contact an advertising agency and buy one for almost nothing.
Another option is to purchase impregnated fabric or use an old awning or tent.
If you made a fence from corrugated sheets and you have some materials left, then try making a shower for your dacha out of them. Metal pipes need to be dug in according to the markings and filled with concrete. When it dries, cut sheets of corrugated sheets are welded to the racks. One of them will become the roof.
If you don't have enough wooden boards, then implement the option shown in the next photo on the right. And on the left is a shower that is made like a fence. So the materials for it will cost almost free.
When the shower is ready, you can install a water container on it. To make it warm up better, you can make a kind of coil out of metal or a hose. Then the water will warm up more actively.
These and other homemade products for the garden allow you to make the most of your existing containers.
To be able to get warm water even when it is not heated by the sun, use electric heating. To do this, you can place the plastic barrel vertically or horizontally. Then you will need to install a shadow on one side, and on the other? water fill fitting. Make an overflow hole so that excess liquid flows out and you can see that the container is already full.
Now all that remains is to install the tank. This is usually done using a shower roof. You can put a flat tank here, made of iron or plastic. You can also make a canister for the soul from a metal or iron barrel. If you need to heat water, then a heating element is installed in the barrel.
Check out other examples of what you can do in your garden with your own hands.
Making a metal workbench with your own hands: how to make a metal structure
For plumbing work, it is better to make a metal workbench with your own hands, because a wooden one will not be suitable for this. The fact is that wood is not that durable. In addition, when working with metal workpieces, a tabletop made of this material will be constantly damaged and will quickly become unusable.
In the general drawing of a do-it-yourself bench, you can identify five main components of the design:
- For longitudinal rigidity of the product, horizontal beams (3 pieces) measuring 6x4 cm are used. Length – slightly exceeds 2 m.
- Rack-mounted small-sized beams (9 pcs.) made of profiled pipes measuring 6x4 cm. They are used to assemble the frame part of the cabinets. In the corner area there are welded spacers made of steel strips. Due to all these elements, the frame is rigid and very durable.
- Rack beams (4 pcs.) 9-10 cm long (section 6x4 cm). To do this, it is better to use metal profile pipes with thick walls (more than 2 mm).
- Corner No. 50 (4 pcs.), which will be used as vertical posts. The height of these elements is 1.7-2 m. Working tools will be attached here.
Dimensions of the bench:
| Workbench options | Size, cm |
| Structure length | 2200 |
| Structure width | 750 |
| Structure height | 950 |
| Width of cabinet with drawers | 750 |
| Clearance between cabinets | 700 |
Do-it-yourself workbench manufacturing technology: how to assemble
Making a universal workbench with your own hands begins with assembling the frame. To do this, you need to take a couple of short and a couple of long beams. During the welding process, these elements may become twisted.
To prevent this, you must:
Installation diagram of a metal workbench
Then the rear vertical racks and the rear beam (long, one of three) are attached. You definitely need to check how evenly they are placed in relation to each other. If there are any deviations, the beams can be carefully bent using a hammer. At the end, the remaining vertical rack elements are assembled, as well as elements that provide rigidity.
When the frame is ready, corners can be welded to it to strengthen the structure. The tabletop is formed from wooden boards. They must first be soaked in a fire-resistant liquid. Then a sheet of metal is laid on top.
A plywood tool shield can be mounted on the vertical rack elements. The same material is used to sew up the cabinets. For boxes, you can use metal boxes or make wooden structures.
You can use the video below to understand in more detail the technology of making a workbench with your own hands:
General design and structure of a homemade unit
When designing a homemade lathe for turning, you can consider two design options: with an electric drive and without an electric motor. Despite the antiquity of the method of processing wood using human muscles, this option has the right to exist in conditions where it is necessary to process wood, but there is no possibility of using electricity.
The main structural elements of a lathe are listed below.
bed
The bed is the frame of the entire mechanism. The safety of the craftsman and the quality of the future product depend on the reliability of the frame.
Drive: motor rotor or pedal for foot drive.
Headstock
The headstock is a chuck for clamping the product and its subsequent rotation. Rotation from the engine is transmitted to it through a gear transmission, pulleys or a belt. At the end of the headstock there is a spindle with a faceplate for fixing the product.
Tailstock
The tailstock is needed for additional fixation of the workpiece, which will help improve the accuracy of the rotation axis and avoid unnecessary vibrations. It is a freely rotating blade that can be moved along the axis of rotation of the product to adjust the distance between the headstocks.
Podruchnik
A tool rest is necessary to support the chisel while processing wood. Without a stand for a hand tool, it is impossible to maintain high accuracy of the blade tip hitting the sketch lines and it is extremely difficult to regulate the pressing force of the cutter.
Joiner's machine
Making homemade machines with your own hands begins with sketches of a drawing. The main parts of a homemade carpentry machine are:
- Working surface. It is necessary to stock up on wood, the thickness of which is at least 6 cm. It is better to choose narrow boards, made of oak, hornbeam or beech. To extend their service life, they are pre-treated with drying oil.
- Homemade vice. Product sizes may vary. If desired, several types of clamps can be installed. To create a massive vice, choose wood. For small bench vices, steel blanks are used.
- The basis of a carpentry workbench. Linden or pine are suitable for it. The structure is strengthened by means of longitudinal bars, which significantly increases the stability of the machine.
It is more convenient to work if there are shelves nearby. The best option for their location is directly above the work surface. Shelves are either fixed or retractable.
The optimal linear parameter of a joinery machine is a length not exceeding 1 m. When installing a pair of vices, the length is slightly increased.
According to modifications they are distinguished:
- mobile;
- stationary;
- folding universal machines.
Homemade options
It is quite possible to make a decent lathe using plywood. To work, you will need, in addition to the material itself, the following elements:
- glue;
- circular saw and miter saw;
- pencil or marker, ruler (for marks);
- fixing clamps;
- bearings, paint, screws, screwdriver;
- metal plate, electric motor and pulley;
- a number of other details.
To form the base of the machine, 1.2 cm thick plywood is used. After cutting and gluing the workpieces, the edges are trimmed, and the grooves are used to install racks. The headstock is also made of plywood; it is necessary to drill a hole in it for the bearing. It is advisable to place some nuts and washers on glue. The width of the platform and the guide part must match, and a well-made platform with clamps moves freely in two planes.
The production of tailstocks and frontstocks is no different. Both of them require special protection. The power drive must be mounted on a board connected to the base using a loop. To make a spindle, you need to weld two nuts in a washer, and then make “teeth” in the nut. The machine must be painted.
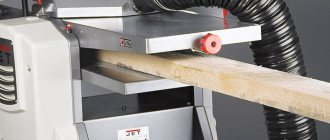
Of course, you can also make a drilling machine from plywood. Since it is usually designed for relatively small workpieces, plywood sheets 1 cm thick can be used. All parts must be fitted as tightly as possible so that there are no visually noticeable breaks
Important: sheet material does not tolerate rough mechanical stress, so joining parts with nails and screws would be a bad idea; you can only use tenons and grooves, and sometimes PVA glue for maximum hardening
If you plan to drill other plywood pieces using a plywood machine, you need to provide space for backing another sheet. Otherwise, the processed products may crack and even split. Painting drilling equipment is not very justified. They are subjected to very intense vibration, thermal and mechanical influences. But applying a primer is very useful, especially in workshops without heating.
It is also possible to assemble CNC milling or woodworking machines. The trajectory of the processing part (as in other types) is calculated along three axes. If there is not enough space in the workshop, you can use universal stands designed for a wide range of tools. Typically the working field is 60x90 cm with a vertical stroke of 25 cm.
There are two main schemes for constructing any homemade plywood machines. In one version, the table moves, but the portal remains motionless, in the second, the roles change. The first method simplifies the design, but is only suitable for very small desktops. Therefore, in practice, the approach of moving the portal and immobilizing the table is much more often used. But in the second scheme there may be private options.
First of all, they relate to the use of a single central or two lateral drives. The 2-drive option is suitable for relatively bulky designs. It allows you to minimize the risk of the portal warping relative to the guides. Moreover, the entire assembly has excellent rigidity. The size of the treated area is determined by the tasks to be solved.
It is often believed that the geometry of the portal, the proportions of the distance between the axes and working guides, the gaps between bearings can only be calculated taking into account strength of materials and precision mechanics. This is largely true, but the basic points are accessible even to non-specialists, namely:
- reducing the gap above the table increases the rigidity of the structure;
- the axles should also be made stiffer and not too long;
- If possible, the gap between the X-axis guides should be increased to reduce abnormal twisting;
- the center of gravity of the portal must correspond to the location of the cutter and at the same time be between the Y-axis bearings (because of this, the vertical posts often bend backward);
- it is required to use only ball screw drive screws that give the least backlash;
- the screw must be equipped with a pair of independent bearings and connected to the motor through a flexible coupling (then a balance of simplicity and quality is achieved)
- All key parts can be assembled on box tenons (this is much more aesthetically pleasing than nuts sticking out in all directions).
How to make a vice
The main element of a homemade machine is a vice. For them, you need to purchase special fasteners - studs, which are easy to find in hardware stores.
The next detail, which is fundamental in the design, is the screw pin. It is with its help that objects in a vice will be clamped or loosened. The minimum diametrical cross-section of the screw is 20 mm, and the length is 15 cm. With these parameters, the machine connector will be 8 cm. The larger the screw, the larger the vice connector.
Clamping is carried out using jaws. One of them is fixed and attached directly to the tabletop, the second is movable. Sponges are made from pine boards. Parameters: 20x18x500 mm. A hole is made in them with a diameter corresponding to the size of the screw rod. Then use a No. 10 drill to make holes for the mounting pins. For ease of work, it is recommended to connect the sponges together with nails and remove them at the end of installation.
Safety precautions when working with a homemade lathe and proper care
After assembly, you must ensure that there are no faults before connecting it to the network. Check the free rotation of the spindle, the absence of delays in the operation of the drive mechanisms and extraneous noise. Alignment is carefully controlled. It is necessary that the power supply parameters meet the needs of the power unit in the mode of highest power consumption when turned on.
Before starting work, make sure that protective screens and casings are available (in good condition). The new tool is installed with the electric motor stopped using all standard fasteners. Observe processing modes corresponding to the parameters of the cutters and workpiece.
After completion of work operations, waste is removed. Perform lubrication and other work required by the maintenance regulations in a timely manner.
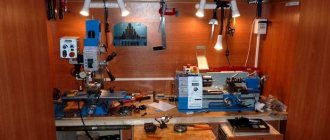
Homemade machines and devices for the home workshop: general information
Each owner of a garage or workshop, depending on his needs, selects the equipment himself. Many of them know how to make homemade machines and devices for garages, so they make do with their own resources when arranging the premises, customizing the technical features of the structures to suit themselves.
So, when creating a metal workbench with your own hands, the drawings and dimensions of the product on them can be adjusted to the parameters of the room and other conditions. Even for a small home workshop, you will need to allocate enough space to accommodate at least the design of a universal folding workbench and a minimum set of tools. The required area for this is at least 3-5 m².
A workshop set up in a specially designated room
Manufacturing of tools storage devices: shelves, racks
In fact, it is very difficult to achieve optimal operating conditions. It is desirable that the size of the room be at least 6.5 m. To equip a workshop, you can make an extension to the house or garage. This solution will be the most profitable in any case.
Before designing a drawing of a folding workbench with your own hands, which has the largest design (therefore its dimensions are taken into account first), it is worth deciding on some points:
- indicate what types of work will be performed in the workshop;
- determine a list of necessary tools and equipment.
By mounting the tool on the wall, you can significantly save useful space in the workshop. Shelves or racks are perfect for this. You can successfully arrange these structures, achieving the most rational distribution of area.
The home workshop should be located so that noise from working tools does not disturb residents
In order to save space, you can get a special device for a circular saw with your own hands, made on the basis of a conventional drill. Such a universal machine can perform several functions at once, combining the following capabilities:
- circular saw;
- grinding machine;
- sharpened;
- mini lathe for wood;
- cutting machine.
The work table can be combined with a vice for a carpentry workbench and equipped with drawers to store small tools.
Making a carpentry workbench with your own hands: drawings, videos, technology
The drawing of a carpentry workbench should include the following details:
There are several modifications of workbenches:
Having familiarized yourself with the structure of a carpentry workbench, you can begin to manufacture it.
Technology and drawings of a do-it-yourself carpentry workbench: how to make a simple design
Step-by-step technology for manufacturing the structure:
- To make a lid for a wooden carpentry workbench, you will need to take thick boards. The size must be selected so that, as a result of their connection, a shield with parameters of 0.7x2 m is obtained (the length can be less than 2 m). Long nails should be used as fasteners, which must be driven in from the front side and bent from the back.
- You can finish the lid by securing a beam with a section of 50x50 mm along its lower perimeter.
- Depending on the size of the carpentry workbench (its cover), vertical supports are located. To make them, a timber (12x12x130 cm) is taken. At this stage, it is necessary to take into account the height of the working surface, because it should be comfortable. The upper limit of the support should be at the level of your lowered arms. Subsequently, due to the installation of the cover, about 8-10 cm will be added to this indicator. Markings for installing the beams should be applied to the ground and these elements should be dug to a depth of 0.2-0.35 m.
- Next, we install the frame part and the cover of the wooden workbench with our own hands. The installed support bars must be connected in pairs. For this, wide boards are used, fixed at a height of 0.2-0.4 m with long screws. The cover is secured to the ends of the supports using the same fasteners.
Setting up a workbench for carpentry work
Technology for making a universal wooden workbench with your own hands
Despite the fact that the technology for creating this design is in many ways similar to the previous version, for the manufacture of a composite carpentry workbench, drawings with dimensions will be required. But in this case, bolts are used instead of screws.
In addition, you can install drawers for storing tools in a folding universal workbench with your own hands.
Technology for making a folding workbench with your own hands:
The dimensions and parameters of equipment created by yourself can be completely adjusted to your own needs.
DIY carpenter's vice design for a workbench
Usually workbenches are equipped with a vice. Many garage workshop owners know how to make such a device with their own hands. For a homemade design you will need special studs. Such fasteners are sold in hardware stores.
For beginners, experts recommend using additional materials to create a vice with your own hands: a video on how to make such a tool can be easily found on the Internet.
To work, you will need a special screw pin. This threaded part is the main operating component of the structure. The minimum pin diameter is 2 cm, the cutting length is 15 cm. The longer this part is, the wider the vice can be spread. If you take into account exactly these dimensional parameters in the drawings of a vice with your own hands, you can get a design that is set apart by almost 8 cm.
Assembly diagram of a vice for a homemade carpentry workbench
The jaws of the tool are made from a pair of boards. One part of the part will be fixed. To make it you need to take pine. The second part measuring 2x1.8x50 cm will move. In each of these boards you need to drill a hole for a screw. Using a drill with a diameter of 1 cm, holes for the studs are formed in all boards at the same time. To prevent the holes from moving relative to each other, you can connect them using nails.
After all the holes are made, the screw and all the studs are inserted into them along with the washer and nut.
Additionally, you can use the video below to create a vice with your own hands.