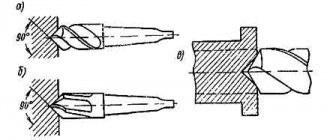
To cut a large round hole in a board or plywood, most people do this: drill a hole with an ordinary drill, and then work it out with a file. And it is rarely possible to obtain a hole of the correct shape in this way. Of course, you can use wood crowns, but when you don’t have them at hand, you can make a homemade round cutter.
It consists of a collet holder and a set of interchangeable “feather” drills of the required sizes. The center “feather” is made of tool steel, for example, from a plane iron. Its cutting part is sharpened into a wedge (in the shape of a chisel). The end should be 3 - 5 mm longer than this “chisel”.
The holder is made from a bolt (or pin) with a diameter of 10 -12 mm, depending on the chuck capacity of your rotary hammer, drill, or machine tool. The head of the bolt is cut off, and the bolt itself is sawed crosswise along the thread side, so that it looks like a collet. The shank of the “feather” is made wedge-shaped, its width should not exceed the diameter of the bolt thread. The drill is held in place by two nuts: one is a guide nut, the other is a clamping nut. It is advisable to take the second one with a slightly smaller diameter - taking into account the fact that your collet has slots that allow, by squeezing, to slightly change the diameter of the bolt.
If a round cutter with a constant radius is enough for you, then the “feather” can be welded to the holder. With such devices we were able to quickly and, most importantly, accurately cut round holes in boards up to 50 mm thick.
If you need to make a large diameter hole in a tree, you will have to use special devices, each of which has its own characteristics. We will consider all possible options and tell you about their main advantages and disadvantages so that you can choose the best option in accordance with the specifics of the work in a given situation.
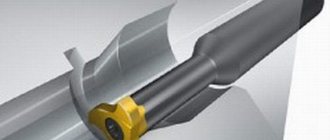
In the photo: equipment for wood differs from equipment for concrete and ceramics
How to drill a log or thick beam? Of course with a screw drill
We continue to understand the equipment with which you can work on wood. In general, wood can be drilled with different drills; in the last article we analyzed the effectiveness of the Forstner drill, and figured out how and where it is recommended to use it.
There are a great many types of wood drills and it often happens that they are ideal for some jobs, but not suitable for others at all. Therefore, a home craftsman must understand what and how to drill into wood. Today's article will be about a screw drill, also called a twist drill.
It is for wood and will help out in cases where it is necessary to drill a deep hole. For example, you have a log house through which you need to stretch a water pipe or a bundle of cables. And only a twist drill can cope with thick wood. Of course, nothing prevents you from trying to use a regular perk, however, as I already said, drilling with it is inconvenient and it is not a guarantee that you will be able to complete the job.
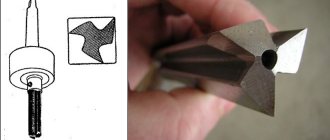
As you can see, the tip is made in the form of a thin thread, which helps to screw in the drill perfectly at the initial stage of drilling. The ejection of chips occurs due to the screw edges (like any drill or brace), so drilling is easy. The shank is most often 6-sided, so the tool is securely mounted in the chuck of a drill or screwdriver.
It is necessary to work with such a drill at low speeds, so it is best to use a regular home drill with speed control or a powerful screwdriver with a high tightening torque.
But it is best, if possible, to use a low-speed drill with a speed of up to 800 (I recommend a rebir drill).
The most common use of such equipment is the fastening of logs. Workers who assemble log houses often come to our store and they buy “spirals” with a diameter of 25-28-30 mm and a length of 450-600 mm. As you know, in order to fasten the logs of a log house together, you need to drill them from above and insert iron reinforcement into the hole made. It is very important that the hole is drilled deeply, which is why a long drill is needed.
The standard range of lengths is as follows:
— 220 mm — 450 mm — 600 mm (the most popular).
To make holes with a diameter of 30 mm to a depth of 600 mm in wood, you need a very powerful power tool, so we recommend using a drill of at least 1000 Watt (and that is unlikely to be enough), as well as screwdrivers with a torque of at least 36 Nm. Of course, the most preferable option is a low-speed drill, which has a power of 1200 Watts; for such work you can’t imagine anything better. It is very powerful and easily pushes such a thick drill bit through solid wood.
The prices for such “consumables” are quite high, at least it is much more expensive than feather and Forstner drills. For example, 22*600 costs around 300 rubles. And the thickest ones come with a price tag of a piece of rubles. They are taken only when it is necessary to drill a hole in a log house for a sewer pipe, etc.
However, if you consider that the drill is powerful and heavy, and it is used to perform specific work, then you should not worry about the price. Because anyway, nothing else can drill through 3 logs at once.
Source
Shape cutting technologies
Jigsaw
As we noted above, a jigsaw will come in handy if we are looking for how to cut a word out of plywood or make other parts of complex shapes:
We transfer pre-printed drawings or templates onto the workpiece using carbon paper.
Figured carving with a jigsaw: photo of the finished product
- If the structure has through sections, we make starting holes with a thin drill.
- Insert a file or jigsaw blade into the hole. Secure the free end of the file with a fastening screw or clamp.
- We make a cut along the intended line, pressing the workpiece to the workbench. The saw moves either automatically (for electric jigsaws) or manually.
After all the arc elements have been sawn, we remove unnecessary areas and process the finished part with a file or sandpaper.
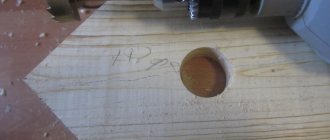
Finished hole
Fraser
A furniture router is great for cutting out thick plywood. Of course, you can’t make a complex shape with it, but cutting an arc or circle is easy:
- We fix the standard ruler included in the router in the center of the circle using a self-tapping screw.
- If the length of the ruler is not enough, you can assemble a simple bracket from a metal profile or wooden planks.
- By rotating the cutter along a fixed radius, we select a groove along the circumference, resulting in an almost perfect hole.
Bracket for router: with it you can cut a disc of almost any diameter
In this way, you can cut not only circles, but also individual arcs - for example, in order to make grooves for furniture brackets.
Using improvised means
For shaped elements, it is advisable to have special devices, but any craftsman may need to make a round hole in a slab of laminated veneer. Below we will tell you how to cut a circle from plywood when you have nothing at hand. Well, almost nothing:
- To cut plywood, use a wooden strip with two nails.
- One nail is driven through the strip into the workpiece, exactly in the center of the hole being made.
- We drive the second nail into the bar so that the point protrudes on the wrong side by at least 5-10 mm. The distance from the first nail should be equal to the radius of the hole being made.
- Rotating the bar, use the tip to draw a groove on the plywood, deepening it with each turn.
- Instead of a stick, you can use a strong cord. The operating principle remains unchanged.
Diagram of "threading" using nails. The sharper the nail used, the faster the hole will be made. It should be noted that although the price of such a device is low, it is worth using it only when other methods are not available: the edges still turn out to be far from ideal.
Criteria for choosing a quality option
Below we will look at the main types of devices for cutting holes in wood, but for now we will outline the criteria that any option must meet, regardless of its modification:
| Reliable manufacturing material | Of course, it is unlikely that you can determine this criterion by eye, so it is best to ask the seller for a quality certificate for the product. Unreliable counterfeit versions from China most often do not have any documents. |
| High quality performance | Examine the product carefully: the surface must be smooth without flaws or defects, the cutting part must be carefully sharpened. If you purchase a long wood drill, check whether it is level; this can be done by eye or by rolling it over a flat surface - any irregularities will be immediately visible on it. |
| Good packaging | Low-quality fakes are most often packaged haphazardly, moreover, there are mistakes in the words. No well-known brand will allow itself unsightly packaging, remember this. |
| Price | Price is also an indicator of quality; as a rule, the most budget options do not last long, especially when it comes to large-sized drills and fixtures. After all, they are subjected to very high loads during operation. |
Advice! To be guaranteed to purchase a quality product, be it an electric jigsaw for wood or a circular saw, you need to contact official representatives of a particular brand or buy products from well-known stores that care about their reputation and do not sell cheap fakes.
Cheap core drill sets are so unreliable that they may only last for a single use
Tips for choosing
An instrument of any form has its own criteria and must meet them. You can determine the quality of the instrument you are purchasing by its appearance, color, and also by the material from which it is made.
- Material. It is impossible to visually determine the quality of the material. Therefore, before purchasing, you need to make sure that the product has a quality certificate. Chinese counterfeits are often sold without documents.
- Appearance. A high-quality product has a flat, smooth surface. Various cracks, scratches and damage are defective. The cutting area must be carefully sharpened. Long drills must be straight. It is very easy to check their quality; just roll them on a flat surface. All irregularities will be immediately visible.
- Color. To ensure that the tool has additional strength, it is manufactured using a special technology. You can find out which processing method was used by the color of the product. The steel color indicates that no additional processing was carried out. The yellow-gold spraying relieves metallic stress. A product treated with titanium nitride (a tool with a bright gold color) will have a long service life. The black drill has increased strength. Steam was used to process it.
- Package. Products from well-known manufacturers have good, high-quality packaging. All fakes are poorly packaged, and the text is sometimes written with errors.
- Price. The higher the price, the better the quality of the product. All budget tools have a short service life.
Caring about their reputation, well-known stores will not sell counterfeits. And no matter what kind of tool you buy, in order for it to be of high quality and last a long time, you should contact reliable and trusted suppliers.
For high-quality performance of even such a simple procedure as drilling holes in wood products, the correct mode and the appropriate tool are required. When choosing a wood drill, you should take into account the characteristics of both the material being processed and the hole that needs to be made. The modern market offers a wide variety of drills designed for making holes in wood, so choosing a tool to solve certain technological problems will not be any particular problem.
Drilling holes for socket boxes with a core drill in wood
Types of products and their features
Let's look at what options you can find in our retail network and how they differ from each other.
Feather drills
The most common and budget option, which is quite convenient for even inexperienced craftsmen to work with. And you can also master this simple process with your own hands.
Let's look at the main advantages of this solution:
Large sizes are usually sold individually, small sizes are usually sold in sets.
It is impossible not to mention such an interesting option as an adjustable pen drill; this type of product can make holes with a diameter of 22 to 76 mm. The work is carried out at low speeds using fairly powerful power tools.
Adjustable nib – a new word in products of this type
Forstner drill
This product option is used very widely in furniture production due to a number of undoubted advantages:
Massive nodes are very reliable
Screw drills
This option is very popular among those who drill large-diameter holes in wood to a considerable depth. To use them, you don’t need special instructions; just connect the unit to the power tool and you can start working.
The features include the following:
Spiral fixtures are available in a wide range of sizes
All craftsmen who build log houses use this option.
Circular adjustable designs
The popular name for this device is wood ballerina. The design is a kind of compass, in the middle of which there is a centering drill, and cutting elements move on the crossbar, which can be installed in different positions.
The following factors can be considered features of this solution:
This is what ballerinas look like when working with wood
Important! You can find many fakes on sale that are short-lived and do a poor job, so you should be especially careful and scrupulous when choosing this option (see also the video in this article).
How to drill a hole in a large diameter tree? Read about it below.
Hole drills for wood
Source
Drill bits for tiles and glass
It is extremely difficult to work with such materials - they are easily damaged. For example, ceramics and glass crack when the drill is misaligned or overheated. Therefore, only two types of drills are used for them: crowns and feathers. Crowns can have a diameter from 13 to 80 mm and, as a rule, are coated with diamond dust.
Feather drills. They are an ordinary metal rod with a sharp spear at the end (usually made of pobedit). They allow you to make holes with a diameter of 3 to 13 mm - ideal for dowels.
But keep in mind that after you have gone through the tiles, it is worth changing the drill. Otherwise, you will simply dull it on the concrete and get a crack in the tile the next time you use it.
How to make large holes in walls? Choosing the optimal tool
Drilling large holes requires large nozzles, and they are different for wood and concrete. We will tell you which attachments to use for which tasks and recommend reliable drills.
To drill holes for air conditioner mounts, cable pulling, installation of a soldered pipe for water supply or connecting furniture structures, you will need a large drill. Although large nozzles for wood and concrete are somewhat similar, they are still intended for different tasks and they are not interchangeable. We will tell you about them and recommend a couple of good attachments for wood and concrete. We have already told you how to distinguish drills for wood, metal and concrete. Here we will focus on large attachments, which we do not use very often, but without which we can’t go anywhere in everyday life.
Drills for concrete and blocks
Their main difference is the soldering of hard metals on the pointed surface of the drill: Pobedit or artificial diamond.
Drills for concrete are also different:
- spiral - suitable for making shallow holes (up to 100 mm), they are the most popular;
- drilling - similar to spiral, but usually with longer and wider grooves for dust to escape;
- crown - used when it is necessary to make a recess or hole of large diameter in concrete for a socket or junction box.
The same drills are also suitable for blocks, but when working with soft materials it is not recommended to use the impact mode (usually it is not needed).
Large diameter drill bits for wood
Non-separable type drill bits
The most common type of large-diameter wood drill. Feathers are a sharpened blade with a pointed tip, which is designed to center the drill in the hole (i.e., so that the drill does not go to the side). Using them you can drill holes from 10 to 76 mm. The maximum drilling depth for them is about 150 mm, however, there are special drill attachments that can extend the pen drill up to 300 mm.
The main advantage of pen drills is the ability to drill deep through holes for connecting structures with studs and bolted connections. They are also the cheapest of the large size wood cutting attachments. So, a good feather drill can be bought for 100 – 150 rubles, for example, Sibrteh 703097 with a blade width of 50 mm.
Adjustable feather drills
A separate type of large bits for wood are feather drills with adjustable diameter. They allow you to set different nozzle diameters depending on the required hole. Drilling with such feathers is performed at low speeds with high torque, so they will require a powerful drill.
Depending on the manufacturer, the cost of a drill varies from 500 to 2000 rubles. For that kind of money, in principle, you can buy a small set of ordinary feather drills. But considering that here the step can be set within 1 mm (and not all sets have all standard sizes of drills), then sometimes it is advisable to buy an adjustable pen. For example, for 650 rubles you can buy a good hardened steel drill BK8 STAYER 2951 with the ability to change the diameter from 22 to 76 mm.
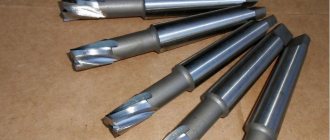
Crowns
Core bits or core drills are used for drilling large holes with a diameter of 22 to 127 mm. Using them you can easily drill a hole for wiring or any accessories. Wood crowns consist of a drill and, in fact, a hollow crown attachment. To work with attachments of different diameters, one drill holder is enough. Almost all drills have hexagonal (not round) shanks for better grip on the chuck.
Given the nature of the work, hollow crowns must be made of durable material. The highest quality crowns are made bimetallic - from an alloy of steel and cobalt. The larger the diameter of the nozzle, the more cutting teeth there are on the edge. Please note that on some crowns the teeth are shaped like a right triangle and point straight up, while on others they are inclined in the direction of rotation (clockwise) by 30 - 40°.
The most popular diameter is 68 mm, since this type of crown is used to make socket boxes in wooden walls and sandwich panels. On average, the price of a normal crown starts from 500 rubles. In addition to 68 mm, crowns of 20, 25, 35, 40 and 51 mm are considered common - other sizes are used very rarely in everyday life. If you buy for home, we recommend buying it in a set to save money. Bosch 2608580868 running bits , which, in addition to wood, can also drill sheet metal up to 0.8 mm thick.
Source
Metal drills
Externally, these drills are the simplest, without carbide tips. Although there are also specialized ones. The list is something like this:
- spiral - an analogue of a concrete drill, only made of HSS, P18 or P6M5 steel;
- conical - they are made in the form of a cone, they can be used for drilling large-diameter holes without reinstalling the drill;
- crown - needed for holes larger than 30 mm, made of hard alloys and HSS steel, and can also be diamond-coated;
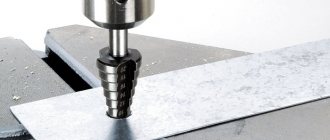
- stepped - the tool is a cone with steps of cutting edges of different diameters. With just one such drill, you can make holes of different diameters.
Deep holes with a drill
Drilling deep holes has always been a problem. This little tool is designed to help hand and electric drills drill deep holes through the center of a piece of wood, which you know is very hard. And the deeper the hole, the more difficult it is to drill. The problem often arises in the hole itself and drilling the hole axially into the end of the block. In this case, this simple device will help you confidently hold the drill in one direction and move away from the wandering center. Such drills tend to follow the path of least resistance. To solve this problem, use a special device, which is shown in the photo above. The device will keep the drill from changing direction in the wood. These drill bits are good enough for drilling holes in softwood, but are not as good in hardwood and require frequent sharpening of the bit. Drill bits are available for sale in stores and come in a variety of diameters and lengths, allowing you to drill holes up to 400mm deep.
Is it possible to cut perforations with a laser?
For many orders - especially cases, doors, panels - it is necessary to make perforations in the metal. A fine mesh of holes through which air passes well. Is it possible to make perforations on a laser machine?
Theoretically, it’s possible. In practice, you shouldn't do this. Why? The same punching machine will make all these small holes with one blow. And the laser will cut each hole separately. In this case, the holes are nearby, in total the cut turns out to be long, the metal heats up - in general, it does not lead to overheating of the laser workpiece, but it can lead to an attempt to cut a perforation. But even if it doesn’t lead, it turns out to be expensive.
So what should we do then?
And the way out is simple. The base metal of the part is taken and a punched sheet is taken. The required window is cut out of the part, and the required piece the size of this window is cut out of the punched sheet. The sheets are fastened using resistance welding. All.
But you are looking for information about laser cutting of holes for a reason, to read. You are interested in specifics. Some specific holes that need to be cut in specific parts. So why beat around the bush? Let's discuss specifics.
Quick cost calculation
How to drill deep holes correctly.
Minor change to the drill . When modifying an auger drill, start by stripping the guide screw. Then blunt the edges as shown in the photo below. This modification will provide a slight “bite” and without being too aggressive helps to drill deep holes in a straight direction.
Alignment. Straight metal rod, aligns V-block with inspection hole.
Start with the pilot hole . Another problem is drilling deep holes, setting a straight hole as a guide. A drill press is a seemingly logical tool that can be used to drill straight holes, but it has a limited drilling depth. However, the drill press still plays a big role in this operation and serves to drill the pilot hole. I start drilling the hole with a drill of a smaller diameter and gradually increase the hole to the diameter that I plan to use.
Crown with holder
The last experiment for today is a crown with a holder. The crown itself, unlike the previous one, is made rigidly, therefore it can be assumed that there should not be too large a deviation in diameter.
As in the previous case, a blind hole cannot be made with such a crown. It is possible to make a through hole, but only if the material being processed is no thicker than 25 mm.
Entrance
Slightly torn edges can be forgiven, but this is not the only drawback of these crowns. In the photo of the inside of the hole, a dark rim is clearly visible - this is burning, which was the result of teeth clogged with chips. Take a look at the photo below to see what we're talking about.
Exit
Interior
Accuracy is also not an advantage of such crowns: it was possible to drill a hole in the chipboard with an error of 1.1 mm, that is, the hole turned out to be 33.1 mm instead of the required 32 mm.
Even when drilling a 19 mm chipboard plate, it is necessary to remove the bit, clean it and only then continue working
Types of equipment: how to drill wood
Wood drills are used for materials such as plywood, wood of varying hardness, chipboard, and drywall. Naturally, if desired, a hole in a wooden piece can be made with a metal drill or even a nail - after all, wood-based materials are quite soft.
But it’s worth doing this only if the diameter of the hole, neatness of execution, straight edges and other similar little things don’t play a role. In all other cases, in order to make a hole in a wooden workpiece, you need to select the right drill depending on the nature of the desired hole.
Let's consider the main options and general principles of working with them.
Resembling a trident in shape and used for small to medium diameter holes, it is the most common of all wood drills. It can be easily distinguished from a metal drill by the presence of sharp cutting teeth on the edges of the cutting tip. These teeth are responsible for the smooth contour and walls of the hole. The most popular diameters of twist drills are up to 12 mm, although, of course, larger diameters are also available on sale.
When drilling wood with such a drill, it is important to use the drill at the correct speed, which depends on the hardness of the material. Hard wood is drilled at low speeds, up to 1000 per minute. For soft wood, the optimal speed when drilling is about 1800 per minute.
, or auger drills
- This is a kind of heavy artillery among wood drills, because they are used when you need to drill a deep and wide hole. They are called auger because of the design of the working part, in which a large spiral seems to encircle the central rod of the drill.
Thanks to this design, the drill is screwed into the material, producing large spiral sawdust as waste materials - hence its second name.
This design allows you to drill even raw material without jamming, and the resulting sawdust is easily discharged along a large spiral groove, also typical for this type of drill.
In addition to the specific spiral, screw drills are distinguished by large diameters and long lengths. To work with this type of drill, the drill must have a high torque so as not to overheat the engine, because they are supposed to make large, deep holes. A drill with low power may not be able to cope in this case.
drills are also classified as auger drills.
– its cutting part has the same design with a central rod around which a spiral with a large groove wraps. Drills with a Lewis spiral are used to produce deep holes of medium diameters, since their spiral allows you to effectively remove chips from the hole in any quantity, and the drill itself, using the principle of a self-tapping screw, is drawn into the material as you work, reducing the efforts of the master to a minimum.
, or feather drills
have a cutting tip design with three teeth, which distinguishes all wood drills. As already mentioned, thanks to the two outer teeth, a clean and even hole is obtained without chips and splinters, which are so easily formed when working with wood.
However, the very shape of the cutting part of this type of drill is very different from twist and screw drills. It resembles a flat spatula, or a feather - hence their name. The shank of feather drills is hexagonal to prevent rotation in the drill chuck under heavy load on the flat cutting tip.
These drills are used to produce fairly large holes - from 12 to 40-50 mm in diameter.
The main advantage of these drills is their low price, but their main disadvantage is that due to the absence of a spiral, chips are not removed from the hole in any way. Therefore, it is inconvenient to make deep holes with such drills. They are typically used for drilling shallow or through holes in boards and chipboard parts.
This type also includes adjustable drill bits
– a variant of a flat tip drill, which allows you to move the side cutting teeth apart, thereby increasing or decreasing the diameter of the hole. If you are not too lazy to tinker with adjustments, and there is no need to constantly change drills of different diameters during work, one such drill can replace a whole set of ordinary “feathers”!
specially designed to produce large blind holes of small depth with a flat, even bottom, which is very popular in furniture production. The design of the cutting head consists of a central tooth and cutting side elements, only in this case they are not made in the form of teeth, like other metal drills, but in the form of a cutting edge with cutters.
The diameter of this type of drill reaches up to 50 mm; the larger the diameter used, the lower the speed of the drill should be. Interestingly, with additional tools, you can even make a square blind hole using a Forstner drill.
Annular, core drills
, or just crowns
, unlike Forstner drills, are designed specifically for producing through holes of medium and large diameters, but of small depth. They are a cylinder with sharp teeth along the edge of the cutting part. The drill in the middle performs the centering function, while the main work is done by the annular part of the crown.
A couple of general tips for working with wood drills
· Wood is not a material that is drilled at maximum speed - it is quite fragile, and you can easily get a chip or a burr. Therefore, wood drills are used at low or medium speeds.
· To prevent the drill from moving to the side, before you start drilling, be sure to mark the center of the future hole with something sharp - a nail, for example, which is not at all difficult, since wood is a soft material. Then the drill is installed in this recess, and work begins at low speeds.
Other interesting articles and videos on the Tool Station channel:
The work of a drill on stainless steel in slow motion. Useful tips for working with a jigsaw. Everything about a drill for metal. Interesting facts: about screws and slots.
Read the article on our website: Types of equipment: wood drills
When using the material or part of it, a link to the Tool Station website www.toolpoint.ru is required
Main types
The main parameter, depending on which wood drills are divided into different types, is the design of the working part. Based on this feature, wood drilling tools may fall into one of the following categories.
Drills of this type are used to make holes of medium diameter in wood - up to 25 mm. It is advisable to use such a tool in cases where the requirements for the accuracy of geometric parameters, as well as for the quality of the holes, are not too strict. Among the most significant advantages of pen drills, low cost and ease of maintenance should be noted.
Feather drills are considered the most affordable
Core type tools are designed for drilling large diameter holes. In terms of their design, wood crowns resemble a metal glass with a shank, the working end of which has cutting teeth. When such a drill rotates, its cutting teeth, interacting with the workpiece, cut out a circle of the required diameter on its surface.
Set of wood crowns
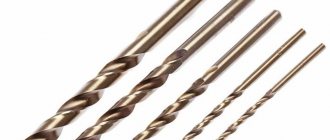
Spiral wood drills are also called screw drills. Their working part resembles a screw. They are used for drilling small diameter holes in wood. Due to the special design of screw-type drills, chips are effectively removed from the processing area when used. The twist drill also ensures high precision and extremely high quality machining.
Spiral wood drill with scoring bits
These are tools with the help of which, in products made of wood, they create not through, but blind holes with a perfectly flat bottom. In addition, if you use such a wood drill with additional accessories, you can drill a square hole in a wooden product.
There are many modifications of the Forstner drill available.
With the help of such tools, it is possible not only to drill wood, but also to make grooves of various configurations in wood products. Drills of this type are most often used in cases where it is necessary to perform complex processing of wooden parts, and in order to drill a regular hole, a twist drill, a feather or a core tool is used.
Milling drills are designed for drilling a round hole and then boring it to the desired shape. Used when working with wood and thin metal
The shank of drills designed for woodworking is usually cylindrical, but manufacturers also produce them with shanks of other configurations. So, on the modern market you can buy drills for woodworking, the shanks of which can be:
- triangular, optimally suited for fixation in a three-jaw chuck (tools with a triangular shank are ideally transmitted torque, and even very significant loads are not able to turn it in the chuck);
- hexagonal (tools with such shanks can be installed in both a standard and a three-jaw chuck, but there is a very high risk of the drill turning when subjected to heavy loads);
- conical (tools with shanks of this type are used primarily to equip production equipment);
- tetrahedral (a rarely used form of shanks, which, however, ensures high stability of the tool against rotation in the chuck).
What is a wood ballerina
A circular adjustable ballerina drill is a device that is designed for drilling round holes of large diameter. The tool has a simple design. It consists of a shank with a transverse rod on which movable carriages with cutters are attached. The rod has markings according to which you can set the required spread of the cutters relative to the center of the intended hole. A core drill is fixed in the middle of the shank. It serves as a centering element and support when drilling.
In addition to designs with two cutting elements located symmetrically, there are ballerinas with one cutter or even three. In the latter case, they are located on the base in the form of a disk with grooves.
Features of working with the tool
The principle of working with a circular drill is simple. A hole is drilled using a centering drill, and then the cutters are put to work. They gradually make a narrow groove, gradually cutting through the material in a circle to the full depth.
The materials used in working with the ballerina are varied: wood, fiberboard, chipboard, MDF, plasterboard, plastic. One common point is that the thickness of the part should be no more than 15-20 millimeters. This parameter is limited by the length of the incisors. Usually the manufacturer indicates the maximum drilling depth on the packaging. If you try to drill into thicker material, you may experience problems with ragged edges.
The use of a tool with one cutter is characterized by runout. This is caused by a lack of balancing relative to the longitudinal axis of the drill. The beating will be especially noticeable when cutting large diameter holes. Cut holes using a drill at low or medium speed. When working on a drilling machine, such problems do not arise.
Also, a laminated or veneered surface can cause inconvenience when working. After passing through the decorative layer, drilling proceeds without problems.
A feature of the circular drill can be considered the ability to adjust the diameter. The distance between the cutters can be set using a scale on a rod or more accurately using a caliper. This is convenient if you need to make a hole without gaps for a pipe or round part.
The spacing of the cutters relative to the center is adjusted individually. It is necessary to align the cutting parts as accurately as possible. This will eliminate unnecessary effort during operation and extend the life of the tool.
Design features
The design of crowns for working with wood depends on the diameter of the working holes that they form. Product sets consist of tools with different numbers of serrated drills. Their basis is a disk, on one side of which there is a rod that secures the bit to the drill, and on the other side there are cutouts of various diameters. A ring-shaped blade is placed in one of the grooves. By folding all the cutting elements, the set is easy to transport. A replaceable centering drill is installed in the center of the working part, which is responsible for positioning the drill before cutting the material with its teeth.
conclusions
If we talk about quality, then out of the five tools, the Forstner drill gets the unconditional and convincing victory. Using this tool, it was possible to obtain the most accurate diameter, the most even edges of the hole and a perfectly smooth inside.
The most inappropriate ones and those that I don’t want to recommend even to beginners were the round cutter (aka “ballerina”) and the crown with a hardened tooth. Interestingly, the “ballerina”, with such disgusting quality of execution and effectiveness in Poland, costs a little more than a Forstner drill.
It is quite possible that the fact that a hand drill was used played a certain role. It is difficult to hold the tool strictly perpendicular to the chipboard and this probably also caused errors. We can also assume that when drilling thin materials (plywood, fiberboard or plastic), the results can be much better even for those tools that were unable to adequately and efficiently drill a hole in chipboard.
Tool functionality
A high-quality ballerina is made of high-strength steel, which makes it possible to use the device in working with soft and hard wood.
This tool has an adjustable drilling diameter. This allows you to make holes of almost any diameter. The limitation of the drilling range depends on the size of the ballerina. Manufacturers produce devices with the following cutter spread limits:
The maximum drilling diameter is limited by the rod on which the cutters are mounted. The minimum is the thickness of the shank.
A ballerina drill can be used in any places where using a jigsaw or a hand router would be inconvenient. For example, this may be assembled and installed furniture, in the part of which it is necessary to drill a neat hole, given the limited space. Another example is an uneven (concave or curved) surface. It’s unlikely that you’ll be able to do everything smoothly and neatly with a jigsaw or milling cutter. It will be difficult to control the inclination of the tool relative to the surface. A ballerina can easily cope with this task.
Shape cutting technologies
Selecting a tool
When starting to work with sheet materials, many craftsmen only have an idea of how to cut along a straight line. Therefore, the question of how to cut an even circle from plywood can confuse many. And indeed, a regular or circular saw cannot cope with the task. Figure cutting is most often done using the following tools: Hand jigsaw
- Hand jigsaw. The simplest device used for sawing. With the help of a jigsaw, even the most delicate work can be done with your own hands, but for thick material or long cuts it is practically not suitable.
- Jigsaws. There are two types of devices you can use here:
- regular, with a vertical file;
- artistic, in which the role of the cutting element is performed by a steel blade.
Ordinary jigsaws will come in handy when working with thick plywood, for example, when making a bed with your own hands. But if you are looking for a way to cut letters out of plywood or make other complex elements (for example, parts of a children's construction set), then it is best to use a model with a band saw. Model for artistic cutting
Advice! Naturally, for each type of jigsaw there are several types of files and blades. The correct choice of cutting element is a necessary condition for high quality of the product.
In addition to jigsaws, you can use a furniture router for curved cutting. Despite how difficult it is to operate, it is many times superior to most models of plywood saws in terms of the quality of the holes it makes. Using a router, you can make a wonderful rocking chair from sheets of plywood with your own hands.
Also, do not forget about available devices, but we will talk about their use in the appropriate section.
Jigsaw
As we noted above, a jigsaw will come in handy if we are looking for how to cut a word out of plywood or make other parts of complex shapes:
We transfer pre-printed drawings or templates onto the workpiece using carbon paper.
Figured carving with a jigsaw: photo of the finished product
- If the structure has through sections, we make starting holes with a thin drill.
- Insert a file or jigsaw blade into the hole. Secure the free end of the file with a fastening screw or clamp.
- We make a cut along the intended mowing line, pressing the workpiece to the workbench. The saw moves either automatically (for electric jigsaws) or manually.
After all the arc elements have been sawn, we remove unnecessary areas and process the finished part with a file or sandpaper. Finished hole
Theme Options
Distinctive features
Regardless of what material the crown purchased from Leroy Merlin will be used for, it has a standard design like all the others. It consists of the following elements:
The kit can be supplemented with a hexagon for high-quality clamping of a core drill.
Manufacturers offer two design options for wood crowns for deep drilling:
Structure of a non-separable drill
A stacked hole saw consists of several removable links of different diameters
In the first option, a solid ring is used, and in the second, an open ring in the form of a split cylinder is used. Quick ring changes speed up any machining process. Each cutting element has special technological holes for removing chips. They are made in the form of circles or slots on the side surfaces of the cylinders for small diameter tools and additionally at the ends for large ones.
Some craftsmen independently make a wood crown in their workshops, using a thick-walled metal pipe of the selected diameter.
The working process
Then measure the thickness of the nail you used and drill a hole of the same diameter in the center of the circle. Use the hole left by the compass needle as a template.
How to make an original, stylish lamp from rope: step-by-step instructions
A woman thought she was feeding a stray cat until she saw an uninvited guest
Animals feel lonely without people: zoos are empty
Now put the workpiece aside and take thin plywood. Make a large crosshair mark in the top left corner and drill through the center using a thin drill bit. Make sure your marks remain after you drill the hole.
Then make a second mark on the workpiece at a distance equal to the radius of your circle. Remember that the radius is half the diameter.
At the last mark, drill a hole with a drill of such a diameter that a jigsaw blade can fit into the resulting hole with a small gap.
Now let's move on to the part with the drawn circle. You need to drill the starting hole with a drill bit larger than the jigsaw blade. Try to drill so that the hole touches the line marked with the compass.
Incredible but true: Keith Richards of the Rolling Stones wrote songs... in his sleep
John Lennon predicted COVID-19 half a century ago: fans are absolutely sure of it
Crafts from youngsters: how children from all over the country are preparing to congratulate veterans in 2020
It's time to put the blank and template together. Securely secure the workpiece to a sturdy surface. Insert a nail through both center holes in the blank and template, then line up the starting holes on the circle.
Now we need to attach the jigsaw to the turning template. For these purposes, I use a favorite secret: double-sided adhesive tape. It is easy to find at any hardware store. Apply tape to the turning template and insert the jigsaw blade into the starting hole. Once everything is installed correctly, press the structure against the adhesive tape for a few seconds.
Finally it was time to make the cut. Keep the jigsaw at full speed at all times, pushing forward with medium pressure. Don't worry about the tape coming off, trust me it won't.
How to choose and what to pay attention to
Choosing a high-quality circular drill is quite easy. The main thing is to know the main points that you should pay attention to first, but also not to lose sight of the little things.
The design is a very important point: a wood ballerina comes with one chisel or two or more. For frequent use, it is better to purchase an option with two or three cutting elements. It is easier to work with such devices and the quality of the processing performed will be at an acceptable level.
It would not be superfluous to be able to replace individual parts. Inexpensive circle drills can have a solid shank with a permanent center drill and rod.
Metal, its quality determines its strength and ability to withstand workloads. High-quality tools are made from high-strength steel or alloys. The shank and cutter holders are shaped using a machine tool. The rod is usually stamped and made of the same metal.
Cheap options often use soft metal or alloys, which can be brittle. Under load, parts may become deformed or break. Such a tool will not last long and it will also be difficult to achieve accuracy from it.
The quality of workmanship, the main feature is the absence of backlashes and distortions. All parts must fit together and be securely fastened with fixing screws.
The markings of a high-quality ballerina's barbell are stamped. Sometimes the divisions are highlighted with bright paint for better visibility.
Cutters and high-quality cutting elements are made from hardened tool steel. They are secured to the holders with rivets or soldering. Solid cutters with holders (made of the same metal) quickly become dull and are not durable.
Manufacturer, when choosing any tool and consumables, preference should be given to well-known and long-proven brands and brands. The most common are Topfix, Stayer, Irwin, Strum.
Purchasing an adjustable circular drill for use at home, or if you need to drill several holes, is completely worth it. This eliminates the need to purchase an expensive tool that may only be needed a few times.
Ballerina device
The design of this tool is simple; in the most common version, it is a bracket with a drill fixed along its axis of rotation. This center drill not only marks the center of the future large hole, but also provides support for stable rotation of the entire device. On two opposing arms of the bracket there are two carriages with cutters fixed in them. The bracket rod is specially marked, which allows you to install carriages with cutters with fairly high accuracy. Having spread the lateral incisors to the required distance, they are fixed on the bracket with clamping screws, after which work begins. It would be a good idea to check the spread of the cutting edges using a caliper.
In addition to this, there are several more modifications, in which there are one, two or even three incisors. They differ in the different design of the bracket - it can be a disk along which cutters move in special slots to adjust the diameter. Also, in the axis on which the ballerina rotates on wood, a hole is drilled, straight or at an angle, and a cutter is inserted through it, fixed with a locking screw. This also makes it possible to adjust the diameter of the resulting circle, and one cutter does a good job, especially if it is made of good steel and used correctly.
The shank of the central axis can be round or have a special shape for fixation in the SDS chuck. Quite often, knives of various shapes are used, capable of removing straight or rounded chamfers where necessary.
Read also: Cold and hot welding of cast iron
Distinctive features
Regardless of what material the crown purchased from Leroy Merlin will be used for, it has a standard design like all the others. It consists of the following elements:
The kit can be supplemented with a hexagon for high-quality clamping of a core drill.
Manufacturers offer two design options for wood crowns for deep drilling:
Structure of a non-separable drill
A stacked hole saw consists of several removable links of different diameters
In the first option, a solid ring is used, and in the second, an open ring in the form of a split cylinder is used. Quick ring changes speed up any machining process. Each cutting element has special technological holes for removing chips. They are made in the form of circles or slots on the side surfaces of the cylinders for small diameter tools and additionally at the ends for large ones.
Some craftsmen independently make a wood crown in their workshops, using a thick-walled metal pipe of the selected diameter.
A few tricks for drilling glass
Features of the technology
How to drill glass if you don’t have the necessary tools? In this case, there are several ways that can help get out of the situation:
Using a regular drill, which requires great care and will take a lot of time. Drilling in water will help prevent the drill from overheating. Using fluid to wet the drill. Replacing the drill with copper wire. Drilling with a tube. A sharpened stick.
These options can be used at home if you want to drill glass yourself. The technique is quite simple.
Drilling holes in wood
At home, you can get by with a fairly modest set of drills. For processing soft wood, a drill made from ordinary tool steel is sufficient. For plywood, chipboard and other wood materials with a high proportion of glue and (or) binder, it is better to use drills made of chrome-vanadium steel, which are more durable and provide better drilling quality. Drills made of high-speed steel are of higher rank. If you frequently drill holes in veneered chipboards, laminated boards or MDF boards, you cannot do without carbide drills.
Sample set of drills for a home workshop
1 Drill with centering point 2 Drill with carbide centering point 3 Regular high-speed steel drill 4 Flat drill bit 5 Adjustable drill 6 Three-stage drill 7 Forstner drill 8 Grooving drill 9 Carbide drill for socketing furniture hinges 10 Hole saw 11 Auger drill 12 Drill bit for drilling holes in beams
To prevent the cylindrical workpiece from spinning when drilling holes, it is placed on a device consisting of two fastened workpieces of a similar cross-section.
It is easier to drill a number of holes for shelf supports using a homemade jig.
This is how a series of holes are drilled at the same distance from the side and end edges: the workpiece inserted into the technological frame is simply moved in the desired direction.
Drilling holes for furniture ties with a three-stage drill - the parts to be connected are fastened with an angle clamp.
Holes for countersunk screws are countersunk.
Blind holes (for example, for dowels) are drilled using a drilling depth limiter.
Tip: Drilling holes for corner joints
Corner connections can be made on furniture ties or dowels. In both cases, it is necessary to drill holes strictly at right angles to the surface of the workpiece.
GROVING DEVICE
The device consists of two rulers (one for each groove shoulder) and two strips that rest on the edges of the workpiece. One ruler and one strip are T-shaped fastened at right angles. Gaps along the other strip and ruler allow you to install boards up to 300mm wide and select grooves up to 38mm wide. Two clamps in an adjustable bar rest against the workpiece and lock the fixture in place.
To operate, you need a set of guide bushings for the router. With bushings, the rulers should be slightly offset to the side relative to the width of the groove itself.
The device is made of poplar, but Karelian birch plywood or MDF is also suitable. The T-nuts and MB screws are recessed, so the router can slide along the rules without hindrance.
Having finished manufacturing, you need to make inserts for installing the rulers. Plane a piece of cutting board approximately 450 mm long, 150 mm wide and 20 mm thick to the same thickness along the entire length. It all depends on the size of the sleeve and the cutter. Leave the jig in place while you make and fit four inserts, each approximately 50mm long, about 25mm wide and equal to the thickness of the gaps. Ideally, the thickness of the inserts should be equal to half the difference in the diameters of the cutter and sleeve.
Precise adjustment of the inserts is accomplished by using them with rulers installed when routing on a short piece that has been sawed off previously. Loosen the adjustable ruler, place the scrap between the rulers and two inserts on each side.
Tighten the screws. Remove the inserts and trim and mill the groove. If the trim does not fit into the groove, adjust the thickness of the inserts.
How to install the router?
We take the outer size of the ring arbitrarily. The main thing is that it does not extend beyond the sides of the pendulum. You can fasten it in any way you like, for example, with metal corners. A number of holes are also drilled in the sidewall, with a pitch of 10 mm.
The upper strut of the pendulum is an optional element, but provides additional rigidity to the structure.
Classic auger
The drill is used to drill holes in wood for screws or hooks, as well as small holes. The drill is more suitable for working with soft wood.
The guide legs of the device can be installed at any angle to the support, which allows you to drill holes obliquely to the surface of the workpiece.
Spring-loaded guide legs can be extended below the supporting surface of the device and used as stops on both sides of the workpiece, which allows you to drill a hole exactly in the middle of its edge.
Source
How to make a round hole in chipboard?
There are a couple of columns to be made, but I still haven’t learned how to cut with a jigsaw. Why does Caliber lead the file to the left? Fiolent is even stable in this regard. How can you make a hole for a speaker with a diameter of about cm. Using a jigsaw with a compass tool!
I just don’t know if there is such a device for the Chinese. A router, with a similar device, if you have a router. Well, actually, using a jigsaw is easiest. Just take a new file and cut without strong feed. If you have a milling machine, then you can use it. The set includes a special lever for circular cuts. And take a small finger cutter. Mill halfway on one side, then on the other. There are also special compass devices for drills.
Enough for 25 cm. But there you need a good stop for the drill, a stand is better. Again, if the chipboard is wide, then the depth of the cutter may not be enough. Then you can try it on both sides. In general, making good speakers is a great skill, incl.
I’m talking about your words - “but I never learned how to saw with a jigsaw.” I make it for myself, so any will be good. I don't have a router. Where to look for them, approximate cost. Such compasses are called “Device for cutting large diameter holes”, or a jig for drilling large diameter holes. In short, this is a special bushing with a drill shank and a cone for centering.
The bushing has a through hole across it into which a long rod is inserted. At the end of this rod there is a rectangular hole for the cutter with a screw for tightening. The diameter of the hole is adjusted by the position of the rod in the sleeve. Set it as needed and secure the rod in the bushing with a clamping bolt.
Well, actually drill. We have seen such devices many times in construction markets. That's where you need to look. This is not homemade, someone makes it on an industrial scale. If you need to make a careful selection for recessing the head flange, which is correct, and for HF it is absolutely necessary, then perhaps this is only with a router. As for the front panel, take Nickel's good advice. Also, a spacer in the case itself would not hurt, especially if it is large and the walls are thin, and the coating with vibration and sound absorbers. I did this.