It is no secret that in the workshop of every home craftsman there are tools that could rightfully retire to a “well-deserved rest.” The owner does not raise his hand to throw out of his life a tool that, on the one hand, is already outdated, but on the other hand, can still solve this or that problem. Or it can serve as the basis for the “homemade” product needed by the master.
So an old Soviet-era hand drill can serve as an attachment for a screwdriver, a key for opening and closing bolts, a device for stripping cable insulation and other devices. You can come up with many different tools, everything is limited only by your imagination.
And what owner would deny himself the pleasure of decorating his home or workshop with a vintage drill?
Shell options
If, in order to make a clamping device, you need to go to Aliexpress or another similar portal in search of a collet chuck, everything is much easier with a casing.
To create it, you can use trash that is usually thrown away. Let's look at several variations.
A bottle of antiperspirant deodorant. Individual plastic containers perfectly fit the dimensions of the motor from an audio recorder or CD player. In a situation where the engine is slightly larger in size, it should be inserted with slight tension. You need to cut a hole in the cap of the antiperspirant bottle to remove the collet cartridge. For greater practicality, at the very bottom you can put a socket for connecting a power source, and on the side there is an on/off button. This makes it possible to keep the drill away from the block.
Socket for connecting incandescent lamps. The option, of course, is of little use - it will not be possible to make a hole in such strong plastic, therefore, the power button will need to be fixed to the shell with glue.
What is the best budget model to buy?
A budget and high-quality device at an affordable price is the hammer md050b mini drill.
Characteristics:
- power 8 Watt;
- collet diameter 1-3 mm;
- revolutions up to 15 thousand per minute;
Thanks to its light weight (only 400 grams), the mini drill is very convenient to use. The drill comes with a variety of attachments and accessories.
In the same price category, there is another remarkable model for household and industrial use – the Engraver or mini drill “Vikhr G 150”.
Characteristics:
- power 150 Watt;
- maximum speed of 30 thousand;
- weight 1.16 kg;
A more powerful model with a similar collet chuck up to 3.2 mm. Very wide application - repair work, polishing, cutting, engraving, etc. There is speed regulation. Very convenient when working with materials of different densities.
Garden shredder
Using an electric screwdriver, you can make a shredder of garden branches (with a diameter of no more than 1 cm) or grass. The power of the screwdriver should not exceed 0.5 kW.
When working, it is recommended to follow the following sequence of operations:
- Prepare a container that will contain the grass or branches to be chopped. This could be a boiler or a large bucket.
- In the central part of the bottom of the container, drill a hole into which the shaft will be inserted to fix the cutting elements of the chopper.
- To install the container and convenient work, you can install it on the edge of the table or make a frame for this from wooden slats.
- Install the cutting elements on the shaft, securing them with bolts. For this purpose, hacksaw blades installed with the sharpening point downwards are better suited.
- Install a screwdriver with installed knives at the bottom of the frame.
- Solder the button to turn on the unit.
- Cut a hole (10x20 cm) in the lower part of the container wall. Insert a metal or plastic sleeve into it, through which the crushed raw materials will be discharged.
The device is ready for use. To ensure efficient operation, it is recommended to first break the branches into small pieces.
Method No. 1 – Second life for an old tape recorder
As you understand, the first version of a homemade mini drill will be made from a CD recorder forgotten by time. All you need from the former bestseller is a motor that will rotate the chuck with the tool. Since the device is powered by 6 Volts, you will additionally have to find an appropriate power supply or several batteries. You can use a USB adapter, but in this case the power will be slightly reduced. In addition, you need to buy a collet yourself (sold in any radio store or on the market, on the Internet on AliExpress, the price is low) and find a suitable housing for homemade work, although this is not necessary, you can hold the tool directly by the motor.
So, in order to make a mini drill from a motor yourself at home, you must follow these steps:
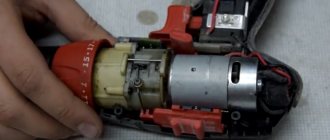
Solder two flexible wires to the contacts of the device, as shown in the photo.
Install a drill of a suitable size into the collet.
3. Place the finished nozzle on the motor shaft and secure the cartridge with screws
Please note that the collet hole must ideally fit the shaft diameter, which is usually 1.5 or 2.3 mm. Otherwise, it will be difficult for you to remove vibration when operating a homemade small drill. If the hole in the collet chuck turns out to be larger than the motor shaft, then you can try wrapping several layers of tape, thick paper, polyethylene or other material
This will compensate for the gap and reduce vibrations
If the hole in the collet chuck turns out to be larger than the motor shaft, then you can try wrapping several layers of tape, thick paper, polyethylene or other material. This will compensate for the gap and reduce vibration.
Carefully tighten all 4 bolts on the nozzle, then connect the wires to the power source and test the finished homemade product. For ease of use, it is advisable to add a button or switch to the power supply.
That's all the technology for assembling a device with your own hands. As you can see, making a microdrill from a motor is not at all difficult, even for a novice electrician. The only drawback of this device is the low strength of the thin drill. If you drill holes that are not at right angles, it will break immediately, so be careful and buy a few drills in reserve for practice.
A very important point that you should know about is that to make the drill spin in the other direction, just swap the wires! You can watch an interesting video instruction on how to make a simple drill below:
A simple drill made from improvised means
Making a drill using a toothbrush
Electric toothbrushes are very convenient to use, but impractical in the sense that the bristles on them cannot be changed and after use, this expensive device, like a simple brush, has to be thrown away.
But you don’t have to do this, using the body of an electric brush to make a drill with your own hands.
We take an old electric brush and cut everything down to the body. Next, you need to connect the motor shaft to the drill using a collet clamp, which must be purchased separately.
When purchasing a collet clamp (or chuck), be sure to find out in advance what the diameter of the motor shaft in the brush is. The motors differ from each other in the diameter of the mounted shaft.
The most difficult thing in this case is to put a collet clamp on the brush motor. The cartridge is designed for a shaft of 2 mm, but the motor here has a smaller one. To do this, each screw for fastening must first be ground to give it a cone-shaped shape so that the minimum diameter of the cartridge mount can be adjusted to the diameter of the motor shaft.
Of course, you can assemble a mini-drill with your own hands not only using brushes or old handles, but also other devices; folk craftsmen come up with new ways to assemble them every day. However, the options discussed above are suitable even for those who have never encountered anything like this and are assembling such devices for the first time in their lives.
This is interesting: Restoring a battery for a screwdriver: we cover all the nuances
Manufacturing of the machine.
First of all, you will need a suitable part for the clamping clip; I found this pulley from Volga, the size was perfect.
We cut the pulley in half, and from a sheet of metal 4 mm thick, cut and weld the fasteners. Then we clamp both halves in a vice and drill holes for the ties, insert the bolts into the hole and tighten the nuts. We secure the nuts by welding and the holder is ready.
The frame was made from a 20 x 40 mm profile pipe. The lamp is mounted on the frame; its mount is made from parts of a rack and pinion window lifter from Volga.
The support for the incisors is also made from it. The design is as follows. A platform with guide grooves (rails from a window lifter), along which the carriage moves with a stop, and in the desired position the carriage is fixed with a wing nut
Two slats, a metal block (width - according to the size of the grooves, height - according to the height of the base), two plates with a cutout for the block (2 mm metal and a file to help), a pair of bushings (a pipe of suitable diameter) and a pair of metal strips for rigidity ( trimmings from parts of window structures).
We weld one of the plates flush to the block. Then we insert everything into the groove of the top rail and weld the second plate to the bar on the back side. We check the movement of the carriage. If everything works smoothly, without jamming, drill in the back of both plates, a hole with a diameter of 6 mm.
We insert a bolt from the side of the bottom plate and fix its head by welding. A thumb will screw on from above (we will use it to fix the carriage in the desired position. Then we install the bushings, the bottom rail and tighten everything with bolts.
We adjust the lower rail relative to the upper one so that the carriage moves without jamming, and the lower part of the bar does not reach the lower edge of the rail somewhere within 1 mm. (the gap is created by adjusting the height of the bushings and is done so that the lower part of the bar does not touch the working surface of the table when moving). Having finished with the adjustment, we insert a strip between the two slats, on both sides, and finally weld everything together.
All that remains is to weld to the front of the carriage a piece of profile pipe into which the stops for the cutters will be inserted. As a base, I took a profile of 30 x 30 mm, for stops 25 x 25 mm.
The stop lock is the simplest. At a height of 2/3 from the bottom of the main pipe, drill a 7 mm hole. We weld a 6 mm nut to it. A wing bolt is screwed into it and secures the stop.
For the base, I took 12 mm thick plywood. Fastening the frame under the drill with self-tapping screws. There is a drawer at the bottom for cutters and accessories. To prevent it from clinging to anything, the carriage platform is fastened to embedded plates. As fasteners, I sawed 6 mm thick plates and drilled three holes. In the central one I cut threads for bolts, through the two outer ones the plate is attached to the table with self-tapping screws.
The mounting of the platform for the stops is made rotating. The angle is fixed - 90°. Below, in the photo, you can see everything. To rotate, you need to unscrew the bolt at the back of the platform. Move it to the desired position and fix it. After trial runs, I came to the conclusion that it was necessary to replace the bolt with a “lamb” one. After all the fitting, we paint the iron and put it in place. I planned to leave the countertop as is, but practicality won out. A sheet of alucobond is fixed on top. The item is timeless and easier to clean.
Voltage is supplied using a cord.
The drill is connected to the outlet. Power is supplied to it using a key switch. We fix the button on the drill in the on position, and then operate the switch. It’s convenient and the drill button will last longer. The second switch key works for the backlight.
The leash from below is made according to the principle of attaching embedded plates. I milled the tracks, laid the wires, fixed them with hot glue and covered the whole thing with plastic.
Additionally, a second stop was made for the incisors. It is wider than the main one. With its help it is convenient to make round blanks. But it performs another function. I drilled holes in the upper part and cut threads. Now we take a piece of PCB, drill holes and get a table for grinding. Using the sanding disc attachment, you can now quickly and conveniently edge workpieces.
The machine is designed for small turning work.
An example of manufactured parts on a machine.
You can make such a lathe from a drill with your own hands.
What is a drill useful for?
Most often, an electric drill is used to drill wood, metal, drive in fasteners with a blow, and cut threads. This universal tool can replace a screwdriver, an angle grinder, and with special attachments it can even partially play the role of a router, lathe and grinder. There are also a number of interesting life hacks using a drill, which will reduce the labor intensity of various household tasks.
Drill grinding attachment
Tool in the kitchen
It happens that the cooking process needs to be speeded up, but there are no “kitchen helpers” available. In this case, you can use a construction drill:
- Peeler. A drill is an excellent tool for quickly peeling vegetables. If you need to clean a large volume of products, it will make it possible to cope in a short time and not get tired. A potato or other vegetable is placed on a drill bit, the rotation is turned on at low speeds, and a regular vegetable peeler is used with the other hand. The skin will come off almost instantly and without much effort. In the same way, peel corn and cut vegetables into a spiral.
- Mixer or blender. It happens that kitchen appliances break down when you urgently need to whip or grind something. “Repurposing” a drill into a mixer will only take a couple of minutes, because both devices have the same operating principle and similar internal structure. However, the power of the construction device is an order of magnitude higher, so you need to use it carefully. You just need to unscrew the drill chuck from the drill and install the whisk from the mixer into the socket. Eggs, butter, cream will be whipped very quickly and efficiently, and this at the lowest speed.
- Meat grinder. If the knives of a regular kitchen meat grinder become dull or it breaks, a construction tool will help out. In addition to a manual meat grinder, the work will require a metal bolt with a hexagonal top, from which the head is cut off. They take the shaft out of the meat grinder, put it in a drill along with a screw and get a new electrical device for twisting meat.
Peeling vegetables with a drill
Advice! It is very convenient to use such a “meat grinder” when cutting large volumes of meat or during autumn harvesting of vegetables.
Drill in everyday life and household use
An electric drill will make life easier for the craftsman not only during construction, but also in everyday life. For example, you can use it to clean the sink hole in the kitchen or bathroom without any problems.
To work, you need a pipe cleaning cable, which is used by plumbers, or ordinary metal wire. A loop with equal sides is bent from it, the free ends are installed in the drill chuck. The loop itself is inserted into the drain hole. When rotating, the wire will “pick up” all the dirt, wrapping it around itself, and remove it from the sink.
Fan
When it’s hot outside, the air temperature in the apartment inevitably rises and it becomes stuffy. The drill will be an indispensable assistant in this situation, because it is suitable for working as a fan.
Important! In this case, you need to use an old tool that is no longer needed, but has a working engine.
A fan made from a drill and spoons.
The procedure will be as follows:
- The drill is disassembled, the contacts are disconnected, and the main mechanical elements are dismantled.
- The motor shaft is inserted into the chuck and clamped firmly.
- Using bolts, a thin metal plate is attached to the gearbox - it is needed to secure the blades.
- The blades themselves are made from sawn plastic pipes or ready-made parts from a broken radio-controlled airplane are used.
- A clamp is placed on the shaft between the cartridge and the gear.
- The blades are attached to the base plate and assemble the entire device into a single whole.
Wood chopping
To quickly chop wood for kindling, you can use a drill rather than an ax. You will also need a keyless chuck.
The tool is turned on with a small number of revolutions (otherwise the chips will scatter wildly), the log is placed so that the cone is approximately in the middle. Turn on the tool and rotate it several times clockwise and counterclockwise.
Important! This method is best suited for splitting small-diameter firewood.
Motor for a boat or children's catamaran
The drill motor is capable of making a light rubber boat or children's vehicle move. Of course, you won’t be able to swim quickly on the surface of the water, but the boat will still start moving and move slowly, which is enough for an entertaining walk on the water.
Boat motor from a screwdriver
To install a homemade motor, you will need a cordless drill, which you can simply hold in your hands. Children's catamarans are made independently from plastic pipes of suitable diameter, connected with plastic ties. The motor for such a craft is prepared from the motor of an unnecessary drill.
pros
There are a sufficient number of advantages that fully justify the use of the described tools.
- Simplicity of design. Due to the absence of a large number of components, mechanical drills are easily repaired and do not require particularly careful maintenance. This allows you to significantly reduce the amount of time and money required to ensure the functionality of the tool used. The solution to this problem is not difficult: it involves timely application of lubricants and replacement of parts that have exhausted their working life.
- Reliability and durability. Experience shows that it is very difficult to break a hand drill even with regular and very intensive use. This is due to the high quality of the materials used in the manufacture of such instruments (especially those produced during the Soviet era). Many mechanical drills produced several decades ago still serve successfully, having repeatedly justified their original cost.
- Autonomy. The described tools do not require electrical power, and therefore they can be used anywhere. This advantage of hand drills is especially important for those who have to work far from the usual benefits of civilization.
- Reasonable price. Today, a new hand drill can be purchased for 600-1000 rubles, while a used mechanical “assistant” will cost even less (about half). In addition to the technical condition, the cost of the instrument is influenced by its dimensions, equipment, body material and the reputation of the manufacturer.
Read also: How to use a large paper stapler
Most often, craftsmen give preference to drills produced in two-handed versions, using them to create small holes and grooves
Accurate performance of such work requires precise adjustment of the drilling depth and extremely careful rotation, for which the described tool is most suitable
Minuses
One of the main disadvantages of hand drills is their massiveness, due to the specifics of the parts used.
Provided that the latter are made of cast iron, the weight of the tool can reach 3 kg, creating certain difficulties for the performer during work and transportation. Another disadvantage of such drills is their large dimensions: as a rule, craftsmen do not consider it critical, however, some craftsmen refuse hand tools for this very reason. This circumstance leads to the fact that many performers prefer power tools. In addition, hand drills are significantly inferior to the latter in terms of productivity, and therefore are practically not used when performing large volumes of work.
Types of equipment
Threading or drilling of holes is carried out with special consumables equipped with wire brushes and cutting attachments in the form of a cone or circle. Not all attachments are suitable for a specific engraver model. Some companies often sell accessories that are not compatible with third-party mini drill models. It is better to immediately purchase those attachments that this or that company recommends. Grinding and leveling operations use cutting and grinding discs and other equipment. When cleaning and polishing you will need discs and bristle brushes. They are most often used when processing difficult-to-grow materials. Quite often, standard equipment is included with a mini-drill. They make it possible to immediately begin performing certain operations with the engraver.
Assembly technology with a wooden frame
Using a clamp and clamps, the drill is rigidly attached to the base. This unit automatically receives the name of the headstock of a mini-lathe from a drill.
By rigidly connecting two wooden blocks to each other on the opposite side of the drill chuck, we get a unit called the tailstock. One end of the adjusting bolt should look like a cone.
The support can be made from a wooden block and thick plywood. Using two clamps you can attach the tool rest to the base of the mini machine.
The assembled design of the machine ensures that all working units are located strictly on the same axis. The most accurate centering along the axis of rotation of the workpiece from the drill chuck to the tailstock adjusting bolt must be ensured.
Making a garden shredder
A garden shredder for grass and thin twigs (less than 1 cm thick) can be made on the basis of a corded drill-driver.
Create an aggregate like this:
- choose a suitable container, for example, zinc boiler;
- a hole is drilled in the center of the bottom for the shaft on which a knife or several blades will be fixed;
- make a wooden or metal frame to install the container or place it on the edge of the table;
- a drill-driver is attached to the frame or bottom of the boiler, which is equipped with knives;
- install an on/off button;
- make a slot in the side of the container - cut out a rectangle 10 by 20 cm in front of the bottom;
- A sleeve is made from tin for disposing of crushed plants;
- attach it to the container;
- check the functionality of the unit.
Knives are easiest to make from hacksaw blades. They need to be installed with the point down. In this case, you can make several versions of blades for different grasses. If you make an attachment in the form of knives for a drill-driver, then you can simply chop the grass in a bucket or other suitable container.
This is interesting: Odorless paint for interior work - subtleties of choice
Screwdriver attachment
With a little thought, you can make an attachment for a screwdriver.
Such a simple nozzle in its design can be created without unnecessary complications.
The good idea is that there is no need to spend money on additional parts. Everything you need is already in the drill design. All you need is a lathe, an angle grinder, a welding machine and, of course, a screwdriver, which we will now attach to:
- Remove the two covers from the drill body. Unscrew the thrust part.
- We knock out the cotter pin from the small gear and remove it from the shaft on which the drill chuck is mounted.
- Using a sharpening machine, we bore the conical tip of the shaft to 10 mm.
- We insert the shaft back into the drill body, put on the gear and cotter it.
- On the right side, use a grinder to cut off the threaded shaft.
- We screw the rubber handle (improved version) into the body on the right.
- Cut off the threaded part of the large gear shaft.
- The head must be welded to the large gear shaft.
- Screw the two covers back to the body and lubricate the gears with special graphite lubricant.
- The nozzle is ready to use!
The DIY mechanism allows you to screw in and unscrew bolts and nuts in hard-to-reach places. Increases torque by 6-7 times. Since the attachment is longer than a simple screwdriver, the tool can be used around the house, for assembling furniture, or for car repairs, if the nut connection cannot be reached in any other way.
A circular saw
You can make a circular saw from a used impact wrench. To fasten future equipment, a plywood sheet is used, in the central part of which a hole is cut to the size of a screwdriver. The tool is secured at the top and bottom of the base with self-tapping screws or clamps.
The cutting element of the saw can be secured using an M10X 50 bolt, onto which a washer and a rubber gasket are placed. The cutting part is tightened in the upper and lower parts of the bed.
To create the sides of a circular saw, a plywood sheet measuring 11.5x15 cm is used. They are assembled using self-tapping screws. A cut (27x40 cm) is cut in the central part of the frame to install the disk
It is important to securely fasten the saws to the frame in order to prevent it from playing during operation.
Bench Drilling Machine
No less important in a home workshop is a drilling machine. An old screwdriver is also perfect for doing it yourself.
First you need to disassemble the tool, removing the engine, gearbox and cartridge from it. You can secure the head of the future machine using clamps made of textolite. To avoid distortions, it is recommended to process the clamps simultaneously. Restrictive posts are made of bushings with threads located in the inner part. The bushings must be the same size.
After this, you should start making 2 bosses from caprolon. A hole is drilled in their central part. The result is 2 eccentric bushings.
Install a clamp on the rod and adjust the backlash. An eccentric is used for this. To ensure the possibility of returning the drilling head to its initial position, the wooden lever is attached to a metal rod with a spring.
Electric current is supplied through the use of a transformer whose power does not exceed 150 W. Now all that remains is to install the capacitor with a diode bridge and the drilling head on the frame. The lathe is ready for use.
Carpentry workshop equipment
A few more interesting suggestions on how to make equipment for home carpentry using a regular screwdriver.
Wood lathe
When making wood products, it is difficult to do without a lathe. You can build it yourself. A flat wooden workbench is ideal for the bed. A screwdriver can be used as a headstock and rotation drive. You need to place the tool in a wooden bed made from a block in the shape of a screwdriver and secure it with a clamp. The block can be secured with a clamp, and if the machine is constantly used, screwed with self-tapping screws. A tooth mandrel must be inserted into the chuck. The tailstock is made of two bars with an adjusting screw, which is sharpened to a cone. It is installed opposite the fixed screwdriver so that the axis of the tool coincides with the axis of the tailstock adjusting screw. The back support structure is secured with a clamp. If you plan to process large parts, then the fastening should be more reliable. The tool rest can also be made from a block, securing it to the workbench with a clamp. A primitive lathe for the home workshop is ready.
Bench Drilling Machine
Another equally important piece of equipment is a drill. It can also be made from a screwdriver. To do this you will need a used screwdriver. From it you need to take a motor with a gearbox and a cartridge. Now you need to make two clamps from textolite, which will perform the function of fixing the drilling head of the machine. To achieve maximum alignment of all holes on the clamps, it is better to process them together, in one installation. Then you will be able to avoid distortions.
Bushings with internal threads are used as limiting posts. They must be the same size, corresponding to the distance between the clamps. After this, another clamp is made from textolite and two bosses from caprolon. They are drilled off-center, resulting in two eccentric bushings. The clamp is installed on the rod and the backlash is selected using eccentrics. After this, install a wooden lever on a spring so that the drilling head returns to its original position. To supply power, you must use a transformer with a power of more than 150 watts and an output voltage similar to the screwdriver you are using. After this, you need to install a diode bridge and a capacitor, and install the drilling head on the frame.
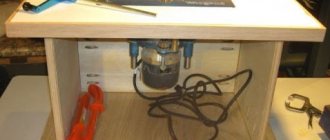
Manual router from a screwdriver: step-by-step instructions
It can be converted into a hand router. To do this, you do not need to purchase expensive materials. Everything you need can be found in the workshop or garage, practically under your feet. To make a manual router from a screwdriver, you will need pieces of thick plywood or chipboard, a clamp for attaching the tool, fasteners in the form of bolts and self-tapping screws, plumbing tools and a feather drill for wood. In the latter case, you can use a drill bit.
Assembling a homemade router is quite easy. To do this you need:
- From pieces of the selected material, cut out a base, a vertical stand on which a screwdriver will be attached using a clamp, a stop and a gusset to impart rigidity to the structure. The dimensions of the parts are chosen arbitrarily, in relation to the dimensions of the power tool.
- Using a pen drill, drill a Ø 40 mm hole in the base for free access of the cutting tool to the processing area.
- Make a clamp according to the diameter of the hand tool.
- Using a clamp, secure the screwdriver to a vertical stand so that its chuck is a few millimeters from the base.
- Install the stiffener.
- Secure the screwdriver with the stop on the vertical stand.
- Install the cutter into the tool chuck.
The screwdriver cutter is ready for use. Such a machine cannot become a full-fledged replacement for a manual milling cutter due to its low power and low spindle speed, but it will solve the problem of milling small parts in a home workshop.
Circular Saw
In addition, for your carpentry workshop you can make a circular saw from a screwdriver. To do this, you need to make a working surface using a sheet of chipboard or thick plywood. You need to make a cut in the tabletop to allow the circular saw to exit. The screwdriver must be securely fastened to the underside of the work surface using metal or wooden clamps. In the same way it is necessary to mount the shaft
It is important that the saw blade extends above the working surface of the table by no more than a third of its diameter
Method No. 2 – Use the reel!
Another original way to make a mini drill at home is using a fishing rod reel. In this case, the assembly technology is quite simple, but the operating principle itself will be based not on the electrical operation of the motor, but on mechanical rotation, like a small drill.
To make a device with your own hands you will need:
- spinning reel;
- chuck from an old drill or collet;
- hot glue or cold welding;
- drill.
The assembly process is quite simple and consists of only two steps. The first step is to dismantle the spool with fishing line and cut off the remaining axle.
After this, the cartridge is glued to the remaining rod. You can do without a chuck and install the collet yourself.
When the glue has hardened, you can check the finished mini drill. You can see all the assembly details in this video example:
How to make a micro drill from a coil yourself?
How to do it yourself?
Finally, it remains to talk about making a simple hand drill on your own. The described method involves using an old umbrella, a dowel and a drill as components of the tool being created, as well as the simplest equipment - a hammer and a hacksaw. Practice shows that this problem can be solved in a few minutes by following the algorithm below:
- take an umbrella and saw off a fragment of the required length from its rod (along with the handle);
- bend the workpiece in two places at an angle as close as possible to a straight line;
- select a dowel of a suitable diameter and drive it into the tube to the maximum possible depth, and then securely fix the drill in it.
If the master needs a thinner cutting tool, he will need another dowel, which must be driven into the already installed one. Upon completion of this action, all that remains is to take a drill of a smaller diameter and secure it in the manner described above.
To summarize, we can state that hand drills deservedly enjoy their popularity. It makes sense to use them for anyone who values reliable and unpretentious tools that can ensure high quality of work performed.
You can see an overview of a hand drill and how it works in the following video.
We make metal cutting disc machines for the home workshop with our own hands
Disc machines are useful devices in the household. With their help, you can quickly cut any metals at an angle of 45 or 90⁰. Such a device must be mounted on a rigid base. If you install another disk, you can work with all kinds of materials, not just metal sheets. Buying a ready-made installation is quite expensive, so it’s easier and more interesting to make the machine yourself.
Ready-made cutting machine
In a simple version of creating a homemade disc cutting machine, you will need the following materials and tools:
- metal corner No. 25;
- channel No. 10;
- shaft and profile pipe;
- welding machine;
- bearing;
- electric motor and wire box;
- trigger, reel and drill.
After preparing all the tools and materials for your own machine, you need to select a suitable drawing of a homemade metal cutting machine. You can make devices with your own hands according to the following schemes:
Option of a detailed drawingMachine diagramDrawing of a simple deviceHomemade pendulum saw
A similar machine for cutting metal sheets based on a grinder is not difficult if you know how to work with various tools and are ready to cut blanks. The progress of assembling your own cutting machine is as follows:
- From the corner, cut blanks for the frame, the dimensions of which should be 40*60*120cm. Weld the elements into a common frame. And weld the channel as a guide.
- Attach a pair of posts to the channel in a vertical position using bolts. It is necessary to make a frame 45 by 60 cm from the pipe to install the motor and shaft.
- Install a saw with a motor on the back of the frame. It is better to choose an asynchronous motor with a power of 1.5 to 3 kW. Next, make a shaft with flanges, a pulley and supports. In this case, the flange protrudes only 3.2 cm.
- Attach the bearing to the shaft, and secure the pulley and supports there. Mount the box with electrical circuits on the bottom of the frame. Then, attach the tool to the long part of the rocker arm, and mount the motor to the short part. Connect the motor and shaft using a belt drive, and your device is ready.
The finished version after connecting all the elements
To fully understand the entire sequence of actions, watch the video on how to make a cutting machine from an angle grinder with your own hands:
Watch this video on YouTube
Related article:
Drill machine
Convenient machine made from a drill.
The design must include:
- A transmission mechanism for communicating the desired movement from the engine to all working elements.
- Working and control elements - for example, a drill attached to a chuck, which is connected to a rotation shaft and a spindle mechanism.
- An electric motor with a belt drive, through which rotation is transmitted to the working parts. In addition to the belt drive, there is a rack and pinion drive that holds the drill in the desired direction using a special handle.
Your device will benefit a lot if you place a special scale on it that will help you measure the length of blind holes. The work table should be a rigid metal plate with a strong base.
The operating principle of a drilling machine made from a drill.
Surprisingly, such homemade drilling machines from a drill, with all their simplicity, are capable of performing a wide range of functions. Of all the home devices made from a drill, the simplest is an attachment unit without a steering rack. With this modification, a heavy table is especially important: it will soften vibration during the work process.
A metal table for the machine can be constructed from a plate measuring 500 mm x 300 mm and at least 5 mm thick. The dimensions of the metal corners for the drill stand are 50 x 50 mm. Connect metal parts by welding. To do this, connect the stand to the surface of the metal table at a right angle.
Secure the drill to the stand with clamps. Attach a vice to the table. Clean the seams with a wire brush. All elements of the machine must be leveled. The mechanism is made in the form of a long nut with bolts
Four nuts are welded to each corner of the base, followed by tightening the bolts.
Lubrication and final painting are equally important matters that should not be neglected. First of all, it protects the machine from corrosion
Lubricate with any technical lubricant. The paint can be anything.
Cool ideas and lifehacks for using a screwdriver at home
In addition to the listed mechanisms, a screwdriver can also be used to implement other ideas on the farm. This hand-held power tool will help you automate the opening of an entrance gate, make a winch for a car, or make scissors for cutting metal. If you attach an attachment for cutting tin to it, you can turn an ordinary rubber boat into a motor boat, and modernize the process of drilling holes for ice fishing. In addition, everyone knows that a screwdriver is used as a drive for a mixer, meat grinder or juicer.
After reading the article, the reader gained knowledge about the unconventional use of a screwdriver. Now he can use this hand tool to create carpentry equipment, improve children's vehicles and other useful things in the home.
THIS IS JUST GENIUS/Cool homemade product from an OLD UNUSABLE HAND DRILL
What will you need, if you remember the design of the mechanism of a hand drill, and what it is, then it’s time to figure out what is made of this tool.
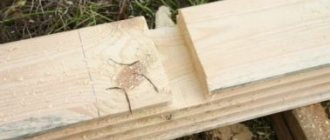
To unscrew or screw a long screw into wood, it will take a lot of effort. If you have tried to do this using a screwdriver or an electric drill, then you understand that this is not easy to do. The screw will “go” into the wood to a certain depth, but it is impossible to tighten it completely with electronic tools. It is also very difficult to do this manually, so you should call an old hand drill for help.
The tool for screwing or unscrewing long screws does not require modification. You just need to clamp a bit in the collet chuck of the device of the appropriate size, and get to work. The efficiency of using hand tools when screwing long screws is much higher compared to low-power screwdrivers and high-speed electric drills.
Not everyone knows what can be done from an old drill; do not rush to dispose of or sell this invaluable tool. Using it, you can make a device for a screwdriver, intended for screwing and unscrewing various fasteners. These are not only long screws, but also bolts and nuts. The secret of this device is that you can make a very useful thing out of an old drill, which will allow you to get to inaccessible places with the next unscrewing of the fasteners.
The principle of producing an attachment or device for a screwdriver from a hand drill is to perform the following manipulations:
- First, we free the tool from unnecessary parts. For this purpose, you should remove the chuck from the tool, and also the handle
- The stubborn heel is also removed, which is not useful in the new device.
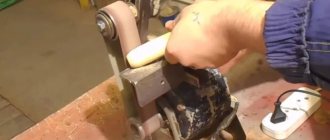
- The shaft where the cartridge was located has an unusually wide diameter. It is impossible to install a shaft of this diameter into a screwdriver chuck, so we proceed to grinding it down
- It is recommended to grind the shaft to reduce its diameter on a lathe. The use of an emery wheel or grinder for such purposes is not recommended, because the grinding will be uneven
- To grind a shaft on a lathe, it will be useful to first remove it from the tool. It's easy to do. In the mechanism, near the bevel gear, which is mounted on the shaft, there is a hole with a cotter pin. This cotter pin needs to be knocked out, thereby separating the gear from the shaft
- After grinding the shaft down to 8-10 mm on a lathe, it should be installed in the area, not forgetting to pin it. The shaft is made of hardened steel, therefore, before grinding it down, it is recommended to do heat treatment (heat it with a blowtorch)
- The shaft moves with the help of a ball bearing, which can be lubricated to extend its service life
- The first part of the work is completed. The shaft that was ground off will be used as a transmission device on the new device. The working element on the device will be the shaft where the handle is attached
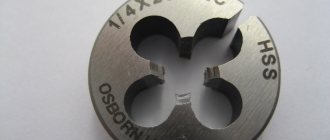
- The 2nd shaft has a specific hexagonal shape, which should also be processed so that you can put socket heads or other attachments on this address. The simplest option is to make a square one from the hexagonal shape of the end protrusion for securing the heads
- There is an option to do this using a grinder and a cutting wheel. At the same time, only heads for screwing and unscrewing bolted connections can be installed on such a shaft
- If you plan to use the device for other purposes, then there is an option to cut threads on the shaft, having previously made it into a cylindrical shape and ground it to suitable sizes
- On the cut thread you need to screw a drill chuck into which various attachments are installed - bits, mixers, drills, cutters, etc.
- Please also note that to install the chuck on the secondary shaft of the device, it is also useful to cut the internal thread for control fastening of the collet chuck
- At the end of the production of the device from an old hand drill, you need to cut off the remaining part on which the stubborn foot is required to be attached
- After which the homemade device is ready for use. All that remains is to fix it in the screwdriver chuck and test it
Hand drill
The advantage of such a device is that it increases the force of the moment. The screwdriver drives a small gear, which transmits force to a huge gear. A small gear is attached to the large gear, and the force is transmitted to the second huge gear, on which the secondary shaft is placed, which reduces the rotation speed, which means the torque increases. Ultimately, the device allows you to unscrew and tear off stuck and rusted bolted connections. But remember that the main role is played by the screwdriver, which must have the necessary power supply, otherwise its engine may suffer.
Having figured out what will be done from an outdated hand drill, you need to find out the advantages of this device. These advantages include:
- The torque increases by 6-7 times. This means that the force from the screwdriver increases by so many times
- Ability to access bolts and nuts that are in inaccessible places
- Additional materials are not needed for the production of the device, because our client can do it on his own
- No need to purchase additional consumables
Even today, the device is used for screwing and unscrewing fasteners and huge self-tapping screws; the device also allows you to quickly tighten and unscrew them. You will definitely be satisfied with this device. How to make it is carefully shown in the video annotation below.
The above describes the process of producing a homemade product from an old two-speed drill, which has 4 gears. But there will be single-speed devices that can also be used for homemade production. From this type of tool, of course, make a screwdriver, which requires one hand. This is beneficial when the other hand is busy. Such a device is called a quick-twist, and the principle of its production is as follows:
- Take an old clamp or weld a U-shaped frame on which the component parts of the homemade product will be placed
- What to weld a fixed handle, in addition to a movable trigger (made of steel with a width of two or more 1.5 mm), which is connected to ¼-1/5 of the bevel gear from the tool
- At the same time, a shaft is attached to the U-shaped frame, on which a cartridge and a bevel gear connected to the half gear from the trigger are required.
- When you press the handle, the cartridge moves due to the transfer of torque
- A bit of the appropriate type is fixed into the chuck, after which we get to work
This homemade product has one drawback - it is necessary to disconnect the bit from the fastening element in order to return the handle to its original position. An example of such an invention is shown in the photo below.
What else is there to make from an old hand drill that has been gathering dust in the garage for over 10 years? Perhaps you can make a simple device that will allow you to wind coils. Of course, winding not only threads and ropes, but also wire, for example, when rewinding electronic engines.
The design of such a machine is very simple, and for its production it is also useful to use the following devices:
- Vice - they have a fixed handle or a tool stop located horizontally
- A block of wood of the appropriate size, located near the cartridge. This commonly heard block acts as a stop, holding the tool horizontally
- A reel is attached to the tool chuck, or other devices on which material is wound - wire, rope, threads, etc.
A photo of such a device is shown in the photo below. If you fix a sharpening wheel in the chuck, then the tool is used for a manual sharpener.
To prevent the ancient drill from sitting on a shelf in the garage, it is proposed to make a manual drilling machine out of it. The advantage of such a tool is that you can always carefully make a hole in wood, glass, plastic, metal and sometimes clay tiles, using at the same time the appropriate types of drills. The production principle is usual, and consists in the fact that first it is necessary to make a bed with a movable frame on which the hand tool will be installed.
- For production, you will need a board, iron corners and cylindrical guides, for example, studs, on the pages of which you need to grind off the threads. The length of the pins affects the amount of tool movement
- First, a base is made to which the pins are attached, located in a straight line along the wooden frame
- Holes are drilled in the corners for the studs
- These corners with holes are put on studs
- A wooden board of appropriate size is attached to the corners, which will serve as the basis for securing the tool.
- The drill is installed and secured to the moving part
- To move the frame smoothly, a latch is made that will affect the pin, thereby limiting the movement of the movable bed
The design of the device may be different, everything depends on your resourcefulness, but the principle of creating such an invention on your own is shown in the photo below.
The range of capabilities of the instrument does not end there. They can also make a successful ratchet wrench from an old and unnecessary hand drill. At the same time, there is an option to use it, like an ordinary wrench, in other words, do the tightening manually, or in pairs with a screwdriver.
To produce the tool, two bevel gears and a drill shaft, and of course iron tubes, plates and apparatus will be useful. The tool production process is carefully shown in the video material. The end result is a universal hand tool that is definitely stronger than modern ratchet wrenches.
As you can see, a hand drill is a completely fascinating tool, from which you can of course make various homemade products, expanding your abilities, and of course simplifying your own work. If you come up with something else that can be done with a hand drill, be sure to share this solution, because it will help people use an outdated tool to do new things.
Source
Manual equipment
There are the following types of equipment for processing holes: manual; manual mechanized; stationary.
Manual equipment is equipment that uses human muscular energy as a drive; This includes hand drills and ratchets.
Hand drill
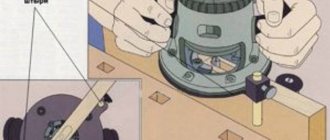
A hand drill (Fig. 3.62) is designed for drilling holes by hand. When working with a hand drill, the drill is secured in the chuck, the fixed handle b is taken with the left hand, and the movable handle 4 is taken with the right hand. Resting your chest against the breastplate 5, rotate the drill handle with your right hand. Through gear 2, 3, the drill is imparted a rotational movement. When working, you must ensure that the drill is directed exactly along the axis of the hole being machined.
Basic rules for drilling with a hand drill
1. It is necessary to firmly secure the workpiece in a vice and the drill in the drill chuck.
2. The handle must be firmly attached to the drill shaft.
3. By moving the handle to different shafts of the drill gearbox, you should rationally adjust the rotation speed of the drill depending on its diameter. With a drill diameter of up to 5 mm, fast rotation is required, and with a diameter over 5 mm, slow rotation is required.
4. When drilling, the drill should not be skewed; in addition, it is necessary to ensure that the drill is perpendicular to the drilling plane.
5. When drilling, the drill handle should be rotated evenly, smoothly, without jerking. The pressure on the drill stop should be applied evenly and constantly throughout the drilling process. Deviation from this rule may lead to drill breakage.
6. At the end of drilling, when the drill comes out of the material, you need to loosen the pressure on the drill stop and reduce the rotation speed of the drill.
It should be borne in mind that the shorter the part of the drill extended from the chuck, the more stable it is in operation. When drilling a deep hole with a small-diameter drill, you should fix the drill in the chuck with an overhang equal to approximately half the depth of the hole being machined, and then, increasing the overhang of the drill, complete the processing.
To facilitate the drilling process and increase its productivity, a lever is used to press the drill stop (Fig. 3.63).
Ratchet
The ratchet (Fig. 3.64) is used only in cases where neither a drilling machine nor a drill can be used to process the hole. The ratchet has a clamping chuck 2 for drill 7, mounted on a spindle with a ratchet wheel 3. The opposite end of the spindle fits into a nut 4 with a hardened steel center 5. A handle 8 with a pawl 9 of the ratchet wheel is installed on the spindle. This design allows the cutting tool to transmit rotational movement in one direction during the rocking (back and forth) movement of the handle. When processing a hole in a workpiece, there is no need to hold the ratchet in your hands; it is attached to the workpiece being processed using bracket 7 of clamp 6.
Manual mechanized equipment (drill) can have an electric or pneumatic drive and is characterized by a wide variety of design solutions. The choice of drill design depends on the nature and conditions of the work. Depending on the power, there are heavy, medium and light drills. The most widely used are light and medium drilling machines.
Electric drills (Fig. 3.65) of the light type are used for drilling holes with a diameter of up to 10 mm, the medium type - with a diameter of up to 15 mm, and the heavy type - with a diameter of up to 32 mm. When working, light and medium-sized electric drills are held in the hands. Heavy-duty electric drills require additional devices for fastening and holding them during operation. Such devices are various suspension devices on springs and cables (Fig. 3.66), screw devices with a stop (Fig. 3.67), as well as a special chest rest mounted on a drill, which allows the use of human muscular energy.
Electric drilling machine
An electric drilling machine with an angle attachment (Fig. 3.68) is designed for drilling holes in hard-to-reach places. A tube 5 is installed on the body 6 of the machine, which is secured with a nut 4. A head 3 is connected to the tube, located at an angle of 90 ° to the tube and the body. Inside head 3 there is a spindle on which a three-jaw chuck 2 with drill 1 is installed. The spindle is connected to the electric motor located in housing b using a roller 8 and a bevel gear, which is located in head 3. The electric machine is turned on by button 7. Head, mounted on a drilling machine, it can also have an inclination of 45° to the body axis.
Bottom line
The complexity of the design is adjusted according to the tasks to be performed. It can be made so strong and precise that it will allow even soft metals to be processed. In any case, we are guided by the principle of expediency.
If the limit of complexity of the workpieces is cylindrical door handles, you can simplify the machine to an ordinary clamp that presses the drill body to the table.
A block as a support platform, and a chisel instead of a cutter.
The hand drill is a tool that was very popular before the advent of power tools. Every self-respecting master had at least one such drill in his arsenal, which was simply an indispensable assistant. But such a tool has a significant drawback - the need to use physical force. Today, such tools have been replaced by more rational ones - electric drills and cordless screwdrivers. New tools have appeared, but what to do with old hand drills? If you have a USSR-era hand drill lying around in your garage, do not rush to dispose of it. You can make some useful things out of this tool. This material will explore several ideas.
The hand drill was created to drill holes in various types of materials: wood, plastic and metal. The operating principle is based on a pair of gears of different diameters, which allows you to increase the rotation speed, thereby making the tool quite suitable for drilling. It is thanks to the gear mechanism that the tool has become widespread and is used even today.
Interest in the use of a hand drill has decreased since the invention of electric drills, but they still resort to using this tool in extreme cases when there is no electricity and it is necessary to urgently drill a hole. Let's not delve into the details of this tool, but rather find out what can be made from an old hand drill?
Option 1
If you are wondering what can be done from an old hand drill, then you are on the right track. Don’t rush to throw it away, as it can be used to make an excellent attachment for a screwdriver. The finished product will allow you to unscrew and tighten various types of fasteners in hard-to-reach places using a screwdriver. Let's look at how to make such a device in more detail.
Other applications of the tool
A drill is ideal for grinding and cleaning various substrates from dirt, carbon deposits, and soot. With the help of brush attachments, brushes, and washcloths, she can easily remove even the most stubborn stains.
The drill is useful for the following work:
- plucking poultry carcasses;
- production of wire springs;
- improving the jack function;
- opening bottles;
- polishing shoes and furniture.
With certain skills and the use of your own imagination, as well as taking precautions, an ordinary construction drill can be turned into a real multifunctional assistant. It will make life easier and more interesting, reduce the cost of physical labor and open up a lot of new opportunities.
Review of the most popular attachments for working on wood and metal
Wood is one of the most commonly processed materials for engraving, along with glass, metal, and stone. Dremels are often used for carving wood, drilling miniature holes in it, applying images to the surface of a given material, sanding, and creating small grooves or tongues. Therefore, popular types of attachments for woodworking are:
- wood cutters;
- drill;
- cutting circles;
- polishing, grinding wheels and cylinders;
- spherical and cone-shaped burs;
- diamond and carbide bits of various shapes;
- felt balls.
There are also specific types of wood cutters, but they are used very rarely even by specialists. It is recommended to purchase consumables for processing wood of different species using a straight grinder as a set. Thus, everything that may be needed when performing work manipulations will be collected immediately in one case.
Read also: Manufacturing of plastic products
Screwdriver as a generator
A screwdriver can be used as a generator. It's very easy to do. You need to remove the battery, attach wires to the terminals using alligator clips and connect them to the consumer. Be sure to first check the polarity with a multimeter. You need to insert and clamp a hex key into the chuck to assemble the furniture. By rotating the spindle, a current will be generated that will be supplied to the consumer. However, it is worth noting that the voltage generated by this electric machine is only enough to charge a mobile phone or operate a small LED lamp.
How to use a drill?
To successfully solve problems using the described tool, it is enough to follow useful recommendations.
If a contractor requires standard hole placement, he should pay attention to the location of the drill. During operation, it should be at right angles to the surface, without deviations in any direction.
As for inclined holes, to obtain them you should position the drill at the required angle. When completing drilling, you need to reduce not only the rotation speed, but also the pressure - in order to avoid damage to the cutting tool. In addition, fulfilling this condition negates the likelihood of the master losing balance. To use a hand drill as a screwdriver, just fix a bit with a suitable tip in its chuck. The mixer is also attached there - in situations where the instrument in question performs the function of a mixer.
Upon completion of the work, the hand drill remains to be thoroughly cleaned of dust, shavings or sawdust.