How to make a hole for a faucet in a stainless steel sink?
From the author: I am glad to welcome you again, my dear readers! When we renovate a kitchen or bathroom, we are certainly faced with the installation of a sink. For some people, the hole for the faucet in a stainless steel sink becomes a real mystery that is quite difficult to solve. I have repeatedly encountered cases where a person decided on untested methods, thereby simply rendering an expensive product unusable.
One of my friends, who not only did not have special education and skills, but also did not even know how to hold a drill in his hands, decided to make such a hole using a hammer and chisel. Naturally, it turned out to be very crooked, and besides, it was larger than it was necessary. While trying to correct his mistake, he deformed the shell so much that it could not be restored.
Be careful, now I will tell you two ways that will help you solve this problem.
Conclusion
We looked at two options for sinks without faucet mountings - stainless steel and ceramic. You have figured out how to correctly make a hole in an iron kitchen sink yourself, and where valves for designer products are now installed.
By choosing beautiful, functional and unusual sinks, you can transform the interior of your apartment or home. The video in this article will allow you to find additional information on the above topic.
Many consumers are surprised - why are sinks sold without holes for faucets? For fans of the “Skillful Hands” circle? Actually, no (more precisely, not only for them). Now I’ll tell you more.
What are the benefits of a stainless steel sink?
I get asked very often why a stainless steel sink is so good. Naturally, installing this item in the bathroom is not aesthetically pleasing, not practical, and generally not entirely normal. To decorate this part of the apartment, it is best to use specimens made of artificial stone.
Installation of the product discussed is more appropriate as part of a kitchen renovation project. An alternative could be a product made from quartz, but not everyone can afford it.
Let us highlight the advantages of steel samples:
- price. The most important thing when performing repair work is rational savings. Yes, if the budget doesn’t bite you and you can afford a more aesthetic product, do it,
- mobility. More than once, even I have encountered moments when a new sink was installed, and the old one was sent to another place for service. For example, to the country house. The issue of removal and re-installation in this case is more convenient,
- reliability. Not every housewife can boast of being careful when working in the kitchen. She can drop something heavy at any moment, and if it is a cast-iron cauldron and it falls on marble, then a crack in the latter is guaranteed. On the steel sink, only a small dent will remain, which can be easily removed with a regular hammer and a wooden block, and the scratch can be covered with special means so that it will not be visible at all.
- it does not need to be embedded into the countertop. This way you can optimize its use and not pay extra when ordering the kitchen itself.
From the above, it becomes clear that a stainless steel sink is the optimal, and most importantly, budget option for the average resident of our country.
Advantages of choosing a sink
The most famous among ordinary people are sinks made of stainless steel. At the same time, both left and right designs are known, differing in the location of the bowl. In many ways, such models are good due to their durability, but most often sinks of this type are produced without a hole for the mixer. Isn't it that hard to do it yourself? You are wrong!
Regardless of the manufacturer’s brand, the right option to purchase is a sink that is completely ready for installation. That's why:
- The hole in the sink for the mixer can be made if you have certain skills. Otherwise, you can not only significantly worsen the appearance of the structure, but completely make it unsuitable for further use;
- The diameter of the hole for the mixer must exactly match the mixer model. Without the necessary tools, this can be difficult to achieve;
- The operation requires a punch, the price of which ranges from $50 to $100. A person who decides to buy a budget sink and faucet will not spend money on a rare task;
- Choosing a product that matches the design of the room and the stylistic solution of the kitchen unit requires knowledge of the characteristics, classification, or even care features. Most of the listed parameters are simply not needed when choosing a model that does not require a hole for a washbasin faucet.
Of course, we can categorically state that sinks with a hole for a faucet cannot be better than their analogues. For example, people who want to save money on buying a bowl are given the opportunity to use the services of a plumber.
The price of the work, however, is no more than $3 per operation and includes the creation of the number of holes that is necessary specifically for you. A neat hole for the rod and die can be achieved in just a few minutes.
Let's use a drill
You can make the necessary hole using a power tool, which every self-respecting owner should have at home. An ordinary electric drill must be equipped with a specialized attachment, which is designed for working on metal. This point is very important, since using a drill with a pobedite tip or diamond coating will simply render it unusable, and there will be no result.
The nozzle is something similar to a compass. If you ask the appropriate question at a construction hypermarket, they will kindly provide you with the necessary product. Let's describe the process step by step.
- First of all, decide on the place where the mixer will be located. In order to understand whether pouring water will splash onto the walls of the kitchen, simulate the pressure using a filled plastic bottle.
- Next, you need to create a small hole that will serve as the center point of the cut circle. To do this you will need a metal drill. Arm yourself with it and follow the procedure.
- Change the nozzle and install it exactly in the place that we created in step No. 2. Before you start drilling, set the desired diameter.
- Drill a hole.
Just four simple steps solve the problem with a bang!
There is also a special tool that allows you to do the same job, but using your physical strength. It is called "Fixa" and consists of two cylindrical bases connected by a bolt. One of them is sharpened in such a way as to create a standard hole for a faucet.
Tips and tricks for drilling tiles
Below are recommendations that will help novice craftsmen drill holes in tiles quickly and accurately:
- If the master has planned the locations of sockets, pipes and other communications, it is best to make holes in the tiles before laying them. After all, it is much more difficult to do this on the wall;
- You must remember to give the drill a rest. If smoke is noticed, stop work immediately. Otherwise, the drill and drill bit will overheat;
- It is recommended to buy only high-quality drills of average cost. Otherwise, a cheap tool may split the tile;
- Before drilling each hole, it is necessary to thoroughly wipe the drill from dust;
- If a craftsman often makes holes in tiles, he can buy a special template, which is sold in every hardware store. This will greatly facilitate the process and speed it up.
If a craftsman often makes holes in tiles, he can buy a special template, which is sold in every hardware store.
The main thing when drilling tiles is caution and accuracy. If you follow the proposed instructions and advice, any novice master can cope with this job.
How to drill a hole in a ceramic sink
When does the question arise? Sinks without a hole were installed in Soviet bathrooms where there was one faucet for the sink and bathtub. Recently, this option has been used less and less, but sometimes, during budget renovations, apartment owners want to save on buying a new sink.
Sink without tap hole.
And so, you have a sink that has no hole. Working with ceramic sinks may seem like a lot of work, but you can do it if you follow the tips below. It's simple.
You will need:
1. Drill or hammer drill. 2. Drill (feather) for ceramics. 3. Crown for ceramics with tungsten carbide coating
Step-by-step instruction
- To prevent the drill from moving, cover the area where you will drill with masking tape.
- We make markings - put a dot with a marker.
- Insert a ceramic drill bit into the drill and start drilling at low speed. Proceed with caution - ceramics are a very fragile material.
- Use a smaller diameter drill first - for example, 6 mm. Then replace it with 8 mm. It is important to constantly cool the drilling site - water it with cold water.
- After drilling the narrow central hole, switch to a bit with a diameter of 30 or 32 mm, depending on the diameter of the mixer.
- Every 2-3 mm, take a thin drill and make small holes in the circle that the crown made. This is done so that the teeth of the crown can engage the edges of the circle and continue working.
- When the hole is ready, you can install the sink in place.
Basic requirements for work
Even before starting work, you should familiarize yourself with some requirements, compliance with which will ensure a high-quality result. Do not forget that any mistakes can lead to damage to the projectile and its destruction, so in no case should you neglect the recommendations below ().
Availability of necessary power tools
Drilling holes by hand is unlikely to be possible, so make sure you have a drill or a powerful screwdriver on hand in advance. At the same time, the equipment must not only be powerful, but also affordable - it is unlikely that it will be possible to accurately drill ceramics using a heavy drill
Selecting the right equipment
Under no circumstances should you use drill bits for metal, concrete or wood on ceramics.
you need to purchase a crown with a special tungsten coating, which will allow you to work efficiently and quickly, the store will help you choose the appropriate option, the main thing is to know such indicators as the diameter of the elements and drilling depth
Be careful when measuring and marking
It is very important to correctly mark the location of future pits, since in case of errors they cannot be repaired. Also, do not forget about the convenience that must be ensured; sometimes the mixer is located on the side and is inconvenient to use. Precision in work
Precision in work
The drilling process itself must be carried out very carefully; below we will look at this part of the work in more detail, as it requires maximum attention
How to drill a hole in artificial stone
Typically, sinks made of artificial stone come with an existing hole for the faucet, but there are options without it, or you need to drill an additional hole for the faucet for the water filter. What to do in such cases?
You can seek professional help, but if you feel confident, you can try drilling the hole yourself. But to do this, it is necessary to determine the material of the product - this determines which tool to use.
Note! Why is the kitchen faucet noisy?
So, the options:
- Porcelain tiles
- Agglomerate
- Acrylic stone
Porcelain tiles
The strongest and most durable of the entire group is porcelain stoneware. It serves for a long time and is durable, tolerates temperature and chemical influences well, so it is in great demand. But it is also the most complex material; it is most difficult to make a hole in it than in other types of artificial stone.
The best option for carrying out the work is to choose a crown for porcelain stoneware. It can be supplied as a set with or without a centering drill.
- What is laid first, paving curbs or tiles?
- How to calculate the ventilation route
Features of turbocharged diamond wheels
When working with porcelain stoneware, the drilling site should be constantly cooled, and the drill speed should be at the lowest possible speed.
You need to understand which side to drill from and when. If from the front side, after installation, the edges of the hole will be smooth and neat, but there is a danger that the drill will slip and spoil the appearance, for example, scratch or damage the edge.
If from the back, before installation, you are unlikely to damage the bowl, but perhaps the hole will have uneven edges. Basically it's not a big deal because they will be covered by the faucet.
Remember - the further the hole is from the edge of the product, the better. Don’t forget about the bowl so as not to get another, completely unnecessary hole - porcelain stoneware is both a durable and very fragile material. Therefore, the following rules must be observed:
- Before carrying out the process, fix the sink, put chipboard under the bottom, this will protect the work surface.
- Drill exactly perpendicularly, otherwise the drill may damage the glaze.
- To prevent the drill from moving, cover the area where you will drill with masking tape.
- Before work, wet the drill; while drilling, spray the work area with water, for example, from a plastic bottle.
Agglomerate
Milling cutter for working with artificial stone
Agglomerate is a softer material. Usually the sink already has a hole almost drilled. It must be knocked out with a core or drilled with the cutter included with the sink. If the kit does not include a cutter or core, then it is necessary to perform the work with a diamond-coated crown. The instructions are completely identical to the process of drilling porcelain tiles.
Acrylic
The third option is acrylic.
If your sink and countertop have color cohesion and create a cohesive space, then it's acrylic stone. This option is not difficult to work with. Ordinary drills are suitable for working with metal or wood. The diameter of the hole for the mixer is 32-35 mm. It can be drilled with a feather drill for working on wood products. The drill speed should be at medium or low speed. When working with acrylic stone, a lot of chips are formed, and a rather unpleasant odor appears from the plastic heated by the drill.
Automatic control gannHow to care for a steel bathtub
- How to connect a hygienic shower to a regular mixer
How to avoid mistakes
Let's say you decide to make a hole using a drill with a cutter.
Often, experts make a hole when the sink is already installed in the countertop. This solution has only one advantage - the edge on the front side will be smooth. But it has many more disadvantages: you can scratch the stone, damage the sink, chip the edge, and so on.
Therefore, it is better to drill a hole from the back. But there is a possibility that the hole will have an uneven appearance from the outside. However, a mixer will be located in this place, which will cover the uneven edges. There is no risk of damaging the front side of the sink.
There are two fundamentally different methods of work. The first involves working with a drill, and the second involves knocking out the weakened cast plugs provided for by the design. Let's consider each of them in order.
We make a hole in the artificial stone sink using a drill step by step:
Some artificial stone sinks have cast plugs that are knocked out during installation. They are usually color coded on the front. First of all, the sink is installed in place in the countertop, but is not fixed.
Then you need to choose the right tool and beat off the plugs with a strong blow with a hammer. A punch with a diameter of 8 mm is suitable for this role, but not a screwdriver. You only need to knock out the cork from the top: that is, from the front side. Use a rasp to smooth out the uneven edges of the hole.
Using this method, you can make a hole for the mixer.
- The center is outlined and the circle is drawn.
- Using a drill, holes are drilled along the circumference, the distance between which is 4 mm.
- To prevent cracks from appearing when knocked out, firmly fix the sink.
If there is a need to increase the radius of the hole, you need to draw another circle of the required size. All cuts are made from the same front side along the circumference at a distance of 4 mm. Using a punch or chisel, remove unnecessary parts.
Nowadays, the question quite often arises of how to drill a hole in a granite sink. A similar circumstance is connected with the fact that in most cases, when purchasing the specified plumbing product, it does not have the mounting holes necessary for installing a mixer or flush switch.
How to work with a stainless steel sink
Manufacturers often produce stainless steel sinks without the special opening required to install the faucet. As a rule, such sinks are made of durable steel. This sink is very difficult to drill with a regular drill. A diamond-coated crown is barely enough for one hole (after that it will only be scrapped).
We offer for your consideration several options for installing a hole for installing a faucet on a stainless steel sink, although these tips are universal and are suitable for sinks made of ordinary steel.
Option #1
To drill a hole in it, you need to use cobalt drills (or tungsten, but they are more expensive) and a cutter. A cutter, or punch, is a two-part tool. It consists of a die and a knife connected by a bolt.
Before starting work, the sink must be turned upside down. Next, we follow the following procedure:
1. Mark the installation location of the mixer with a pencil or bright marker. 2. Make a small dent in the center of the circle so that the drill does not slip off. 3. Make an initial hole using a 5-6 mm drill, and increase it to 10 mm with a drill of the appropriate diameter. 4. Install the punch (notch) so that the part with a smaller diameter is where the mixer should be. Tighten the bolt until the cutter cuts a hole.
Option No. 2
The second option involves drilling holes only for flexible connections and mounting stud(s). You can use the mixer pressure plate as a template. This option will save you from buying a cutter. But, in any case, you cannot do without cobalt drills.
Option #3
Here's a video as an example:
- Which is better, bath or shower reviews?
- Which brand of bathtub mixer is better?
The tap on the mixer is spinning, what should I do?
We hope the article was useful. If you know of other ways to drill holes in a sink or sink, write in the comments.
Quartz agglomerate
Quartz stone is considered harder and more durable than acrylic stone. How to drill through artificial stone of increased strength? Diamond coated crown. And if wood drills are suitable for an acrylic sink, a more durable drill may be needed for a quartz sink. You need to be prepared for the fact that after drilling a quartz sink, the crown will be unsuitable for further use and will have to be thrown away.
You need to work in the same way as with acrylic agglomerate: slowly, carefully, at low speeds. It is advisable to prevent chipping, since quartz stone must be polished at home.
How to cut a hole in different types of sinks
The lack of holes for taps or mixers in modern sinks is not a defect, but a necessity. Installation technologies for such products require several positions for the sink itself.
The product line offers several basic diameters for plumbing fixtures - try to guess which one is needed here! We won’t guess, we’ll install it.
Photo is a problem that we have to solve.
What it is?
Drilling bits are attachments for a drill in the form of a cylinder. On the one hand, these drills have devices for fastening in a hammer drill or drill. On the other hand, there are teeth, on top of which spraying of various compositions is often applied. Such cutters are used for cutting ceramic, porcelain stoneware, tile or mosaic tiles.
This drill attachment allows you to get large-diameter holes and achieve high-quality results without chips and cracks.
Cutting with a crown on tiles is only possible in conjunction with a special drill or a special hammer drill. The first should have the option of low speed, and the second should have the function of turning off the “impact mechanism”. Thanks to this, drilling holes, for example, for a switch or socket, will be easier and more efficient. By the way, the most popular crown diameters are 40, 68, 100 and 110 mm. This is enough to carry out all the work in the bathroom.
Two types of sinks
The most popular types of kitchen sinks now are:
- Stainless steel sinks;
- Porcelain stoneware products.
With both stainless steel and porcelain stoneware, manufacturers are in no hurry to drill holes, leaving these little details to the sellers.
The sinks are different, and so are the appliances.
For your information! You can arrange for holes to be drilled at sink sales stores. The price of the manipulation is negotiable, you indicate the diameter and location, pay and receive the finished product with places for installing taps and mixers.
The problem has been solved, and this topic can be closed, but there are situations that radically change the original plans. Moreover, the desire to do everything with your own hands, and the pleasure you get from a job well done is incomparable.
Independent work
Simple things can change the world. The initial desire to install the tap on the right side in the corner will be nullified if your wife is left-handed.
On a note! In the kitchen, more than anywhere else, great importance is given to beauty, functionality, and also ergonomics. It is very inconvenient for left-handed people to open the tap on the right with their left hand. Water gets on your hand.
You can press out a hole.
We recommend placing the sink in place first, taking a closer look, and then deciding and selecting nest locations. Have you decided to do the work yourself?
- Carry out all work on the product before installing it in a permanent location; with these simple steps you will prevent deformation of the item and premature damage;
- Place the sink horizontally on a wooden base. Drill a small hole with a metal drill, enough 5-6 mm to locate the center of the circle;
Advice! If you use punches and a hammer, then the above manipulation is not necessary.
Carrot drills and their capabilities.
- And then there are three paths to choose from:
- Hammer and punch. Here you simply pierce the fixed bowl with special nozzles manually, the nozzle is initially selected to match the diameter of the hole in the sink for the mixer or tap;
- Punch of special design. This is a mechanical toy that uses the extrusion method. Such a punch consists of a threaded pin and two nozzles, a tap and a pressing washer with a wrench head. By installing the pin into the hole from the outside, screwing on the washer with the head, you use a wrench to tighten and press. The result of this manipulation is a hole in the stainless steel sink for the mixer;
- The third way is a special drill called a carrot. The name has taken root so much that even on the factory packaging of the product it is not called anything other than a carrot drill. The drill is presented as a cone, with a cutting edge diameter from 6 to 32 and even 38 mm. We will not describe the principle of using a drill, everything is clear.
Punchers included.
To the piggy bank! Sometimes the consumer's choice is on mixers with large diameter glasses. A sink siphon with a large hole requires a large seat. Then there are several options: the first is to order a hole in the store, the second is to drill several holes of a smaller diameter around the circumference. Then simply connect them together by removing the inner circle with a chisel. True, accuracy and precision of movements will be required.
How to drill a hole in a stainless steel sink - we've sorted it out, let's move on to the stones.
Stone and under stone
Much more interesting is the topic of drilling landing sockets in stone sinks.
- At the location of the proposed hole, we make a mark and drill;
Note! A simple manipulation - working with a drill - is not very simple in practice. A drill with a pobedit insert is contraindicated for this work; it doesn’t drill so much as it chips and peels the material. The drill for metal performed well, but low speeds of the drill itself are required (ideally, it is better to use a hand drill). At high speeds, the edges melt.
We work at low speeds.
- During the drilling process, the material can heat up quickly, but this is difficult to control. It is better to drill a hole in a sink made of artificial stone with a thin drill. We work around the perimeter of the entire future nest;
- It is recommended to “pass” the partitions between the holes in two ways:
- We cut the strokes with an electric soldering iron, followed by knocking out the plug with a hammer;
- The material is cut well with a jigsaw. Although this process takes longer, the edge is the smoothest;
- Grinding the hole circumference is done using a round abrasive attachment for the entire circumference. If you don’t have one on your farm, use a regular round file.
Crowns coated with diamond are rare guests on the farm.
To the piggy bank! You can also drill a hole in an artificial stone sink with a diamond drill, if you have one.
We inform you! Some bowls have special marks. These are places where, by striking accurately with a hammer, you can punch a hole. This must be done with caution; the tags themselves are marked with paper stickers, which may slip during transportation. A blow to another point can only lead to destruction of the material.
Quality work is the key to longevity.
Where to start drilling a sink and how to drill a sink
To drill the sink, you will need ceramic drill bits and a tungsten carbide bit to cut round holes with a diameter of 33 mm. For drilling, it is better to use a hammer drill rather than a drill. And not because the hammer drill has a stronger blow. We will not use any blow at all. The rotary hammer has a lower rotation speed, but more weight in kg. and power in W. But if you don’t have a hammer drill, then of course take a drill, but reduce the speed, otherwise the crown will be of no use.
Marking and drilling
Start by marking, this is the smartest thing you can do, decide where the hole will be where the faucet will be installed. Once you have decided, use a marker and draw a dot in the desired location.
Now load a chuck with a ceramic drill clamped into the hammer drill and start drilling. You need to make a through hole. The hole is needed so that the drill that comes with the crown can be inserted into it. You can drill this hole using a drill or screwdriver.
The ceramics from which the sink is made are very durable. Its strength is comparable to porcelain stoneware. If you have ever drilled or cut porcelain tiles, you will understand what I mean. Porcelain tile material is very durable, but fragile
If you are not careful, it can easily break. Therefore, you should drill a hole in a ceramic sink carefully and without haste.
First you need to drill a very narrow hole in the center, and then widen it with another drill. To start, use a 6mm drill bit. Then go to 8 or 10. While drilling, constantly cool the drilling area with cold water, pouring from a bottle or other container.
Once you've finished with the center hole, start drilling with a core bit. The first 2-3 mm. ceramics will be drilled without much difficulty, but then you will be disappointed in the capabilities of the crown. The crown will rotate on the ceramic surface without causing any visible harm to it and without going deeper than a fraction of a millimeter.
In order for the crown to continue drilling, it needs help. It's done like this. Take a thin ceramic drill and drill shallow holes around the entire circumference already selected with the crown. Now the teeth of the crown will have something to grab onto and things will go faster. As soon as the crown deepens and begins to slide on a smooth surface again, do the whole operation again.
Sharpening drills for ceramics
Drills for ceramics become dull very quickly. The tips are made of a very hard alloy, so they cannot be sharpened with a regular abrasive or metal cutting wheel. But if you install a diamond segmental disc on the grinder, then you can handle sharpening the drill for ceramics. Many people do not know, but such diamond blades are excellent at cutting steel, aluminum structures or cast iron.
If you have trouble sharpening the drill, then either buy a new one or use a new drill bit for the hammer drill. Just don't turn on the shock function. A ceramic sink is not like a concrete wall; it is highly likely to crack. You can make small recesses with a ceramic drill, and then widen them with a drill. After which the tungsten carbide crown comes into play again. And do not forget to cool the drilling site with cold water all the time.
This is my method for drilling faucet holes in a sink and I don't find it needs improvement.
As you know, most sinks and sinks are sold with a ready-made hole for installing plumbing equipment. But some options have a symmetrical shape, allowing you to install water supply from different sides, in addition, if you purchased a sink faucet with three holes, then most likely you will have to make two of them yourself.
This review will be devoted to this issue.
How to install a faucet on a stainless steel sink
Bathroom renovation involves a huge amount of work related to the installation of plumbing equipment. The process of installing taps and mixers requires special attention.
If you don't know how to install a faucet on a stainless steel sink, you have two options. The first is to turn to specialists who will perform all the manipulations for you, but at the same time you will have to look for a good master and pay money for his services. The second option involves independent installation, for which you need to familiarize yourself in detail with the information in this article. Information about the features of plumbing equipment and its installation will be presented here.
To install a faucet on a stainless steel sink, you must first delve into the details that will allow you to understand all the intricacies of this process. Of course, it is practically impossible to list all manufacturers and their products. Still, it must be said that all modern sinks are divided into two large categories: mortise and overhead. The latter are relatively cheap, but the mortise ones have a more presentable appearance.
It should be noted that overhead sinks made of stainless steel produce quite a lot of noise from falling water. This problem can be eliminated by using a special sticker that is attached to the back of the product. It is made from foam insulation and dampens vibrations. This must be taken into account during the selection and purchasing process.
Before proceeding with the actual installation, it is necessary to prepare all the necessary tools and consumables that will be required when performing the work.
Tools and materials needed to install the faucet on a stainless steel sink:
- Electric jigsaw. It is necessary to make grooves in the tabletop.
- Drill. It is used to drill holes for installing a jigsaw blade.
- A set of fasteners for fixing the device on the sink.
- Masking tape. It is used to cover the countertop to avoid damage to the surface.
- Silicone sealant. This material is necessary to reliably seal the seam between the sink, countertop and the faucet itself.
- Additional protection of the ends of the groove can be obtained by treating with drying oil.
- To connect the mixer you will need an adjustable or gas wrench.
- A Phillips and flat-head screwdriver will help you install the harness.
Attention! When choosing fasteners, you need to pay special attention to the amount of steel in them. The thicker the steel base, the greater the chances of high-quality fixation of the elements. This indicator will ensure a long service life. Experts recommend avoiding the use of plastic fasteners.
Preparing the countertop
To carry out accurate markings and high-quality cutting of grooves, it is recommended to adhere to the following instructions:
- Initially, you need to attach the sink to the countertop and trace its outline with a pencil.
- After this, we remove the sink and draw another internal contour from the received one with an indentation of one and a half centimeters.
- It is recommended to cover all sides of the outline with masking tape. This will protect the surfaces from damage during installation.
- Next, holes are drilled inside the resulting contour, into which a jigsaw file will be inserted to cut out the grooves. During the cutting process, you must be extremely careful not to go beyond the created contours.
- At the end, it is necessary to clean the cuts from burrs and soak the ends with drying oil.
Mixer installation process and piping
These manipulations are performed after installing and securing the sink into the resulting slot in the countertop. The arrangement and fastening of parts requires special attention to avoid inaccuracies.
- At the first stage, you need to wind a special FUM tape onto the threads of the flexible water supply hoses. As an alternative, a sealing polymer thread can be used. This will ensure sealing. After this, you can connect the hoses to the body. Even if standard rubber seals are present, they will not be able to create the necessary reliability against leakage, since they will be squeezed out during the assembly process.
Important! It is not recommended to screw in supply hoses while holding them by the braid. Such manipulations can lead to a rupture of the braid at the junction with the sleeve. Screwing is carried out only using a key.
- In the hole under the mixer in the sink, you need to put the union nuts for the tap one by one.
- After this, the mixer body itself is pulled to the installed sink. To perform this procedure, you need a nut with studs or a wide plate. Before screwing the faucet, it is important not to forget to install a special ring gasket. This is what will ensure the seal. Despite the relatively small thickness of the stainless steel sink, the mixer can be installed really reliably. To do this, it is recommended to make special inserts from plywood according to the size of the tap hole and install them on the back side. You can avoid swelling of the material under the influence of water by pre-coating the plywood inserts with drying oil.
The installation of the harness has one subtlety - you should not use excessive force when tightening the screws and fasteners. Otherwise, you can tear out the middle of the sheathing.
Sealing and fastening
- Initially, we glue the sealing tape, with an indentation of 3-4 millimeters from the edge of the sink.
- Silicone sealant is applied along the entire perimeter of the product beyond the boundaries of the previously installed tape.
- After this, you can install the sink on the prepared place in the countertop. After this, it is necessary that the hook be made from the bottom of the tabletop. To secure, tighten the screws.
- Remove excess squeezed out sealant.
After completing all the above manipulations, it is enough to connect the flexible water supply hoses to the water supply pipes, and also install a siphon.
Standard system fasteners
Not everyone knows how to install a stainless steel sink on a cabinet or countertop using a standard mount. This option consists of plastic corners with special inclined slots.
For reliable installation, you must adhere to the following procedure:
- When installing the sink, it is necessary that its edges be placed on special fasteners.
- At the bottom of each mounting groove, holes are drilled with a thin 3 mm drill to ¾ of the wall thickness. To avoid through drilling, it is recommended to stick a piece of electrical tape on the drill, which will allow you to control the depth of entry.
- The fasteners are secured with self-tapping screws. All installed corners should move with little force from the attachment point.
- At the end, just set the fasteners and press the sink.
Because of this, we can conclude that installing a flush-mounted sink does not require excessive effort and complex calculations. However, this option cannot be called reliable. In the case where the corners are fixed to the side walls, the product may shift in the horizontal plane.
Alternative mounting option
To ensure maximum reliability of the installation, it is enough to take a rail whose cross-section corresponds to the curves of the edges of the sink where it will be installed. You also need to use overhead galvanized plates or 4 corners with pre-prepared holes for self-tapping screws, which will help with fixation.
Stages of work
- Cut the strip according to the perimeter of the sink.
- To avoid rotting of the material, it must be soaked in drying oil.
- Next, the rail is placed behind the bends of the sink.
- Tightening to the walls is carried out with overlays or corners.
Where to cut the hole
Another important question that will arise regardless of what material the sink was purchased from: should I cut a hole in it from the front after installation? Or should I do this before installation and from the back?
Each method has a number of pros and cons:
- In the first case, the edges on the front side will be much smoother, but there is a possibility of damaging the front side of the sink with a drill, and if it has a narrow side, then splitting the edge.
- In the second option, the risk of damaging the bowl is much lower, but there is a possibility of getting a sloppy edge of the hole on the front side. In most cases, this is not critical, since the edges of the hole are closed by the mixer. When turning over, there is a possibility of unintentionally making a hole on the wrong side, so it is advisable to mark the side on which you want to install the faucet.
In any of the methods, it is advisable to place the hole away from the edge of the product, but without touching the bowl. To do this, before starting work, you need to attach the lower nut of the mixer to the sink and mark its center.
Nuances of algomerate shells
If you purchased a sink made of stone agglomerate, it will be a little easier to work with.
Agglomerate sink shown
Well-known manufacturers usually include a cutter or core, which is used to knock out a piece of stone that has already been drilled, but not completely. If they are missing, then it is best to use a cutter or diamond-coated crown and proceed as when working with porcelain stoneware.
The Fostner cutter will also cope with a hole in a stone agglomerate product. But be prepared for the fact that after this you will need to sharpen it, or even throw it away completely.
Be sure to read the instructions and operating rules before taking any action, so as not to accidentally void the product warranty.
Acrylic stone
If the sink is made as one piece with the countertop and the same color as it, then it is an acrylic artificial stone. Of the above materials, this one has the lowest density, so it is the easiest to work with. If the purchased sink is made of acrylic stone, then you can drill it with ordinary drills for working on metal or wood.
The hole for a standard mixer, in most cases, has a diameter of 35 mm. In a product made of acrylic stone, it can be easily drilled with a feather drill for woodworking or a forstner cutter of a similar diameter. It is necessary to work at low or medium speeds. When drilling this material, a large amount of chips is formed, and the plastic contained in the acrylic stone emits an unpleasant odor, somewhat reminiscent of epoxy glue.
An example of a sink made from this material
Acrylic stone is the most pliable of all types of artificial stone, which is why most countertops are made from it. If there is a need to make a hole in it for a sink or hob, it is better to first practice in the middle of the cut part so as not to spoil the entire countertop. Despite the fact that acrylic stone can be sawed with a jigsaw without any problems, it is not advisable to make cuts with it. When working with a jigsaw, so-called stress concentrators often arise (sharp transitions, sharp corners, microcracks), which will affect the service life of the product.
In this case, it is permissible to cut a hole 5 mm smaller than required with a jigsaw. After the work with the jigsaw is completed, bring it to a clean size using a cutter. It is imperative to make an R3 chamfer along the edges; it will also reduce stress and increase the service life of the tabletop.
More information in this video.
If you are not ready to take on this work yourself, delegate it to experts in your field. The contact form is located at the bottom right. Consultation on issues and cost calculation is free.
Useful tips for installing a faucet on a stainless steel sink
In order for all work to be completed at a high level, you need to listen to the following advice from experts in this industry:
- An excellent option for the kitchen is a sink with two bowls, on which you can install one swivel faucet with a long spout.
- When carrying out installation, you need to take care of safety. To do this, it is enough to install an overflow system that will protect your home from flooding.
- For the kitchen, the ideal option is a single-lever mixer, which is very simple and easy to use.
- In cases where it is necessary to attach flexible supply hoses to a steel pipe with serious thread defects or rust, it is better to extend it using couplings and seals. This will increase the reliability and sealing of the system.
- It is recommended to install several separate valves on the kitchen supply line. Even in the event of a breakdown, you can continue to use water.
- Avoid bending the supply hoses or connecting them under tension. The lower the voltage, the longer they will last.
All of the above tips and recommendations will allow everyone to reliably install the faucet on a stainless steel sink. Our video will allow you to become more familiar with all the intricacies of installation.
Reasons for missing holes
Manufacturers of sinks and plumbing fixtures are trying to standardize the dimensional parameters of models so that they are as compatible as possible with each other.
But there is one important circumstance: individual layouts in both the kitchen and bathroom are very popular. To meet such needs, it is necessary to produce sink models in which there is no hole for the faucet. The groove is made independently in the most convenient place and with the necessary characteristics
The groove is made independently in the most convenient place and with the necessary characteristics.
There are no holes in metal double-bowl sinks, which by default do not have slots for washing or drying for practical reasons. A person chooses the best option for himself by installing a sink on site.
The size of the holes depends on the design of the tap. Faucet models may vary significantly. The size of the required groove in the sink depends on this.
Before performing work, you need to select a model, find out its parameters and design features.
How to cut a hole in different types of sinks
The lack of holes for taps or mixers in modern sinks is not a defect, but a necessity. Installation technologies for such products require several positions for the sink itself.
The product line offers several basic diameters for plumbing fixtures - try to guess which one is needed here! We won’t guess, we’ll install it.
Photo is a problem that we have to solve.
How to drill through tiles using core bits
Step-by-step instructions for tiles not glued to the surface:
- Take an electric drill and set it to low speed;
- Take the crown and secure it in the chuck;
- Mark the drilling location;
- Secure the tile on a flat surface;
- Place tape on the drilling site;
- Start "drilling";
- Using even pressure, drill through the entire thickness of the tile.
Some craftsmen recommend soaking red clay tiles to prevent drilling from cracking the glaze.
Step-by-step instructions for tiles glued to a surface:
- Take an electric drill and set it to low speed;
- Take the crown and secure it in the chuck;
- Mark the drilling location;
- Place tape on the drilling site;
- Start "drilling";
- Using even pressure, drill through the entire thickness of the tile.
A tile drill bit will last longer if you use only low drill speeds and periodically cool the bit in water.
When choosing a cutter for drilling material, you must first of all proceed from the density of the material; the surface of the crown should be harder than the surface of the tile itself. The work itself is not difficult, but skills are required in marking the cutting site, starting drilling and performing the drilling process itself.
When purchasing a new sink, the question often arises is how to drill the hole. Answers to this and related questions can be found in this article.
Types of faucets
To understand why you need to take into account the nature of both items of the set, let's get acquainted with the different types of faucets and find out in what environment they will reveal themselves best.
Single lever
The single-lever mixer is perhaps considered the most common modern model. As a rule, it is made of stainless steel, sometimes with PVD coating. Models of this type are usually installed on stainless steel sinks in a modern style. Any sink shape is suitable, but square, rectangular and trapezoidal corner models with a single bowl look better.
The big advantage of single-lever basin mixers is their ease of operation. If you need to fill a pan with water, you can easily adjust the pressure. You can close the water with a light touch. If your hands are floury or oily, just touching them with the back of your hand is enough so you don't get the mixer dirty. But if you have low-quality water flowing through your pipes, it is better to install a filter at the inlet, since single-lever models are very sensitive to small mechanical particles.
Two-valve
The most ancient system that is used in our time. Two-valve mixers are convenient because they make it possible to more accurately regulate the temperature of the water flow. They are often made in a retro style, so they go very well with antique sinks. In the past, models with a rubber seal prevailed, but now varieties of faucets with ceramic plates are more often produced. They are more reliable, but if they break down they must be replaced rather than repaired. Two taps and a high spout between them are often stylized as bronze, copper, brass, and sometimes they give the surface an original granite color.
Sensory
This variety is easily recognized at first glance and is found only in ultra-modern kitchens. Only the spout with a sensor built into it “grows” from the sink or countertop. You may not immediately understand how to turn on the water. But if you put your hand near the sensor’s activity zone, the water will turn on.
The water temperature is set in advance using a special lever on the side. During subsequent turns on, you will receive water at the desired temperature without touching the tap. A touch-sensitive kitchen sink faucet is a good solution: it has an auto-shut-off system, so you won't forget to turn off the water.
Thermostatic
The most modern type, which can create a water flow of a given temperature, even if the water flows through the pipes is too hot or cold. Typically, thermostatic faucets are used in the bathroom, but there is nothing stopping you from installing one of them in the kitchen. This will be especially useful if the boiler is responsible for the hot water supply. You are guaranteed not to scald yourself with boiling water.
An addition to the thermostatic mixer can be sinks made of artificial granite, ceramic, or metal. This solution is more suitable for a modern interior, but if you wish, you can find rare universal models that are appropriate in any environment.
Recommendations from professionals
In addition to general advice, you can pay attention to the recommendations of craftsmen and specialists in working with cutting tiles. Thanks to them, even beginners can drill holes without chips or cracks. Many people note the mandatory presence of a crown diameter sign. Others focus on the presence of a high-quality tooth set, since cheap materials may not have them at all. Such a low-grade crown is not able to drill through a tile covering.
Experts note that cutting red clay tiles can be done with either a tungsten carbide or diamond coated crown . In addition, a tool with a precious coating can even cope with natural stone or porcelain stoneware. But metal crowns with a cutting edge are not suitable for working with tiles, since their purpose is to drill holes in wood.
The next recommendation is to purchase crowns as a set: this will save you money and protect you from mistakes when selecting the required diameter. All masters prefer collapsible types of crowns. They claim that it is much easier and cheaper to replace one damaged element than the entire part.
Thus, we can conclude that crowns are indispensable for drilling ceramic, porcelain stoneware, tiles and even mosaic tiles. Thanks to the correct choice of this part, the holes are smooth, without chips or cracks.
Craftsmen and specialists who work with cutting tiles recommend using diamond-coated crowns. They are of high quality and make difficult work with a fragile product easier.
See below for a description of the different types of crowns and how to use them.
When you need to drill holes in a tile for an outlet or switch, you will need to use a special tool called a tile drill. It is with the help of it that tilers perform this kind of work.
Sinks for installation on one level with a countertop:
Sink installed on the same level as the countertop:
- located flush with the countertop
- wipes off easily
- makes it easy to remove crumbs
- fits into the overall interior design
- can be made of stainless steel, ceramic or SILGRANIT™ material
Do you like the combination of design and practicality? Then flush mounting is the right way to install a sink for your kitchen.
Easy to clean, hygienic and tidy
You can wipe down the countertop and be absolutely sure that you have removed all the crumbs and food debris. Consequently, bacteria and microbes will not begin to develop under the sink edging. Therefore, there is no need to walk along the edge of the sink with a cotton swab. A thin black line will not appear over time around a sink installed at the same level as the countertop. There is simply nowhere for crumbs, drops and dust to accumulate. They can be easily swept from the countertop into the sink with one movement of the hand. Simply wipe the sink with a soft cloth. That's all. She will again delight with her purity, brilliance and beauty.
A combination of aesthetics and functionality
Modern minimalism. Flat surfaces are elegant and visually appear more expansive
. There are no joints that would disturb the harmony of integrity. There are no handles on the cabinet doors. Do you like this solution? Then give preference to a sink for installation on the same level as the countertop. Combine stylish design, aesthetic appeal and practicality in your kitchen interior.
- The sink and countertop merge into a single whole, making them look elegant and exclusive. Plus, you get more countertop space. Attach special cutting boards to the sink. That's all! You can cut vegetables or bread directly over the sink. Cuttings and crumbs will fall directly into the sink bowl.
Types of crowns for tiles
Small holes in tiles are made mainly with a drill, but for pipes and sockets - crowns or hole saws. Almost all of our readers have seen this miracle of technical thought in stores. The crown is a bowl with a coating on the edges or a rolled metal strip with teeth. It looks like it is not immediately clear how it works, but this happens due to the fact that it is not used separately from an electric drill. Without an electric drill, using a crown will be problematic. Not every electric drill is suitable for using crowns. It should be able to operate at low speeds and not have a shock function, i.e. work slowly and smoothly, and the drill should move forward only as a result of physical pressure.
Crowns for tiles and tiles are:
For tiles made of red clay, it is suitable to use both carbide and diamond; for cutting holes in porcelain stoneware and natural stone, you will need diamond and KS series. Metal crowns are suitable for working with wood.
Crown sizes range from 19 mm to 120 mm. For pipes and plumbing fittings, a 30 mm tile crown is mainly used. For sockets you will need to take a larger crown.
The easiest to use and affordable crowns with tungsten carbide coating. The disadvantage of such a crown is that they quickly become inoperative, and also that it is much more difficult to drill, the smooth edge may be chipped, and if used improperly, cracks may appear on the tile glaze.
A diamond tile bit is so strong that it can even cut elements of reinforcement that might come your way when cutting a hole in the wall. This type of crown will give straight edges on tiles, even glazed ones, as long as you use the crown correctly.
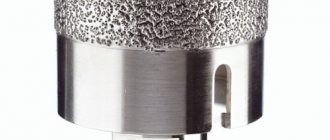
Stainless steel drilling technology
Stainless steels are alloys of iron with the addition of at least 11% chromium and varying amounts of nickel and molybdenum. They differ from other types by their specific microstructure and mechanical properties. Stainless steel is resistant to high temperatures, has increased strength and ductility.
Its high coefficient of linear expansion, ductility and tendency to strain hardening make it a difficult material to drill. When drilling, chips often stick to the drill, slowing down the process. Only a small amount of heat is removed from the material being processed with chips; most of it is absorbed by the drill, the tip of which is subject to deformation. Compared to carbon steels, stainless steel has low drilling efficiency due to its high hardness and therefore low machinability.
The production of holes larger than 6 mm should be carried out in at least two stages, starting with the use of a drill with a diameter smaller than the specified size. Thanks to this, internal stresses in the material can be avoided, which will make work easier and avoid overheating of the tool, thereby extending its service life.
Drilling on stainless steel should be done at low to medium speed, up to approximately 800 rpm. Higher speeds may damage the cutting edges. The workpiece must be firmly fixed, for example, in a box, and the drill must be directed exactly perpendicular to it. Start drilling as soon as the optimum drill speed is reached, using minimal pressure. We constantly keep the speed at the same level - we stop the drill only after removing the drill from the hole. Any deviation in direction, jerks and disruptions will negatively affect the structure of the hole.
The hardness of stainless steel leads to significant heating of the drill, so during operation it must be constantly cooled with water, oil or a special emulsion.
The use of such a special fluid is aimed at cooling, lubrication and removal of chips when working with a drill. Don’t forget about this, because it allows you to improve the quality of the holes made and extend the service life of the tool.
Interesting! How to fasten an anchor bolt with a nut.
What you need to know about the dimensions of the crane landing pipe
There are certain standards so that everyone does not have to cut a hole in a ceramic sink; most manufacturers offer ready-made ones, with a diameter of 30–35 mm. If it is more or less, it is already considered a deviation. In addition, such products are often more expensive, because individual equipment is used for their production.
If there is no hole in the ceramic sink, then to create a seat you need to determine what it should be. To do this, you need to measure the outer diameter of the mixer mounting bolt. It is advisable to immediately buy a faucet, then take a sink and purchase a sink and make a hole in it.