Spot welding is one of the most common in everyday life. It allows you to connect metal parts quickly and reliably, and there is no need for any special welding skills. Another important advantage is its simple equipment, which is quite possible to make yourself. Considering the fairly high cost of such units, the issue of independent production of this device becomes very relevant.
The essence of technology
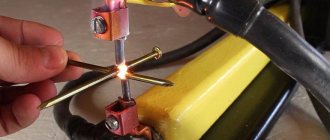
The operating principle of resistance welding is based on heating the metal to its melting temperature by passing a short-term current pulse of sufficiently high strength through it. The duration of such a pulse ranges from a hundredth to a tenth of a second, the time is selected based on the parameters of the metal.
Under the influence of current, the parts heat up and melt. A liquid core forms between them. Until it hardens, the surfaces of the workpieces should be kept under pressure. As a result of core crystallization, a local connection of two products occurs.
Pressure must be applied so that during the flow of current along the perimeter of the area of local melting of the metal, a sealing belt is formed, which does not allow the melt to flow outside the welded area.
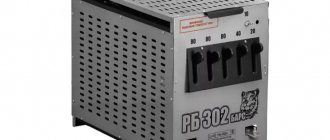
Spot welding machine.
It is possible to obtain a high-quality and reliable connection of workpieces only after proper pre-processing of the parts. It is important to remove oxides and corroded areas from the surface.
In tasks that require high-quality connection of parts with a thickness of one to one and a half millimeters, capacitor equipment for contact welding is used.
The operating principle of such devices is based on the following: a block of capacitors is charged with a small current. Then the capacitors are discharged. The resulting pulse force is sufficient to ensure the required welding mode.
A welding machine for welding of this type is widely used in tasks requiring the connection of miniature products, for example, in radio engineering and electronics.
It is also worth noting such an advantage of this device as ease of manufacture. Anyone can make a spotter from a welding transformer. And getting the necessary parts is easier than ever. For example, welding can be done with your own hands from a microwave.
Even if this piece of kitchen equipment is not available, it will not be difficult to purchase the specified equipment on the secondary market. In our case, only the transformer is of value in the microwave, so it is necessary to consider non-working equipment options. It will cost significantly less.
Rules for preparing for work
We almost already understand what a welding inverter is and how it works. Now you can start using it in practice, but first you need to prepare for the welding process. To do this, you must follow the following recommendations:
- Protection. It includes all the important features that must be used for safety purposes. You need to wear gloves made of thick fabric on your hands; they can protect the skin from sparks. Glasses and a mask are used for the face. A robe made of material that can withstand fire is suitable for the entire body.
- Preparation of the workplace. Cooking should be done on a durable iron table; it should not be covered with varnishes or paints. The welder must stand on a wooden base when welding.
- Preparation of the necessary consumables, namely electrodes. They should be selected depending on the thickness and type of metal.
- Cleaning metal from dirt and various coatings.
Device designs
It was said earlier that do-it-yourself spot welding can be assembled by any craftsman. At the moment, there are a large number of examples on the Internet dedicated to the manufacture of such equipment.
Do-it-yourself welding will allow you to solve a large number of problems related to the repair and manufacture of various products and mechanisms. This device will be indispensable in almost any workshop or garage.
The most important fact is this: making a unit with your own hands from a welding device is not difficult. As a result, with this device, creating high-quality and reliable connections of various metal products will become commonplace.
Depending on the characteristics of the workpieces being welded, such as their size, thermal conductivity, etc., the welding process should be carried out with the following parameters:
- the power circuit voltage ranges from one to ten volts;
- the process time should last from 0.01 to several seconds;
- the welding pulse current exceeds a thousand amperes;
- the melting zone of the surface of the parts is minimal;
- the pressure applied to the welding site must reach tens and sometimes hundreds of kilograms.
It is enough to comply with all the above parameters, and then the quality of the connection will not raise any doubts. You can do resistance welding with your own hands in accordance with one of the diagrams presented on the Internet.
Electrical circuit of the welding machine.
The most common option is microwave welding. This is due to the fact that getting this device in our time is not difficult. The assembly process itself is quite simple and only requires careful adherence to the instructions.
Also common are devices based on laboratory autotransformers, inverters, etc.
Let's look at one of the options on how to make spot welding.
For these purposes we will need:
- variable resistance element, nominal 100 Ohm;
- a capacitor with a capacity of one thousand microfarads, designed for a voltage of at least 25 V;
- thyristor;
- diodes;
- five amp fuse.
Blueprints
Do-it-yourself contact-type welding can only be done if the drawing is chosen correctly. Here preference should be given to the simplest schemes with the least number of components and parts.
It is worth keeping in mind: DIY welding does not have too much power. However, it is quite sufficient to perform almost all everyday tasks that arise when working in the country, in a workshop or in a garage.
Before you understand the assembly of such a device, you should remember the school physics course, namely the Joule-Lenz law. The essence of the law is as follows: current passing through a conductor creates thermal energy. Its value is proportional to resistance, time and the square of the current.
The conclusion from the above law is as follows: if the current is large, for example, on the order of a thousand amperes, then in the case of poor contact and the use of thin wires, the energy consumption will become too large and will be several thousand times higher than the consumption corresponding to a current of ten amperes.
In this regard, the quality of the assembled electrical circuit is very important.
Required Parts
To assemble a spot welding machine with your own hands, you should make sure that you have certain parts. Such a device, made at home, can have any shape and dimensions. There are two main types of implementation of the unit: in the form of a portable structure or in the form of a large-sized stationary version.
The most practical is tabletop resistance spot welding. It will cope perfectly with the simplest tasks of joining thin sheet metal. It can also be easily transported or simply moved around the workshop.
Processes during spot welding.
So, we will need:
- a transformer that you can make yourself from microwave spare parts; an LATr or a transformer from a TV is also an excellent option;
- cable with a cross-section of ten millimeters;
- copper electrodes;
- timer;
- tips;
- bolts;
- various available materials for making the body, mass, etc.
Spot welding with a spotter is done both using a ready-made diagram and on the basis of drawings developed independently. All necessary parts are purchased in the appropriate stores or taken from “donor equipment”.
When manufacturing this device, it is important to select the right components based on the parameters and characteristics of the transformer.
Only use wires with the correct size for the current flowing through them. When contacts are poorly made, they will experience large energy losses. As a result, the connections will spark and heat up, and the welding process will simply become impossible.
Transformer assembly process
Many people are interested in the question: how to properly weld from a microwave?
So, to assemble a homemade spot welding machine, you need a transformer. This element is the heart of the device and the parameters of the device as a whole will depend on its characteristics. Taking a transformer for spot welding, as noted above, follows from the microwave.
Any microwave oven is equipped with a magnetron, which provides the necessary electromagnetic radiation necessary for heating food. This node requires a fairly high voltage.
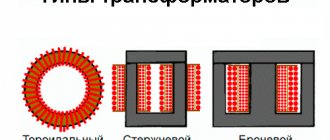
The microwave transformer connected to the magnetron is a step-up transformer. Its primary winding has fewer turns than its secondary winding. Thanks to this, a voltage of up to two kilovolts is formed on it. Due to the doubler, this value is then multiplied by 2 times.
It is necessary to carefully and carefully remove the transformer from the microwave oven. The microwave should be disassembled by removing the base and removing the fasteners. In the case of making spot welding from a transformer, only two of its components will be needed from the furnace.
Structural elements of a welded joint.
The first is the primary winding, the mains voltage is supplied to it, the second is the magnetic circuit. It needs to be improved so that it can provide the necessary parameters of the transformer.
The secondary winding is not needed, so it is dismantled using a hammer, chisel or chisel. The main thing is not to damage the primary winding. If during dismantling you find shunts designed to limit the current, they should be removed.
In a microwave oven, two options for implementing a magnetic core are possible: adhesive and welded. In the first case, it is best to remove the winding using a hacksaw or chisel. But in the second case it needs to be drilled out. Such operations should be performed with the utmost care to avoid damaging the magnetic circuit.
After the transformer is removed from the microwave, you need to wind the secondary winding. For these purposes, a wire with a diameter of at least one centimeter is perfect. If the farm does not have one, it will have to be purchased.
It is not necessary to buy a solid single-core wire; you can get by with a bundle of several individual wires with a total diameter corresponding to the required one. Once the secondary winding is complete, the resulting upgraded transformer will provide up to a thousand amps of current.
This value is quite enough for a do-it-yourself device to allow you to easily connect small parts, repair body work, and much more.
If it is necessary to manufacture a more powerful device, the parameters of one transformer may not be enough. In this case, you can use two such elements.
In this type of welding, it is necessary to obtain 2 V at the output, which will provide a current of more than eight hundred amperes. This result can be achieved by winding two or three turns on the core of the secondary winding.
Forming the required number of turns can cause certain difficulties if the insulation on the wire is too thick. This problem can be solved quite simply: the insulation is removed from the wire and another one is made instead using fabric insulating tape.
The shortest length of wire used in the secondary winding is important. This is necessary to minimize electrical resistance.
If it is necessary to weld metal workpieces with a thickness of more than five millimeters, you will need a device with high power. In the manufacture of such a device, two transformers should be used, connected into one electrical circuit.
In this matter, it is important to follow all the rules of such a connection. An error in connection and incorrect assembly will lead not only to the inoperability of the device, but also to a short circuit.
After connecting the terminals of the same name, the current generated by the windings is measured. Typically, such devices are capable of providing a current of two thousand amperes. If this value is exceeded, then malfunctions may occur in the electrical circuit not only of your home, but also of your neighbors.
So, what results can be achieved if two transformers of equal power and parameters are connected to each other?
Let's say there are two identical devices with a power of half a kilowatt, the input voltage corresponds to the network value and is 220 V, and at the output the transformer produces two volts and provides a current of 250 amperes.
Scheme of capacitor spot welding.
If two such devices are connected in series with each other, then they can provide a rated current of five hundred amperes. However, during its formation, significant losses will occur due to the significant electrical resistance of the circuit.
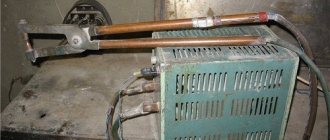
Homemade pliers for resistance welding are subsequently connected to both ends of the winding.
If there are 2 transformers with sufficiently high power, but their output voltage is still not enough, then their secondary windings are connected in series to each other.
In this case, the essential point is the number of turns wound on both windings. This method turns out to be especially useful when it is simply impossible to rewind the turns due to the insufficient size of the magnetic circuit.
When making such a connection, it is important to carefully monitor the coordinated direction of the turns on the windings connected to each other. Otherwise, the output voltage from the two windings will be in opposite phases. After summation it will be equal to zero.
If the transformer terminals are not marked, then you should determine which of them are of the same name and connect them to each other. This problem is solved as follows: the secondary and primary windings of the transformers are connected in series, voltage is applied to the input, and a voltmeter is connected to the output.
Depending on how the devices are connected, the voltmeter will either show some number or nothing. The first case is realized when there are different terminals in the connection circuit.
This connection is incorrect. In such a case, the following processes will occur in the windings: the voltage arriving at the input of the device will decrease by half on each of the primary windings, since they have the same transformation ratio.
As a result, a voltmeter installed at the output will show twice the input voltage.
In the second case, when the voltmeter shows 0, the following situation occurs: the voltages coming out of the windings of each transformer connected to the circuit are equal in magnitude. However, the signs of the stresses will be different, which means they compensate each other.
Electrodes
Welding spotter is equipped with copper tongs. They will subsequently be used in connecting metal workpieces to each other.
Electrodes for spot welding can have several design options. They are installed directly into the body of the device itself, or a remote device in the form of scissors is implemented.
A simpler option in the case of self-manufacturing of a resistance welding machine is electrodes built into the body. The disadvantage of the design is the insignificant clamping pressure corresponding to the force of the welder if the distance from the device to the end of the pliers is not increased.
Remote electrodes are easier to use. They can be used even at some distance from the spot welding device. The pressure generated by this design depends on the length of the lever between the movable joint and the ends of the pliers.
It is very important to insulate the moving connection well. Textolite bushings and washers are used for these purposes.
The issue related to the length of the lever should be thought through in advance, even at the stage of manufacturing the pliers. Welding machines, as noted above, require significant compressive forces to be applied to metal workpieces during welding.
Spot welding machine design.
Another important point is the length of the handles. It determines the maximum distance from the edge of the parts being welded to the joint.
Typically, the most common material from which electrodes are made is copper, but beryllium bronze can also be used. Soldering iron tips are perfect for a simple and ready-made option. The important thing is the diameter of the clamps, which is no less than the diameter of the wires connected to them.
At the same time, the tips of the electrodes are made small, almost sharp. This will allow you to obtain kernels of sufficiently high quality.
It is also worth not forgetting about degradation processes. Over time, the electrodes can wear out. In this case, they will sometimes have to be sharpened. Nevertheless, sooner or later the electrodes will have to be replaced.
If you use copper rods as the electrode material, then replacing them will not cause any particular difficulties. On the other hand, a better welding result is achieved when using tips from professional soldering irons, but their price is higher than that of simple rods.
Which design option to choose is up to everyone to decide for themselves. It all depends on what tasks are to be solved with the help of this device, as well as on the financial capabilities of the person.
Do not forget that in wires, in any case, there will be losses of electricity due to heating, because any conductor has resistance.
The principle of operation of the welding device was already mentioned above and the Joule-Lenz law was discussed. It is also applicable in the case of simple conductors, since their resistance is not zero. This means that when current flows through the copper wires, heating will occur.
From the above it follows: the length of the wires connecting the electrodes and the device must be minimal. Only in this case will it be possible to realize the full potential of the unit.
Control
To make a welding machine an easy-to-use device, you need to take care of the controls. Its implementation is not too difficult. For these purposes, you will need only two main elements: a lever and a switch.
As you can see, the control circuit in ordinary homemade spot welding does not require the presence of any complex parts or their purchase. After all, with a high degree of probability, they are already in the household of almost any master.
The role of the lever is to ensure reliable contact between the parts being welded. It is possible to increase the compressive force of this unit through the use of screw elements. Of course, this part must be highly reliable, otherwise homemade spot welding will not last long.
In large and critical industries, the compression force between two connected parts reaches thousands of kilograms. Spot welding at home, intended for occasional work, does not require industrial loads.
Usually in everyday life a pressure of thirty kilograms is sufficient. The welder can provide it independently, but increasing the length of the lever will significantly simplify this task.
Drawing of spot welding of metal products.
More specifically, a handle length of 60 centimeters is quite enough. Such a lever is capable of increasing the force applied to its shoulder by approximately ten times. As a result, to achieve a force of 30 kilograms, it is enough to press on the shoulder with a force equivalent to 3 kg.
The resistance welding spotter switch is connected directly to the transformer. The connection must be made to the primary winding, where the current strength is negligible.
If you connect it to the secondary winding, it will not only increase losses by creating additional resistance, but will also be tightly welded to the leads of the welding transformer.
The design with the switch located directly on the handle of the lever is very convenient. This option allows you to leave one hand free, which will simplify the task of supporting the parts being welded.
It is also worth considering the heating to which a homemade spotter made from a welding transformer is exposed. In this regard, it is necessary to provide a cooling system. A simple fan is suitable for its implementation.
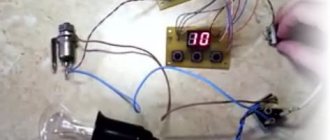
In addition, short breaks should be taken so that the resistance welding machine does not overheat. You should monitor the duration of welding of products visually, or use a controller for this purpose.
In case of short-term operations, such as welding wire, there is no need to worry about heating. But in longer processes, this point is extremely important and should not be forgotten.
Control circuit
To control the welding process, short pulses are used, generated in a special electronic circuit. When manufacturing a spotter based on an old unit, it is also necessary to provide a control unit that allows switching a significant output current.
To solve this problem, manually generated pulses are applied to the primary winding of the CT (the simplest control circuit is shown in the figure below).
Simple switching diagram
The disadvantages of such management include:
- Using the button shown in the figure, the mains voltage is switched, which is extremely dangerous;
- When mechanical contacts open, strong sparking occurs;
- Even if you replace the mains switch with a traction relay from the starter, controlled by a push-button mechanism, then such a circuit, despite the improvement, will still be unfinished.
Note! To implement the traction principle, it is allowed to use a combination of “powerful starter plus automotive relay” (and the latter can be of any brand).
When this combination is selected, the relay is activated when a voltage of 12 Volts is applied, and its switching causes the power contactor to operate. However, this control option is not without drawbacks, since in this case it is not possible to precisely control the impact interval (pulse width).
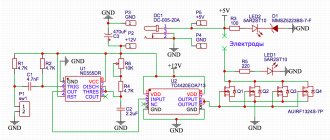
For those who know the basics of electronics and know how to handle a soldering iron, a more complex in design, but reliable in operation, electronic control circuit will be suitable (see photo below).
Thyristor control circuit
Here, operating pulses are supplied to the input winding of the CT from an electronic device - a thyristor, which opens when voltage is applied to its control electrode. The capacitor (C1) included in its circuit, with the button contact open, is charged through the elements V1-V4 of the diode bridge. When the button is pressed, the capacitance is discharged through resistor R1 and directly through the thyristor control electrode circuit, which causes it to turn on.
The electronic device will remain on until the capacitor is completely discharged (this interval can be adjusted with variable resistor R1). For the subsequent start operation, the button must first be released and then pressed again (its shutter speed determines the welding interval).
Transformer T1 can be of any type (with a voltage on the secondary winding of 12 Volts). The parameters of the thyristor must satisfy the operating conditions, that is, allow it to operate at voltages up to 400 Volts and currents of at least 50 Amperes. An electronic product of the T132-50 brand is quite suitable for these purposes.
In the final part of the review, we would like to remind you that welding equipment of the “spotter” type is most often in demand for body repair and similar work with sheet metal. In this regard, when choosing the output power of a home-made unit, it is necessary to take into account the thickness of the sheet material with which you will mainly be working.
Homemade welding device
The resistance welding machine is an indispensable device. Such units should be in the “arms” of every master. In the garage, at the dacha, in the workshop and even at home, there is always a use for such units.
The resistance welding machine is quite expensive, so its production looks very attractive. Firstly, you can be proud and show off this device in the future. Secondly, homemade manual resistance welding is much cheaper.
It is also important that it is quite possible to assemble such a device yourself from scrap materials, which will further reduce the cost of the unit. In addition, the assembly is not very difficult and almost anyone can handle it. In this matter, it is important to strictly follow the instructions.
Schematic diagram of a spot welding machine.
It is worth noting the following: the manufacturing task is greatly simplified if you make a spotter from a welding machine that has stopped standing. In this case, there will be almost all the necessary details. As a result, assembling a new unit will not cause any difficulties.
Another common method is to create a device based on a microwave oven. In this case, the main thing is to correctly connect the transformers, especially if there are several of them.
It is enough to understand the basic diagram of resistance welding, as well as understand the principles of its operation, in order to be able to manufacture a device not only according to ready-made drawings, but also according to your own. In the latter case, it becomes possible to create equipment that fully satisfies all the requirements of the master.
With the right approach, you can make welding better than models sold in stores. This is due to the fact that your own product will take into account many parameters that are important to the master. We are talking about the design of the pliers, the size of the body, as well as the power and weight of the device.
At home, resistance welding is used for welding cars, metal sheets, wires, small household appliances and much more.
Specifications
The reverse hammer for body repair, made from an inverter, has a number of features. Technical characteristics of different models may differ, but their functions and purposes are similar.
Both homemade and factory-made devices, which have industrial purposes, have their own important functions:
attaching washers to the surface using a spotter;- welding occurs spotwise using an electrode, which stretches the surface of the car;
- the ability to warm up parts, align them and cool them;
- the simple design of the device makes it easy to use;
- two operating modes - one short-term with time regulation, and the second constant;
- the presence of an automatic temperature control system, which consists of turning off the device and cooling the part at high temperatures, as well as turning on welding if necessary.
Key part of the spotter
The welding gun is the main part of the device. For continuous operation, a factory-made device is used. You can make it using a construction glue gun with your own hands. An alternative method would be to use semi-automatic welding parts. Identical parts with lengths from 12 to 14 mm are cut out of textolite. There should be 2 of them. A bracket is installed in them, used as a fastening of the electrode for welding. If desired, you can mount a light bulb for illumination, as well as an impulse switch.
The bracket can be made of copper. It can have a cross-section - rectangular or square. A copper rod with a thickness of 8 to 10 mm is used as an electrode for welding. The gun must be designed in such a way that the electrode can be changed without disassembly. To connect the gun to the device, use a combination of a welding cable with the required cross-sectional area and a 5-core control cable. The latter is connected in accordance with the diagram.
Three wires are connected to the switch. Two more are moved to the backlight bulb and the engine. The welding cable must be stripped and soldered into a special hole in the bracket.
Advantages and disadvantages
Inverter welding machines have pros and cons. Among the main advantages:
- Efficiency The efficiency level of the inverter device is up to 95%. There are no inductive losses because the circuit mechanism contains a high-frequency switching converter. It turns off automatically during breaks.
- Does not respond to voltage changes in the network. The above-mentioned high-frequency converter successfully adapts to almost any input voltage.
- There is a manual adjustment of the welding machine. The welder himself can easily set up the machine, regardless of the level of professionalism and welding skills. To do this, the inverter has a manual adjustment indicating the size of the electrode.
- The ability to use any, including carbon electrodes, both alternating and direct current.
- Light weight, mobility of the device and comfort of use even at home.
- The easy ignition function allows the welder to start working quickly and without unnecessary problems.
- Even a beginner can handle welding. It’s easy to learn how to use such a console in a couple of lessons. Of course, at first the electrode will stick to the metal surface; you just need experience.
But there are several disadvantages to this welding:
- Price. Such devices are expensive, but this is a very reasonable price for a high-quality and necessary tool.
- Requires care. The inverter should not be contaminated even by dust. Also, moisture should not get into the console and it should be kept away from the cold. When the air temperature is below -15°C, it is not recommended to connect the inverter.
If you follow the instructions and all the rules of care, the inverter will serve for a long time and will become a reliable assistant in the household of a welder of any level. You can watch detailed instructions on the basics of using inverter welding on video.