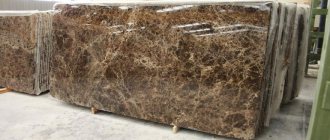
Natural stone - marble, granite, slate, etc., in finishing and construction work, probably has no equal in aesthetics and practicality. Same as for the cost. Only very wealthy people can afford to purchase such materials for decorating their home or apartment. This is probably why a good alternative has appeared - artificial materials, which in appearance and characteristics are in no way inferior to the originals. The production of artificial marble today can be considered one of the most profitable areas in the production of building finishing materials.
Brief analysis of the business: Costs of organizing a business: 40-43 thousand rubles Relevant for cities with a population: from 100 thousand people Situation in the industry: low competition Difficulty of organizing a business: 2/5 Payback: from 2 months
Despite the protracted economic crisis in the country, the demand for building materials is not falling. A wide range of artificial stone choices allows it to be used in a variety of areas of construction, and its natural appearance, reliability, strength, and, of course, price make it one of the most popular building materials. Moreover, it should be noted that the technical properties of artificial marble are the same as those of natural stone, and in strength and resistance to wear it even surpasses the “original”.
Where exactly is artificial marble used? First of all, it is a material for finishing office and administrative premises. It is also used to make massive window sills, countertops, bar counters, bathtubs, and used for finishing staircase steps.
Application of artificial marble
The uniqueness of marble lies in its variety of uses. The material has long been used for finishing interiors and facades of premises. Such pleasure is expensive. Therefore, not every owner of an apartment or private house can afford marble products.
The price of natural material is determined by the location of the raw materials in hard-to-reach places and the need to deliver special equipment to mountainous areas. Marble is quarried meticulously. The cost of delivery and processing of raw materials also increases.
Concrete is simpler in this regard. Making marble concrete yourself will require patience and a set of home tools. With their help, they create durable elements that decorate the walls of the kitchen, bathroom, hallway and the outside of the house. And the proper use of paints will allow you to maintain a given color scheme.
The chemical properties of the artificial composition make it resistant to physical impact. The concrete mixture is not afraid of sudden temperature changes, does not ignite and does not crumble. Thanks to these qualities, the composition is often used in the decoration of fireplaces and stoves.
Marble concrete paving slabs are becoming more popular every day. The result is a stone similar to a natural specimen that lasts for decades.
Composition and manufacturing features
Natural marble has a heterogeneous color, there are veins, and a granular structure throughout the entire thickness. These characteristics are observed when making an artificial sample. Please note that the natural equivalent is painted in different colors:
- Pink;
- Blue;
- Grey;
- Black;
- Red;
- Green;
- Violet.
To produce artificial marble from concrete, a simple mixture of cement and sand is often used. The shapes are selected from elastic compounds - polyurethane, plastic. After drying, the product becomes strong and resistant to mechanical stress.
Homemade marble should not be thin, since the stone will be too fragile and may burst during installation. But you shouldn’t make it thick either. Concrete is not a light material, and the tiles may be too heavy.
If you choose high-quality materials and follow the basic rules for creating consistency and proportions, the result will be a fairly reliable stone. For example, to save money in arranging a kitchen, you can make a durable countertop from marble concrete. One note - the body of the furniture must be strong enough to support the stove.
Do-it-yourself tabletop made of cast acrylic
Many people think that a solid tabletop without seams is the best possible option. Easier to maintain, no leaks. This is true, but the material itself (acrylic) is not easy to use everywhere. Acrylic itself is an excellent material. For a bathroom, an artificial stone countertop is a good choice. There are very few opportunities to scratch the surface and there are no high temperatures. And moisture, steam, soap and other detergents are not afraid of plastic. If you decide to master the technology of casting an acrylic countertop, you can try making it for the bathroom.
A non-specialist cannot distinguish one type of artificial stone from another by appearance
Preparation
To pour acrylic, make a mold. For its manufacture, laminated chipboard or MDF is used. If the surface of the countertop must be smooth, the formwork material must also be smooth. If texture is needed, it should be on the form. After removal from the mold, the acrylic stone will repeat all the grooves and tubercles. Therefore, we are meticulous in selecting material for the mold.
We frame the cut-out workpiece with sides, close the holes for the hob and sink with technological plugs
The sides are made from the same material. The edges of the planks are sanded first with a coarser cloth, then with an increasingly finer sanding disc. Increasingly decreasing grain sizes are used. Remember that all defects will then be cast in acrylic. And they are very noticeable if the stone chosen is plain, without inclusions. The seams are sealed and leveled. The structure is thoroughly cleaned, dried, and then covered with wax from the inside.
Making a countertop
Fillers are added to acrylic - stone or marble chips, pigment, decorative components. Everything gets mixed up. Lastly, the hardener is poured. Acrylic is poured in several layers, so the hardener is added only to part of the composition.
The composition is distributed over the plane
An acrylic composition is poured into the finished formwork. Distribute it evenly over all areas. It should spread over all elements of the form. In this case, bubbles must not be allowed to appear - the air must be removed. After the composition has been distributed, a sheet of chipboard is placed on top, which is also lubricated with wax. A load is placed on the chipboard. It must be selected carefully so that the composition does not squeeze out on the sides. The load is left for half an hour. Then they remove it and lift up the chipboard. A second portion of plastic is poured into the mold and left for a day. During this time, the acrylic will harden. You can remove the formwork.
Installation on frame and polishing
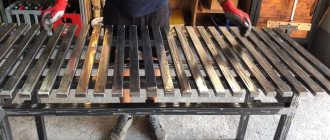
After the plastic slab has been removed from the formwork, it is attached to the frame. Acrylic is an elastic material. Even with a thickness of 20-30 mm, it bends. To ensure stability of shape, the frame is assembled. It is made of wood (timber 50 mm thick or more) or moisture-resistant plywood (thickness 27 mm). The frame consists of slats along the front and rear posts, transverse jumpers installed in increments of 40-50 cm. The slats are also placed in places where they rest on the furniture frame. More reinforcements are needed in areas of greatest load. This is where the hob or sink will be installed.
A solid worktop for a kitchen or bathroom is also fixed to the frame
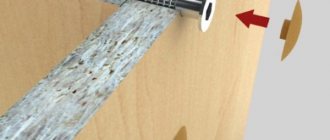
The frame is made with an acrylic thickness of more than 10 mm. A thinner layer requires a solid base. That is, you need to cut out a repeat of your tabletop from the same plywood and glue these two sheets together. The thickness of the plywood is 27 mm or so. You can glue two thinner sheets. It turns out cheaper. For normal gluing, the sheets are fixed with clamps.
The final finishing is sanding. First, with discs with fine grains - from 320 and above, and finally - with a polishing attachment. This stage is important for appearance. Most of the flaws can be removed. But it can also cause harm.
Tools and materials
Marble is made from concrete quite quickly. You can create many different shades. It all depends on the design of the room in which the finishing work will be carried out. The process will not take much time and money. All you need:
- Water;
- Cement (grade M400-M500);
- Plasticizer S-3;
- Sand;
- Polyurethane mold;
- Film;
- Fine gravel (aggregate);
- Drill;
- Standard mixer attachment.
When choosing components, pay attention to their quality. For example, cement and plasticizer are purchased only from trusted sellers whose product quality is not suspicious. Marble chips are often used to fill the mortar. You should also not skimp on the quality of the form.
The procedure for making the mold
In order to start working on making a mold, you need to determine:
- will the matrix be used once or will it be used multiple times. If it is necessary to use the matrix several times, its design must be made collapsible;
- the necessary strength that can be achieved when preparing the mixture;
- view of the front surface. It can be smooth or grooved. Often, the grooved look is suitable for making wall tiles.
A variety of materials can be used to make the matrix; there are no restrictions. The main requirement is the strength of the matrix and ease of working with it. Most often it is created on the basis of gypsum, polyurethane, plastic, and wood. In the event that the matrix is quite large, and the final product must be smaller in size, the mold can be divided into half-molds. Thus, samples of the same type will be produced, and the work will represent mass production.
How to prepare a matrix
To prepare the matrix for sample production, it is necessary to lubricate the internal surface with a lubricant, thus preventing the mixture from sticking to the walls of the matrix. If the resulting marble is planned to be processed in the future, a thin polyethylene film can also be used as a separator. The surface of the sample is lubricated with gel, which gives it the necessary shine.
Preparing the batch
The basic rule used when preparing a batch is to obtain a homogeneous mass. This result can only be achieved by thoroughly mixing all components. To facilitate manual labor, you can use electrical appliances such as a construction mixer or drill.
Pouring the mixture
When the solution is poured into the matrix, it is necessary to remove air from it, which appears in the form of bubbles. It is easier to do this by piercing the solution along the entire perimeter of the matrix. Those who are not producing cast marble for the first time may have already purchased a vibrating table, the operation of which allows you to rid the mixture of air layers.
The rate of hardening of marble depends on the air temperature, the thickness of the load and the components of the mixture. Minimum time 30 minutes, maximum 12 hours. At this stage, it should be remembered that the mass should not be completely poured into the matrix at one time; filling the matrix is carried out in several stages and is accompanied by constant stirring. When the entire mass is loaded, the matrix is covered with a film on top, which prevents cracks from appearing on the sample and prevents moisture from evaporating.
Post-processing
Removal of the sample from the matrix is accompanied by a decision on the need for additional mechanical processing and final polishing.
Step-by-step instruction
The whole process is divided into several main stages. Initially, it is necessary to prepare all the tools and components of the concrete mixture. Select a clean container for mixing.
Experts advise using a standard solution whose proportions are 1:3. Mixing begins with dry ingredients using a construction mixer. Fine sifted sand is added to the cement.
After mixing sand and cement, filler is added to the dry solution. Such a base can be either pebbles or ordinary crushed stone. Also, in the production of marble from concrete with your own hands, pumice, ceramic chips, and fine expanded clay are often used. All these ingredients will help create a dense structure of the product.
Color
The technology of factory and self-production of artificial stone involves adding a coloring pigment to concrete. The basic rule is that after adding paint, the composition should be lightly mixed for several minutes. You should not thoroughly mix the pigment in the solution, as this will not make it look like real marble. Natural stone has a heterogeneous structure and color - this is what the master achieves.
Often two or three colors of coloring pigment are used at once. This will create an interesting, natural pattern. It is considered ideal if the following appear in a multi-colored consistency:
- spots;
- Divorces;
- Dots;
- Bends;
- Convolutions.
But don't add too much paint. The amount of pigments is 1% of the dry composition.
After adding colors, the solution is shaken. A vibrating table performs this process better. But if the task is to make one piece, then it will be enough to simply shake the container with your hands.
Water
Next, the technology for making marble at home includes the process of adding water. Ratio – 1:2. The first stage is adding no more than 80% water. The solution must then be thoroughly mixed. The second stage is the addition of a plasticizer, which helps the product acquire the necessary consistency and strength. The component is also added at the rate of 1% by weight of the entire composition.
The third stage - after a few minutes of rest, the remaining water must be added to the concrete.
Form
After mixing, the finished solution is poured into molds, which are thoroughly cleaned beforehand. The mold is covered with film over the composition. The structure is left in this state until it hardens. You can also add a metal mesh to the solution of the future slab. It reinforces the stone and will not allow it to crumble.
Next, the finished tiles are removed from the elastic molds and carefully polished. It is better to use specialized equipment with diamond discs. But you can limit yourself to improvised means. Sanding makes the walls of concrete panels smooth. Make sure the surface is even so that further installation of stones does not create unnecessary problems.
The listed processes that can be performed at home are part of the “systrom” technology. Under the same name, marble concrete is produced by a popular research and production company. Therefore, following the steps will allow each owner to create durable products at home.
Which technology is easier to master on your own?
If we talk about making it ourselves, the easiest way is to make a tabletop from cast acrylic. True, if you use ready-made mixtures, the price will be almost the same as when ordering from a company. The next most complex process for making countertops is from agglomerate. Since there is only a small amount of binder, achieving a smooth front surface is not so easy. If you don’t mind long grinding to get a normal result, you can try to master this technology. A countertop made of artificial stone based on agglomerate is the best choice in terms of durability and appearance.
DIY artificial stone countertop
The latest “lightest” countertop manufacturing technology is made from sheet stone. A lot of precise cutting, gluing parts and sanding. You need professional tools - a circular saw with guides, a jigsaw, a disc grinder with a set of polishing discs. A lot of clamps are also required to attract and fix the glued fragments.