Country real estate, country cottages, as well as the first and last floors of high-rise buildings need reliable protection more than others. Attackers enter such buildings mainly through a window opening. A great way to protect your property is with window bars. But sometimes, manufacturing and installation make up most of the cost of the structure itself. Therefore, if you wish and have a little experience working with metal, it is possible to create window grilles with your own hands.
Purpose of the gratings
Modern window bars serve not only as reliable security. Thanks to the variety of execution techniques, they can look like real art objects. Therefore, you can also make window bars with your own hands for the sake of external presentability. For example, at the dacha, in a metal gazebo.
The following variants of such designs are distinguished:
- decorative - the main difference is the small thickness of the reinforcement;
- decorative and protective - these are mainly expensive forged products that decorate country mansions;
- protective - mainly welded structures, where the thickness of the rod is at least 2 cm.
Of course, most grilles are made for protection, and this should be taken into account when choosing a material. The thicker the reinforcement used for manufacturing, the more reliable and rigid the structure will be.
Reinforcement thickness and cell size
In order to be completely sure of the high degree of protection of your home, it is better to buy products whose profile thickness is no less than 14 mm. It will take a lot of time to bend or saw a profile of such thickness.
This is the main purpose of a good security grille. When choosing a product, consider the possibility of penetration into the room through its cells. So that even the smallest window thief cannot crawl through the bars, the distance between them should not exceed 15x15 cm.
Grating classification
Once you have definitely decided whether the bars on the windows are needed solely as decoration, or whether their main function is protection, you should decide on the manufacturing option. There are 4 groups here :
- welded - more often used and more convenient for self-production;
- forged - they allow you to choose a special design for window grilles, they are distinguished by high decorative properties, but will also cost more;
- forged-welded - combining the ease of manufacturing of a welded structure with forged decorative elements allows you to obtain intricate bends at an affordable cost;
- cast - manufactured exclusively in the production workshop, have a lot of weight and cost.
Having even a little experience in welding, you can make window bars yourself. The main thing is to immediately decide on the design feature of the product.
Depending on the design of the window grilles, there are:
- monolithic - they are a solid product that is firmly attached to the wall;
- swing doors are the most fireproof option, which involves opening one door or both at once. They can be attached directly to the window unit;
- retractable - the hinge mechanism is difficult to manufacture at home, while the grilles themselves are attached mainly from inside the room;
- folding - fastenings to the wall can be unscrewed if necessary, but attackers can also quickly remove them.
Another classification is installation option. The following types of fastenings :
- internal - either inside the room itself with fixation in the window opening, or between two windows;
- external - fastenings are mounted directly into the wall. This option is more reliable.
What kind of bars should there be on windows in a wooden house?
The use of massive, high-class protection bars for windows in a permanent residence is impractical and leads to unnecessary expenses. In this case, you can get by with inexpensive models that serve a more decorative function.
In case of long-term absence of the owner of the house, it is better to equip the windows with reliable models. Inexpensive options include stationary types. They are suitable for country houses that lack expensive exterior decoration. Otherwise, take care of purchasing other options - for example, forged products.
Swing lattice on a wooden house
What are the advantages of using expensive models:
- Reliable burglary protection.
- External attractiveness.
- Possibility of combination with the overall design of a country house.
The main disadvantage is the expensive price, which not everyone can afford. The use of expensive structures for nondescript houses is inappropriate.
Advantages of using inexpensive metal gratings:
- Easy to install.
- Possibility of self-production.
- Sufficient level of protection against penetration into the house.
The unattractive appearance discourages any desire to install such structures at home, but if the main goal pursued is protection from intruders, then this option is quite appropriate.
Preparatory work
Preparing tools and materials for the manufacture of gratings is no less important than the production itself. After all, the quality of the finished product depends on correct measurements and accurate execution of the drawing. You need to start by taking measurements by preparing a tape measure.
Taking measurements
The success of the upcoming installation of the structure directly depends on the accuracy of the measurement. It is good if the outer part of the window opening is available for measurement. Depending on the chosen installation method, it is necessary to measure the height and width of the future installation location of the fasteners.
- external fastening . When taking measurements, be sure to mark the locations of future holes with chalk;
- internal fastening . Keep in mind that the grille, which is mounted in the slopes, must fit freely into the window opening. To achieve this, you need to subtract 10 mm from each indicator.
Drawing up a drawing
If you are not planning complex intricacies and intricate patterns in the window bars, then you can neglect the scale. A simple sketch with dimensions will be enough. Otherwise, the drawing of the window grille should be made in accordance with all the rules for its design. A squared notebook is perfect for this. It is important to note that the more accurate the drawing, the easier it is to subsequently calculate the amount of material.
Also, despite the artistic part of the work, one should not neglect the “physics” of the design. It must have stiffening ribs , which will ensure its strength. This function can be taken over by spacers. When the sketch has been double-checked and all dimensions are marked on it, you can begin selecting rolled metal. And if the size of the windows in all rooms is the same, then the amount of material can simply be multiplied by the number of windows in the building.
Overlap welding
This technology is most often used for reinforced frame elements that are not subject to increased loads. This means that such welding of reinforcement for the foundation is not suitable. The same applies to structures experiencing heavy bending loads. This type of connection is considered the most unreliable and least durable.
The principle of such joining of metal rods is to connect the rods in the longitudinal plane, with their ends offset by up to 30 cm from each other. The more overlap is made, the greater strength the welded structure will have.
Overlapping reinforcement welding is performed on both sides of the joint, which can cause inconvenience if one of the welds is on top and the other on bottom. In this case, it can be very difficult to reach the bottom seam.
Healthy! In order for the rods to fit together better, their ends must be cleaned with an iron brush and treated with abrasive tools so that the mating surfaces are flat.
Reinforcement frames must be welded in a certain mode, which will depend on the cross-section of the metal rods. Let's say you use products with a diameter of 5-8 mm. In this case, it is necessary to use electrodes with a cross section of 3 mm for welding. For 8-10 mm rods, you will need a 4 mm consumable. If the diameter of the rods is more than 10 mm, then electrodes with a diameter of 5 mm should be used.
Healthy! You can use any electrodes for overlap welding of reinforcement, but most often builders use ANO and MR consumables.
It is also necessary to take into account the current strength that will be required for rods of different diameters:
- for rods with a diameter of 5 mm, 200 A will be required;
- 6 mm – no more than 250 A;
- 8 mm – 300 A;
- 10 mm – 350 A;
- 20 mm – 450 A.
Selection of material
When making window grilles with your own hands from reinforcement, you should take into account the variety of sizes of this material. The most popular types of rentals for this are:
- square with a section of 10x10 and 12x12;
- round timber smooth or corrugated with a diameter of 10 and 12 mm;
- strips of metal of different widths with a thickness of 3-4 mm.
The following is often selected for the frame:
- corner 40x40 mm;
- the profile is square (25x25, 30x30) or rectangular (15x25, 20x30).
Depending on whether the grilles are intended to be opened, you need to take into account the hinges, locking mechanism (for hinged ones), rivets and wheels (for retractable structures).
Types of window grilles
Metal gratings are divided into several types depending on:
p, blockquote 5,0,0,0,0 —>
- manufacturing method;
- mechanism of action;
- appearance.
Let's look at each type in a little more detail.
p, blockquote 6,0,0,0,0 —>
p, blockquote 7,0,1,0,0 —>
Methods for making window railings
p, blockquote 8,0,0,0,0 —>
Differences between window grilles based on their mechanism of action
p, blockquote 9,0,0,0,0 —>
Window decoration
Metal structures for windows come in a wide variety of shapes and varieties. The main criterion on which the choice of the appearance of the structure depends is the material from which it will be made. The following components are most often found in modern solutions:
p, blockquote 10,0,0,0,0 —>
- square;
- rod;
- stripes.
Rod and square are the most preferred because both materials are reliable and have high strength. It is through their use that the most diverse elements for decoration are obtained. For the manufacture of window grilles, a rod with a cross-section of 0.6-1.6 cm is used. For a square, this figure fluctuates within 1-2 cm. The strip, as a material, is much inferior to the others in terms of strength, and it cannot be used to achieve any special decorative effect. . But this is an excellent budget option for those who want to protect their home from theft, but do not yet have the funds to install an alarm system.
p, blockquote 11,0,0,0,0 —>
p, blockquote 12,0,0,0,0 —>
The use of one material or another determines the shape and design of the gratings. Flat structures are cheaper, most often made of a square or rod and are a two-dimensional product (located in 2 planes). Convex (or French) products look very elegant and unusual. In addition, they provide simple and convenient access to the window, making it easy to clean or paint. Convex grilles will cost an order of magnitude more than flat ones, and if you decide to get one, carefully study all the offers for reviews. Making such products requires skill and skill, so use the services of only trusted craftsmen and experienced designers.
p, blockquote 13,0,0,0,0 —>
In general, when you choose window bars, you need to pay attention to the following criteria:
p, blockquote 14,0,0,0,0 —>
- thickness of alloys and their strength;
- the quality of the fittings and materials from which they are made;
- professionalism of the craftsmen;
- price.
Attention! If you choose all the components wisely and think through the details, window grilles will not only provide you with protection from unwanted guests, but also an exclusive decoration of your home.
p, blockquote 16,0,0,0,0 —>
Tools required for work
After creating the drawing and preparing the material, you should take care of the tool. To make grilles for metal windows with your own hands, you will need a set of devices that will be easy to get for those who have ever done repairs:
- grinder - a tool that easily cuts a metal profile;
- welding machine - the simplest model will cost several thousand rubles, but it is better to try to rent a device or borrow it from friends;
- a hammer drill, which will require metal drills and a concrete drill;
- chalk, tape measure, square, hammer, brush with stiff bristles, a piece of foam rubber and brushes of different sizes;
- an anvil, forge and blacksmith tongs - if you have started a complex forged structure;
- a special machine - for bending patterns and flowers from metal rods.
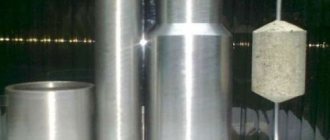
You can create some tools yourself. For example, a pipe with a diameter of 100 mm poured into concrete will serve as an excellent alternative to a machine for bending rolled metal. To do this, you will need to weld a hollow tube and a hook to it. But for more complex bends you will need a wrench with a welded tube in the center, into which you can thread a rod or metal profile.
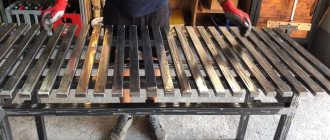
Step-by-step production
How to make window bars with your own hands without having the experience to do so? You just need to be patient and have the necessary equipment, and then gradually follow the considered manufacturing algorithm. Any design can be depicted on paper, but the more parts it contains, the more complex the production. Therefore, for the first time, it is recommended to choose a simpler option, for example, a frameless grille.
Solid grille, without metal frame
Such simple hand-made window grilles consist of only a few horizontal and vertical rods. For work you will need: a metal strip 40x4 mm, smooth round timber 14 mm, threaded rods 10x12 mm. The length of the rods depends on the size of the specific window opening.
After the preparatory work on choosing the material, you can begin assembly. To do this, the future window grille made of reinforcement must be sawn into marked parts.
- Cutting rolled products . In cut metal strips, it is necessary to bend the edges at an angle of 90°. A sturdy table with a metal top and a vice are suitable for this purpose. The edge of the fixed rolled product is bent with a gas wrench. This action is repeated on each side. The main thing is to ensure that all bends are performed equally.
- Drilling holes . Fix the metal strip in a vice, measure the holes for future vertical pins and drill them with a hammer drill with a metal attachment. The holes are made strictly according to the drawing and are several millimeters larger than the required diameter. You should not do this “by eye”.
- Assembly . To assemble the entire product, you need to insert pins into the drilled structure. Find a spacious room for this work.
- Welding . After final assembly, all that remains is to scald the structure. The weld should be made continuous to protect the future product from corrosion.
- Threaded studs are welded onto the bent parts . Their length is determined by the thickness of the window opening with an addition of 30 mm. This is done to secure the studs with nuts from the inside.
- Cleaning and painting the entire structure with the chosen enamel or paint. It is more convenient to use Hammerite brand products or 3-in-1 primer-enamel, since you do not need to remove rust to apply them. Otherwise, thoroughly scrub away weld slag and rust.
- install the grille on the window yourself quite simply. Drill through holes in the opening and insert pins into the resulting holes. Tighten the nuts on the reverse side. You can grab them from above by welding.
Blind grille in a metal frame
Which window bars are better? Everyone decides, of course, for themselves. But the option with fixation in the frame is deservedly considered the most reliable. After the preparatory stage, you should immediately move on to making a metal frame.
- Cut the rods to the required length with the ends cut at 45°. A protractor or a special corner will help to properly design the corners.
- Welding the frame . Carefully connect the individual elements together, checking the resulting angle. Or simply connect straight profiles with corners.
- Filling the structure . Only imagination can tell you exactly how to weld the internal rods. You can add decorative bent elements. The main thing is not to forget to provide stiffening ribs, the role of which can be played by horizontal jumpers. When choosing a grating filling, you can get inspiration by looking on the Internet for photos of do-it-yourself gratings.
- Installation . This stage depends on the choice of fastening method. If the grille will be installed in a window opening, then you should pre-drill holes in the frame, 3 on each side. The same is done in the walls of the opening. All that remains is to connect the holes and hammer in the anchors.
- Paintwork processing . Coating of the structure to increase service life and improve appearance can be done both before and after installation. The main thing for conventional compositions is to carefully prepare the base. But there are paint and varnish compositions that allow no surface preparation.
Hinged grille
Creating an opening model is possible based on the previous version. You just need to provide additional frames for the sashes.
- Welding the frame . After preparing all the elements with a 45° cut, they need to be welded - first with a spot weld (grab), and then with a continuous seam.
- Installation of hinges . The obligatory next step is the installation of hinges on the doors - for opening and closing the structure.
- Filling the frame . Just like for a blind structure, you can use not only straight jumpers, but also forged elements. This decor can be purchased separately, since production will require considerable skill and special devices. Unfortunately, making a DIY window grill without welding is almost impossible. Since connecting structural elements to each other only through forging requires special skills, abilities and special equipment.
- Installation . If outdoor installation is planned, then we must not forget about the reserve - increasing the dimensions by the appropriate length.
- Lock . Swing structures require the installation of a lock. An external padlock is not the best solution. It is better to install it from the inside. This is more convenient for the owner of the premises and less convenient for the attacker.
How to make window bars with your own hands?
If a person has at least some experience in welding, then it will not be problematic for him to weld a window grill himself if he follows a certain sequence of actions.
- Using a grinder, all the details of the window grill are cut out according to pre-prepared drawings. If the design has complex decorative elements, they are bent according to the required pattern. To bend elements with rounded patterns, use a metal pipe of a suitable diameter. If there are decorative mirror elements, this also needs to be taken into account when preparing parts.
- Welding work is also carried out according to prepared drawings. For convenience, all individual parts are assembled like a puzzle on a flat surface made of non-flammable material. First of all, the frame is welded if the structure is swinging or the outer elements in a blind system. During welding, it is important to ensure that the angles are right to avoid distortion.
- If a frameless structure is being built, as in the photo, in the places where the locking mechanism and metal hinges are attached, pieces of iron strips are welded to the outermost side rods.
- In the slopes of the window opening, sections of rods are fixed, which are driven into pre-drilled holes to a depth of 150 mm with a diameter slightly smaller than the pin. It is very important that the fasteners do not end up in the places where the hinges are installed, since the latter may not open and close well. To properly secure a blind grille, 6 embossed rods are enough, in turn, if the structure is swinging, their number is increased by 2 units.
- The metal pins must protrude at least 30 mm above the surface of the window opening. After welding to the grate pins, if necessary, they can be shortened with a grinder.
- The hinges for the opening grille structure are welded in such a way that they have the opposite direction. This is due to the fact that such a design will not be removable.
- All welded elements are cleaned of scale, and opened with a primer, and after it dries, with a metal paint and varnish material.
A high-quality metal window grille with forged elements will become a truly worthy decoration of the façade of a building. You can also show a little imagination when painting such protection by using paint with patina, gilding or other rich shades on the windows. A flowerpot with flowers can be attached to the bottom of the structure; in general, the entire decor is limited by the imagination of the owner of the room.
Paint coating of grilles
In order for the grilles to serve for a long time, they need high-quality painting. There are many modern means for this. Some of them do not even require preliminary surface preparation and cleaning of rust. Although there are quite budget oil paints, their use will require additional application of a primer in color.
Products such as hammer paint for rust Hammerite and primer-enamel 3 in 1 have proven themselves to be excellent. Water-emulsion-based enamels are a cheaper option. Only for their greater reliability is it worth applying a transparent varnish on top. Of course, there are also aerosol cans, but their significant drawback is the excessive consumption of paint. In any case, the choice of color palette is huge; everyone can easily choose their favorite shade.
It is worth applying both enamel and paint with brushes of different widths for better painting . Hard-to-reach places should be blotted with a foam sponge. For example, such elements as fastenings and hinges of swing structures. It is more convenient to do this before installation. But if installation is carried out by welding, it is recommended to apply paint to the installed grille.
Self-installation methods
Installing bars on windows with your own hands can be done in different ways. In this case, it is advisable to study the features of each option and take into account the experience of professionals.
Fastening by welding
This is the simplest, but at the same time very reliable option. It is also worth considering that the wall in this case must have high strength.
You will need: 6-8 reinforcing pins with a diameter of 10-12 mm, a hammer drill and a grinder.
There are 2 ways to carry out this type of installation.
- Holes are drilled in the wall for the pins. Then holes are drilled in the appropriate places on the frame. During installation, the pins are threaded through holes in the frame and driven into the wall. Then all that remains is to cut off the remaining ends.
- Driving reinforcing pins into the wall and then welding the frame to them.
In both options it will be a strong and reliable mount.
Screwing with hardware
The design of the grille includes small “ears”. The finished structure is applied to the frame, the holes for the holes are marked on the “ears” with chalk, and then holes are drilled on them. Then the grille is again applied to the frame and bolted.
Through-wall mounting
This is the most unaesthetic type of fastening, since the pins will pass through the wall, leaving a washer inside the house that will need to be masked. To eliminate this drawback, it is enough to purchase a decorative overlay. The method consists of welding pins to the frame of the grille, the length of which is 30-50 mm greater than the thickness of the wall. Then they are inserted into through holes in the wall and fixed on the reverse side.
general information
First, let's define what reinforcement is. Reinforcement is steel rods of various diameters; they can have a ribbed or smooth surface. The reinforcement differs from a regular metal rod in that it is pre-hardened for greater strength. In most cases, fittings are made from different grades of steel, but recently fiberglass products have appeared on the market. Its service life is much longer, since fiberglass is not subject to corrosion.
The most popular fittings are A3 A500C. There are even special electrodes for welding A500C reinforcement. They have a diameter of 5 millimeters and are suitable for fittings with a cross-section of less than 15 mm.
Useful tips
- Experienced craftsmen advise taking the proper time and drawing a sketch drawing to scale for subsequent accurate calculation of the material.
- In order not to miss the holes on the frame with the through fastening method, it is worth marking the edges of the pins with paint .
- You should not weld the frame element by element. First, the structure is assembled (by spot welding), and only then the grate is scalded .
- At least one grille in the building must have a swing design .
- It is very difficult to make an intricate forged lattice at home, so it is easier to purchase decorative elements ready-made .
- It makes no sense to buy a welding machine for the sake of making one or two gratings. It can be rented in specialized stores.
Making your own window grilles is much easier than it might seem. Especially if you have at least some skills in operating a welding machine, and you have a set of necessary tools at your disposal. It’s still worth starting with the simplest design. If you have a country house, first you can experiment with its windows. The main thing is not to neglect the preparatory work and observe safety precautions when working with welding.
Bath welding technology
To weld yourself, follow these steps:
- Clean the ends of the rods with a wire brush until a metallic shine appears. It is necessary to process at least 3 cm from the edges.
- Weld the two ends of the rods to the bath. The distance between the ends of the products being welded must be at least 1.5 times the cross-section of the electrodes. If you use a three-phase arc, then the gap can be increased to 2 diameters of the consumables.
- Start melting one end of the rod until molten metal begins to form in the bath.
- Move the electrode to the other end (of the other rod) and melt it in the same way.
- Melt the ends of the reinforcement alternately until the bath is filled so that the liquid metal completely covers the rods. As soon as this happens, you need to start slowly rotating the electrode in a circle between the rods being processed. This is necessary for uniform heating of the molten metal before it cools. If the steel cools unevenly, cracks may form at the seams, which will significantly reduce the strength characteristics of the reinforcing frame.
When the metal has completely cooled, you can weld the corner and other joints (if necessary).
This method performs welding in both horizontal and vertical planes.
Healthy! The distance from the rods to the walls of the matrix should be about 1.5-2 cm.
Docking of this type is carried out using inverters (220 V), transformers (380 V), semi-automatic devices or automatic machines.
The only drawback of this welding method is that it will not be possible to complete the entire procedure using just one electrode. You need to change consumables very quickly - in 5 seconds you need to remove the remnants of the used electrode and install a new one.
Bath welding is considered the most reliable and durable, since the processed rods form a very strong connection. This method is most often used to create armored belts for foundations and other structures. If we are talking about simpler elements, then it is enough to overlap them.