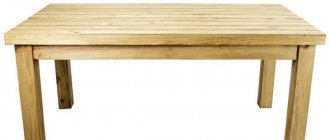
Making a table with your own hands is a way out of a situation when ready-made design solutions cannot satisfy, when there is a lot of material, wood, lying around at home or in the garage, from which you can make furniture that will please the eye and warm the heart.
If you have a tabletop, you will only need one element - legs for it; the choice of what they will be depends only on the master.
What to make of: wood or metal?
The first step when approaching the manufacture of legs for a future table is to choose the appropriate material . The material determines how functional and reliable the table will be, and these, by the way, are the two most important criteria for furniture.
What should you start from when choosing what to make legs from? There are three options:
Plastic . It is very problematic to make supports for the tabletop from plastic yourself.
In addition, plastic legs do not have a high level of strength and reliability - they may not withstand impact and may crack. This material is chosen as usual for children's furniture and for finished products.
- Metal . As for metal, it is considered the most reliable, functional and aesthetic. Designer furniture is increasingly placed on chrome supports and looks very beautiful.
- Tree . It is as durable, reliable, looks designer as metal, and is also easy to process. But there is a risk that the wood will crack.
Design finds in the interior
Here are the most striking design ideas:
| Photo | Model of furniture supports |
| Metal legs in the form of wheels. | |
| Thin steel posts, sharply curved towards the outer edges of the tabletop. They look like the limbs of a huge insect. | |
| Making dining tables, coffee tables, work tables and desks in the loft style makes them comfortable and original. Most often, their lid is made of wood, and the rough and simple frame with legs is made of metal. For example, a very interesting table is made of slab, equipped with high supports made of steel reinforcement. | |
| Italian designers have designed a table that looks like a folded piece of paper (origami). Although it is sheet aluminum, coated with powder paint. | |
| The legs made from steel pipes for water supply look very original. |
Drawing
Regarding the drawing, you need to determine three indicators for yourself: the height of the table, the number of supports, the size and cross-sectional shape of the legs. In order to determine these characteristics, it is worth analyzing what kind of table you want to get as a result? Will it be a dining table, an outdoor table, a work table, a coffee table, or even a bar counter? the height depends on the intended purpose .
The number of supports is made depending on preference, but do not forget about the purpose. It’s hard to imagine a dining table for a large family on one or two legs.
One leg fits perfectly under countertops with a cross-section that fits into a square. In this case, it will have to stand not on its own section, but on an additional support.
Next comes the choice of section, which dictates the thickness and shape of the leg.
When constructing a drawing, you need to take into account the thread, if any, and the change in cross-sectional shape along the length of the support.
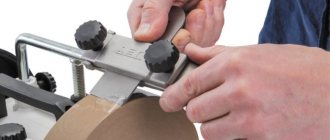
Cut out the Leg Shape.
Using a band saw, cut out the profile of the front and back of the first side of the leg. Be sure to leave bridges intact.
When the front side and back of the leg were cut out, many of the line markings on the second side of the leg were removed. These lines will be needed when we cut out the second side. Attach the template and complete the lines.
Turn the workpiece 90 degrees and make a cut on the second side of the leg. Notice how the bridges support the base of the leg while cutting. Cut carefully. The goal is to remove as much material as possible, as cleanly as possible. This will reduce the amount of manual work later.
The bridges are cut after the leg profile has been completely formed.
Here are the table legs after making the cuts on the band saw. As you can see, the products have curves and a general shape, they just need some refinement. This is where things get interesting.
How to do it yourself?
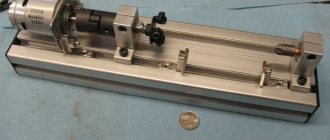
With access to a lathe, any piece of furniture can be made, including square or shaped legs. As an example, let’s take the algorithm for making a carved wooden table support on a lathe. The algorithm consists of the following steps:
Prepare sufficiently thick blanks without flaws that could damage the machine- Set up the machine, observing safety precautions to avoid accidents
- Transfer to the workpiece from the drawing all markings indicating changes in shape
- Start shaping the table leg, using a caliper to adjust the thickness of the cut.
- When all the cuts have been made to the required depth, the formation of the structure begins using a round chisel
The wooden leg is ready. All that remains is to make the remaining legs according to the diagram.
Woodworking tools
Each craft uses its own tools. The quality of the finished product depends on the right choice. The most commonly used tools for making wooden objects and furniture are hammer and nails. Hammers that have a claw on the back are very convenient. It balances the impact and helps remove an incorrectly driven nail.
Screws are considered a good alternative to nails. They are often used to secure folding table legs. You can do all the work yourself, even with a simple screwdriver. For faster work, it is recommended to use an electric screwdriver.
To process or cut wood, you will need a good knife and chisel. A stationery knife with a disposable blade is used for applying patterns and trimming unnecessary parts.
The chisel is usually beveled on both sides; in some models, it is beveled only on the side of the cutting edge. In principle, anyone can work, it all depends on your desires. The chisel must be carefully hit with a hammer so as not to damage the structure of the wood. To check whether the table is level in the end, you should use a level. It will show how inclined the surface is relative to the horizon.
How to attach to a tabletop?
The most optimal and inconspicuous fastening is fastening using surface plates. How to do this step by step:
Purchase eye and eye bolts for large tables and threaded dowels for small tables- Buy the plates . The holes in it must match the dimensions of the purchased bolts. That is, the purchase must be made jointly: bolts + plate
- Mark the center in the section of the leg and drill a hole in it. Screw a bolt into the upper parts of each leg (you can start screwing it by hand, then use pliers)
- Turn the tabletop upside down. Screw the plates strictly at the corners, aligning all the edges of the table and plates, onto the dowels
- Screw the legs all the way into the plates until tightened
- Place the table on the floor and make sure it is level
Drawing Model Lines
We mark the modeling lines on the first side; they will be needed for the final formation of the leg. Apply marks with a pencil from the middle of the ankle at the bottom of the workpiece. Hold the pencil at a distance equal to half the thickness of your ankle. Use your middle finger as a depth gauge and draw a line that is parallel to all four edges on the profile. There is no need for precise marking of model lines. Remember that these are just recommendations.
Marking the model lines on the second side is done in the same way as on the first side.
Finishing
In order for the product to last for many years, it must be processed. Legs made of chrome cannot be processed in any way, but wooden products must be properly processed.
In order for a wooden leg to serve faithfully for a long time, after manufacturing it must be treated with sandpaper . This is the polishing stage. After sanding, open with varnish or stain . Wait until dry, sand again, then re-open. Repeat this algorithm of actions several times.
We advise you to look at non-standard design options for legs:
Smooth Leg.
Use a file to shape the leg. Study your foot carefully to see which areas need shaping.
After shaping the leg, it's time to sand. Sand the table legs with sandpaper to the final shape. Connect your legs to the apron. Once the legs and aprons are connected, cut off the top uneven parts of the legs on a band saw. Use a rasp and sandpaper to align the legs with the apron. Legs done! Use this technique on legs of any size and proportion.
How to make a coffee table from a basket
What do you need
How to do
If the basket has handles, remove them using pliers.
eHow YouTube channel
The authors of this master class use an unnecessary cutting board. If you also took an old piece of wood that doesn't look very nice, prepare it. Sand the entire surface first.
eHow YouTube channel
Then coat it with a thin layer of varnish to add shine. Dry completely.
eHow YouTube channel
Place the basket bottom down on the wood piece.
eHow YouTube channel
Place the staples in a circle at equal distances from each other.
eHow YouTube channel
Secure the brackets with self-tapping screws using a drill.
eHow YouTube channel
Place the table upright, with the wooden top facing up.
What other options are there?
The basket can be placed bottom down, and a large tray can be used as a tabletop. You can also take a wicker basket or paint the table a different color.
Types of supports
Based on functionality, the following types of legs are distinguished:
| Photo | Type of support |
| Standard legs They have no additional functionality. For example, you cannot change their height. Ordinary racks are inexpensive, practically undecorated, and have a simple shape. | |
| Sliding supports They allow you to use a simple mechanism to select a furniture height that is comfortable for users. Telescopic stands are attractive in appearance and multifunctional. | |
| Decorative stands Their main purpose is to decorate furniture. They may have an original style and configuration, different designs and heights. Sometimes this is detrimental to the functionality of the table. |
How to make a coffee table from wooden pallets
What do you need
- 2 wooden pallets (they are also called pallets);
- grinding tool;
- wide brush;
- wood stain;
- white or other paint;
- wood glue;
- clamps;
- door hinges;
- self-tapping screws;
- drill;
- 4 furniture wheels.
How to do
First, thoroughly sand the surface of both pallets. Then go over them with stain. There is no need to lubricate the very bottom.
YouTube channel popsugarliving
When the wood is dry, paint it white or another color. Let dry completely. Do not paint the boards of both pallets that are not covered with stain.
YouTube channel popsugarliving
Turn one pallet over and coat the unpainted bottoms with glue.
YouTube channel popsugarliving
Glue the second pallet on top, also attaching it with unpainted parts.
YouTube channel popsugarliving
Secure the wood with clamps while the glue dries.
YouTube channel popsugarliving
For beauty, you can screw door hinges at the junction of two pallets. They also need to be coated with paint.
YouTube channel popsugarliving
Using a drill, attach the wheels to the edges of the table.
YouTube channel popsugarliving
If you wish, you can sand the wood to give it a vintage look.
What other options are there?
A very detailed master class on making another table from pallets:
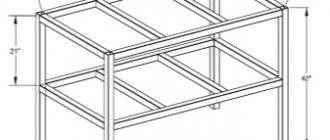
This piece of furniture has a solid tabletop and an additional shelf below:
And a simple, but very unusual option with a glass tabletop:
How to make a coffee table from planks
What do you need
- 2 short boards of the same length (the table will look more original if you take thick ones with uneven edges);
- grinding tool;
- 2 small planks;
- drill;
- self-tapping screws;
- wood stain or varnish;
- wide brush;
- 4 furniture legs for a table;
- 4 attachments for furniture legs.
How to do
Place the main boards next to each other as shown in the photo. Sand the surface of the wood.
YouTube channel Homedit
Place smaller boards vertically on top, closer to the edges.
YouTube channel Homedit
Drill three holes, positioning them like the vertices of a triangle, in four places on the small boards. Do not drill through the main boards. There should be 12 holes in total. Details are in the video below.
YouTube channel Homedit
Connect the boards with self-tapping screws first in one place.
YouTube channel Homedit
Then connect the boards in other places by screwing a self-tapping screw into each hole.
YouTube channel Homedit
Cover the entire piece with stain or varnish. Let the countertop dry completely.
YouTube channel Homedit
Place the legs on small boards.
YouTube channel Homedit
Screw each leg.
YouTube channel Homedit
Place attachments on their tips. Place the table straight.
What other options are there?
This table is made of decorative planks, but ordinary ones will also work:
If you want more reliable furniture, make a table according to these instructions:
Tables are an integral part of the interior. The variety of shapes, images and manufacturing styles make this piece of furniture not only necessary and important, but also a truly beautiful addition to the interior decoration of the room. Particular attention is paid to the legs, since they are the ones that have the most variations in design. If you have the time and, most importantly, the desire to decorate your table and give it exclusive touches, then we will help make it happen. How to replace the legs of this piece of furniture yourself?
What types of furniture supports (legs) are there?
In general, furniture supports are designed to perform a protective and aesthetic function.
Table legs perform a protective and aesthetic function.
Nevertheless, despite all the variety of designs, there are three main types of legs:
- Solid. The most common classic version. It can be made of wood, plastic or metal.
- Sliding. A more technologically advanced solution that allows adjustment in height or, less commonly, width.
- Decorative. A variety of materials can be used, since its function is rather decorative.
All of these types require either their own unique or compatible installation method. In addition, the number of furniture supports also influences the mounting option. So, in addition to the classic solution with four legs, there are tables with three and even one.
The table can also be installed on one leg.
Materials and tools for making table legs
Currently, there are up to 20 types and methods of making legs. Of course, you can limit yourself to the classic version. A rectangular table with 4 straight legs will look great and stand steadily in the center of the kitchen.
REFERENCE! The most stable table will be (like any other furniture on supports) standing on three legs, provided that it is evenly distributed over the area of the tabletop, and not in one line. Yes, exactly three, not four. Remember the geometry course! The plane is defined by three points. Therefore, 3 points always lie in the same plane of space, and therefore our structure will not swing from side to side under any conditions. It is more difficult to select four points so that they all coincide in one projection, so this design is more susceptible to loosening.
But despite the huge variety of manufacturing options, the set of tools and materials is always approximately the same. Prepare everything you need for carpentry work and get to work.
- Wood beams of any size, but not less than 50×100 mm (almost any species are suitable, but for beginners it would be better to use pine, since it is easier to process).
- Metal pipes of rectangular or round cross-section.
- It is possible to use plastic blanks.
- Glue.
- Dye.
- Varnish or special impregnation for the finished product.
Wood coating
Then the wood is coated with a special varnish, which allows the material to be preserved in its original form and protected from moisture and mechanical damage. As an option, you can use water-repellent varnishes; they are considered a fairly reliable product. If you accidentally spill water or another drink, the surface of the countertop will remain unharmed.
Today, the choice of varnishes and paints is very wide: from transparent to dark, matte and the brightest. In addition, the right varnish will make the table an attractive piece of furniture.
Mounting methods
When choosing a material, it is necessary to choose the method of fastening the legs that will best meet the requirements of the table and will be easy to do with your own hands without the use of special tools. A correctly and efficiently assembled frame and fastening of the legs are key factors in reliable support and extending the life of the table. Therefore, special attention is required to this stage.
Let's look at the main types of fastening:
- When using surface plates. The leg is simply screwed into a special hole on a threaded metal dowel. Convenient for small, compact furniture.
- Application of T-nuts. The nuts are inserted from the side into which the leg will be screwed.
- Fixation to the tabletop using regular screws. Does not require additional materials and imitates the integrity of the product.
- Z shape holders. Conveniently and easily mounted to the body.
- The use of a special system of grooves and joining in them. This will require processing the wooden blank and preparing special holes and protrusions.
IMPORTANT! When carrying out work, it is necessary to use wood with an optimal humidity in the range of 6–8%. If the material is excessively damp or dried out, its dimensions may change and the structure may be damaged.
Table functionality
A folding table made of wood is very durable and is not inferior in convenience to ordinary furniture. It can be used as a writing desk, a lunch desk, for children's activities, or for crafts. If you think about the decor, it will fit well into the interior of the room. As an option, you can make your own table with folding legs, which will take up little space during transportation.
Another plus: it is ideal for small spaces; if necessary, it can always be folded and hidden in a closet, thereby freeing up space in the room. Some models easily fit into the trunk of a car, which is very convenient - you can take it with you while traveling.
And you don't have to buy it. Making a folding wooden table with your own hands is not at all difficult. The article presents drawings and describes the main stages of work.
This is a simple design. The most important thing is to prepare all the components and process them efficiently. The dimensions indicated in the drawing give an idea of the dimensions of the entire structure and individual elements.
How to make table legs with your own hands
Of course, you can buy ready-made parts and attach them to the tabletop. It's simple and won't take much time. But if you want to make your furniture unique, you can try building the legs yourself. Let's look at two options that differ in level of complexity and style of execution.
Method without additional finishing. Simple rectangular legs for a classic table:
- Select 4 bars and cut blanks from them approximately 0.7 - 0.82 m in length.
- To make one leg, fasten the two parts with glue. For secure fixation, secure them in a vice.
- After coupling, the part should be given a strictly square shape; for this, cuts are made along the edges.
- Clean the wood from nicks and irregularities using sandpaper.
- To give a narrowed shape and attach the legs with screws, cut off part of the material from the top edge of the product at an angle. On two legs on the right and two on the left. We received a complete support kit.
- Attach it all with screws or using one of the methods described above.
IMPORTANT! When working with glue, ensure good ventilation and follow safety rules!
The second method differs only in that we give the workpiece a certain shape with curly cutouts on the frame (after we have glued the two parts of the block together):
- We prepare a drawing diagram of the future work of art in advance. This can be decorative carving, cuts along the entire length, or decoration using inlay.
- We carry out steps 1 to 3 above.
- We transfer the dimensions from the drawing to the part.
- Using a machine or a semicircular chisel, we cut off the “extra parts” and create a shaped image for the leg.
- We process the entire surface with a grinding machine or emery to make it smooth.
- We cover it with varnish or wood paint.
- We repeat the same for the other 3 parts.
This method is much more complicated, but the result is much more beautiful. You and your loved ones will definitely like it and will surprise your guests.
Table decoration
An important point in the process of creating furniture is, of course, decor. The easiest way to decorate is painting. We sell a wide range of paint and varnish products from various manufacturers. It is important to choose not only the right shade that will harmoniously combine with the interior items, but also the quality. It is better to choose an option that dries quickly and has no odor. For application you can use a paint brush or roller.
For a more original finish, you can resort to hand painting or unusual coloring. A variety of stripes, checks and other geometric patterns are created using paper tape or a stencil.
Beginners are often afraid of ruining a product with poor-quality dyeing, because they have never done this before. Alternatively, you can use spray paint. Simply shake it and spray the paint over the table surface.
Over time, plain countertops become boring. In this case, something needs to be changed. But you don’t have to repaint or buy new furniture. You can try decoupage or choose a new tablecloth.