What the article is about:
How and from what to make a welding table for welding
Agree that cooking on the garage floor or on the ground is extremely inconvenient and unsafe. When constantly carrying out welding work, a specially equipped place with a welding table is required.
A welding table can be simple or professional. Here it is already necessary to determine the requirements for the table and workplace for welding.
From this fascinating article you can find out exactly what requirements apply to a welding table. What types of welding tables are there? How and from what you can make a welding table with your own hands.
What is important to know about welding safety?
When making welding tables yourself, you must take into account all safety requirements.
Self-made workstations for welding work should:
- have well-thought-out ventilation for the welding station, ensuring complete air purification in the area where a person is present;
- be equipped with a network of hoods for efficient operation of the ventilation system;
- have properly installed grounding;
- be made of non-combustible materials.
There are several risk factors when performing welding work:
- electric shock;
- the effect of an electric arc on the visual organs;
- getting foreign objects into the eyes;
- damage to the respiratory system by harmful gases and fumes;
- contact of molten metal with skin areas;
- getting injured when working at height;
- burns from an explosion of a liquefied gas cylinder.
Immediately before starting welding work, several preparatory measures should be carried out:
- checking the quality of the electrical network;
- control of the reliability and stability of a table made of a profile pipe;
- diagnostics of the integrity of the insulation of the supply wiring;
- monitoring the performance of the air exchange system of the welding station;
- checking the serviceability of auxiliary equipment.
In general, safety precautions when working with welding should be followed as diligently as possible.
Drawing of a welding table.
To prevent the risk of injury, the workplace must comply with the following rules:
All cables must be securely insulated and secured. The use of welding workstations with dangling power wires is not allowed.
Before making a table, the master must thoroughly think through the grounding. The following tools must be grounded in the workplace: power supply housings, auxiliary electrical equipment and the equipment box. The cross-section of network wires laid to the work site must be at least 25 mm2. The equipment used must be of industrial production. The gas line is fully operational and has no leaks. Connection, disconnection and repair of welding equipment must be carried out exclusively by a regular electrician. Lighting devices used for welding must be powered from a 12-volt network.
The electrode holder of welding equipment must be insulated
This precaution will help avoid electric shock when touching live parts of the electrode holder. The electrode holder of the welding installation must have good mechanical characteristics and provide at least 8,000 electrode clamping cycles.
The welding machine operator must be dressed in special clothing that provides reliable personal protection:
- protective bandages, respirators and, in rare cases, gas masks are optimal for workplaces where it is not possible to install high-quality ventilation;
- overalls and protective masks to prevent droplets of molten metal from contacting the skin;
- a helmet or goggles to protect your eyes from sparks and flying hot drops.
Most popular models
In addition to the type of design, set of functions, and operating features, the rating of the manufacturer’s company is important. Only a conscientious company will produce reliable welding equipment, including a table adapted for various tasks.
The most well-known and trusted companies include:
- Sovplym is a joint venture between Russia and Sweden, developing ventilation systems for professional welding tables.
- The German company Siegmund is very famous. Welding tables in this line are equipped with brackets and fasteners of excellent quality.
- A distinctive feature is the main plate, designed to perform many tasks.
- The master has the opportunity to arrange several universal zones on the countertop for simultaneous work.
The most effective 3D models are tables from the German company TEMPUS.
The universal production technology allows us to work in both vertical and horizontal planes, producing parts for relief fences, fences, and components of any level of complexity.
What to look for when choosing ready-made tables
When choosing a table for a home workshop, it is best to give preference to a more versatile design. These types of welding and assembly workbenches are suitable both for working with equipment and for other functions: grinding, drilling, sharpening, riveting and others.
In appearance, it is a steel surface, which is assembled from strips of metal, has holes and slots for attaching clamps and vices.
When choosing such a table, you need to be guided by the following requirements:
- The working area is made of non-flammable and refractory material.
- Reliability and stability of the structure, which is ensured by a weight of 180-200 kg.
- Possibility to rotate the work surface in the required direction.
- To install drilling or milling equipment, such workbenches must have grooves in the surface, and the design must ensure reliability under various loads.
Requirements
Assembly tables for soldering and welding are divided into:
- stationary;
- mobile.
- Dimensions should be such that it is comfortable to work;
- the material must be durable;
- the table edging should be made of copper strip to make it easier to knock down the electrode coating;
- have sufficient mass for stability;
- stationary structures must be equipped with a tabletop hood for soldering or a fan;
- When located outdoors, a canopy is required.
When designing a post, you should take into account all safety requirements: equip grounding, ventilation, lighting.
What else is needed for the kit?
To create the most comfortable working conditions, you will need to buy additional tools for the welder. Their function is reliable fixation of the workpiece and the ability to quickly change its position. Requirements: resistance to temperature changes, mechanical strength.
A set of additional tools:
- Clamps. Necessary for fixing the workpiece on the surface for precise welding;
- Clamps. They perform the same function, but in a more specialized manner - installation requires an angle between the parts being welded, a complex connection.
- Magnetic base. Recommended for processing small-sized parts, the fixation of which is difficult mechanically.
In the latter case, it is necessary to take into account the mass of the auxiliary magnetic tool and the maximum permissible weight of the part.
The video provides a detailed overview of the optimal table model for a welder:
Hi all!
This time I’m telling you how to make a gazebo table with your own hands. It all started when a new machine arrived at our production. Instead of wooden pallets, a metal square tube profile 50x100 mm was used at the base of the package. They wanted to throw it away as it was no longer needed, but I took it to the dacha. Even then I didn’t know that I was using it specifically for the table. After another visit to the dacha, I realized that my gazebo (I told you how to build it earlier in the article “How to build a metal gazebo”) lacks a good, solid table. Remembering that there was a 40x150 edged board in the bins, it was decided to use these particular materials.
The dimensions of my table are: width 875mm, length 2000mm, height 800mm. Naturally, you can adjust the dimensions to suit your requirements, but I will tell and describe exactly the manufacturing process of my version.
Buy a welding table or make it yourself?
Making a workstation on your own is an ideal option for a person who does not have the required amount of money to purchase a factory version of the product. In addition, tables from factories are not able to fully provide the required functionality, since the needs of each master are purely individual. If the welder himself is responsible for creating the workplace, then he will easily provide it with the required functions and capabilities for maximum convenience of welding manipulations and work.
Naturally, you need to use some kind of metal material as the main component to create a welding table. The use of wood is strictly prohibited, since welding work involves high temperatures, hot metal, etc., therefore, a table made of wood will not satisfy fire safety requirements. Also, a metal table is better in that it can be grounded, thereby increasing the level of safety of all work performed. It is worth noting that even the metal version of the table must be treated with special substances that are resistant to high temperatures and open flames.
Table made of profiles: design solutions
The simplest type of furniture to make yourself for beginning craftsmen is a table.
A table made from profiles is a fairly simple and very durable product. It is easy to design, and then create a model that will fit into the interior, will be a pleasure to work with, and will not require large expenses.
Profile pipes are good because they go well with any materials: plastic, wood, stone, glass, MDF, etc.
Note! To make a table, thin-walled pipes with a cross-section of 40x25 or 20x20 mm are most often used.
Tables made from profile pipes fit perfectly into rustic, loft and hi-tech styles.
Design solutions can be anything:
- desk table for a schoolchild with compartments for books;
- brutal table with a massive wooden tabletop for the dining room;
- lightweight structures for a summer cottage;
- workbench;
- transforming table, where metal profiles are used as transformation elements;
- coffee or console table;
- a two-legged table that uses a wall as another support;
- table in the form of a bar counter.
You can experiment with shapes and sizes to create a functional and decorative piece of furniture.
A table made by yourself will be a source of pride for the craftsman and will last for a long time.
General characteristics of the rotary welding table
Externally, the design is very similar to equipment that is used in large industrial enterprises. The working surface of such a table has the form of a solid metal disk with a coating that is resistant to high temperatures. Due to the fact that its outer edge is free, parts of different sizes can be installed anywhere.
So that the rotation axes can be easily combined, beacons or markings are applied to the installation surface. This also helps eliminate weld runout when turning the workpiece.
The rotary welding table is the most complex unit available on the market today. But in some cases it is simply impossible to replace it with other options. For example, designs of other types are useless if you need to weld a circumferential seam on a cylinder, steel pipeline blanks, etc. In such situations, you cannot do without a rotary belt drive.
When it is possible to rotate the tabletop, the welder’s work is greatly simplified. As a result, achieving high quality of the most complex seam is not difficult. The master doesn't even have to change his location.
Bent frame
To bend pipes, you will need a pipe bender and a template (plaz), the outline of the part that should be drawn on a sheet of plywood. The bent pipe must be periodically applied to this template and compared with it, so that several identical elements can be made. Here are a few secrets that will help you bend a profile pipe:
- a homemade pipe bender can be made from an old car brake disc, attaching a pin made of steel rod to the side, which will serve as a stop;
- the pipe must be filled with fine river sand and plugged at the ends;
- It is advisable to heat it red-hot with a blowtorch at the bend.
Welding table manufacturing process
It’s not difficult to make a table for welding work with your own hands, the most important thing is to prepare the correct drawings. You can calculate and draw diagrams yourself, or you can use ready-made
Pay special attention to this point so that the dimensions are carefully observed. Before the manufacturing process, thoroughly study the photos of the finished work so that you know what to focus on.
As you work, follow simple and consistent steps. First you need to weld the frames with the shelves, which will make a solid slab. To do this, it is necessary to combine the blanks from the corners using electric welding. In this case, the connected angle must be straight - 90 degrees. The other frame is assembled in the same way. Tabletops for welding are attached in a similar way. To do this we need a metal plate with an applied frame. Be sure to make several seams around the perimeter of the tabletop before you begin the main welding. This is necessary to protect the homemade table from deformation that it will undergo during welding work.
The second shelf is made in a similar way. After this stage, the rotary table must undergo installation work. Welding equipment is used for this. Make sure that the legs are positioned strictly perpendicular to the tabletop. A clamp is used to secure individual parts. After this, the next shelf is assembled and secured. The elements should be at a distance of 70 cm from each other. In this case, the parts are fixed using tacks and only after making sure that the resulting product is geometrically smooth. At the last stage, the seams are welded.
After installing all four legs, attention turns to the wheels. In this case, the holder on which the burner is installed must additionally be welded.
For this, a tube blank is used. Note that it is not difficult to make a welding table for work with your own hands. The most important thing is to put in a little effort and find the necessary materials. When searching for materials, pay special attention to their quality.
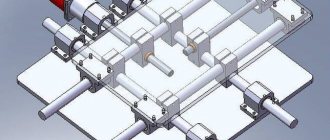
Manufacturing scheme
On the Internet today, anyone can find a huge number of different diagrams and drawings that allow you to create a welding table of different types (folding, assembly, rotary). Let's consider the simplest manufacturing option.
The welding table consists of a large number of parts. It is recommended to make them separately. At the end, when all the blanks are made, it will be possible to begin the final assembly.
Top cover
Cast countertops should not be used. It is better to make a new weld for the top cover. To do this, it is recommended to take a profile pipe (the optimal size is 60x40x2 mm). The grille located inside the frame is also made from a profile, but of a smaller size.
All elements are cut using an electric grinder. The ends of the cuts must be thoroughly cleaned so that there are no irregularities. After this, the upper frame is prepared, and its diagonals should be as identical as possible.
Then the profiles that are intended for the interior are carefully cut according to the dimensions of the finished frame structure. Later they are inserted into each other, the distance between them should be about 30-50 mm. Channels are fixed on top of the frame. If in the future it is necessary to regularly lengthen this part of the table, then folding panels are additionally attached to the tabletop. A copper edging can be installed on the surface of the upper part; it is needed in order to clean the electrodes.
Legs
To make these parts, it is better to take round pipes with a diameter of at least 50 mm (if you don’t have a round one, a square one will do). The length of one workpiece should be about 760 mm. The racks are firmly welded at the corners to the prepared tabletop.
Increased rigidity
When the legs are completely secured to the top, for greater strength, you can make a special strapping at the bottom of the racks. To do this, you need to retreat approximately 20-25 cm from the floor covering, and then weld the legs together with an angle (30x30 or 40x40 mm).
At the same time, the corner is welded to the floor covering with its flat side. This is done so that a sheet of thick plywood or chipboard can be laid in the formed middle. Thus, a shelf will be made to store the necessary welding tools and materials.
When making and attaching the legs, make sure that they are not skewed. They are attached to the frame strictly at right angles. Otherwise, the structure will be unstable and it will be difficult to work on it.
If desired, small wheels can be separately welded to the racks so that the table can be moved if necessary. You can also make several hooks for placing the cable.
Pen
It is important to make the handle as comfortable as possible in order to greatly facilitate the tilting of the structure, as well as the movement of the welding table. To do this, take a metal rod with a diameter of at least 10 mm. To shape the part, you should use a hammer or vice. The workpiece must be attached to the supporting frame of the tabletop. For greater convenience, it is better to weld two such handles at once.
Ventilation system
It is designed to prevent a person from inhaling harmful fumes during the welding process. It is best to first purchase a ready-made hood and install it on the table.
As a rule, the ventilation mechanism is installed to the left of the countertop. It is placed at a height of at least 1.3-1.5 meters above it.
Conduit and clamps
To ensure that the work area is as safe as possible for people, all power cables must be organized. The simplest option for fixing is a simple hook. Such parts are welded around the perimeter of the product. And also for this purpose, special plastic conduits are often used.
Roller wheels
These parts are optional, but they make moving the table much easier. The greatest stability of the structure is achieved only with four small wheels. You can purchase ready-made elements in the store. They are attached to the product by welding.
Niche
During manufacturing, you need to make a compartment to accommodate welding equipment. Most often it is made from wood or a metal base.
From these materials, using tools, a product is cut out that looks like a pallet. All irregularities and roughness, if any, are removed from the workpiece. The finished niche is installed at the bottom of the structure. Some tables come with entire storage sections, including several small drawers and a section with open shelves.
Additional cover
This element makes it possible to clean the electrodes from scale and other debris formed during operation. It is made from a metal sheet, and it is permissible to take a base of almost any thickness. Before attaching the additional casing, you will need to weld a small metal rod to the legs on one side, and then begin securing the finished part. This can also be done using welding or bolts.
When all the individual parts of the table are completely ready, it is better to thoroughly clean the resulting welding seams. If the surface was made of metal tubes, the metal structure should be formed in the form of a lattice surface with spaces between the cells (the distance between them is approximately 4-5 cm).
Required materials and tools
To create a welding table with your own hands, you will need a standard set of tools and reliable materials. The latter must comply with fire safety regulations. Prepare for work:
- welding machine;
- grinder;
- pliers;
- roulette;
- hammer;
- square
The grinder can be replaced with a hacksaw. Chalk is included for drawing lines and marks. To make a full-fledged model, you will also need clamps, clips and a magnetic base to hold small parts.
To weld a metal table, you need a material that is not exposed to the welding beam and can withstand heavy weight loads. The frame is made from a profile measuring 60 × 40 × 2 mm, and the working surface is made from an analogue with parameters 30 × 30 × 1.2 mm. A U-shaped channel is also suitable for the job. A metal sheet is prepared for the pallet.
If the legs are made of a profile pipe, it should be selected according to its cross-section. It must be at least 60 × 60 × 2 mm. A corner of 63 × 63 × 4 mm is suitable for the racks, and a corner of 30 × 30 or 40 × 40 mm is suitable for tying the legs. If the table is supposed to be rearranged, wheels or handles are also prepared, for which brackets or fittings are suitable. For hooks you will need nails or wire, for a shelf or bedside table - plywood or chipboard.
Welding machine
Bulgarian
Pliers
Roulette
Hammer
Square
Design
Design is the main and most difficult part of creating a folding table in the garage with your own hands. Without a well-prepared drawing that indicates the main structural elements, you will not be able to properly purchase materials and prepare the necessary set of tools. The drawing is made independently or downloaded from the site and subsequently modernized to the needs of a specific owner.
Important! Do not neglect the design stage, otherwise after assembly it will turn out that the design is inconvenient and only gets in the way instead of being useful.
Design Features
Household welding tables are characterized by their simplicity of design and low cost. However, they are highly reliable and can provide comfortable work for the home handyman.
These tables consist of the following parts:
- a strong frame, which can be made from metal corners;
- 6 supports that are adjustable;
- a small bedside table, which is equipped with several compartments for storing various tools;
- tool surface, which is equipped with grooves for fastening various workpieces;
- several open shelves on which large workpieces can be stored;
- a special tray for collecting waste;
- brackets for massive wires;
- containers of water for emergencies.
It is very simple to prepare such a table before starting work. It is necessary to align the welding table in the horizontal and vertical planes. For this purpose, you need to use a building level and adjustable feet. Next, the structure must be grounded, the angle of inclination and position of the ventilation chute are adjusted, a welding machine is connected, and the safety of its components is tested.
For some types of welding machines, you will need a portable fan, which is equipped with a hood about 2 m long, and a special magnetic holder to secure it to the frame. The power cable of a portable fan should be about 5 m long, and its maximum power is selected depending on the required performance of the exhaust head.
Which welding table to choose
The choice depends on the available space and the tasks to be solved. In a cramped garage, occasional welding work can be done at the folding welding workbench. If space allows, a stationary or mobile table of a simple type will be more convenient. Those who love comfort are advised to purchase or make their own turntable in the shape of a circle, mounted on a rigidly fixed support. To carry out complex repairs, so that everything is at hand, it is better to choose a work table with machines installed on it. Factory models are equipped with various additional devices, so in order not to overpay, think about how important they are to you.
Expert recommendations will tell you how to choose a convenient and reliable design:
- the working area must be fenced with a protective screen made of fire-resistant material;
- to ensure reliable rigidity of the structure, its weight must be at least 180 - 200 kg;
- lighting should not create glare, therefore the use of energy-saving lamps is excluded, since their light is not absorbed by the glass of the mask;
- a rotating platform is welcome;
- If there is no built-in ventilation, a mobile fan with magnetic suction cups on the suction arm must be used.
#3
Sent 20 March 2022 09:15
This is an AutoCAD format, it opens with both without problems. Usually in this format they ask to send drawings for plasma and CNC laser.
My work on Instagram: @MOV_engineering
Tel./WhatsApp: +7-999-62O-1O-3O
How to make a welding table?
Once you have acquired the materials described above, assembling the table remains only a “matter of technique.” In order to assemble the welding table, you need to follow the following algorithm of actions.
- The first step will be to create a frame for the table. To do this, you will need to connect corners measuring 46 and 76 cm to each other.
- Carefully check the size of the angle, it must be exactly 90 degrees.
- Next, you need to assemble the second frame in an identical way.
- The two assembled parts must be connected to each other using tack welds.
- Next, you need to weld the tabletop with the frame using metal plates.
- Before starting welding work, you need to slightly grab the future tabletop, as this will allow you to subsequently avoid the process of deformation during work.
- The next step is to weld the legs to the frame, also at right angles.
- Fix the second shelf relative to the first so that the distance between them is exactly 71 cm.
- After this, you will need to install the wheel supports.
- Then you can supplement the design with the required elements. One of these is a holder for a welding equipment torch, for which you can use a small pipe with a diameter of three centimeters.
As you can understand, assembling a welding table yourself is a rather exciting activity, which, with the proper skill, does not cause any difficulties. It is worth noting that all of the above manipulations must be performed in strict accordance with safety precautions.
Precautions when working at a welding table
It is no secret that working with a welding machine is accompanied by a certain danger and therefore a person must protect himself from possible troubles when working independently at a desk. Before starting any work, the following factors must be considered:
It is important to ensure high-quality ventilation at the work site. The best option is to install exhaust ventilation. Protection against electric shock
For this purpose, it is necessary to work in special welding gloves and ensure that they are always dry. Eye protection from arc radiation. To do this, you definitely need a protective mask or goggles. Protecting the desktop from metal splashes. Before carrying out welding activities, it is necessary to clear the work area of any debris, especially flammable ones. You need to remove paint containers, sweep away sawdust, and especially remove fuel containers if the workshop is located in a garage.
Also, protective equipment has been specially developed for welding activities, without which it is not recommended to start work.
Safety precautions during welding
In order to carry out welding work conveniently and safely, you must follow simple rules. Compliance with these requirements will also help improve the quality of work performed.
Safety regulations:
- Work only in ventilated areas or in places where there is exhaust ventilation.
- Use all personal protective equipment necessary for a welder: special non-flammable clothing, shoes, leather or canvas gloves, a welding mask or shield, and in some cases a respirator.
- Insulate all welding cable connections; their insulation must not be damaged.
- All flammable materials and substances are removed from the workplace.
- Mandatory workplace lighting is installed without glare or flickering.
What type of welding table should it be?
Working with a welding mechanism is dangerous, so the table must be comfortable and safe for work. There are many types of welding tables, but for comfortable use, any type must meet certain requirements:
The workplace must have a hood. When welding, a lot of harmful dust and gases are released, so the air must be cleaned through an exhaust hood so as not to harm your health.
At the workplace, there must be a fan at the end of the table. It is better to place it at a height of 150 cm.
The edges of the welding table should be covered with copper material.
For lighting, a homemade system is made, with a power of no more than 36V.
The welding table must have a built-in place for storing electrodes and another place for other necessary tools.
One lockable compartment where tools that are rarely used will be stored.
An integral part of the welding table is grounding.
Next, you need to make a drawing of the welding table with dimensions and prepare all the necessary tools.
Advantages of a specialized countertop
Having your own welding table in your garage or workshop allows you to carry out repair or installation work much faster.
The advantages of practical table selection include:
- Convenient and level area for work.
- Possibility of reliable fixation of objects, parts, assemblies, which ensures high precision of the welding seam.
- When fully equipped (the presence of brackets and lighting), even the slightest movements of the workpiece being processed are limited, which increases the accuracy of the welding seam.
- If there is a well-equipped ventilation system, the master has minimal contact with industrial dust and harmful compounds.
- Large countertops can have multiple functional areas to perform different tasks. If necessary, the welder has the ability to quickly switch to another type of activity.
The available tabletop height adjusters allow you to adapt the work area to the height of any craftsman.
Instructions for making a welding table with your own hands
The top cover will be made for the welding table from a profile pipe, with a section of 0.5 by 0.5 cm at the edge and 0.3 by 0.3 cm on the outside. It is better to cut the pipe with a grinder. The prepared parts are fastened using a welding machine. The edging of the lid will be made of a 0.5 by 0.5 cm rectangular profile
The inner part is laid with a profile 0.3 by 0.3 cm. The pipes are attached by welding in such a way that a lattice is formed, the seams are cleaned.
Next we make the legs, they can be made from a pipe 0.25 by 0.25 cm. In total, you need to cut 4 pieces, then weld them to the base of the table. To make it easier to understand what and how to do, for clarity, look at the photo of the welding table.
For additional rigidity, we make a belt around the perimeter of the table, at a height of 30-40 cm from the floor. This is necessary so that when working the table stands firmly and does not wobble.
Wheels for more convenient transportation of the welding table. Just 2 wheels, which can be taken from an old cart, will be enough.
Storage space for tools. It is recommended to make the niche from chipboard or plywood. If desired, you can use a metal sheet. A niche is attached at the bottom of the table.
The garbage casing is made of metal sheets of any thickness.
The finished welding table can be painted with special paint for metal if desired.
There must be a container of water next to the workbench, because welding work is flammable. Also, the floor surface next to the welding table, at a distance of 1.5 meters, must be covered with non-flammable material.
If you follow the instructions on how to make a welding table and apply these tips in practice, then you will succeed.
Work methodology
In domestic conditions, the tabletop can be made of durable plywood, which is then sheathed with a metal sheet whose thickness should be about 5 mm. All metal elements are carefully checked for rust. If traces of it were found, they would have to be cleaned up. From the pipe you need to cut blanks for the legs and jumpers of the future assembly table - two blanks will be 1.1 m long, the same number will be 0.66 m long, four will be 0.9 m long.
All these parts need to be chamfered and welded together. When the structure is ready, cut out a tabletop of the required size from a sheet of plywood and cover the top of the table with it. Now a steel sheet of the same size is cut out and laid on top of the plywood.
The table can be further reinforced with metal inserts. It is advisable to chamfer the tabletop with a grinder to remove sharp edges. In principle, the welding table is ready for immediate use at home, for installation in a barn or garage.
Working surface of the table
It is not advisable for the countertop to be manufactured in a fused form. It is better when it is welded from a professional pipe with dimensions of 60×40×2 mm. The grille inside the frame is made of a profile with dimensions 30×30×1.2 mm (8 or 10 channels can also be used).
The elements of the parts are cut with a regular grinder; the ends of the cuts must be cleaned of burrs. First, the outer frame is prepared with as identical diagonals as possible.
Profiles for internal placement are cut directly along the opening of the finished frame. Afterwards, they are inserted approximately 30-50 mm from each other. The channel is placed on top of the frame.
Types of welding tables
Depending on the complexity and frequency of the work performed, the design of the welding table is selected. When performing simple operations periodically, a simple option is selected. To repair and manufacture complex structures, you will need a semi-professional assembly and installation option.
Simple table for welding work
Such structures are durable, easy to manufacture, and convenient to work with. The basis of the structure is a rigid frame, to which 4 racks made of a profile pipe or angle are welded. Below, at a distance of 20 cm from the floor, they are fastened with crossbars. There is a table top with grooves for clamps on top. A bracket for the welding cable is welded to the frame with the tabletop, and under it there would be a tray for collecting waste. On the side you can place a cabinet with shelves for folding large equipment. A stand for a container with water is installed next to it.
Simple welding tables are easy to manufacture and convenient to work with
Semi-professional welding table
This is a more complex design, equipped with additional equipment. In terms of ease of operation, it does not differ from the simple type, but with installed metalworking heads for drilling, milling, grinding and other operations. Installation of built-in ventilation systems and air ducts is possible. The support posts of semi-professional tables are attached to the floor using anchor bolts or embedded in concrete. The presence of a rotating tabletop allows you to weld complex structures from one place. A rotating platform is provided for installing the inverter. The kit also includes removable yews and clamps of different sizes.
In terms of ease of use, a semi-professional table does not differ from a simple one, but is equipped with additional equipment
Assembling the upper frame
To assemble the upper frame of the welding table, place the workpiece on a flat surface. The crosspieces are inserted between the long frame blank, so they are made 80 mm smaller (taking into account 2 longitudinal profiles). The net size of the structure will be exactly 1100/660. When using another profile pipe or rolled metal, this factor must be taken into account.
Having laid out in a plane, grab all the corners with 1 tack, measure the diagonal and grab on all sides. After this, measure the diagonal again and check that all the parts are in the same plane. As experts say, “so that there is no propeller.” Only now they are scalding all the joints.
At a distance of the thickness of the plywood from the top, gussets are welded from the inside. They will strengthen the frame and serve as stops for the plywood tabletop.