The need for surface hardening and tempering
Surface hardening of parts is done to achieve better characteristics of the outer layer, while in the core the metal remains tough and ductile. In this way, it is possible to change the physical and mechanical properties of the metal.
To reduce brittleness and residual stresses, the metal is then tempered, after which its hardness decreases slightly and its properties become more stable.
The steel surface hardening temperature is 820-900 0C. It can be distinguished by color.
To obtain the required depth of heat treatment, after rapid heating, the surface of the part is cooled with air or water.
How to take a holiday on your own
Tempering of steel is carried out to reduce its brittleness and increase its ductility, which occurs during its heating to a low (compared to quenching) temperature, followed by slow cooling.
Most steels (carbon and low alloy) that can be hardened in a home workshop are tempered at temperatures ranging from 150 to 250 °C (see table above). Unlike hardening, such heating does not require special equipment, so many home craftsmen use household stove ovens with thermostats for this purpose.
The heating temperature during tempering can be determined by the color of the tarnish - a multi-colored oxide film that appears on the surface of the steel when heated (see figure below). If you harden steel “to martensite,” that is, with rapid cooling in water, you will get a very hard but brittle structure. Therefore, tempering is a mandatory procedure when heat treating a cutting tool.
VIEW Melting furnace on AliExpress →
Gas flame hardening
The temperature regimes associated with heating and cooling can be continuous or cyclical. Surface hardening is performed in four ways.
- Heating and cooling of a part area: hardening of wheel teeth, rail ends, valves, etc.
- Hardening of small rotating bodies with a small width of the treated area: axle and shaft journals.
- Continuous-sequential method: moving a flame along the surface, followed by a coolant. Sequential heating and cooling of narrow areas with water jets is carried out. The surfaces of large-diameter parts are similarly hardened with their slow rotation relative to stationary burners and nozzles. Temper zones remain at the edges of the strips during secondary heating from neighboring areas.
- Combined method: moving along the generatrix of the flame jets, and behind them - the cooling medium while rotating the cylindrical part. The technology is used for hardening long products. The method provides a uniform solid layer on the surface of the part.
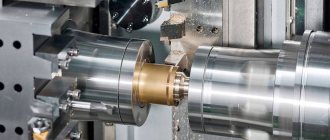
Flame hardening technology
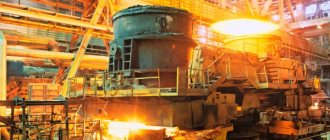
Surface hardening is carried out on machines where the processes of moving heating and cooling devices and parts are mechanized. The process is widely used in industry. It requires simple devices. A mixture of acetylene and oxygen, natural gas or kerosene is used as an energy source. Sometimes gas-flame heating is more profitable to use than high-frequency heating. This especially applies to large-sized products for which it is difficult to manufacture inductors. The method is often used in small-scale production, when high demands are not placed on the quality of parts. Injection-type quenching burners contain replaceable tips for adjusting the flame power. Mouthpieces are made in accordance with the profile of the parts being processed. They are made with a large number of nozzles or slotted ones. Jet sprinklers supply water for cooling.
Mechanisms for moving tools and parts are used specialized or universal. Enterprises often manufacture them on their own using metalworking machines.
Hardening of metals depends on the composition, as well as on the size and shape of the products.
Hardening a knife - step-by-step instructions for hardening various types of metals (75 photos and videos)
Surface hardening of the knife provides additional strength to the cutting base. Heat treating a steel billet significantly improves the mechanical and physical properties of that item.
If you neglect this requirement, then the risk of quickly erasing the metal plate increases. In simple terms, the knife will constantly become dull, which will affect its performance.
In our material we will talk about how to harden a knife at home. Here are recommendations from professionals who know all the intricacies of working with metal.
What material are knives made of?
An alloy of carbon and iron is used to produce knives. When these components are heated, high carbon steel is formed.
This material is able to cope with sudden changes in temperature. In addition, it is characterized by high density and resistance to various mechanical influences.
Products made from pure carbon steel are quite expensive. To reduce the cost of materials and components, many craftsmen prefer to add special additives.
To do this they use the following substances:
- Molybdenum;
- Vanadium;
- Zinc;
- Tungsten;
- Calcium.
If the workpiece contains a minimum amount of carbon steel, then which products are elastic? They require proper hardening, which will provide them with additional strength.
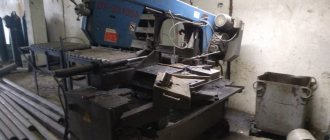
We make a chamber for hardening metal
Before you begin processing the metal base, you need to prepare the appropriate equipment. It is recommended to pay special attention to the oven in which high-temperature processing will be carried out.
The oven chamber should have dimensions of 30 cm x 20 cm x 10 cm. It is made of refractory clay and brick. The clay composition should not contain any impurities.
The design of the furnace is a rectangle. The walls and back panel are on the same level. A metal door on hinges is installed in front. This will maintain the temperature inside the furnace structure.
To harden steel you will need from 300 to 900 degrees. This parameter directly depends on the material from which the metal product is made. For example, to harden a knife from a file, you will need a temperature of 500 degrees.
The composition of this material contains a high steel content and a minimal amount of tungsten. The finished item is quite strong and durable.
The process of hardening steel at home
The easiest way to harden a workpiece is an open fire. Our ancestors used a similar method more than 100 years ago. The processing process is carried out “by eye”.
For the work process you will need the following materials and tools. These include:
- Fire;
- Large container with oil;
- Bucket of cold water;
- Metal pliers with long handles. They will help you carefully remove and lower the iron for further heating.
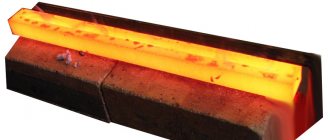
The first step is to achieve the desired temperature. We send combustible material in the form of firewood and coal to the oven. The flame begins to change its hue from bright orange to crimson.
At this time, wood and combustible material are added to the fire. When the flames change their color to white, you can proceed to hardening the metal product.
Place the base of the knife on burning coals and leave until the metal turns red. On average, this will take from 5 to 15 minutes. When the product acquires a bright red hue, it is immersed in oil.
Tempering a knife with oil helps add ductility and strength. After the first dive, similar manipulations are carried out 5 more times. Next, he sends the metal blade back to the heating furnace
.
The next step is cold water quenching. This procedure is final. It adds strength to the metal product. The hot workpiece is placed in ice water for 20 minutes. A photo of knife hardening shows this manipulation.
We present to your attention a detailed video of knife hardening. Here is presented all the regular actions and manipulations with carbon steel.
Photo of knife hardening
Process parameters
The adjustable parameters are as follows.
- Heating power. It depends on the acetylene consumption and the speed of the flame relative to the product.
- The distance from the center of the torch to the heated surface is maintained at a level of 2 to 3 mm.
- Duration of heating or speed of movement of the heater. The depth of hardening and surface hardness depend on these characteristics, which are selected experimentally.
- Water with a temperature of 18-350C is mostly used as a coolant, and the flow rate is about 1 l/cm2.
- Time between heating and cooling (5-10 sec) or distance between heating and cooling zones (12-25 mm).
Steel hardening technology includes the processes of heating the metal, holding it to equalize the temperature while undergoing the necessary structural transformations, and cooling at a given speed. A distinctive feature of surface hardening is rapid heating.
Preparation of parts before hardening involves smoothing out sharp corners and cleaning in various ways: sandblasting, chemical, or manual brushes.
Surface hardening under the correct conditions ensures an increase in the durability of parts by 2-5 times. The choice of cooling modes allows you to smoothly increase the hardness of the hardened layer up to 700 HB. The process should go quickly. At the final stage, when the temperature is 200-3000C, the cooling rate slows down. As a result, the formation of cracks is reduced and the products do not warp.
When alloy steels are overheated, the hardness may decrease, which is considered as a defect. There is also no possibility of precise adjustment of the thickness of the hardened layer. In addition, when working with gas, additional measures are required to ensure safe working conditions.
Common media for self-heating
For hardening steel at home, the following cooling media are usually used: air, water and aqueous solutions, mineral oil. 10-15% sodium chloride (table salt) is usually used as aqueous solutions, and mineral oil in home workshops is most often used as a regular engine oil.
To harden individual parts of a product with different hardness, hardening with sequential cooling in two environments is used. Each of these quenching media is characterized by its own cooling rate, which directly affects the structure of the metal being processed.
For example, air cools steel at a rate of 5÷10 °C per second, oil - 140÷150 °C, and water (depending on temperature) - 700÷1400 °C.
In order to properly and without problems harden your product, you need to know the brand of metal from which it is made, since both the heating temperature and the cooling method depend on this. For their products, craftsmen most often use used products made from high-speed and tool steels, which can be hardened in a home workshop, as starting materials.
The table below shows the recommended temperature conditions and cooling environments for various steels.
Hardening metal in oil
Oil conducts heat rather poorly, which contributes to the slower formation of structural elements of steel.
Therefore, if it is hardened in an oil environment, it will acquire strength and elasticity along with hardness. In production, industrial oil I-20 or modern quenching oils such as “Thermoyl”, “Thermo” or “Voltex” are usually used for hardening. In home workshops, craftsmen use what is available. Most often this is new or used motor oil.
To safely quench a part in such oil at home, you need to remember that it has a much lower flash point compared to industrial quenching liquids, and when hot metal is immersed in it, it ignites for a short time, releasing acrid smoke.
Therefore, a hardening container used in a home workshop should have a minimal exposed surface and be used only outdoors or in a ventilated area. In addition to ordinary buckets and cans, one of the most common designs of such containers, which are used by home craftsmen, is an elongated section of pipe of a suitable diameter with a welded bottom.
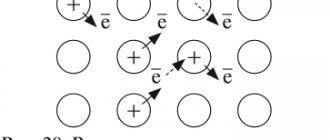
Hardening with high frequency currents (HFC)
High-frequency heating is one of the most effective ways to harden a surface. The use of high frequency frequencies up to 10 thousand kHz significantly reduces the heat treatment time. A high-frequency current is passed through a water-cooled copper inductor. The resulting electromagnetic field penetrates the steel part, forming eddy currents in it, thereby causing heating. The main energy is concentrated in the surface layers. The depth of heating depends on the magnetic permeability of the steel, electrical resistance and current frequency. By adjusting these parameters, you can change the size of the hardened layer.
Advantages of the induction method
- high productivity and economical heating when it is necessary to heat only certain areas of parts;
- the surface of the part is slightly oxidized, there is no decarburization;
- products warp less, fewer cracks form;
- The depth of hardening is precisely adjusted;
- possibility of process automation.
The disadvantages of the HDTV hardening method include the high cost and complexity of manufacturing induction devices.
Copper inductors are manufactured with or without damping devices.
There are the following types of surface hardening.
- Simultaneous. After heating, the part is cooled with water. The part being hardened is heated inside the inductor. After a predetermined time, the electric current is turned off and water is supplied in strong jets through the heater holes to cool the product. Ring inductors are used for hardening gears, and loop or zigzag inductors are used for flat parts.
- Continuous-sequential. A heating inductor moves along the stationary part, followed by a showering device.
HDTV heating makes it possible to create automated units in the flow of machining shops. Due to this, there is no need to transport parts to heat treatment shops.
Other methods of surface hardening of steel
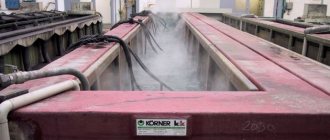
- Quenching in electrolyte. If an electric current is passed through an aqueous electrolyte solution, the cathode is a part that heats up quickly. The method is convenient because after a power outage the part is immediately hardened. The electrolyte bath simultaneously functions as a heating furnace and a quenching tank.
- Laser hardening. Laser radiation heats the metal surface to a high temperature. The reinforcement thickness is less than 1 mm. The wear resistance of cast iron parts increases several times, and the endurance limit of steel increases to 80%. The method is often used to harden the cutting edges of a tool.
Tempering after hardening
Hardening and tempering are two processes that complement each other and ensure the production of high-quality parts. The purpose of tempering is the final operation after hardening, forming the final, more stable properties of the metal, ensuring the removal of internal stresses. A steel product of a certain grade is heated and maintained at the appropriate temperature, after which it is cooled in air.
- Low tempering at 120-2500C - processing of tools and other parts. The metal has a stable structure, high wear resistance and hardness.
- Average tempering at 350-5000C - for dies, springs, leaf springs. The structure has good plasticity and high elasticity.
- High tempering at 500-6800C - medium-carbon structural steels. Provides high strength, toughness, and plasticity.
Hardening a knife at home
Many centuries ago, master blacksmiths wondered about the hardness of the blade. And many of them understood that steel must be cooled quickly after heating. Damascus craftsmen hardened steel in gorges where strong winds blew. They believed that the force of the wind was transferred to the blade, and it became elastic, hard and did not break.
Hardening the cutting edge of a knife.
A little more history
Some blacksmiths used sheep urine collected for three days for this purpose. And others used the boy’s urine for such a process, and he had to be red-haired. These are the tricks the masters of the past used. By the way, the use of urine can be partially justified, since the presence of salts in it accompanied the rapid absorption of heat from the hot metal.
There were even quite barbaric methods of hardening, a red-hot blade was stuck between the ribs of a slave, and it was believed that his strength was transferred into a metal blank. It's good that those days are over. But people gradually noticed that if, after heating the metal, it was placed in a salty environment, its quality and characteristics improved.
Time passed, and thousands of methods were tried before achieving a positive result. The young scientist metallurgist D.K. Chernov, who worked on this problem in 1866, achieved considerable success in determining certain values for each metal.
The plant where Mr. Dmitry Konstantinovich Chernov conducted the tests completely got rid of defects and this man can be called the progenitor of modern metallurgy. Today, any student, having a wealth of knowledge accumulated over centuries, can cope with the hardening of steel.
Choosing steel for knife hardening
As you know, steel is nothing more than an alloy of carbon and iron. Additives are added to them in small doses. They do not play a big role on the quality of the future blade. The most important element is carbon.
Additives can be such as zinc, chromium, molybdenum, calcium, etc. But the less carbon in steel, it acquires high strength, but wears out faster and corrosion develops faster. For proper hardening, you must know the composition of the future blade.
It is best to carbon analyze the steel.
Ideal hardening of a knife blade.
If the future product is, for example, made from a file or a car spring. Hardening in this case is simply necessary, especially since forging such a metal implies its mandatory heating. You can check the quality of hardening at home, but it is quite “cruel”.
You need to tighten the finished blade in a vice and begin to gradually bend it, and if the blade breaks at around 45 degrees. We can safely say that the hardening was carried out correctly.
But this should be done after your first independent hardening of the blade, you need to remember the whole process well and repeat it again.
Hardening methods
There are essentially 2 types of hardening methods. On an open fire and in the oven. But, unfortunately, in an ordinary fire it will not be possible to raise the temperature above 900 degrees. Then the oven comes to the rescue. You can make it yourself. This is a rather difficult process, but once you make it once, it will serve you for a long time. Moreover, if you are a beginner master, you simply need it.
In the cell
Next we will talk about how to make your own muffle furnace for proper heat treatment of workpieces, and now we will simply and briefly describe the hardening process in it; the blade steel will be used 50Х14МФ:
- We heat the oven to the desired temperature, in this case 1070 degrees, and immerse the blades in the oven.
- Having loaded the blade into the oven, we heat the oven again to 1070 degrees, and at this temperature the countdown begins. The principle is simple: 1 minute 40 seconds for every millimeter of blade thickness.
- After the required time has passed, the blade is pulled out and cooled in air for 15 minutes under light pressure.
- Then the metal is tempered in the oven at 200 degrees.
Hardening a knife in a chamber made at home.
With this process, the steel gains a hardness of 56 HRC.
But keep in mind that in this case, hardening took place without immersion in liquid. Each steel has its own hardening conditions. And the result you want to achieve will depend entirely on the process itself.
On an open fire
The method, one might say, was tested by our ancestors and has been around for many years.
To properly harden steel, without any precise measuring instruments, so to speak “by eye”, you need to be attentive and patient. The only way to check is with a magnet.
When a metal reaches a certain incandescent point, the so-called Curie point, it stops interacting with the magnet.
And one more sign is the color of the workpiece itself, it should turn dark red. But you also need to make sure that no blue or black spots appear during the process, this indicates overheating. The workpiece should be placed in the coals when the color of the flame from them is crimson.
What you will need:
- mineral oil in a container (can be worked off);
- bucket with water;
- well prepared coals;
- long metallurgical pliers.
Hardening a knife over an open fire.
After the part has acquired the desired shade and is not magnetic, you need to carefully take it with pliers and lower it into the oil for 3 seconds, and this must be done several times. Keep the workpiece in the oil a little longer each time. And at the final stage we immerse it in water.
How to make a chamber for hardening metal
It is clear that when making such a camera, it is better to take the process seriously, since you will not be making it for one day or once. Let's try to briefly describe the manufacturing process of such a chamber; it is also called a muffle furnace.
- The main thing is to correctly manufacture the “body” of such a camera; here they resort to a simple process. The future neck is made from any hard paper material (such as cardboard) and coated with a thick layer of fireproof clay. Don't forget to make a thin layer of paraffin between the form-building paper material and the clay.
- In the second stage, the future chamber is dried for at least a day, and then placed in the oven and calcined at a low temperature of about 90-110 degrees Celsius. After this stage, the paper component can already be removed.
- The final firing of the structure occurs over an open fire at a temperature of about 900 degrees, then it is cooled under natural conditions. You need to wait until the camera cools down completely.
- After the workpiece has cooled, it acquires the properties of stone and becomes very hard, like a brick. Doors that open horizontally are attached to it.
- The final stage can be called wrapping the future furnace with nichrome wire, with a cross-sectional diameter of about 0.75 mm. The entire structure will require about 18 meters. To prevent short circuits during winding, it is better to immediately coat it with raw clay. We make two holes in the housing, one for a thermocouple (to measure temperature), and the second for visual control.
A self-made chamber for hardening a knife.
At this point, we can say that the furnace for heating metal is ready. As you can see, there is nothing difficult in making a muffle furnace for your home.
It is very good if there is a furnace for hardening steel. You can even purchase it in a specialized store, but the pleasure is not cheap. So how to harden a knife at home without a special muffle furnace? There is a way out, and to be honest, there is more than one.
But first, you need to conduct small experiments and remember in detail all your actions. If the result is positive, then the same manipulations can be performed with a real part.
This tricky technique will help you get better at working on small workpieces and acquiring the skills to heat and cool a blade. We must not forget that different alloys require different temperatures and cooling methods, otherwise cracks and brittleness of the workpiece cannot be avoided.
Heating source
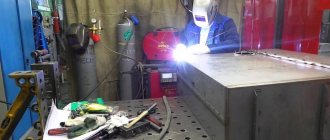
Basically, several sources of heating the workpiece can be distinguished. It is better to exclude the muffle furnace, since according to all expert estimates, it is the best in this matter. But we will try to evaluate other fairly common heating devices.
The forge copes quite well with heating workpieces. A blowtorch or propane torch may be suitable for this purpose; by trial and error, you can achieve the desired result. By the way, for these two options, you can build a small oven from refractory bricks, and the process will be simpler and the result will be positive.
Fireproof brick furnace for hardening a knife.
Well, the last, one might say, completely unacceptable source of heating is a gas stove. If you want to spoil something, use this option.
Cooling and holiday
For proper hardening, you need to maintain the correct temperature during cooling. It is preferable to cool stainless alloys in mineral oil with additives. And low-alloy steels, in aqueous solutions with salt and other additions.
Cooling the knife with mineral oil with additives.
There are many cooling options:
- blades with double-sided blades are dipped first into oil and then into an aqueous solution;
- Red-hot workpieces are dipped into the oil three times, each immersion taking a little longer than the previous one. And only then they lower it into the water;
- To give elasticity to the middle of the blade, this part is heated, then dipped in boiling water for 2 hours, and then in ice water.
With all these manipulations, it is worth considering that metal cools twice as fast in oil.
A workpiece that has undergone hardening is subjected to a special process called tempering to restore the crystal lattice of the metal structure.
There is nothing complicated in this procedure: the blade needs to be warmed up for a couple of hours. For alloy steel 270-320 degrees, for plain steel 150-200 degrees.
Determining the quality of work
Having gone through all the stages described above, I would like to know what will come of it. How to check the quality of the work done is quite simple:
- sharpening should last for a long time;
- the blade should not wrinkle or crumble when in contact with dense materials;
- the blade must have plasticity, bending and restoring its previous shape;
- a normal tool, with regular sharpening and constant use, should last at least 10 years.
Don't forget that true mastery comes with experience. And experience, as we know, is the son of difficult mistakes.
If you didn’t succeed the first time, or the second, then be persistent - the tenth time it will turn out no worse than others. Study the material, practice and sculpt true beauty.