Decorating a hallway with special wall panels is a beneficial choice in many respects. A sufficient variety of such materials allows you to choose many interesting options for creating a beautiful, fashionable hallway. At the same time, the main charm of this solution is practicality. After all, the entrance room is one of the most visited in the apartment, and maintenance of wall panels in the corridor or hallway is minimal. But besides this, this finishing material has many more advantages.
Recommendations
Cladding walls with plastic is not the most difficult job.
The main thing is to follow the instructions provided and use high-quality materials/tools. If you decide to do such finishing work yourself, you should take into account some recommendations from specialists.
- It is not recommended to combine PVC panels with more expensive materials. For example, a combination of luxurious marble and polyvinyl chloride will look ridiculous and disharmonious.
- According to experienced craftsmen, hot melt adhesive cannot be used for PVC.
- To carry out proper installation of panels around sockets, you should make all the necessary holes for them in the material in advance. Be sure to turn off the electricity before doing this.
- If you have constructed a wooden sheathing in the bathroom or kitchen, then you need to add a couple more millimeters to the resulting indentation, since wood is subject to deformation under the influence of dampness, moisture and temperature changes.
- PVC panels are a popular and in demand material, but they are not recommended for installation in the bedroom (both children's and adults). For such rooms it is better to choose more “breathable” materials.
- It is not recommended to cover walls with PVC panels immediately after purchase. They must rest in a dry and warm room for at least 2 hours.
- Wall finishing should begin only after the floor and ceiling are ready.
- The advantages of polyvinyl chloride panels include their ability to hide various communications. However, these elements must still be accessible to the owners. To do this, use removable inserts.
- If you use liquid nails to fasten PVC sheets, then you should not delay removing their sagging - these compounds dry out very quickly.
- Wall finishing materials should not have different openings at the junction points. This must be monitored when selecting plastic panels.
- At each stage of laying PVC panels, it is necessary to check the evenness of the structure using a level. This device will help avoid bevels and curvature of the finish.
- Experts recommend purchasing high-quality polyvinyl chloride panels. Do not look for too cheap coatings - such materials are already available. Ask the seller for quality certificates for the canvas. Study them carefully. Such finishing materials should not contain toxic compounds.
Fake diamond
For unusual wall decoration in the hallway, artificial stone is used.
1. Tiles based on gypsum or cement are available in many colors and types of surface relief. It imitates various natural textures from stone to brick.
The material contains cement or gypsum with plasticizing additives. The advantages of stone tiles are strength and long service life.
Artificial stone wall design.
If damaged, it can be restored. It's easy to install.
Disadvantage: low abrasion resistance, relative high cost.
2. Acrylic and quartz stone contain environmentally friendly mineral materials of natural origin.
Tiles made from these types of stone have high strength characteristics. Quartz stone is non-flammable and scratch resistant. Its low weight makes installation easy. It is easy to care for and can withstand wet cleaning.
When decorating the hallway, you should not use stone throughout the entire room. However, its fragmentary fragments without support from other materials look extremely strange. It is better to decorate one of the walls with stone. You can also imitate exposed ancient brickwork by combining stone with concrete-like plaster.
Review of manufacturers
Among domestic manufacturers of brick wallpaper, the first line is occupied. It was formed in the mid-90s of the last century. During this period, the company became a leader not only in the domestic market, but also abroad.
The specialists of this company daily analyze the building materials market and fashion trends, introduce and create new products in this segment. Most of the products are exclusive wallpapers, created by the world's best minds. The product quality is at the highest level, even in the economy segment.
Russia is represented in the ranking by one more. This manufacturer has ten years of experience. It produces its products from environmentally friendly raw materials and using European equipment. Excellent combination of price and quality.
The world leaders in this area are companies from the United States of America. Such high indicators are achieved not only due to high technologies and accumulated experience, but also due to the cooperation of this country with manufacturers from all over the world.
American brands are not afraid to experiment and annually release dozens of new collections designed both for domestic buyers and for export.
Among American manufacturers we can highlight the companies Wallquest, Fresco, Living Style. In the domestic market, wallpapers that imitate brickwork from Chesapeake, Nextwall and Tiffany Design are widely popular.
Analyzing customer reviews, we can state that they also highlight English manufacturers. First of all, due to environmentally friendly components, and secondly, for its commitment to the classic style. Although it is worth noting the fact that the UK is also developing modern collections designed for the hi-tech style. In Russian construction stores you can find wallpaper from Chelsea Designs, Prestigious Textiles and Sanderson.
Belgian companies - Calcuta, Grandeco and Omexco made history thanks to the creation of seamless wallpaper. This became possible after “crossing” paper, non-woven fabric and textile materials. By the way, their vinyl wallpaper was the first to be painted over the entire surface.
Germany has been a European leader in both the electronics and construction markets for decades. Thanks to established technologies and design ideas, companies such as Decor Deluxe, Architects Paper and P + S International take their place in the sun.
But manufacturers from the Netherlands have gone the furthest in terms of realism. They succeeded in recreating three-dimensional pictures and optimistic scenes. This contributed to the fact that they were included in the ranking of manufacturers with good performance. Manufacturers Eijffinger, Esta Home and BN International work only with modern components and keep up with the times.
Italian wallpaper is the standard of quality. Every second manufacturer from this country produces collections in classic, retro and loft styles. Their collections also include brick-like wallpaper. Non-woven and vinyl wallpapers are produced by the companies Decori Decori, Sergio Rossellini, Emiliana Parati. But in Russia the most famous brands are Roberto Cavalli and Limonta.
The Premium segment includes French companies – Casagedo, Casamance and Camengo. Unfortunately, their cost is not affordable for everyone, so they are not represented on the domestic market. But they are available upon individual order.
From time immemorial, Swedish wallpaper has been the most durable. They can easily withstand mechanical damage, have an unexpected design and are suitable for any room. The emphasis on safety is placed by MR Perswall and Borastapeter.
When choosing combined options for brickwork, wallpaper with silk-screen printing has proven itself well. The birthplace of wallpaper is the People's Republic of China. A few centuries ago, the Chinese were the first to use bamboo fabrics for interior decoration. Such wallpapers have a long service life. Among the Chinese manufacturers, Artshow and Loren can be noted.
Korean and Japanese companies produce fifteen-meter rolls to reduce seams. Companies such as LG, Oriental Coat, Fuji Kogua are rapidly conquering the market.
Among the countries of the former Soviet Union, manufacturers from Ukraine and Belarus occupy a worthy place in the domestic building materials market. They absorbed all the best that was in Soviet technologies and brought new ones from Europe.
Panels installation on the wall
MDF panels are usually attached to the sheathing, which is made of wooden blocks. The optimal cross-section of bars for such a task is 2 by 4 cm.
More detailed description of the process:
- Since the walls may be uneven, any unevenness should be eliminated using blocks and a level. Where necessary for this, wedges are placed;
- The first block is attached from the floor at a distance of 30-40 mm. All other beams are fixed from each other at a distance of 500 mm. The topmost beam is installed from the ceiling at a distance of 30-40 mm;
- Now the moment has come when you can start installing the very first panel. They usually start from the corner - this is mandatory. The panel is carefully leveled - strictly vertical. Further, on one side it is secured with self-tapping screws. On the other hand, they attach a clamp, then secure it with nails or with staples (in this case, a construction stapler will help you);
- If you install the first panel with a slope, then the entire wall will go further with a slope. Only the first panel will need to be fastened with self-tapping screws - all other panels are attached only with special staples to the sheathing (we are talking about gluers);
- The second panel is inserted into the groove of the first panel. On the other hand, fastening is carried out with a gluer.
A variety of finishes can be achieved using panels. Including - as in the photo
This is how panels are installed on the entire wall - easily and conveniently
.
A jigsaw is a tool that will help you adjust the height of the panels. You can also use a hacksaw for this.
- All joints (for example, between the ceiling and panels) are usually closed at the very end with fittings (glue will help with this work)
- The corners (both external and internal) are closed using glue with special fittings. It is customary to use liquid nails as glue.
We also invite you to watch a video about how specialists finish the corridor with panels
. Surely, this material will be very informative if you have never done such work before.
Everything will definitely work out - wall panels are a material that is easy to work with - even for beginners in this business.
What you need to prepare for self-assembly of MDF
Installation of MDF panels in the hallway is quite possible for anyone who knows how to use the simplest tools and devices.
You will need:
- Jigsaw. You can also use a hacksaw, but you can cut the MDF panel more accurately with a jigsaw - the cut is perfectly even and smooth.
- Electric drill. It is needed if the panels are fastened not with liquid nails, but with a frame.
Materials that may be needed during installation:
- Final corners having the same film coating as the panels;
- Wooden slats for the frame under MDF panels with a section of 4x2 cm;
- Wood screws about 80mm long, plastic dowels for attaching the slatted frame to the wall surface;
- Clamps – fasteners for fixing MDF panels on a wooden frame;
- Liquid nails for gluing corners, as well as for attaching panels to the wall.
Selection of materials
The hallway or corridor is the place in the house where you can give free rein to your imagination and dress this location in any materials.
Anything except ceramic tiles is suitable for decorating the walls in the hallway. This material is best left for kitchens and bathrooms.
Experts say that before decorating the hallway, it is necessary to level the surface of the walls and only then do the decoration. This procedure can be skipped if we are talking about mounted frames.
In order for the decor to be not only beautiful, but also of high quality, you need to properly prepare the room and sanding the walls is one of the most important actions. You can handle this task yourself or call specialists.
Many people, in pursuit of stylish and unusual decor, overdo it with bright accents, decorations and other decoration techniques. Remember the golden rule: more is not better.
If you want to decorate this location, just one accent is enough.
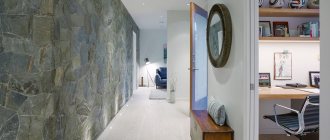
Another popular and winning technique that designers often use is dividing the hallway into zones, decorating each part separately and creating a so-called decorative wall in the hallway.
For example, decorate the wall with wooden panels, decorate with photo wallpaper, stone, etc.
When decorating, do not forget that the color of the walls in the hallway should be combined with the color scheme of the entire room.
Decorating the walls with wallpaper in the hallway does not lose its relevance. This is a universal material that is suitable for all rooms. This option is optimal in terms of cost, it looks good and it’s not difficult to change the wallpaper if you get tired of the image. Experts recommend using plain wallpaper for small hallways, without large patterns.
Using paints you can make a bright accent. Nowadays, modern stores offer a huge selection of wallpaper for painting, which can be diluted in various colors and shades.
How to decorate the walls of a small hallway
Finishing a small room with MDF panels is not an easy task. There is little natural light in the hallway, there are many doorways, which create problems during the installation of finishing materials. The room is designed both for the use of the owners and visiting friends, so such a place often gets dirty.
Taking into account the above features, it is recommended to decorate a small hallway with slatted panels. They are small in size and easy to install, allowing them to fit into any problem area.
For a small hallway, a suitable option would be light stripes that visually increase the space.
An excellent option is alternating white and yellow panels arranged vertically. Cover the doors with brown slats, the main thing is to match them to the color of the furniture.
Another method is to use vertical MDF panels of several colors, located only in the lower part of the hallway, and paste wallpaper of a suitable tone at the top.
Types of plastic panels
There are quite a lot of differences between the panels, but they are mainly distinguished by the method of decorating the panel facade and the dimensions of the modules.
Based on size, panels are divided into subtypes:
- lining. It looks like a long rectangular sheet. The panel consists of 2 plates with partitions and empty grooves between them. The length varies from 3 to 12 m, and the width from 100 to 500 mm, with a thickness from 8 to 12 mm. Used in finishing walls and ceiling surfaces. Attached to a pre-prepared sheathing.
- panel. Differs from the previous subspecies in dimensions. The length is 1220 mm, width 2440 mm, thickness 3.2 mm. The facade looks like tiled surfaces.
- tile. Produced in the shape of a square 30 x 30 cm or 100 x 100 cm.
Methods for applying façade patterns of panels are distinguished as follows:
Thermal transfer of the drawing. Special thermal films are applied to the panel and secured with varnish to protect against various types of damage. Such panels have bright colors that last for a long time, and they can be selected for different styles and interiors.
Offset print of a drawing. With a special roller in the form of an impression, used in printing houses, an offset print is applied to the panel facade and secured with a two-layer varnish coating.
Lamination. The quality of the drawing is excellent. Thanks to a certain film, for which special glue is used, the design looks voluminous and textured.
There are three options for the types of butt joints of panels:
- Seamless. The most popular of all, they are produced in widths of 20, 25, 30 and 33 cm. They have a perfectly smooth appearance, but are inferior in quality to stretch ceilings in terms of barely noticeable connecting seams. The perfect fit of the seams must be checked in the store before purchasing. The lathing should also be done with high quality.
- Embossed. They have a relief connection between the modules and are used for unstable surfaces such as house shrinkage. Available in width: 10; 12.5; 15; 20; 25; 33 cm.
- With rustication. These panels are similar to the first and second options, but the grooves at the ends of the panels are replaced with chamfers.
Variety of existing species
The tongue-and-groove fastening allows you to quickly and easily connect panels. Manufacturers produce a variety of materials for corridor finishing that meet customer requirements.
A rich range of colors, varied textures, design solutions - this is not a complete list that characterizes the panels.
The most common are:
- Tiled. They are similar to ceramics, but on the back they have a tongue-and-groove fastening. They are used as a single material and in combination with different types of finishes, resulting in an interesting design.
- Rack and rack ones are similar to lining; on the reverse side they also have a tongue-and-groove fastening, this makes their installation easier. The height of such panels can be from 2.5 to 6 m, width - 10-40 cm.
- Sheet panels are entire identical sheets inlaid with various ornaments. This material is perfect for uneven walls, and placing them on an ideal surface will not be difficult at all.
Types of panels in the corridor
The hallway is a place where dust, moisture and dirt brought in from the street often accumulate, so the walls need to be finished with moisture-resistant material that can be wet cleaned. PVC panels are best suited for this, especially since the market offers a wide range of these products. It is worth considering the most common types:
Tile - squares of various textures, dimensions and colors. Its parameters resemble clinker tiles and look great in combination with other finishing materials. Using tile panels, you can make the corridor look presentable and at the same time level the surface without resorting to plaster;
Using tile panels, you can make the corridor look presentable and at the same time level the surface without resorting to plaster.
Slatted - similar to lining, although made of PVC. Using slats, you can create any pattern in a room - horizontal, vertical, square herringbone. Excellent for rooms with a small area, as it does not visually conceal the space. The length of one panel is 6 m, the width reaches 40 cm;
PVC slatted panels in the hallway design.
Sheet - a large slab measuring 1.2 x 2.45 m. They are made from durable material with imitation wood, stone or with a decorative pattern. These panels are very easy to match to any interior. Installation is carried out using special glue on a previously prepared wall surface.
PVC sheet panels in the interior of the hallway.
How to combine beautifully with other materials
If you combine several types of materials in the corridor, it will turn out to be unusual and attractive. If space in the room allows, then the panels can be combined:
- With wallpaper;
- With frescoes;
- With plaster;
- With ceramic tiles;
- With paint.
Combination of PVC panels with wallpaper.
Often the hallway is divided into 2 zones - the entrance and the vestibule, using different materials for wall decoration. For example, cover the entire corridor with wallpaper, and cover the fragment near the door with panels. Or use decorative stone near the entrance, and the rest of the room with lining material.
It is not necessary to use different textures of materials when zoning; you can combine sheet and slatted panels.
PVC slatted panels.
Wallpaper with panels is combined, dividing the space horizontally, for example, the lower part of the walls is lined with lamellas, and the upper part is pasted over or painted. This finishing option looks especially advantageous in a room with high ceilings.
Wallpaper with panels is combined, dividing the space horizontally, for example, the lower part of the walls is lined with lamellas, and the upper part is pasted over or painted.
Decorative stone can be glued on top of the lamellas, thus decorating individual sections of the walls.
Plastic panels: varieties
This finishing material is made of polyvinyl chloride, which is why they are often called PVC panels. This material, in a semi-liquid state, is extruded through a special mold, after which various patterns are applied to the panels. Often the design is already prepared and placed on a film that is simply glued to the front side of the panels. The surface can be either smooth or textured. Panels with a pattern retain an attractive appearance for a long time, but they are much more expensive compared to regular panels.
PVC wall panels with a pattern
There is another technology when the design is applied directly to the panels and covered with two layers of varnish. This type of panel does not have a long service life, since the quality of the pattern is lower.
Ceiling and wall panels
There are panels both for finishing walls and for finishing ceilings, and they differ in the thickness of the panels themselves and the partitions in the panels. Those for ceilings are 2 times thinner. If you look at the cut of the panel, you can easily determine its purpose. In addition, the ceiling panels have a glossy surface, and the quality of the joints is such that they are practically invisible.
PVC ceiling panel
There is another type of plastic panels - this is plastic lining. The thickness of the panel is 10 mm, and its width is 10 cm, and it has shaped edges, so when upgrading the walls, you get a surface similar to that obtained when installing wooden lining, that is, relief.
Plastic lining panels
Wall panels come in different widths, but most often the manufacturer produces PVC panels with a width of 25 and 37 centimeters, with a length of 2.7 and 3 meters. As for the cost, it depends on various factors, since different manufacturers use different technologies.
PVC panels for walls – thin
There are various PVC panels, but those that consist of two layers of plastic connected by thin bridges have a number of disadvantages. The main drawback is their poor resistance to physical stress. If you press on the panel even slightly, a dent will appear, and if you press harder, you can push it through. This drawback always becomes the stumbling block because of which people refuse to use these types of panels.
PVC panel sectional view
Recently, a completely different type of PVC panels has appeared on the market, which do not have this drawback. Their thickness is only 3 mm and they have no cells, and a pattern is printed on the front side. The panels differ in size 950x480 mm, although the dimensions may be different. These panels also differ in their installation technology, since they are glued to a flat surface. Due to their thinness, the panels are easily cut with scissors, which simplifies the processing process. This type of panels takes up virtually no usable space, but they can only be glued to flat walls.
Flexible PVC panels
Prices
The cost of wall panels largely depends on the type of processing and the material used. For each type of panel it is different:
- laminated – 290 rubles;
- PVC – 235 rubles;
- MDF -150 rubles.
How to use such a material as a glass wall panel for the kitchen can be found in this article.
Wall panels for finishing the corridor can be presented in various variations. Here you can change the color, texture, shape of the panels. But at the same time, it is necessary to understand that the main selection criteria remain such material features as strength, sound and heat insulation, and fire resistance.
Ceiling design made of plastic panels in the kitchen, bathroom and hallway with photo examples
The choice is determined by the specifics of the premises and the preferred design. If you can install a dark ceiling in the hallway, then for the kitchen you should consider white, cream, beige, soft blue and light green colors.
The moisture resistance of the material is ideal for the kitchen: the design with such a ceiling is charming
Any colors will look good in the bathroom if they match the tone of the walls
In the kitchen, plastic lining looks good and is very easy to clean
Small hallways look neat with this decoration. And the non-standard texture seems to turn everything upside down
Related article:
Plastering slopes
The method of finishing internal slopes with plaster was at one time very popular. This option is suitable for use in houses made of brick, monolith and stone. For wooden buildings, other methods will be more suitable.
In areas where serious frosts are possible in winter, the use of modern heat-insulating plaster will be relevant. This mixture prevents freezing of slopes.
Stages of making plastered slopes with your own hands:
applying the plaster mixture to the slopes in several layers
Important: the next layer is applied only after the previous one has completely dried. Plastering lasts one to two weeks; foaming gaps; surface primer; puttying and painting slopes.
The method of finishing slopes using plaster compounds has a number of serious disadvantages that outweigh the positive qualities of the method. These include:
- inconvenience and complexity of the procedure;
- the high cost of the materials used (cheap mixtures eventually lead to the passage of cold air through the window);
- the formation of gaps due to differences in the properties of the plaster mixture and the plastic of the window;
- fogging of windows due to lack of required thermal insulation.
Plus, professional skill is required to do this job correctly.
Due to the above-mentioned disadvantages of finishing slopes with plaster, some experts do not even recommend considering this method as a do-it-yourself finishing option.
Materials
Everyone approaches the choice of material taking into account their financial capabilities, as well as after studying the properties and characteristics of the raw material.
The most budget options include MDF, PVC, plastic, fibreboard, chipboard, mirror polystyrene. It will be expensive to finish with panels made of wood, cork, bamboo, stone, glass. Other materials include:
- MDF. Made from pressed wood. The material is quite popular. One can note its high strength and resistance to external factors, for example, water and household chemicals. It has sound and heat insulation characteristics. Under the influence of high temperatures, such panels lose their original attractive appearance.
- PVC. These panels are also quite popular. It is convenient to purchase them in sheets, as this will simplify the installation process. In the manufacture of PVC panels, materials hazardous to human health are not used. Among the properties are moisture resistance and ease of care. With prolonged exposure to sunlight, PVC is subject to deformation, but this does not threaten the panels in the corridor. They are produced in different colors, you can easily imitate natural materials (wood, stone), and it is also possible to apply any design or pattern.
- Plastic. The material is not completely natural, but this disadvantage can be compensated for by some advantages. Plastic wall panels can help solve the problem of sound insulation. Differ in design diversity. There are models with matte, glossy or cellular coating, with various patterns and imitations. Plastic is moisture resistant and easy to clean
- Fiberboard and chipboard. This is an inexpensive option, almost indistinguishable in appearance from wood. Suitable for creating a simple, unobtrusive interior. Panels of this type are not strong and durable.
- Mirror polystyrene. Such panels are attractive with their design. A special glossy film imitates a real mirror. The advantage over the mirror is that polystyrene cannot be broken, it has good flexibility. These panels are best used as additional decoration, combined with other materials.
- Wood. This expensive raw material will give the room luxury, elegance, and respectability. A good solution would be to combine it with other finishes. Wooden panels are good for interior decor due to their environmental friendliness. They are multi-layered and highly resistant to moisture, heat, external damage, and sun exposure. As a rule, they are made from walnut, oak, cedar, alder, and maple wood.
- Cork and bamboo. Durable, natural, lightweight material. It has all the necessary properties for finishing a living space, especially a corridor. Retains heat and increases sound insulation. The honeycomb structure turns the panels into decorative wall hangings. Bamboo panels are woven pressed thin sheets, they are impregnated with a special binder. Excellent for decorating curved surfaces when creating a design with an oriental flavor.
- Stone. Finishing with artificial stone can create a lot of trouble, since the walls need to be prepared for it: properly finished and primed. The material itself is not cheap, but the finished work looks very impressive, aesthetically pleasing and original. Such panels are durable and resistant to various types of damage. They are fire-resistant, do not require a special frame during installation, and are fixed directly to the surface with glue.
- Glass. Glass panels are a very unusual choice. There is a variety of colors. They can be mirrored, with shades of various metals. It is recommended to decorate the upper parts of the room with these panels due to their fragility.
Decorating the corridor with wall panels with your own hands
The popularity of wall panels is explained by the ease of their installation.
- If the walls in the hallway are smooth, you can attach the slabs directly to them using “liquid nails.” The advantage of this method is that it does not require additional effort to install the sheathing. The fastening system itself does not take up space. The disadvantage of this installation method is the inability to replace one of the finishing elements if necessary;
- If you need to hide wiring or disguise uneven walls, the panels are attached to the sheathing with self-tapping screws or clamps.
Preparing for work
- Before starting installation work, you should calculate how much material will be needed. Take measurements of the room, take into account all the nuances: switches, sockets, allowances for the baseboard;
- Choose a mounting method. Due to their light weight, MDF and fiberboard boards can be glued to the wall. Other types of materials will require the installation of sheathing. If there are no sudden changes in humidity and temperature in the hallway, you can fasten the slabs with self-tapping screws. Otherwise, use clamps. They will prevent the material from deforming;
- If you decide to use glue, check the condition of the walls: they should be smooth. If necessary, they should be plastered and puttied. For better adhesion, prime the walls;
- Regardless of the installation method, treat the walls with a disinfectant to prevent mold and mildew.
Installation
Glue mounting:
- Apply “liquid nails” in a zigzag pattern to the prepared wall;
- Press the finishing sheet onto the surface.
Fastening to the sheathing:
- Form a frame from slats using self-tapping screws or dowel-nails;
- Secure the panels to the sheathing with clamps;
- Installation should begin from the corners, moving gradually in the opposite direction.
Wall panels can be smooth and textured, plain and patterned, have a flat surface or 3D design. But any of them will make the hallway a comfortable and stylish room.
Decorating the corridor with wall panels with your own hands
There are several methods for installing wall panels with your own hands - it depends on the quality of the walls and the characteristics of the finishing materials.
The first option is using glue. This option is only possible in the case of smooth walls, provided that the panels themselves are not heavy, for example, MDF, fiberboard. In this case, the adhesive is applied to the surface of the tile in a zigzag motion, after which the material is pressed against the wall.
In this case, the glue is applied to the entire surface in a zigzag pattern, after which the panel is pressed against the wall. The adhesive itself must be elastic and not interfere with the thermal expansion of the finishing material. However, this method has not found widespread use due to its fragility - most builders use glue as an additional fastener, using self-tapping screws as the main one.
The method of fastening with self-tapping screws to the sheathing is more reliable, but it is not suitable for rooms with large temperature fluctuations. And all because self-tapping screws do not allow materials to expand if necessary, which can cause deformation of products.
Another popular method is fastening with clamps. In this case, the panels in the corridor will not deform during thermal expansion.
The following tools and materials will be required to complete the work:
- wooden bars for sheathing;
- self-tapping screws;
- clamps;
- liquid Nails;
- 2 cm nails for mounting clamps;
- drill;
- hammer;
- screwdriver;
- building level.
Additionally, you need to purchase platbands, baseboards and corners to match the wall panels in the corridor.
Installation begins with the installation of the sheathing. First, the crossbars are mounted, which are fastened in increments of 25-30 cm using self-tapping screws. The main thing is that the lower crossbar is installed so that it is in contact with the floor, the upper one - with the edge of the panels. Due to this arrangement, sufficient structural rigidity can be ensured. Before directly fixing the slats, markings are carried out to secure the poured out without displacement.
Thermal insulation materials are laid before the actual installation of the finishing. The installation method depends on the chosen type of insulation: materials in the form of mats or slabs are laid between the laths; if we are talking about film, then the insulation is placed under the slats themselves.
After this, you can begin the direct installation of the sheathing:
- Markings are made on the surface of the walls.
- Wooden slats are secured with self-tapping screws.
After this, all that remains is to install the finishing, not forgetting about the installation of skirting boards, which are necessary to hide possible defects.
Installation:
- If materials made from natural wood are used, then you need to buy them at least 3 days in advance - the wall panels must lie in the room where the repairs will take place for at least 40 hours. Due to this, deformation of the finish after installation can be avoided.
- Installation begins from the corner - a plastic corner is put on the first wall panel, then the product is attached to the sheathing.
- Subsequent products are inserted using the tongue-and-groove method. Similarly, the cladding is carried out around the entire perimeter of the apartment.
- Upon completion of the work, installation of platbands and skirting boards is carried out.
But it is also possible to finish without lathing - using glue. You can find a wide variety of types of glue on the construction market, but there are several secrets for choosing it:
- after drying, the composition should form a film layer and be transparent;
- the glue should not be afraid of moisture or temperature fluctuations;
- it is necessary that the selected composition provides reliable fixation, hardening quickly.
Installation instructions:
- They take the material and wipe it to remove dust and minor dirt - the material must be clean.
- Glue is applied to the back surface in a dotted manner, there should be about 3-5 cm between the drops.
- Apply to the wall (remember that the surfaces must be smooth).
- Press the material against the wall for the time specified in the instructions (approximately 5-10 seconds).
If installation is carried out using liquid nails, then after gluing it is recommended to tap the product (you need to act carefully so as not to damage the material), then tear it off for a couple of seconds. This action is due to the fact that liquid nails require little ventilation - thanks to this, the composition will acquire the required rigidity.
How to install
Wall panels can be fixed in several ways - it all depends on the quality of surface preparation:
- PVC panels or slabs can be installed with glue, provided that the surface of the walls is perfectly level. The glue is applied to the entire plane of the panels from the inside and pressed firmly against the plane;
- Fastening with self-tapping screws to a pre-assembled wooden frame;
- Fastening lamellas using clamps is a very reliable and popular method of covering surfaces.
PVC panels have a strong fastening, so they are durable.
Before you start finishing the hallway with PVC panels, it is worth making accurate calculations on the material. To do this, measure the height of the room and the total length of all walls.
An option for decorating a hallway using PVC panels.
Wall panels are an excellent material that allows the consumer to transform the hallway space with the least investment. And if you do the installation yourself, you can save on installation costs.
Calculation
It is recommended to proceed to finishing work only after all the necessary calculations have been made. This stage is needed to find out the exact number of PVC panels that you will need for wall cladding. Thanks to accurate calculations, you can avoid unnecessary overpayments due to the purchase of material with a large supply.
To calculate the vertical volume of material:
- first you need to measure the entire room (that is, find out the length around the perimeter);
- then you should subtract the width of window and door openings;
- Now the remainder must be divided by the width of one PVC panel.
As a result of such simple calculations, you will get the number of panels needed to finish the room. It is recommended to add a couple of additional units to the resulting value. This is necessary so that you have a reserve in case some parts are damaged.
As for calculating the amount of material horizontally, it is carried out as follows:
- first you need to measure the area of the room;
- then the area of door and window openings should be subtracted from it;
- the resulting number must be divided by the area of one panel from the kit.
Add 10% to the final figure - this will be a reserve. It is worth considering that when laying horizontally, plastic panels will have to be cut, so you will have leftovers in the form of PVC scraps.
How to make a ceiling from plastic panels on a frame
The material has been purchased, extraneous furniture and people have been removed from the room, it’s time to start installing a ceiling made of PVC panels with your own hands! The sequence of work consists of preparing and installing the frame and installing the panels themselves. To help with clarity, we suggest watching a video on installing a ceiling made of PVC panels with your own hands:
Assembling a frame from guide elements
First, prepare the working surface: the old ceiling is cleaned of dirt or previous finishing material. Next comes the stage of marking the frame: you need to draw a line that you should follow when attaching the profile. The markings are made on a sheet of paper: the lathing is made with a light CD profile. The ideal step between the cross bars is 60 cm.
The work can be carried out by one person
For installation you will need a drill and dowels: keep in mind that it takes 1 dowel per half meter of profile and 1 self-tapping screw per half meter of panel.
Fasteners for the horizontal profile must be installed around the entire perimeter: rigid UD guide profiles are placed on the dowels. The transverse frame is installed on U-shaped fastenings