Printed concrete (stamped concrete) is a relatively new construction technology for Russia that allows you to turn a “dull gray” concrete surface into a real work of art.
That is why stamped concrete is often called “architectural concrete”. Using this technology, you can visually accurately imitate the surface of areas made of “noble” components: granite paving stones, slate, marble, brick, weathered stone, shell rock and other materials. .
Printed concrete manufacturing technology
The technology of stamped concrete is not prohibitively complex, and can be implemented on your own using relatively inexpensive universal construction tools
The essence of the process of making architectural concrete is to give the surface of the prepared concrete site texture and color: granite paving stones, boardwalk, brickwork, animal skins, whatever. For this purpose, special rubber stamps, special coloring and strengthening materials, as well as special tools and equipment are used.
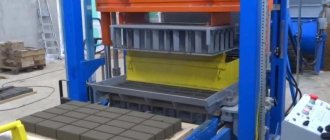
To implement the technology of printed concrete on your own, you will need to have, purchase or rent special tools and equipment. In particular, you will need the following tools for stamped concrete:
- Concrete mixer, galvanized buckets, shovels and bayonet shovels for making the base - heavy concrete. Note If ready-made concrete material is purchased from the nearest bacon factory, there is no need for this equipment.
- Special rubber stamps in the amount of 6-7 pieces and a tamper for “compressing” the concrete surface with stamps.
- Angle grinder with a cutting tool “for concrete”, for opening expansion joints and correcting stamping defects.
- Scraper for leveling the surface of concrete.
- Magnesium floating strip for rubbing in color strengthening agent.
- Magnesium polisher for leveling concrete.
- Manual edge bender for forming corners.
- Steel trowel.
- Vibrating screed.
- Rustication to eliminate defects in joints.
- Texture roller for processing stamp joints.
- Paint brushes, paint roller, plastic buckets.
In addition, you will need 100x20 (25) mm edged boards for formwork, M350 concrete and a number of special finishing materials which will be discussed below. As you can see, the technology of blasted concrete will require certain costs for the purchase of special tools.
However, considering that the price for 1 m2 of printed concrete starts from 1,500 rubles and above, it makes sense to spend money. Moreover, some of the above tools will definitely be needed later for other construction work on a private or country estate.
What is hidden behind the concept
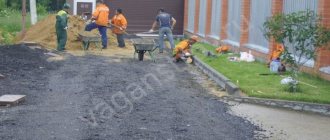
American technology for constructing concrete paths involves the use of so-called printed or stamped concrete. In essence, this is an artistic version of a pedestrian surface, the main component of which is cement mortar. And decorative uniqueness here is achieved by creating one or another relief using pre-made stamps. In this way, for example, an imitation of brick, stone, wood texture is created, or animal tracks, leaves, burlap are created. There are practically no restrictions on realizing your fantasies. The main thing is that the drawing is expressive.
Source hozsektor.com
Thus, we can highlight several undeniable advantages of decorative concrete:
- the ability to create a unique coating in terms of relief, pattern, roughness, color in a single or combined design;
- low cost when compared with natural analogues and care products;
- the practicality of a concrete screed that can cope with both natural phenomena and the load from pedestrians, cyclists and even cars;
- accessibility of installation work, including for novice craftsmen;
- The durability of the canvas with proper installation and subsequent care reaches 15-25 years (this is longer than just poured concrete or laid paving slabs).
The disadvantages are also worth mentioning. The complexity of the process of creating a track lies not only in the multi-stage nature, but also in strict adherence to all the nuances. And this is noticeably reflected in the labor estimate (paving slabs are cheaper). Plus, here you have to use special compounds for dyeing the canvas. Finishing agents need to be renewed approximately every 2-3 years as they wear out.
Source yandex.net
Compound
The preparation technology and recipe for printed concrete are not very different from the classic version. To mix the solution, the same Portland cement with grades M400 or M500 and clean sand with a size of about 2-2.5 mm are used. Gravel is selected with uneven edges (crushed stone and pebbles are excluded) and fine-grained. One part of the binder component contains 3 of each mineral filler.
As an addition to the construction of the roadway, reinforcing polypropylene fiber and a plasticizer are added to the concrete solution. A portion of the hardener is usually calculated based on a cubic meter of working mass - this is 600 grams. A means for improving the plasticity of the concrete mixture is added taking into account the recommendations from the manufacturer (the dosage almost always differs for different compositions).
Source ozone.ru
In the case of stamped concrete, the working time of the solution is one of the important points. Therefore, due to the limited period, preparation of the mass should be carried out within 5-8 minutes. To simplify the process, reinforcing fibers and dry plasticizer are pre-dissolved in buckets of water before pouring it into a concrete mixer or trough with dry components.
Types of stamps
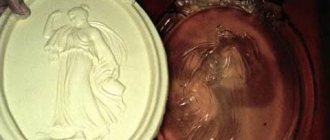
To create an impression, factory-made or self-made pads are used. It is important here that the material is durable, lightweight and easy to use. On the construction market, tools are presented in the form of a platform with handles in the center or on the sides.
As a rule, manufacturers offer three options for stamps for decorative printed concrete. Aluminum, due to its natural softness, is intended for the formation of simple patterns such as brick or tile masonry. The platforms are made from polypropylene by injection molding and the material has a high density and is light in weight. Therefore, the range here is much wider. Silicone stamps are less common. On them, due to their elasticity, the protrusion for imprinting a design relatively quickly becomes unusable.
Source mycona.ru
Stages of work
As already mentioned, you can make printed concrete yourself. However, it is best to take on this work with some experience in handling concrete. Problems that inexperienced stamped concrete layers may encounter:
- The material hardens quickly, making it impossible to get a clear print.
- Difficulties in correcting typing errors.
- The need to be able to handle an angle grinder, trowel, magnesium lathe and other construction tools.
In general, the technology for producing architectural concrete consists of the following main stages:
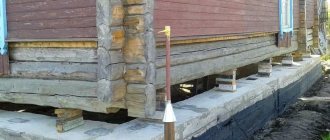
- Surface preparation. The base for pouring concrete for stamping is a standard planned area of the required dimensions. The boundaries of the site are marked with pegs and a cord. Next, along the line of the cord, the soil is removed to a depth of 20 cm. The resulting surface is compacted, a crushed stone cushion 10-12 cm thick is poured, formwork is installed from boards, and a reinforcing mesh is laid, placing pebbles 3-4 high under the mesh cm.
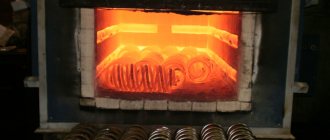
- Preparation (purchase) and pouring of heavy concrete grade M 350 or higher.
- Leveling the surface as a rule.
- Compacting concrete with a vibrating screed.
- Smoothing the surface with a trowel until the surface is smooth, uniform and horizontal.
- Application of the “MONOPRESS” hardener. This is a colored hardener, which is a fine powder of various colors. Work on its application begins after the initial hardening of the surface. The powder is spread manually in a format “from the center to the edges of the concrete.”
- Allow the initial layer of hardener to penetrate into the concrete for 10 minutes. Smooth the surface with a magnesium trowel and apply a second layer of color hardener.
- The edges of the corners are formed using a manual edge bender.
- The next stage is the application of a special separating component from Increte Systems to the concrete surface, which ensures that the loaf does not stick to the molds. The separating component is applied using a paintbrush. The brush is immersed in the container with the component, and the release powder is sprayed horizontally using double hands over the surface of the base for stamping.
- Stamping. One of the most critical stages. Before stamping, it is necessary to check that the surface has the required degree of ductility. To do this, you need to press your finger in different parts of the site. If, after pressing, an imprint with a depth of 5-6 mm remains, you can begin stamping. The available rubber stamps are laid out on the surface according to the accepted pattern, and pressed into the concrete with a tamper. After this, the prints are left to harden for 1 day.
- Elimination of stamping defects using rustication.
- Cutting temperature-shrinkable joints using a grinder and a disc for concrete.
- Washing concrete from the separating component with running water.
- Washing concrete with hydrochloric acid solution.
- Spraying Clear Seal with a paint roller and paint brush. The sealant serves as protection for stamped concrete from abrasion, and also gives its surface rich color and a pleasant shine.
- Drying. After the sealant has dried, stamped concrete is ready for use.
Variety and Application
More often, press shapes imitate expensive materials used in construction and design, which significantly reduces the cost of work.
These are paving stones, different types of stones, bricks, boards, skins. They successfully embody more subtle patterns - plant patterns, cobwebs, openwork, animal tracks. Accordingly, the scope of application for printed concrete is wide:
Concrete stamps are widely used for laying garden paths or sidewalks.
- interior and exterior decoration;
- garden paths, sidewalks;
- large areas and playgrounds;
- parking lots, gas stations;
- floor coverings for terraces, gazebos, restaurants, centers;
- flights of stairs.
Decorative concrete is of particular interest to restorers. It is much easier to replace an antique surface or artifact with a modern material using a stencil. In addition to the uniqueness of the texture, the technology is valuable in its ability to convey a rich range of colors thanks to special pigments, their combination and application methods. The list of materials where stamping is applicable is also impressive - different types of plaster (gypsum, cement), glue, concrete, putty.
Types of stamps
There are 2 types of pressing molds: hard (made of hard plastic) and soft. Rigid ones are good for large geometric patterns, but have a number of disadvantages:
- do not impart a glossy or matte appearance to the finished product;
- have a short service life;
- require preliminary preparation;
- the print does not show the fine details of the design.
Innovative relief prints are created by pouring liquid polyurethane into the simulated material in silicone. The excellent flexibility of the stencils allows them to be easily removed after stamping. They require a more precise and careful approach to work, but the drawing turns out clear and extraordinary. From a practical point of view, the polyurethane mold is resistant to abrasives and chemicals, elastic, and reusable.
A few tips for quality stamping
In addition to the basic instructions, I would like to point out a few more nuances that it is better to know about before starting all the work.
If you are printing concrete for the first time in your life and have no idea what the transferred stamp texture will look like on the surface, then it is better to make the first print on tightly compacted sand.
You should not repeat a printed image on a concrete surface, especially if you decide to make a surface that imitates natural materials. Random reliefs always look much more realistic.
To achieve the effect of an antique surface, you need to use a separating material.
It must be applied to a layer of solution that has not yet dried. First you need to spread the powder, and then apply a liquid release material on top. The liquid will dissolve the powder, causing spots to form on the concrete surface that look like abrasions.
It is very important to ensure that the release material fragments are thoroughly pressed into the solution during stamping. If this moment is missed, the dye will be washed off during washing.
You should also ensure that the worker who will be walking through the stamps wears clean shoes. It is highly undesirable for it to have traces of building materials or dust on it. These elements can get into the solution and thereby disrupt the texture of the surface.
Return to content