Do-it-yourself spot welding from... a microwave!
Previously we wrote: what can be done from an old microwave oven.
Today, let's take a closer look at how to make a spot welding machine with your own hands from a high-voltage transformer or MOT (Microwave Oven Transformer - microwave oven transformer) from an old, unusable microwave oven. Of course, provided that the high-voltage transformer is working (at least its primary winding), and something else is faulty: magnetron, cable, control board, etc. For a master, there is a need for spot welding. This spot welding produces a current of up to 800 Amperes, which is quite enough for welding sheet metal up to 1.5 mm.
So, we need an old microwave and the larger it is, the better. Larger microwaves have a higher power transformer. If you don’t have an unnecessary microwave, you can often buy old microwaves cheaply on forums and free bulletin boards, or you can look for them near trash containers or ask at TV repair shops.
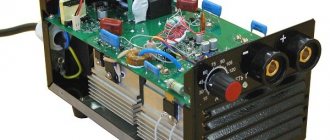
Attention! Before disassembling, the microwave must be turned off from the power supply. Next, we disassemble the microwave oven. There are several components inside a microwave oven that are dangerous even when turned off and can cause serious electric shock - these are capacitors (see photo) that can hold a charge for some time. Therefore, we discharge the capacitors by connecting their terminals to each other with a screwdriver. The high voltage transformer is located below.
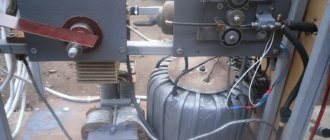
Of the insides of the microwave, we are primarily interested in the high-voltage transformer.
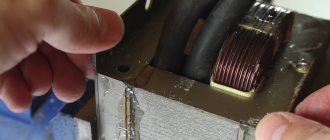
The transformer consists of a core and two windings: primary and secondary. The primary winding is wound with thicker wire and contains much fewer turns.
The transformer core is held together using two thin welds, as seen in the photo.
How to make a transformer for welding?
There are two options for removing the winding:
- Disassemble the transformer core.
- Cut off the winding with a chisel.
Method 1.
You will need a hacksaw or grinder to cut this seam, as well as a hammer and chisel to get to the transformer windings.
Be careful when removing the primary winding from the transformer, as we will need it later.
Try not to bend or scratch it.
The secondary winding can be wound very tightly and is difficult to remove, so if you don’t need it, you can cut it and pull it out in pieces, it will be much easier.
Now, after all the manipulations, you should have in your hands an intact and undamaged primary winding of the transformer and its core, divided into two parts (without glue and paper that held its windings inside).
The next step is to wind the secondary winding of the transformer. To do this, you need to take a copper (required!) cable of approximately the same cross-section as the slots in the transformer core (about 7 mm) and wind two turns.
I then bonded the transformer core to its base using regular 2-part epoxy resin and gently pressing it in a vice and left it to glue.
Once the epoxy has dried, the transformer should look something like this.
Method 2.
It’s also not easy, but the transformer hardware will remain intact, which is important. To do this, you need to remove the winding using a chisel, chisel, hacksaw, etc.
We also remove shunts.
Next, we wind a new winding onto the transformer. It is made from stranded wire with a cross-section of at least 100 mm2 (or a diameter of more than 1 cm). It will be enough to make 2-3 turns. If the wire has too thick insulation, you can remove it and replace it with fabric insulating tape. If two transformers are used at once, then the secondary winding for them is made common, but it is very important to correctly connect the leads from their primary windings.
The voltage at the output of the transformer was just over 2 volts, but the current was about 800 Amperes! This is sufficient current to ensure a strong connection when welding metals.
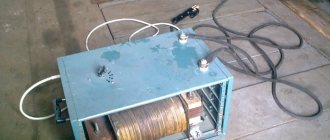
DIY welding body
Now all that remains is to make a housing for the spot welding machine. You can make it out of metal.
You can make the body out of wood. You can make it based on what you have on hand.
The photo below shows the process of making the case.
Once I had all the body pieces cut out, I carefully rounded the edges using a router bit. You will need to make a notch on the upper arm so that the arm can easily rise up without resting on the body.
On the back panel I cut two holes, one for the switch, the second for the power wire.
I then attached the switch to the back panel and inserted the power cable into the hole. The thickening on the cable prevents it from falling out.
I secured the transformer to a wooden base using regular self-tapping screws. I put a terminal on one of them, which I connected to ground.
I then sanded, primed and painted all the parts. I chose two colors - black for the body, and yellow for the moving parts (levers).
Also, when making spot welding with my own hands, I used:
- Power cable;
- Door handle;
- Switch;
- Copper holders for contact electrodes (2 pcs) (they can be bought in stores selling welding equipment);
- Thick single-core copper wire for making contact electrodes (about 5 mm);
- Wood screws, nails;
After the painted body had dried (I gave it about 2 days), we began the final assembly of the device.
Electrodes for spot welding
The electrodes of equipment for spot welding perform several functions simultaneously: compression of the sheets being joined, supply of current to the welding zone, and subsequent heat removal. Important parameters when choosing an electrode are its shape, dimensions, etc. It is these parameters that directly determine how high-quality the welded joint will be. The geometric shape of the electrodes can be straight or curly, but preference is given to straight models, as they provide better access to the welding area.
When choosing electrodes for a microwave welding machine, you can simply refer to the corresponding GOST (14111-90), which already specifies all possible diameters of these elements (10, 13, 16, 20, 25, 32, 40 mm).
Homemade electrodes. To make them, cut two pieces of thick copper wire, each about 2.5 cm long. Clamp them into the holders. The electrodes in the holders are tightened using a regular screwdriver. The denser the better.
The electrical part could be considered complete, but for greater safety and convenience, I decided to add another button (microphone), which will be located on the upper lever at a slight angle. Microswitches can also be taken from the microwave. This way, spot welding will only work when the rear panel switch is on and the mic is pressed (in other words, two switches are in series).
You can use a timer to set the welding time. For example:
Note: Remember to carefully insulate all connections! I screwed the sides with self-tapping screws (6 pieces per side).
I secured the levers in the following way: experimentally (by eye) I installed them one on top of the other, drilled two holes in the side walls (for the lower and upper levers) and inserted an ordinary nail into the hole, the end of which I then bent. The result is a cheap and reliable axle.
I installed contact electrodes at the ends of the levers. For convenience, the top wire goes in one direction, the bottom in the other.
After the contact electrodes burn out, they can be easily removed and replaced with new ones.
To ensure that the upper arm was always raised, I used a regular rubber band.
If, after assembly, the axes of the electrodes do not align correctly with each other, this can be easily corrected by bending them slightly.
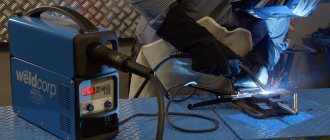
Homemade spot welding tests
To use, place thin sheets of metal between the electrodes, then press the button (micric) for 3-4 seconds. A powerful pulse of electric current heats them to the melting point, and the pressure of the electrodes further strengthens the welded joint.
Now you can remove your finger from the button and wait until the weld has cooled down.
The DIY spot welder works so well that after welding these washers together, I could not separate them (I was only able to do this using 2 pairs of pliers).
Attention!
1. You cannot short-circuit the electrodes with each other!
2. When welding galvanized metals, zinc oxide fumes are formed, which is harmful. Therefore, it is advisable to carry out welding work in a well-ventilated area.
Video of the process of making a spot welding machine with your own hands: Another option for spot welding: Another option for making spot welding:
Tags: [microwave, devices]
SHARE WITH YOUR FRIENDS:
POPULAR N O E:
- Automatic dimmer
- Using a microcontroller in a summer cottage. Part 1
- Homemade woodworking machine
It is known that insufficient illumination of the workplace, as well as its excess, negatively affects vision. There are many professions for which it is especially important to monitor visual fatigue. These are, for example, copiers, module installers, watchmakers and many others. During the day, the illumination in the room changes, and sometimes these changes occur so slowly that an enthusiastically working person cannot always notice them in a timely manner and turn on artificial lighting. Read more…
Sound in the garden
It is known that when using classical music, there is an increase in milk yield from cows and an increase in the number of pigs. This article analyzes the possibility of using music to increase productivity at a summer cottage, and also consider a scheme for scaring away birds and moles.
Read more…
A wood milling machine will be an indispensable assistant in the affairs of a home craftsman. Buying a machine will be quite expensive, but making it yourself will be much cheaper! Let's take a closer look at the manufacture of such a machine in pictures.
Read more…
Popularity: 9,865 views.
Determination of unnecessary winding
Microwaves rarely fail due to transformer-related reasons. In those cases when the malfunction of the microwave lies in the transformer, most often the high-voltage coil is damaged.
And since, as will be shown below, in order to make welding from a microwave, you only need a steel core (magnetic core) and a primary winding, then almost any non-working microwave oven (aka microwave) can serve as a source of the necessary part for spot welding.
Now you need to modify the obtained microwave transformer with your own hands. First, determine which coil will be needed to make spot welding, and which should be removed.
The magnetic core of the microwave transformer is W-shaped, the windings are located on the middle rod, one above the other. The required primary winding is easy to find - it is wound with the thickest wire.
The secondary high-voltage winding of the microwave transformer is made of thinner wire and has many more turns. This winding, as well as the one that consists of several turns and feeds the filament, should be removed.
Bottom line
The main feature of assembling a welding machine from a microwave is the fact that cooking occurs easily, but only briefly, since the transformer must be protected from overheating.
After use, the electrodes must cool down. It is not recommended to weld a thin metal surface as it will be damaged rather than melted.
To reduce the current flow in the circuit, experts recommend using a choke or a balanced resistor.
An alternative option is a small piece of steel wire that is connected to the low-voltage winding and the current strength and evenness of the arc can be adjusted according to its length. Now it’s possible to use equipment assembled on your own, without unnecessary power and financial costs.
How to determine the terminals of transformers of the same name
If the terminals of the windings of the connected devices are not marked, then it is necessary to identify among them those of the same name in order to connect them to each other. This problem can be solved in the following way: the primary and secondary windings of two or more transformers are connected in series, voltage is applied to the input of such a combined device, and an alternating voltage voltmeter is connected to the output terminals (terminals from series-connected secondary windings).
Depending on the direction of connection, the voltmeter may behave differently:
- show one or another voltage value;
- show no voltage at all in the circuit.
If the voltmeter produces any voltage, it means that there are opposite terminals in the connection circuit of both the primary and secondary windings. When the windings are connected in such an incorrect way, the following processes occur in them: the voltage supplied to the input of the primary windings of two connected transformers is reduced by half at each of them; The voltage increase occurs on the secondary windings, each of which has the same transformation ratio. The output voltmeter will register the total voltage, the value of which is equal to twice the input value.
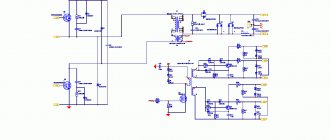
We determine the terminals of the transformers in this diagram
If the voltmeter shows a value of “0”, then this means that the voltages coming out of each of the series-connected secondary windings are equal in value, but have different signs, thus they cancel each other out. In other words, at least one of the pairs of windings combined into a circuit is connected by terminals of the same name. In this case, the correct connection of the circuit elements is achieved by changing the order of connecting the primary or secondary windings, focusing on the readings of the voltmeter.
How to avoid 4 mistakes when creating electrodes
Look at the picture for the electrodes used on the homemade device. When assembling welding, you need to make the right electrodes. Their diameter must match the wires that are attached to the weld. Copper rods are usually used. But if the power of the equipment is very high, then it is advisable to use a tip from a professional soldering iron.
To connect devices with electrodes, very strong wires are used. If you ignore this rule, then power loss cannot be avoided. Power can also be lost if a large number of different connections are used.
To increase the efficiency of the collecting apparatus, copper tips are used. Then it is possible to avoid power loss in contact areas.
Read also: Tabletop drilling machine 2m112 technical specifications
To ensure that soldering occurs without problems, it is advisable to use tinned tips. Since the electrodes are removable, soldering should not be used in the places where they are fixed to the tip. Oxidation forms in these places - the power will decrease. Removable electrodes ensure easy cleaning. It is very comfortable.
The tips will be fixed with the electrodes on the bolts. It is important to ensure that the connection is more reliable. If you do not take care of this, then an increased transition resistance will occur, and therefore the power of the spotter will drop. It is advisable to create a hole of the same diameter for two parts. It is advisable to select the connected elements from copper. The choice of material is not unreasonable - it has low electrical resistance.
Assembling the device
In order for a spot welding machine made from a microwave to be used, it must be equipped with a lever for clamping workpieces, contact spot electrodes and a switch.
The lever, which provides point compression of the workpieces, as well as the housing for the transformer, can be made of wood. At the ends of the lever arms there are electrodes made of thick copper rods. The welding cable leads are connected to the reliable bolted electrodes. The switch is located in a convenient, easily accessible place.
Now your DIY microwave spot welding is ready to go. The workpieces to be welded are placed between the electrodes, clamped with a lever and the current is turned on. This is how welding occurs.
Manufacturing of the secondary winding
Now the microwave transformer for spot welding is almost ready, all that remains is to make the secondary winding. A copper stranded conductor with a large cross-section, for example, a piece of welding cable, is suitable for this purpose.
The main thing is that the selected cable passes through the window of the magnetic circuit. Wind two turns with the selected conductor at the site of the removed secondary winding. Now you can carry out the first test of a DIY microwave transformer for spot welding.
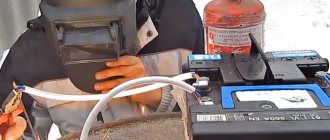
The ends of the cable are stripped of insulation. Following safety rules, connect the microwave transformer to a 220 volt network. Using a voltmeter, measure the voltage at the secondary terminals (that is, at the terminals of the welding cable).
If the voltage is between 2 and 4 volts, everything is fine. After this, the operation of the transformer is checked in spot welding mode, that is, in short circuit mode.
To test the operating current of the future spot welding machine from a microwave transformer, the stripped ends of the welding cable are securely connected to each other using a bolted connection.
Cover the secondary conductor with current clamps and briefly turn on the transformer. The current clamp indicator monitors the value of the short circuit current. If its value is about 500 amperes or higher, then everything is done correctly.
How is welding copper wires better than soldering?
Also check out these articles
- How to choose the right fertilizers for the garden
- Attic staircase from professionals
- Features of drilling water wells
- Features of designer furniture
It is also possible to solder copper wires, but the resistance of tin solder is tens of times higher than that of copper. In principle, everything works with soldering, but when large currents flow, there is a possibility of heating the section of the circuit with a higher resistance. Although in most cases electricians neglect this.
In the end, I decided to assemble a machine for welding copper wires.
The design of the machine for welding twists is not final, because Following the advice of good people from the Chipmaker.ru forum, there is an opportunity to further improve this device.