In order to remove a bearing from the electric motor shaft of some tool (drill, grinder, etc.) or, for example, a generator without unnecessary problems, you will need a simple device - a puller.
These devices can be large or small, and can also vary in design - for example, there are pullers with two, three or even four jaws.
However, regardless of external differences and design features, bearing pullers operate on the same principle.
If we talk about which one is better, then three-legged models are considered universal. Although in most cases the use of two-legged devices is sufficient.
In addition, pullers are hydraulic and mechanical.
The first ones are convenient because no effort is required. The second ones are cheaper and easy to manufacture. In this article we will look at homemade mechanical pullers.
Unlike factory-made devices, pullers made by yourself will cost less (for assembly, you can use any available materials that you can find in the workshop) and will last longer.
We will look at how to make simple devices that will be of interest to those who do not have a welding machine in their workshop or garage.
To work, you will need the most common power tool that every man has:
- electric drill;
- Bulgarian;
- hand tool.
Reliable simple do-it-yourself bearing puller - Do it yourself
How can you tell if a wheel bearing has failed? By the sound! The main symptom is a hum that gets worse during acceleration. If it occurs only occasionally, it means the bearing has just started to fail.
A constant suspicious sound as the load increases means that this part of the car requires immediate replacement. In any case, to carry out repairs you will need a bearing puller.
You can buy it or make it yourself.
How a puller makes life easier for a car owner
Using this tool, you can dismantle bearings, bushings, pulleys, flanges and other components, remove or fix rings and gears, and repair chassis elements.
It greatly facilitates the process of maintenance and repair of various parts of the vehicle. Using the right puller, you can quickly and easily replace a damaged element without the risk of damaging the machine elements connected to it.
In addition, the tool can be used to work with hard-to-reach parts of the car, in a convenient position.
Products can have different designs, but the most common is the following - several gripping arms, which are shaped like hooks, and a threaded rod between them. Thanks to this structure, you can easily grab the required element and press the bearing out of it.
Kinds
Tools are divided into two groups.
- Hydraulic. When they operate, hydraulic traction is used; removal and landing are performed in semi-automatic mode. The main part of such a puller is a hydraulic nut, the internal cavity of which presses on a special piston. This, in turn, transfers the force to the desired part. The hydraulic model is in demand among owners of trucks and other large vehicles - with its help you can easily remove the most massive internal parts.
This is what a hydraulic bearing puller looks like
- Mechanical. They operate from human muscular strength and are in demand for mounting/dismounting wheel bearings. There are two-jaw, three-jaw and internal ones. Two-grip ones are the simplest. They are used where maximum process control is needed. Three-jaw machines are equipped with three paws and are used for working with the front hub and generator. Internal options are useful for removing ball and needle roller bearings; in addition, they can be used to dismantle various brass couplings.
: How to add another driver to OSAGO? Mechanical three-arm model
Bearing pullers can come in different sizes, but the most popular are universal ones. Their parameters can be adjusted manually, adjusting them to any diameter.
You can make different tools with your own hands, but it is best to make a universal three-jawed version - it is convenient to use.
Diagram of a two-jaw puller
Making a universal three-gripper with your own hands
To make a universal three-jaw puller designed for working with bearings ranging in size from 202 to 308, you will need:
- sheet metal (10 mm wide);
- round metal with a diameter of 30 mm.
If you plan to remove large bearings, take sheet metal 15 mm wide and round timber 30 mm in diameter.
- The first stage of production is sketching. Calculate the length of the legs - it should be 200 mm. Sketch the sheet metal according to the drawing and cut out the tabs with a gas cutter that runs on propane and oxygen.
- Sand the workpiece with heavy sandpaper. The dimensions of all paws should be approximately the same, but absolutely perfect parameters are not required - a difference of approximately 1 mm is allowed. When this part of the work is completed, you need to drill two holes in the top of each tab - these will be used to expand the tool. The diameter of the holes must correspond to the diameter of the 8 or 10 bolts. If you plan to work with large bearings, drill 3 holes for 12 or 14.
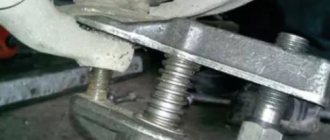
- Making the core. It is made of round metal with a diameter of 30 mm and a length of 35 mm (50 and 45 mm if it is necessary to work with massive bearings). We take the workpiece and drill a hole in it for a 16 mm thread (30 if necessary in a larger product), cut the thread with a fine pitch. We apply marks on the sides every 120 degrees, to which we then weld the paw holders. The distance between them should be equal to the width of the foot. Now you need to drill holes in the holders. They should be positioned at a certain distance from the center so that the foot can grip the large bearing. This is what the parts of the future puller should look like
- The final part of the work is making the screw. For a standard puller you will need a screw 350 mm long with a thread length of 280 mm, for a large one - 500 mm with a thread of 420 mm. We process the workpieces on a lathe and cut the threads. We leave the upper part without threads - there you need to drill through holes located perpendicular to one another, having a slight offset in height.
: About the sale of used cars from AmericaAppearance of the finished product
A simple way to make a homemade removal device
This option is easier to implement, but the product will not be as convenient. You will need the following tools and materials:
- steel pipe, the internal diameter of which will be greater than the diameter of the bearing;
- metal plate more than 5 mm thick;
- Bulgarian;
- stud with nut or bolt with long thread;
- a few nuts.
- Cut a piece of pipe with the required parameters. Cutting off part of the pipe
- We mark all the necessary elements on a metal sheet, outline the pipe and bearing. Marking out future details
- We cut out the parts with a grinder and grind them to meet the exact parameters. Cut parts
- We drill holes for the bolt in the obtained washers. Drilling holes for bolts
- That's it, the remover is ready!
Ready puller
How to make a two-jaw wheel bearing puller: video
Making a bearing puller with your own hands is not at all difficult - you don’t need either expensive materials or specific skills. Using the instructions, you will easily cope with the task and get a useful tool for car repair.
Do-it-yourself puller for tightening bearings - Construction Blog
Homemade pullers
When repairing electric motors, in addition to open-end wrenches and a set of heads, you definitely need to have in your arsenal several pullers for tightening (removing) bearings. One universal one simply won’t do. If you have electric motors on your site from 1 kW.
and up to 100 kW, then 2-3 are necessary. I have in my arsenal two pullers for removing bearings. At the moment, there is a large selection of pullers in the markets and can be purchased there.
But at the same time, if you have the material, a lathe, gas and electric welding, and the desire, then you can make a puller yourself. And I assure you, it will serve you for decades. It’s better to make three-legged ones, the most comfortable ones.
I will also indicate the dimensions of my own pullers, which have long been tested during repairs. Let's start with a small one, with which you can remove bearings from sizes 202 to 308, large 317 and more. We will need sheet metal 10mm wide and round metal 30mm in diameter.
(for huge metal 15 mm and round timber with a diameter of 50 mm). First we make a sketch (pattern) of the puller legs. We make the length of the legs 200mm.
Next, we draw a sketch on the sheet metal according to the pattern. You need to cut the legs with a gas cutter (propane and oxygen). After cutting, we process the workpieces using large sandpaper.
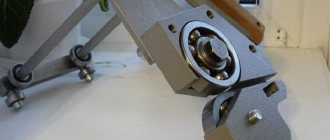
Homemade pullers for removing bearings
Evenly adjust the sizes of the 3 legs to the same size. There is no need to achieve very perfect dimensions, the difference is 1mm.
the negative role will not be included in the design. When the paws are made and adjusted, in the upper part we drill two holes (for a small expansion of capabilities) with a diameter of 8 or 10 mm for bolts (for a huge 12 or 14 mm, 3 holes) for attaching the paw to the core of the puller.
We do the same with the remaining 2 paws. Drill holes in them along the first leg using it as a template. Here you need to try to prevent the difference in size from allowing the bearing to be removed to be captured immediately.
Puller disassembled
The next detail is the core. For the core for a small puller, we need round metal with a diameter of 30 mm and a length of 35 mm (for a huge one, respectively, 50 mm by 45 mm). In the workpiece, we drill a hole for a 16 mm thread (for a huge puller, there is a hole in its workpiece with a diameter of 30 mm) and cut the thread, preferably with a small pitch.
In the prepared part for the core, apply markings, three marks at 120 degrees. And to these places we weld them using electric welding, two per mark - the foot holders (the distance between the holders should be the width of the foot). I think there is no need to describe in detail how to prepare them, because there is no point in adhering to any serious rules and dimensions.
After welding, we process this part in the same way using large sandpaper.
Now, having tried on the paw, we drill holes in the holders. Drill the holes at a distance from the center, so that the installed foot has good movement to the side to capture larger bearings. And the 3rd part of our puller is a screw.
For the 1st puller we make a length of 350mm, thread length 280mm, for the 2nd - length 500mm, for a thread 420mm. Next, on a lathe, we process the workpieces and cut the threads. In the upper part of the screw, where there are no threads, we drill through holes with a slight offset in height and perpendicular to each other.
Third stage
Now you need to weld two supports to the body. The seam must be strong and airtight. Let's start working on securing the nut. We screw the bolt into the hole and thread the nut. We secure everything with a welding seam, but do not overdo it with the current, otherwise the nut may melt. It can be attached externally or internally. With the nut located internally, the overall design of the puller seems more durable and reliable. The threaded rod will act as a handle. This makes it much easier to remove the bearings.
Selecting and manufacturing a wheel bearing puller
pages:
A wheel bearing puller is a specialized tool designed for pressing and pressing parts into vehicle hub units.
Since the bearings are installed on the seating surfaces with interference, pressing or pressing them requires a lot of force to be applied to a limited area of the unit. Conclusion - for this operation you need a reliable and also universal tool.
A wide range of size ranges for hub units correspond to various types of wheel bearing pullers (HBP). Choosing the right puller for replacing bearings is not easy. You will learn what parameters to follow by reading the article. We will also touch on the topic of making the device yourself and how to operate the tool.
Types of wheel bearing pullers
Study the summary table, which presents several main types of BSC, as well as specific recommended models.
Type and modelApplicationAverage price, rub.
| With 3 legs | Removing parts from axles and shafts, including rear hub ball bearing races. | 2000-3000 |
| With 2 legs | Removing parts from axles and shafts, including rear wheel hub bearings. | 1000-2000 |
| Cup with a set of mandrels | Removing and pressing parts into holes, including steering knuckles and front wheel hub bearings. | 6000-8000 |
What pullers are needed to remove and press in wheel bearings?
For the front and rear wheels, it is recommended to use two types of tools: with three or two legs and a cup puller - this is the minimum set of removable tools for the correct and safe removal and pressing of parts of hub units.
Any of the tools can be replaced with a hydraulic or manual press, as well as a vice, but other pressing methods are described at the end of the article.
A quick overview of wheel ball bearing pullers
It is impossible to choose a universal kit for all types of car repairs, since the range of actions is limited:
- a variety of shapes, sizes for charging to the starting position;
- limited work space.
Cup - “Force 9T0311”
- Internal mandrels 34-80 mm.
- External mandrels 44-90 mm.
- The dimensions of the outer diameter of the cups are 44-90 mm.
- Rod (stud) with nuts.
- The plates fit a wide range of sizes.
- The steering knuckle remains in place.
- The set is included in the workshop press kit.
- Pressing-pressing takes place in one step.
Price 18000 RUR
Garage tool. Suitable for use in restricted access work areas.
- Long life if you follow the manual.
- The articulated design of the paws engages securely.
- Removing stuck parts from shafts and machine axles.
- Wide grip range - 20-230 mm.
- Maximum force - 4.5 tons.
- Screw rod dimensions: M18 x1.5 x 240.
- The dimensions of the bolts for the hinges are 19 mm.
Price 11500 RUR
The tools from the set of the German manufacturer Kukko are well-thought-out forms of gripping mechanisms. On the traverse, the paws move along guides, and the suspension screws fix the specified position.
- Grasp the paws at an angle parallel to the axis of the tension force.
- Reliability of engagement.
- Maximum tension - 5.5 tons.
- The legs rotate 180 degrees.
- Wide grip range.
- Double acting.
- Suitable for use in confined spaces.
Price 6000 RUR
You can also find hydraulic pullers on the market. The operating principle of hydraulic SSPs is similar to jacks. Designed for repair shop mechanics, no muscle power required, speeding up the repair time. Pay attention to the quality of the metal, the rotation of the screw rod, and the condition of the hinges.
- the force of influence on the pressed-in unit reaches 20 tons,
- operation time is reduced,
- the share of physical costs is reduced.
- limitation of the working area of application,
- the price is higher than a mechanical tool.
Wheel and bearing puller for VAZ and LADA cars
To replace the front and rear hub units on VAZs, according to the manufacturer’s recommendations, two types of removable devices are needed.
- Gripping tools are used to remove the ball bearing from the rear wheel.
- For pressing and pressing the bearing at the front wheel, cup types are used.
You can select models of these tools from the overview presented above. To select a cup puller, focus on the outer and inner diameters of your bearings, but as a rule, it is enough to read reviews and get advice from the seller.
For VAZ cars, for example, the model Force 9T0311, AV Steel AV-922722, MHRTOOLS MHR04039, NEO 11-829 are suitable. Suitable for pressing bearings into rear or front hubs, as well as into the steering knuckle. Insert the washer on the reverse side, tighten the nut, and put the key on the hold. Then rotate the stem nut clockwise.
Hot topics of the magazine BEHIND THE DRIVE:
Recommendations and tips when choosing a puller
- Don't buy expensive sets. There is a rational grain in this: replacing wheel bearings does not happen so often. The minimum service life is 50-60 thousand mileage.
- Select the BSCs described above. Cheap analogues or home-made ones will do.
- For continuous work, as in auto repair shops, hydraulic-type SSPs, as well as the universal cup set of the KS TOOLS series, are suitable.
Do-it-yourself universal wheel bearing puller
Buying a puller is not always justified, since it is not used so often when operating and repairing a car, so if you want, you can make the tool yourself.
Homemade tools also have advantages:
- Proven material.
- Possibility to make it to your own size.
- The cost is lower than that of a purchased device.
- Possibility of finishing or alteration.
Homemade three-grip tool
This type of tool is the most difficult to manufacture, since the parts have a unique shape and require precise dimensions to mate them.
Required tools and materials:
- Grinder with cutting disc for metal;
- Sheet 1 m2 10-20 mm thick;
- Hairpin M18x1.5x 400 mm;
- Two nuts M18x1.5 height 20 mm;
- Pipe section outer diameter 89 mm, wall thickness 7 mm;
- M10 bolts for hanging the legs in the eyes;
- Welding machine.
The legs are cut from a sheet of 10-20 mm, L = 200-220 mm, the cross is made from an M18x1.5 nut, or cut out of a solid sheet with a grinder. Mark the contours of the crosspiece, cut it out, drill a hole in the center, then use an M18x1.5 tap to cut the thread.
Second option: weld a nut to the sheet instead of threading it. Holes are made in the eyes for M8 or M10 bolts.
: “Making three gripping devices”
Cup puller
The main part of the tool: M18 pin, cup and replaceable disks. A threaded bolt and nut can be picked up in a store, but the remaining parts will have to be ordered from a turner based on a sketch or drawing.
For VAZ 2108, 2109, 2110, 2111 washers are suitable - 30, 34, 37, 77 mm, bowl (ring) - 77 mm. For other car brands, find the original part number and its dimensions, and then cut out the appropriate washers and cups.
: “Do-it-yourself cup puller”
Double jaw wheel hub puller
Having amateur welding skills, two gripping devices are made from plates, nuts, and studs.
Not the easiest way to make a SSP in a garage; to assemble it you will need:
- Sheet 5 mm;
- Bolt M 14x1.5x 240;
- Bolts with nuts M6;
- Nuts M14.
: “Do-it-yourself two-gripper device”
Removable traverse for pressing out
This option is suitable for pressing and pressing the ball bearing out of the hub without removing it from the knuckle. The photo shows an example of such a design.
- One or two strong steel plates are taken, a hole for the bolt is drilled on top and a nut is welded.
- A second nut is welded coaxially from below.
- Next, holes are made for M10 bolts at equal intervals. The legs are cut from a 10 mm plate.
- The two plates are bolted together. Between them there is a long M16 bolt.
The only purchase is a crown to match the size of the ball bearing race. Cut the required washers from a 10 mm strip.
Tools and materials required:
- Bulgarian;
- Welding and drilling machine;
- Internal pipe section D 75 mm;
- Strip 70x30x5, 2 pieces;
- M6 bolts with nuts 4 pieces, lock nuts 8 pieces
- Thick-walled washer D 45mm.
Drawings for self-production of pullers:
Click on the drawing you are interested in to enlarge it.
Hot topics on DRIVE2:
How to operate a cup puller
Pressing:
- We charge the housing puller.
- Insert the bearing into the hole in the knuckle.
- A washer with the diameter of the body is placed on top.
- We press the housing into the socket until it rests against the locking ring.
Pressing out:
- Use a reverse hammer to knock out the hub.
- On the reverse side we place the washer in the hole.
- Let's skip the rod.
- From the outside we put on a cup larger than the diameter of the fist.
- Rotate the rod clockwise until the remaining ball bearing is completely released.
- Let's analyze the design.
Photo report of the application:
Operating procedure for a 3-jaw puller
Pressing out:
- Secure the fist in a vice.
- Charge the puller.
- The hub is pressed out using a hydraulic rod.
- In the same way, squeeze out the remains of the ball bearing.
Pressing in reverse order:
- Insert the locking ring and turn the fist over.
- The bearing is guided into the hole.
- A washer is placed on top under the outer ring.
- Press in until it stops.
- The hub is pressed in in the same way.
Photo report of the application:
The kit includes a set of feet. This mechanical puller with three legs removes hubs, ball bearing races and other parts from shafts and axles.
Other methods of pressing and pressing
Pressing out:
- The fist is placed on the pressing table and bars are placed.
- Take a washer along the diameter of the ball bearing housing and place it under the press rod.
- Press out the remains of the ball bearing from the fist.
Pressing:
- First, prepare the hub.
- Turn the fist over and install the retaining ring.
- Insert the ball bearing into the socket.
- A washer is placed on top to match the size of the ball bearing housing.
- Press in until it stops.
- Then press the hub into the bearing hole.
If there is an ABS magnetic ring, place it on the axle side.
Using bench vices and bolts
1 way:
Here, under the jaws of the vice, cut pieces of a profile pipe are placed on the edges of the hub, leaving a gap for the bearing to exit, and a mandrel along the diameter of the outer race is clamped on the reverse side. Then squeeze it out. It turns out to be a homemade cup SSP.
using a vice:
Using bolts to remove the hub:
Method 2:
The bearing is pre-installed into the hub, then the assembly is placed in a vice so that the jaws pass exactly in the center. Slowly tighten, thereby compressing the parts. To achieve the final result, it is necessary to place an additional spacer under the end of the ball bearing race.
Replacement and installation of the bearing through the jaws of the vice:
Impact method
The last and most not recommended method is the use of shock loading.
- Place your fist on wooden blocks.
- Take an adapter to match the size of the hub axle.
- They hit the manual with a massive sledgehammer.
- The remaining part of the bearing is knocked out with a guide to the size of the outer race.
Use a back hammer to knock the hub into position.
It is better to take the fist to a workshop, where they will replace the bearing for little money.
Conclusion
When repairing a hub assembly in a garage, parts are removed and dismantled without the use of special tools. The use of removable devices (RDF) is necessary when assembling the unit, pressing in the ball bearing, to ensure the accuracy of the mating.
To select a device, use the recommendations from the article. They also make tools of this type with their own hands; standard instructions, drawings and photos are presented in the material. Finally, he recommends using a professional tool when replacing wheel bearings.
Option for correct replacement of hubs:
Our website has a lot of useful information on this topic:
Author of the material:
Second phase
We will make the lower and upper supports. We need a piece of sheet steel of maximum thickness. We cut a circle in it, you can also do it with a grinder. To simplify the work, you first need to cut a rectangle from the sheet, and then sand the sharp edges and the circle is ready. You only need two of these circles.
Finishing touches on the supports. Cut a hole for the bolt connection in the middle of the top support. The hole can easily be made using a drill and then drilled to the desired size using a lathe. Let's move on to the lower support. There you also need to drill a hole in the middle. The hole dimensions should be slightly larger than the axes from which you will remove the bearings. Then we cut out the part in the form of a triangle. At this point, the stage of work on the supports is completed.
How to make a wheel bearing puller with your own hands?
- 1 Do-it-yourself universal wheel bearing puller - Metalworker's Guide
- 2 How to make a bearing puller with your own hands
- 3 Front wheel hub bearing puller for VAZ 2108-2109 (review, price, photo, video) 3.1 Types of wheel bearing pullers
- 3.2 How to work with the puller
Replacing a wheel bearing is a routine job that all car enthusiasts can do. In this publication we will look at how to replace the front and rear wheel bearings with your own hands.
Hub unit
You cannot change a wheel bearing without understanding this component of the chassis.
The front axle hub assembly is also called the steering knuckle, since it transmits the desired direction of movement to the wheels through the steering rods. The latter, in turn, are required to rotate.
The role of the wheel bearing is in the articulation of the steering knuckle and the hub to which the wheel is directly attached.
There are many types of bearings (tapered, spherical, roller, radial ball, etc.), but this is not of fundamental importance for replacement.
Novice DIY repair enthusiasts will be interested in learning how this part works. The product consists of an outer ring, a rolling body, a cage and an inner ring. For lubrication, the insides are filled with grease.
The essence of the work is to transmit rotation through rolling bodies. In this case, the outer and inner cages are not connected to each other. In our case, the inner race is articulated with the hub, and the outer race with the steering knuckle.
Inside the hub there are teeth that serve to engage the hub with the drive shaft. It is these splines that allow torque to be transmitted from the gearbox to the wheels of the car.
It’s worth noting right away that replacing the wheel bearing is possible in two ways:
Universal puller
- canonical, which is the only option if you want the part to go happily ever after;
- artisanal. In this case, the service life of the new spare part depends entirely on your skill.
The first method involves the use of specialized tools: a hub and bearing puller, tools for pressing and pressing. You can build such a mechanism with your own hands. A hydraulic bottle jack can be used to force the bearing in and out.
To successfully press out, you need a mandrel whose diameter will be larger than the outer diameter of the hub. One edge of the mandrel will rest against the steering knuckle, and the second against the plane pushed by the jack. Another attachment will be used for extrusion.
Its diameter should correspond to the outer diameter of the bearing or be 1-2 mm smaller.
Another type of design involves using the threaded joint between the bolt and nut as a force to push out the bearing. The principle of selecting attachments is the same as for the previous puller.
The second replacement method involves using various attachments and a hammer. They knock out and then drive the wheel hub and bearing back in.
Using the Daewoo LANOS as an example, let's look at how to replace the front wheel bearing.
- Install wheel chocks.
- Remove the retainer and “tear off” the hub nut.
- Raise the car, securing the position using a log or other type of support.
- Unscrew the brake caliper and remove the pads. The caliper itself can be secured with a rope. Be careful not to damage the brake hose. Remove the brake disc.
- Unscrew the stabilizer link, steering linkage and ball joint.
- Using a ball joint remover, remove the end and ball from their seats.
- Unscrew the bolts securing the shock absorber strut under the hood of the car.
- Pull the steering knuckle off the drive shaft splines.
- Remove the brake disc protection. Move the stand to a convenient place for working.
- Install the puller and separate the hub from the steering knuckle.
- Using special curved pliers, squeeze the corkscrew ring. While holding it compressed, pry it out using a flathead screwdriver. Remove the second one in the same way.
- Now, on the reverse side, install an extension that will press out the bearing. Remove it from the front wheel steering knuckle.
Press-fitting
Whether replacing the front wheel bearing will be successful depends entirely on proper installation. Before pressing, be sure to clear the surface of dirt and clean the grooves of the retaining rings.
The edges of the seat in the steering knuckle can be wiped with sandpaper. Be sure to lubricate the bearing itself and the cavity inside the “fist”. Of course, the first step is to install a new retaining ring.
Place the hub strictly in the center of the mounting hole. You can try to fill it a little with light blows of your hand.
https://www.youtube.com/watch?v=dGIS5q-2Uj0
Otherwise, replacing the front wheel bearing will be in vain. Soon a hum or play will appear again.
When you feel that the bearing has stopped, you can stop. Install the second retaining ring. Press the hub into the steering knuckle. We can say that the bearing replacement was successful.
What to do if part of the bearing remains on the hub
Oddly enough, but often replacing bearings does not happen without incidents. When pressing out the hub, the inner race of the front hub may remain in its seat.
The best solution in this case is to tighten the clip using a special puller.
Unfortunately, its cost is quite high, so only service stations can afford such a tool.
Folk craftsmen recognize two ways out of this situation:
- file the remains with a grinder and then cut them with a chisel;
- knock off the clip using a chisel.
Both of these methods are dangerous because there is a risk of damaging the front bearing seat on the hub. If you use the second method, be careful not to damage the mating plane.
If you cut through the landing site, it is better to replace the part immediately. Experience shows that new bearings on such hubs “run” very little.
We recommend trying to use a hub puller. And only in case of “dead” sticking of the clip should resort to emergency measures.
Rear axle
The principle of pressing out and pressing in the rear wheel bearing is no different from the work done on the front axle.
Working without a puller
If you are changing the front wheel ball bearing using a makeshift method, pay attention to the following tips:
- a socket head of a suitable diameter can be used as a clip for pressing out;
- The old bearing can be used as a press-fit race.
The clip should be struck with even force. You need to hit on opposite sides or evenly moving in one direction. The main thing is that there are no distortions.
Universal wheel bearing puller
The transmission transmits torque from the car's engine (the heart of the car) through shafts to the drive wheels (legs) of the car. In this case, the wheels are not tightly attached to the shafts, as you have seen when replacing wheels, but through a hub. A hub is such a unit - an intermediary between the car shaft and the wheel.
The role of this unit during movement cannot be underestimated.
It does not simply duplicate the rotation of the shaft, but creates a connection of all components into a single overall structure, including brakes and steering.
Failure of the hub unit together with the bearing located there can lead to sudden braking, the steering wheel jamming in the middle of the road, which can lead to an accident.
Location of the hub in the car
The unit is subjected to constant loads, such as braking and increasing speed, turns, bumps, and heating during operation to high temperatures.
Therefore, great attention should be paid to it.
And if extraneous noise appears while driving, or a knocking sound is heard when turning, you need to urgently check the wheel bearing before a major breakdown occurs.
Wheel hub, its appearance
Changing the bearing is not at all difficult; it is located inside the hub and, as a rule, covered with a metal casing.
Replacing wheel bearings
You can change the wheel bearing yourself, even in the garage. All you need is a tool kit, a new bearing and new hub nuts.
Sometimes, when disassembling the unit, it turns out that the hub bearing is in good condition and only needs to be lubricated.
This can be seen with an open bearing. If a sealed type bearing is installed, the fact that it has little or no lubrication can be determined by oil leaks from the bearing.
In their “dry” form, bearings are subject to high heat or high friction between the rolling elements. In this case, deformations occur inside the bearing, the balls stop rotating and the wheel “jams.” Therefore, you need to monitor the condition of the bearing, which is a very important part for the entire car.
How to make a bearing puller with your own hands
How can you tell if a wheel bearing has failed? By the sound! The main symptom is a hum that gets worse during acceleration. If it occurs only occasionally, it means the bearing has just started to fail.
A constant suspicious sound as the load increases means that this part of the car requires immediate replacement. In any case, to carry out repairs you will need a bearing puller.
You can buy it or make it yourself.
Fourth stage
All welds will need to be thoroughly cleaned. A sanding disc can easily handle this task. It will be convenient to collect the residual slag with a wire brush. The entire product is ready, all that remains is to coat it with special anti-corrosion paint. To ensure long service life of the structure. Before using the puller, you will need to lubricate the threads to improve the quality of work.
Let's test our homemade product. Bearings from a drill are suitable for testing. As we can see, the product copes with the task. Now you can repair your instruments without fear or risk, without fear of ruining them. The design is also suitable for removing bushings. If while using the puller you notice that the axle is too thin, you can place a stand under the bearing being removed or make a smaller puller. All in your hands.
General information about valve stem seals
Oil seals (oil seals) are part of the oil distribution mechanism in the engine. The presence of oil is the most important condition for the operation of the internal combustion engine. But it doesn’t have to be everywhere. For example, the camshaft is always surrounded by oil mist during its rotation. But there should be no lubricant in the combustion chambers. There is only a fuel-air mixture, which burns. If you add oil to it, combustion will worsen, which will affect the increase in gasoline consumption.
In addition, carbon deposits will form on the bottom of the valves. As a result, the valve begins to close loosely. The same carbon deposits accumulate on the cylinder walls and on the piston rings. This phenomenon is called engine coking. Of course, all this does not improve its performance, but, on the contrary, reduces its service life. And it increases the cost of oil and fuel. Located on the stem, the cap (also known as the valve stem seal) removes oil from the valve during its downward movement and prevents it from entering the combustion chamber.
It is curious that this indicator practically does not depend on the manufacturer of the part itself: on expensive and budget cars they serve approximately the same. This will be useful for those who are thinking about the question: which valve stem seals are better? In this case, it is much more important to buy only those that match the engine and make of the car.
How to replace valve stem seals without removing the head
- Remove the valve cover, also known as the timing cover.
- Align the crankshaft and camshaft to the marks.
- Write down and take a photo of which pipe you took from where (for those who are doing it for the first time).
- Loosen the timing belt tensioner.
- If there is a chain instead of a belt, then you need to unscrew and remove the chain drive gear. It is better to remove the key from the groove so as not to lose it.
- Unscrew the bed fastening and remove the camshaft from the cylinder head.
- Inspect the journals and cams for wear.
- Depending on the design, when removing rocker arms or cups from hydraulic compensators, you need to remove the valve pushers.
- Pistons 1 and 4, after aligning the shafts to the marks, are at top dead centers (TDC). Therefore, we begin to change caps 1 and 4. To loosen the valve, it is required that it rests against the piston.
- There are designs where the intake manifold interferes with the installation of the desiccant. But rather than removing the manifold, it is easier to shorten the desiccant.
- The desiccant bracket must be secured to the bed fastening pin. And attach it in the middle part with a ring on the spring valve plate. Next, with one hand we press on the desiccant lever, and with the other, using tweezers, we pull the crackers out of the plate.
- Remove the crackers and remove the poppet spring valve.
- We install a collet puller on the cap. We lift the weight up the puller rod and hit it on the upper stop. In this way the oil seal is removed.
The easiest way to unscrew/tear off a hub nut
The easiest way can be considered the following, but it involves completely replacing the nut. Don't worry, any method does not guarantee the safety of this part. To easily unscrew or tear the hub nut out of place (an option for all brands - from VAZ to foreign cars with a groove on the shaft), you need to take:
Unscrewing the VAZ hub nut using a drill
- New nut.
- Drill or screwdriver.
- Drill up to 3 mm.
- Chisel.
- Hammer.
- You need to drill the nut along the groove to counteract it.
- Using a chisel and hammer, simply break the nut and remove it, then replace it.
- If throwing away the nut is not possible, then you will have to sweat - and in the literal sense of the word too.
Signs of wear on valve stem seals
Oil seals are rubber seals that fit onto the necks of the valve stems and protect against oil leakage into the cylinders.
Signs of wear are:
- Engine oil consumption has increased. If the rubber seal does not hold, then the oil goes into the cylinder, therefore, the total volume of oil decreases, which after some time will be noticeable in the dipstick levels. Oil consumption is not necessarily a sign of worn rubber caps. Oil may also leak when the oil rings need to be replaced. Perhaps they have stuck to the piston, this is also called “stuck”.
- Immediately after starting the internal combustion engine, bluish exhaust smoke is observed. This effect occurs when oil accumulates on the piston. When the car was not running, oil flowed into the sump and down the piston rod through a broken oil seal.
- Sometimes the engine stalls. Triple occurs when one spark plug does not spark at the right time or does not produce a spark at all. If oil gets into the cylinder, the spark plug is splashed with oil. This can be checked by unscrewing the spark plugs. If the base of the spark plug is covered in soot and oil, then this is a sign of wear on the caps.
It is useless to use various additives in these cases. It is better to quickly replace failed parts.
Necessary tool
Before you start work, you need to prepare all the tools and assemble them in one place:
- Special puller for bearing removal.
- Collar.
- Head at "30".
- Keys or sockets for “17” and “19”.
- Mandrel for knocking out the hub.
- New wheel bearings.
The tool is assembled and ready to use
Preparatory work
Make sure that the workplace is well lit, and it is best if it is on a viewing hole or a lift. Because this is the only way to talk about high convenience when carrying out such work. It would also be a good idea to familiarize yourself with the detailed diagram of the location of the bearing on the front hub of the VAZ-2112.
Thanks to this illustration, the diagram becomes very clear.
Step-by-step work order
First of all, we place the car in a stationary state, put on the handbrake, and, if desired, install wheel chocks. And while the car is on the surface, we tear off all the bolts on the front wheels.
We unscrew the torn bolts and put them aside. We remove the wheel.
Next, we need to use a “30” wrench to unscrew the hub nut
Please note that during its dismantling, you will have to press the brake pedal, and for this we will need an assistant. Then, using a screwdriver, press out the calipers. When this operation is completed, having the key at “17” at hand, unscrew the calipers from the steering knuckles.
Then, using a screwdriver, press out the calipers. When this operation is completed, having the key at hand at “17”, unscrew the calipers from the steering knuckles.
- Carefully unscrew the brake disc from the hub.
- Then, making gentle blows, we release the hub.
- And then the CV joint from the bearing.
Replacing the wheel bearing
Then, when access to the hub bearing is completely open, there are several ways to replace it.
First way
In this case, it is necessary to have a special puller to remove the bearing.
- First you need to take care of removing the stopper.
- Using this device, you simply remove the old bearing and install a new one in its place.
- After this, we carry out the entire assembly process in the same order as removal.
- The advantages of this method include the fact that during this work there is no need to touch the wheel alignment bolt, therefore, you will not have to add additional work.
- The disadvantages of this method include inconvenience during the process. Because you have to contrive and take an extremely uncomfortable position.
Second way
To carry out this work, it is necessary to carefully dismantle the steering knuckle and completely remove the hub.
- Moving to the workbench, we replace the wheel bearing.
- To do this, dismantle the retaining ring and knock the bearing out of its seat, or press it out.
- Next, we perform the installation in reverse order, having previously cleaned the surface of the hub.
Advice! Before you begin removing the alignment bolts, mark their position with a marker or chalk. In this case, the marks should indicate the current position of the bolt on the rack and the previous location of the knuckles. Thanks to such marks, during assembly it will be much easier to navigate the position of these bolts. Although it will not be possible to return to the previous state, it will still be possible to minimize it.
Putting marks
- We put marks.
- We knock out all the bolts from the fist.
- Remove the mounting bolts on the lower ball joint.
- This will knock the bearing out of the hub.
- Remove the retaining rings.
- Press out the bearing.
- We mount a new bearing, having previously cleaned the space of the hub and generously coated its surface.
This repair method will be very effective when not only the wheel bearing is subject to repair, but also most of the VAZ-2112 chassis. Such elements include the replacement of steering tips, silent blocks of levers and ball joints.
Third way
To perform work using this method, it is necessary to remove the entire rack completely.
The stand has been dismantled.
- Next, using a vice, we replace the wheel bearing.
- Because this is how the replacement will happen quickly and efficiently.
After dismantling the bearings, we install everything in the reverse order, assemble the rack and mount it on the car.
Do we make the puller ourselves or buy it?
If you do not want to knock out the bearing, you can purchase a special puller in stores, since the entire process of working with such a device becomes easier and the time required for work is reduced. This also applies to bearing installation work.
Hand-made hub puller
Assembly
Clean and lubricate the inner surface of the steering knuckle. Use a puller to press the new bearing into the steering knuckle. In this case, the large puller washer rests on the steering knuckle from the inside so as not to damage its mud rings, and when pressing, the new bearing can be pressed through the old bearing, which will transmit force only through the outer ring. Install the retaining ring. Use a puller to press the hub into the bearing. Now the puller washers rest against the inner race of the bearing and the hub.
We carry out further assembly in the reverse order, tighten the bearing nut to the prescribed torque and be sure to lock it by jamming the collar.
In conclusion, I would like to note that replacing a hub bearing on a new car is not difficult, but if the suspension parts are many years old, then removing the hub and other elements will be very problematic. Replacing the wheel bearing is shown in the video:
By the way, do you know how to check the suspension yourself?
Replace the wheel bearing yourself...
1200 rub. for the photo report
We pay for photo reports on car repairs. Earnings from 10,000 rubles/month.
Write:
Many will agree that unscrewing the hub nut is an activity that can be punished in court; it is too inconvenient and difficult even for a physically strong person with all the necessary tools. However, since it is not always possible to choose the easiest one (option One, also known as the Main one!) - sending the car to a service station, where they will not only unscrew it but also carry out subsequent repairs. Then you will have to figure out the task yourself, using the easiest and most effective method possible.
Causes of failure
Despite the fact that the product is made of high-quality steel, replacing the VAZ 2110 wheel bearing is required for the following reasons:
With high mileage of the car. This value can reach 70-120 thousand km. In this case, all suspension elements, including the bearing, are completely worn out. While the car is moving, crunching sounds can be clearly heard.
Violation of tightness. The product contains casings under which there is lubricant. They are made of plastic or rubber. If they are violated, the lubricant is quickly produced. After several thousand km, dry, rubbing parts quickly wear out. A specific hum lets you know about this.
In case of careless driving. Dynamic impacts resulting from wheels falling into holes destroy the bearing.
Incorrect installation
When installing the bearing, it is important to prevent it from being distorted. Due to uneven wear, it will quickly fail.
Constriction when adjusting
In this case, there is severe overheating of the unit. Operation under temperature conditions exceeding the norm reduces bearing life.
Replacement methods
Which wheel bearing remover to choose or how to make it yourself
We recommend watching a video on how to remove a wheel bearing from a VAZ 2110. This will allow you to better understand the nuances of the work. A clear example will never be superfluous.
Installation
As for the replacement, there is also a video teaching how to do this process. Craftsmen use three replacement methods, each of which has its own characteristics and advantages. Therefore, it would be correct to talk about each of them.
First way
We take out the locking ring
- You will definitely need a puller to remove the bearings.
- Carefully remove the bearing with a specialized tool and replace it with a new one.
- Upon completion of the shift work, the unit is reassembled.
The advantage of this method is that the camber adjustment bolt does not need to be touched. If you violate its geometry, move it from its rightful place, it will be quite problematic to put it back.
But there are also disadvantages - you will have to take a position that is not the most comfortable to perform the operation. Therefore, it is strongly recommended to carry out work with a lift or using an inspection pit. But even so, you can forget about comfort.
Second way
Here you have to complete the following steps:
Carefully remove the steering knuckle to remove the bearing
After this, the hub is completely removed; Next, use the workbench; On the workbench, replace the element and then put it in place; It is important to follow the correct reassembly sequence. In terms of execution, the second method is easier than the first
But here you can affect the camber. If this happens, adjustment may become difficult. Do not rush to remove the bolts securing the knuckle to the strut. Make marks with chalk or a marker to later find their original position. Based on the marked marks, it will be much easier to put the unit back together.
From an execution point of view, the second method is easier than the first. But here you can affect the camber. If this happens, adjustment may become difficult. Do not rush to remove the bolts securing the knuckle to the strut. Make marks with chalk or a marker to later find their original position. Based on the marked marks, it will be much easier to put the unit back together.
Even a professional cannot achieve a perfect match of marks, but it is more than possible to minimize deviations.
We recommend you take several steps:
- Place tags. The first is the position of the adjusting bolt on the strut, and the second is the previous position of the knuckles;
- Knock out the knuckle bolts;
- Remove the fasteners from the lower ball joint;
- Knock the bearing out of the hub;
- Remove the retaining rings;
- Press out the bearings with a vice;
- When you put the assembly back together, generously lubricate the cavities in the fists with lubricants.
This method is relevant for cases where a full repair of the chassis is performed. This way you can easily replace not only the wheel bearings, but also ball joints, steering ends, lever silent blocks, etc.
Third way
Before carrying out work using any method, think about which front wheel bearing for the VAZ 2110 would be best to use. These can be factory elements or analogues from other manufacturers. There is not much difference between them, but it is better to choose the highest quality ones.
According to the third replacement method, the process is performed as follows:
- You will need to completely dismantle the entire rack;
- Use a special vice;
- In this vise, the hub bearing is changed, and all elements are installed back in their places.
This method is considered the most difficult, since the rack is completely dismantled. Plus, you have to unpress the steering tips and remove the fastening nuts that hold the upper support to the base of the body.
As you can see, the process of replacing a wheel bearing is relatively simple, but has its own subtleties and nuances. Consider whether it is worth taking on the work yourself, or whether it is better to entrust the task to professionals. In this case, these should be trusted specialists who will really be able to competently replace the bearing, put a high-quality, new part in its place and not damage the integrity of your suspension.
Loading …
Remove the nut from the car: force method
- Lever made of pipe (length of at least one and a half meters).
- Powerful socket wrench (450 mm).
- Head of the appropriate size.
Place the head of the wrench on the hub nut, insert the wrench and place the pipe on the handle.
Gradually increasing the applied effort, we unscrew the part. How to unscrew a broken bolt
What to do, what to use and how to unscrew it if a pin or bolt is torn off. Video tips on how to independently unscrew a broken bolt/stud in an engine or manifold. A reliable way to unscrew if the head of a bolt has been torn off Read more
Replacing the rear wheel bearing of a VAZ 2111
To replace the rear wheel bearing on VAZ 2110, 2111, 2112 cars you will need: a “30” socket, “10” and “15” keys, a hammer, duckbills and a long pipe as a lever. See details clearly Read more
When to change caps
In a good way, these parts need to be replaced after several tens of thousands of kilometers. Experienced drivers are able to visually determine that it is time for another repair, as there are certain signs of wear on the valve stem seals.
The first sign is an increase in oil and possibly fuel consumption. After all, a worn cap will let oil into the combustion chamber with all the consequences mentioned above. The second sign is blue smoke from the exhaust pipe when accelerating. It should be noted that these signs already indicate the presence of a problem and the need for urgent repairs.
True, it’s not always a matter of seals. Sometimes the problem may be worn rings. Of course, the question arises: how to identify valve stem seals or rings, because the “symptoms” are almost the same. The answer is quite simple. It is necessary to unscrew the spark plugs and inspect them for oil and carbon deposits. The presence of both indicates a malfunction of the caps. This can also be checked by measuring the compression in the cylinder (the spark plug is unscrewed and a special device is screwed into its place). If it is normal according to the passport, then the rings do not require replacement. In addition, if the oil seals need to be replaced, the car will smoke during acceleration and during engine braking.
In general, the destruction of the oil seal occurs due to the fact that it is constantly in a chemically aggressive environment (oil). Plus is subjected to intense mechanical stress (friction). As a result, the rubber loses its elasticity, hardens and begins to collapse. Often, after removal, the caps simply fall apart in your fingers.