Published: 12/1/2012 Category: Design and interior, Homemade products and crafts Views: 20758
DIY decorative gilding
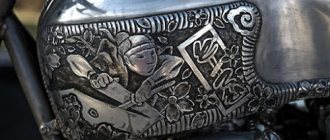
Gilding is a very ancient decorative finishing technique. It has been used since prehistoric times. Indeed, native gold is one of the first metals known to man. And then, in the Bronze and Iron Ages, nothing could compare with noble metal in color intensity, depth of tone, softness of shine. And the master who made the blade considered it his duty to decorate it with a gold pattern. Otherwise the work lacked the finishing touch.
Kievan Rus has been famous for its goldsmiths since time immemorial. However, they did end up in history. The chronicles mention that Grand Duke Vladimir ordered Perun's silver head to be decorated with a golden mustache. And this happened even before the baptism of Rus'!
In the 9th-10th centuries, gold began to be used on a larger scale; they were used to decorate details of architectural structures. So, in 1113, at the behest of Prince Svyatopolk, the grandson of Yaroslav the Wise, the domes of St. Michael's Cathedral were gilded in Kyiv, and from then on it became known as the Golden-Domed Cathedral. Another interesting monument has also been preserved, confirming the art of ancient masters - the copper doors of the cathedral in Suzdal with a gold pattern on a black lacquer background. In those days, heating during gilding was carried out on coals, and the metal was etched with cranberries. Nevertheless, the gold coating did not age for centuries, despite the fact that it was in the open air and touched by thousands of hands!
The gold trim of the old candlestick made it elegant and solemn. All that remains is to decorate it with red balloons and light the candles. The house is ready for Christmas evening.
Decorative gilding
Precious metals have always been used in the finishing and decoration of palace interiors, creating the impression of unimaginable wealth and luxury. But it is possible to make a small object sparkle without large financial costs.
Gilding is a creative process. Two wooden candlesticks show us how the transformation takes place. It’s easy to transform your original walls. The basis will be a smooth surface, for example, vinyl wallpaper. Apply the paint to the wall using a template, lightly touching it with a brush dipped in gold paint. Gold and silver colors will easily give a noble look to the most ordinary things: candlesticks, paintings, boxes.
What to gild?
Example of work
Using gold leaf you can decorate different surfaces:
- tree,
- glass,
- metal,
- mirrors,
- ceramics,
- plaster stucco,
- decorative rock,
- textiles, as well as the paint layer on paintings.
Potal is also used as an auxiliary material, for example when working with epoxy resin:
Earrings with gold leaf
Preparation for decorative gilding
Gilding is a very complex and lengthy process that requires patience, accuracy and experience. To gain this experience, you should start with simpler methods of decoration that imitate gold plating. Our goal is to give our products a beautiful, noble, sparkling look. And naturally, the gold surface should have an impeccable appearance. The slightest imperfections: traces of processing, scratches, roughness, even specks of dust - and the work is ruined! Therefore, the surface of a wooden object is sanded, cracks are sealed, and dust is carefully removed.
Using liquid gold paint, you can apply a geometric or floral design to the wall. Contrasting transitions between the red matte color of the wall and the gold pattern, sparkling metal, create the effect of truly royal wealth.
Gilding with paint
There are ready-made gold paints, which, when applied to a cleaned surface, give the product a golden appearance. The paint consists of a metal powder that reproduces the color of the metal (gold, bronze, copper, iron, etc.). However, paint can only approximately imitate real leaf coating.
1. Acrylic paint is applied to the prepared wooden candlestick as a primer. Red goes better with gold and cool blue with silver. Let the soil dry. | 2. Before application, the gold paint is thoroughly mixed with a wooden stick, as the pigments settle to the bottom of the container. A small amount of gold paint is poured into an old saucer and the candlestick is evenly tinted from bottom to top. The paint dries very quickly. | 3. To give the candlestick an antique look, after the paint has dried, the “golden” layer is lightly sanded with coarse wool until the red primer layer begins to show through in some places. |
Popular techniques for working with gold leaf
A set of rules and a step-by-step algorithm for gilding products is called a technique.
There are many different techniques, and for one type of gold leaf there are several methods of applying it.
Today, even a novice artist does not experience a shortage of information, since on the Internet you can find recordings of master classes on various topics.
Here are examples of the most popular techniques that use various types of gold leaf.
- Stretching technique. It is suitable for gold leaf flakes, since the artist has the opportunity to form or adjust the leaf layer already on the surface itself. The well-known craquelures are made using the stretching technique.
- Sheet application technique. This is a fairly simple type of gilding, which is used to decorate a large surface area. Sheets of gold leaf are glued to the prepared surface in various ways.
- Creating an invoice. The gold leaf is applied to the surface, and a stamp is placed on top of it. The remaining material is removed, and the leaf coating remains only in the depressions left by the stamp.
- Filling with epoxy resin. Resin has many positive qualities that allow it to be used in various decorating techniques. If you pour melted flakes with a layer of resin or use layer-by-layer pouring, you can get a beautiful volumetric overflow.
- Mixed technique. In this technique, gold dust or flakes are mixed with paint and then applied to the product.
Framed in gold - gilded leaf
Since ancient times, gilding has been carried out mainly in two ways: by gluing gold leaf onto an object or by fire gilding, based on the use of mercury. The second method of gilding is very dangerous. For example, when the domes of St. Isaac's Cathedral in St. Petersburg were being gilded (1838-1841), about 60 people were poisoned by mercury vapor. Nowadays this method of gilding is not used.
But gilding with gold leaf is widely used today. The word “susal” comes from the ancient word “susal” - face, that is, leaf - facing. Such gold is stored in special books in which 60 pieces of gold with a thickness of 0.13 to 0.67 microns are placed between sheets of paper. Sheet size - 80 x 80, 72 x 20 mm. Other sizes may be available.
Gold leaf can be free and transfer. Free gold is simply a very thin layer of metal. It cannot be touched with your hands; it deflates from breathing, so the gilder manipulates it (transfers, cuts, smoothes) using a special knife and a squirrel brush. In general, considerable skill is required. In transfer gold, each sheet of gold is placed on white silk paper, together with which it is transferred to the surface to be coated. Once the gold is stuck in place, the silk paper can be removed. Transfer gold is much easier to work with.
1. The prepared surface of the frame is painted with acrylic paint. After drying, the surface is thoroughly sanded, dust is removed and a second layer of primer is applied. It is sanded again. If necessary, the operation is repeated again. | 2. Then the dry and dust-free base is painted with oil varnish using a brush. Gold leaf or its substitute is glued onto the varnish. After about three hours, the varnish dries, acquiring ideal adhesive ability. If you run your finger over it, you can hear a slight whistling sound. |
3. The time has come for the most important operation - we begin to cover the surface with gold. We place a sheet of transfer gold on the prepared frame and press it lightly (paper side on top). | 4. The paper is removed and the gold leaf is gently pressed with cotton wool. It is advisable not to rub, but to tap lightly, so as not to damage the thinnest layer of gold. Master gilders use squirrel, core and rubber brushes to transfer and smooth gold. |
| The frame is gilded using gilding leaf method | |
Care, cleaning and storage of gold-plated items
In order for your jewelry to last as long as possible, you must follow a few simple rules for caring for gold plating.
| Wearing | Be sure to remove gold-plated jewelry before any contact with water (shower, swimming pool, washing dishes) or sports activities. Avoid contact with cosmetics. Don't forget that everyday wear shortens their service life. |
| Storage | Store only in a separate box or fabric bags so as not to damage the layer with other decorations. |
| Cleaning | Clean only with a soft cloth without using abrasives. If dark spots just appear, just wipe with ordinary vinegar and rinse in water. The shine will help return the egg white (after it you will also need to rinse in clean water). Once a year, items should be taken to a jeweler for professional cleaning. |
Despite the fact that sooner or later the coating wears off, it can always be renewed in a jeweler’s workshop.
Gilding
There are two types of gilding with gold leaf: oil (matte) and glue (glossy).
Oil gilding can be used on almost any surface - wood, metal, plaster, plastic. This is a fairly simple, convenient and common method of gilding. This method is called oil-based because the gold leaf is glued onto oil varnish - mordan. The composition of the varnish can be different, it all depends on the conditions in which the gold-plated object will be located.
Adhesive gilding is used only for interior work. This method is used to gild mainly wood, sometimes plastics (polyurethane). The technique of water gilding has remained virtually unchanged since ancient times.
Gold leaf and various types of gold paint can be purchased at art supply stores. We offer transfer gold in different sizes and shades: white gold, yellow gold, 24-karat pure gold. It must be remembered: the purer the gold (the more carats it contains), the less sensitive the gilding will be to the influence of weather and climatic conditions. A material that anyone can purchase to try their hand at gold plating is transfer gold foil.
How to spot a fake
According to statistics, 4 out of 10 gold jewelry is fake. Unfortunately, you can buy gilding for the price of full gold even in a jewelry store. There is only one method of checking that would allow you to avoid counterfeiting at the purchase stage - make a transaction in large, trusted jewelry stores and be very attentive to the product itself.
Signs that jewelry is fake:
- Uneven color. Gold plating can wear off in places even with careful storage and transportation. Moreover, the fakes use a very thin layer.
- Some “experts” on the Internet advise checking with a magnet. Gold should not be magnetic. However, given that many metals do not react to magnets, this method is practically useless.
- Very often, scammers remove the stamped lock from real gold jewelry and attach it to gold plated jewelry. Therefore, one way to identify a fake is to carefully examine the links next to the lock. Any defects in this area may indicate that this is a fake.
At home, if the product has already been purchased, it is much easier to check:
- Chemical method. You can purchase a special set of reagents for testing. This method is suitable for those who often buy gold and not always in reliable places.
- You can drop alcohol onto the surface: low-quality gold will darken.
- If in search of the truth you don’t mind spoiling the appearance of the jewelry, then you can scratch the surface. Small particles will fall off the gilding, leaving noticeable damage.
The most reliable way to check is always a consultation with a specialist. For a small fee, any pawn shop will conduct a series of tests and samples to ensure authenticity.
All that glitters is not gold
A gold-plated product is an expensive thing, not accessible to everyone. The price is mainly high due to the high cost of gold. Therefore, a cheaper replacement was found for gold leaf. One of the well-known substitutes for gold leaf is potal. Potal does not contain precious metals and is the thinnest sheets of a metal alloy - copper with zinc or copper with aluminum. Potal is much cheaper than gold leaf. And it is great for expressing individuality and even momentary mood. The technique of decorating with gold leaf is similar to decorating with gold leaf.
Difference between gold and gilding
The main difference is in the composition. Even a professional cannot always distinguish them by their appearance. Gold jewelry is durable, since the layer does not wear off, and is often much more expensive. Due to their short service life, gold-plated items are not worn every day and require more careful care.
With the development of technology, new methods of gilding have appeared. They allow you to achieve a thicker coating. Such bracelets and rings last much longer, but their price is higher than regular gold plated ones.
Film gilding
With some stretch, gold self-adhesive film for laser printers, from which stickers and labels on CDs are made, can also be classified as gold leaf. This material is quite accessible to home craftsmen, and working with it is easy. The film is unwound from the roll and gradually glued to the surface. Film gilding is used only on flat surfaces. This is how simple wooden baguettes are gilded, for example. All imitation gold, as well as gold leaf with impurities, are usually coated with a protective layer of varnish.
1. To turn a wooden box into gold, use gold leaf. First you need to apply glue to the base. In this case, acrylic is suitable (it dries quickly). | 2. The leaf of gold leaf is glued in its entirety. Since it is thicker than gold leaf, it can be separated by hand and placed on dried glue. The sheets should lie without wrinkles, one on top of the other with a slight overlap. |
3. Using a kolinsky brush, the gold leaf is smoothed out and glued to the base with light tapping. Be especially careful when pressing the edges and corners. The excess is picked up on a piece of paper for further use. | 4. Since the gold leaf is made of metals such as copper, zinc and aluminum, it oxidizes and darkens when exposed to moisture. Therefore, it is necessary to apply a protective layer of transparent varnish on top. Use shellac or tsaponlac. Bituminous varnish gives gilded items an antique look. After drying, the varnish is polished everywhere, except in hard-to-reach places where a noble patina remains. |
What materials will you need?
Potal is one of the so-called “capricious” materials, so if you decide to decorate something with it, but you don’t have experience, be sure to check if you have everything you need for gilding at hand.
Materials for working with gold leaf
For gilding you will need the following:
- A flat, wide brush with squirrel bristles (lampenzel) is used to transfer loose gold leaf to the surface of the product. You can also use a fan brush.
- To apply glue and primer, flat brushes with artificial or bristle bristles . The size depends on the surface area to be covered.
- The kolinsky brush is very soft and is used to carefully smooth out the gold on the surface.
- The gilder's knife has rounded edges; it doesn't even cut, but rather presses through the gold leaf.
- The golden pillow is designed for cutting gold leaf or gold leaf; it is made from thin soft suede.
- Gloves to protect the product from particles of sebum.
- Before starting work, the surface must be treated with a degreaser to remove grease, lint, dust and other contaminants and thus ensure its best connection with the ground and the gold leaf itself.
- Primer for gilding. For wood and plastered bases, a special primer for gold leaf is used - gesso, which contains linseed oil. Adhesive primer is considered the most convenient to use, since it also contains special glue and is suitable for any surface; it is used for free and stencil coatings, in addition, it is suitable for beginners. Bolus primer is available in several colors, which allows you to create interesting artistic effects.
Separately, it should be said about the special glue for gold leaf. There are several types of them, and each has its own characteristics.
- Rabbit and fish glue is available in the form of granules and flakes; it must be diluted with steam according to the instructions. It is intended for restoration work.
- The most popular is Mordan, an oil-based glue. It is used by both professional artists and beginners. It gives a very durable, high-quality coating. Drying time depends on the brand and can last from several hours to a day or more.
- Water-acrylic and water-based adhesives, as well as adhesive milk, are used only for interior work. They are not suitable for coating glass, metal, stone. A significant advantage of this group of adhesives is fast drying (from 15 to 60 minutes).
- Alcohol-based adhesive provides strong adhesion to smooth, water-repellent surfaces - stone, glass, metal. Dries within a few hours.
- Glue in the form of a pencil is designed for applying a thin complex pattern or small details.
From applying the glue to laying out the gold leaf, be sure to wait a certain amount of time specified by the manufacturer.
For the final protective coating, shellac, a natural, alcohol-based resin, is best suited. It creates a very durable wear-resistant layer, so the finished product can be used without fear of scuffs, cracks, or damage caused by moisture or temperature changes. When choosing a topcoat, you should take into account the fact that water-based varnishes oxidize gold leaf, while alcohol-based varnishes, on the contrary, preserve the gilding for a long time.
If you want to create some interesting artistic effect on a gold-plated surface, we recommend using wax or bitumen varnish. With their help, you can make darkening that is natural for an antique item; they give the product volume and an original texture. Patina is used for artificial aging. As a result, veins and spots of greenish and red colors form on the surface, just like on antiques. All decorative products must be applied strictly under varnish, otherwise they will wear off. The product is varnished only after it has completely dried.
Gold and silver sparkles
Metal in the interior is especially relevant today. Even small accessories like boxes, cornices, candlesticks, if given a shiny look, completely change the impression of the apartment. The easiest way to transform them is with metallic glitter or metallic paint in an aerosol can. Working with these materials is interesting, easy and pleasant.
As if by magic, you can literally prepare for Christmas in half an hour. Household items like nuts, pebbles, and shaped pumpkins actually have a wider range of uses than is commonly believed. Especially if the surface, sparkling with gold and silver, is illuminated with candles.
Apply a layer of glue to the box with a brush and, while it is still wet, sprinkle with small glitter. Spread the glitter with your hands, making sure that the surface is covered evenly. A wonderful decoration for a dressing table.
Production of tinsel
The softness and malleability of pure gold allows the metal to be rolled into very thin sheets. Thanks to these physical properties of the metal, the sheets are obtained without cracks and breaks, that is, they are not damaged during the manufacturing process. The process of producing gold sheets begins with the casting of a bar. An ingot with dimensions of 20x5x1 cm is cast from metal, and then carefully rolled into a strip. The length of such a strip can reach 30 meters.
How to continue working with gold leaf? The strip is cut into squares, which are folded together, separated by paper sheets. Before the tinsel can be used for gilding work, this book is sent under a hammer that works about two thousand blows. Under the blows of the instrument, the sheets of tinsel become even thinner and form a kind of “cake”. A square is cut out of the “cake” and placed in a book.
The most important stage in the production of tinsel is beating the gold with a hammer. This procedure is very labor-intensive and difficult to perform. The hammer must strike so that the blows occur not only in a certain sequence, but also with the same force. Compliance with these requirements is mandatory, as it ensures the same thickness of the gold sheets over their entire area.
One book contains up to three hundred leaf sheets, each of which becomes 10 times larger after the beating procedure. For the most complete picture of the tinsel production process, it is recommended to watch the video, which reflects each stage of the production of thin gold sheets. Working with gold leaf largely depends on the quality of the sheets. If the sheets are made in accordance with all the rules, then the gilding of the product will also meet all quality requirements.
Spray paint gilding
Aerosol paints that imitate metal are now widely available. They can be applied to any surface: paper, wood, metal, plastic, glass, even to the wall. You can buy aerosol “gold” at car dealerships. With its help, you can not only create golden wheel caps for your car, but also elevate nondescript interior items. A table lamp, old picture frames, cornices blackened by time - there are a lot of places to use them! To obtain a brilliant result, it is important that the surface is dry and thoroughly cleaned of dust and rust. The treatment must be carried out twice. Both layers will dry within an hour. Unfortunately, it is technically impossible to maintain shine for a long time. But don’t be upset: when the shine fades, just apply a new layer of gold-plated aerosol.
On the eve of the New Year's carnival, we'll give one more idea to parents: your daughter will probably love that her quite ordinary shoes have suddenly turned into golden ballroom slippers. Just don’t forget to degrease them before painting!
Gilding a chest of drawers with primer
Progress of working with the primer: choose a pattern, let it be simpler to begin with, without unnecessary curls, determine the proportions and size. We cut it out by hand, or, which is much better, we take it to an advertising company on a flash drive, where everything will be very carefully cut out with a plotter. Use cotton wool soaked in alcohol to wipe the surface with which we will work. In this case, the surface must be fixed horizontally. Select the inside of the stencil and clean it. Carefully and evenly glue the oracal onto the surface, having first removed the backing. We outline the stencil with a pencil and remove it.
We prepare the soil based on the proportions: 300 grams of bolus + liter of water + 100 grams of rabbit glue. We heat it in a water bath, and, keeping it warm, apply at least three layers. Each layer must dry well. We apply varnish. We glue the sheets of sweat, leveling and smoothing them. Dry and remove excess. At this stage, advanced users can include elements of artificial aging: scratch, tint, spray... Then we varnish in several layers, everything is great, isn’t it?
Another idea for the holiday
Using glue, draw an outline on a sheet of gift paper and leave it to dry until the glue becomes transparent. Then we put gold or silver transfer foil on top and gently rub it in. After this, carefully remove the base paper. This design can even be made on textiles - a T-shirt or baseball cap. A great gift for the New Year - both unique and practical!
A great idea for decorating gift boxes for Christmas or New Year | |
Repair using gold paste
In art stores you can find gold paint in paste form. Pastes are usually made with beeswax and metallic pigments. The paste is ideal for restoring an old frame or an old wooden candlestick. It is applied with your finger and thoroughly rubbed into the surface. To achieve an antique effect, the gold trim of the frame can be slightly “aged” by rubbing a little natural umber into the figured profile.
Repair using gold paste
These articles may also be of interest to you:
- How to age wood - use brushing
- Making a New Year's stand for gifts and a Christmas tree
- Restoring an old wooden table
- Wall decoration - painted furniture