Changed and forgot | 10/11/2017
Auto body repair specialists are familiar with situations where it is necessary to remove a structural element of a vehicle that is attached to adjacent parts by spot welding. It is not always possible to use a hydraulic punch, so the best option is a special drill for drilling spot welding, installed in the chuck of an electric drill.
How to work?
At first glance, the simple technology of using a tool designed to dismantle welding points has several features. Specialists adhere to the following rules in their work.
- For work, an electric drill is used, which has the ability to adjust the speed of rotation.
- Drilling work cannot be performed at high speeds, as the tool pin may be broken due to the heavy load.
- To perform the drilling process, the drill is placed at the drilling point in a strictly perpendicular position. No deviations during operation are allowed, as this may damage the surface of the part being drilled.
Before starting drilling work, the work surface must be prepared. They do it as follows.
- The surface is cleaned of dirt and a layer of paint - this will significantly improve the quality of the work result and reduce the likelihood that the tool will come off during drilling. Cleaning is done using sandpaper.
- Although the drill can be used without first core drilling the drilling area, for ease of operation this procedure is sometimes performed using a separate core for this purpose.
Before starting work, it is necessary to inspect all welding points and determine what diameter tool will need to be used for drilling.
When the preparatory work is completed, you can begin drilling. To do this, place the drilling tool in the chuck of an electric drill and, pointing the working part of the tool to the welding point, pressing the drill tightly, begin to drill, starting at low speeds
When drilling, it is important to take your time and be careful not to drill through the metal part. After completing the process of drilling out the welding fastening points, the next step is to separate one part from another
It should be taken into account that the cutter does not drill completely through the welding point, as a conventional drill does; its operating principle is different - it drills in a circle in the area of the welding point and allows you to separate the part from the base. After the parts are separated, the remaining welding metal is cut off with a grinder or a cutting grinding disc, and in some - especially difficult - cases, a chisel and hammer are used to separate the parts. If it is necessary to drill out the front part of the welding fastener, use a drill that has a kind of cone-shaped protrusion in the form of a spout, with the help of which the centering of the drill is held in the desired position
At the same time, the sharpening of the drill itself is flat
If it is necessary to drill out the front part of the welding fastener, use a drill that has a kind of cone-shaped protrusion in the form of a nose, with the help of which the centering of the drill is held in the desired position. At the same time, the sharpening of the drill itself is flat.
Another effective way to dismantle welding points is to use a small crown with sharpened teeth. This device has in its design a spring-loaded stop with centering, which acts as a limiter. It can be adjusted using a special setting. During operation, the crown removes only the area of the weld point, without affecting the unnecessary parts of the metal of the part.
Peculiarities
A spot welding drill bit is used to remove a permanent weld joint. Such a cutter allows you to accurately drill out the welding point without causing significant damage to the surface of the part. Often a tool with a diameter of 8 mm is used for drilling. You can find a similar drilling tool in specialized retail outlets, but its cost can be quite high. However, the purchased drill will recoup your costs by greatly facilitating the procedure for removing parts connected by spot welding.
In addition, a durable steel cutter can be sharpened - the tool can withstand several sharpening cycles and retain its original properties.
The main advantages of the cutter for removing spot welding fasteners.
- It is possible to carry out work on drilling welding without first forming a recess at the welding point, that is, without punching. This feature of the drill is convenient, as it saves a lot of time and effort.
- You can work with a drill for a long time, sequentially drilling several welding points in a row. Even when heated, the drill does not lose its properties.
- The service life of the tool is quite long, since this product is made from high-strength steel grades and has the ability to undergo multiple sharpening cycles.
- After drilling out the weld points, the dismantled part remains preserved for reuse. In addition, the surface of the second workpiece, to which the dismantled part was attached, is not damaged, and it can again be used for its intended purpose.
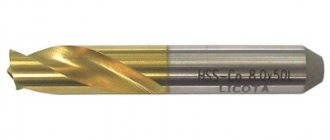
The tool intended for dismantling welding points is made of alloy steel with the addition of titanium coating . available : with one working side or double-sided . The drill diameters are different - they can be 6, 8 and 10 mm. The choice of drill diameter depends on the size of the weld point that will have to be drilled. In this case, an additional 1.5 mm is added to the diameter of the drilled object.
According to its structure, the drilling tool has 3 main parts.
- Core area. The height of this part must be selected so that it exceeds the thickness of the part by 2 mm.
- Cutting part. To strengthen this area, titanium coating is applied to the metal, which significantly strengthens the drill, prolongs its wear resistance and allows the tool to work regardless of its heating.
- Mounting area . This part is designed to secure the drilling tool into the holder of an electric drill.
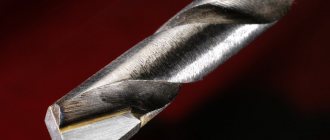
By visual signs, it is quite simple to distinguish a tool designed for dismantling welding points from other drilling analogues - the axis of the tool has a cone-shaped shape, with an angle of 90°, while the working end part of the drill is flat.
How to work with drills for spot welding?
One of the important questions in the welding industry is - how to drill a spot weld? This is often necessary when repairing a car body or other work where it is necessary to eliminate this type of welding.
To make a drill for drilling spot welding with your own hands, you need to use hard materials in the form of titanium or its alloy. The part can also have either one or more tips to work with.
The product range is quite large, where you can find a part with the necessary parameters and size. It is worth highlighting one rule that must be followed - the diameter of the rod used must be selected one and a half millimeters larger than the hole itself in the place being drilled.
The element is attached to the drilling equipment - it is possible to use a mechanical method, but the result will be better and faster using an electrical structure.
The optimal method is to use a special device for drilling spot welding, through which you can manually adjust the operating power of the device.
Spot welding drilling tool set.
Before starting the work process, you need to select a specific rod model. Its main characteristics should be strength and sharpness. Then the required diameter of the part is selected in the same way.
It is worth remembering that it must be a little larger in millimeters in order to drill the required hole. The procedure is not difficult, even a beginner can handle it.
It is not necessary to core, but experts still advise using a drill with a small diameter to simplify the work process. It should be noted that it is prohibited to work at an angle.
The drill should contact the surface of the material only at a right angle. If it is impossible to comply with this condition, a different method of carrying out the procedure is selected. After the drill model has been selected and the equipment is in the mood, the specialist can begin to perform the work.
All stages of the procedure are performed only in the perimeter of the upper part of the metal product. In other words, only the welding fastener is processed.
Sharpening a drill for a spot procedure
Drill sharpening machine.
Any spot welding drill bit has a primary purpose, but it also requires regular sharpening of the part. Items that are used to sharpen drills also need to be cleaned regularly.
Before sharpening a drill for resistance welding, you need to start the process with preparation - blunting. In this procedure, it is best to use regular sandpaper with a hard surface.
Then you need to use it to walk along the side edges. It is worth paying attention that the cutting edge must not be touched. Instead of paper, a special stone is sometimes used. The edges are also processed with it to trim the edges to a high-quality and even level.
Finally, the rod is sharpened to the middle length. The main thing is that drilling is convenient and easy, and for this you need to control the alignment.
Other Spot Weld Removal Methods
There are several ways to remove weld spots in hard-to-reach places. They can be used in conjunction with drilling if getting to the point is problematic.
- Felling. A sharp chisel is installed between the parts, and the point is cut off with sharp blows. The parts are deformed, so additional editing will be required. You can make the process easier with a pneumatic chisel or hammer drill.
- Sanding. Using an abrasive wheel, the metal of the point is selected until a clear outline of the connection appears. The method requires caution, as there is a risk of damage to the part.
- Cutting out. To do this you will need a plasma cutting machine. They can be used to carefully cut out points and weld the holes.
Depending on the goals that the master has and the ease of use, you can use any of the proposed methods. Each case is unique. You should trust your experience and intuition.
voice
Article rating
What size should the drill be for drilling resistance welding points?
You can make a special drill for drilling out resistance welding points yourself. You need to sharpen a regular metal drill so that only the outer points of the drill are cut, and there is a point protrusion in the center for centering.
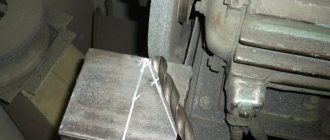
You can sharpen such a drill on a sharpening machine or even with a grinder. In this article we will look at the option of sharpening a drill on a sharpening machine. The grinding wheel must have a normal, not rounded edge, since sharpening will be done precisely using the edge of the grinding wheel.
The tip of the drill should be located exactly in the center. The cutting edges of the drill should be the same distance from the center of the drill. The edges should protrude the same amount so that when drilling begins, the drill does not move to the side and drilling begins evenly with both edges.
The tip of the drill should be slightly longer than the cutting edges, that is, when you start drilling, the central protrusion will first touch the surface, and then the cutting side edges.
If the central point is equal in height to the outer tips of the drill, then it will not be possible to start drilling from the central protrusion, and the drill will move along the surface when trying to drill.
The angles of the cutting edges should be approximately the same. They should not be very sharp or very dull. Blunt edge angles will not cut into metal well, and very sharp edges will quickly become dull.
Sharpening method No. 1
This method is the most common; it has been demonstrated more than once in videos by various masters. You need to take a metal drill with a diameter of 8 mm.
It is better to use a drill containing cobalt, as it is the most durable and will last longer until the next sharpening. First, its tip must be made flat by blunting it on a sharpening machine. You can completely blunt the tip, or leave the edges slightly unground.
Next, we sharpen the edge of the grinding wheel from the center to the edges, leaving a small point protrusion in the middle. Although the tip will be ground off, the center will be visible (where the spiral turns meet). The edges are ground down along the turns of each spiral.
This leaves cutting tips on the sides and a sharp tip in the center. The center should be 1–1.5 mm higher than the outer tips. You can check this by leaning the central part of the drill against a plane. The drill should swing slightly on the center lip, touching the outer cutting edges.
Finally, you need to carefully, also using the edge of the circle, sharpen the sides of the central part, making it sharper so that the drill is better centered and the central bridge does not interfere with drilling. Each cutting edge should be the same height so that they cut the metal at the same time.
How to work?
At first glance, the simple technology of using a tool designed to dismantle welding points has several features. Specialists adhere to the following rules in their work.
- For work, an electric drill is used, which has the ability to adjust the speed of rotation.
- Drilling work cannot be performed at high speeds, as the tool pin may be broken due to the heavy load.
- To perform the drilling process, the drill is placed at the drilling point in a strictly perpendicular position. No deviations during operation are allowed, as this may damage the surface of the part being drilled.
Before starting drilling work, the work surface must be prepared. They do it as follows.
- The surface is cleaned of dirt and a layer of paint - this will significantly improve the quality of the work result and reduce the likelihood that the tool will come off during drilling. Cleaning is done using sandpaper.
- Although the drill can be used without first core drilling the drilling area, for ease of operation this procedure is sometimes performed using a separate core for this purpose.
Before starting work, it is necessary to inspect all welding points and determine what diameter tool will need to be used for drilling.
When the preparatory work is completed, you can begin drilling. To do this, place the drilling tool in the chuck of an electric drill and, pointing the working part of the tool to the welding point, pressing the drill tightly, begin to drill, starting at low speeds
When drilling, it is important to take your time and be careful not to drill through the metal part. After completing the process of drilling out the welding fastening points, the next step is to separate one part from another
It should be taken into account that the cutter does not drill completely through the welding point, as a conventional drill does; its operating principle is different - it drills in a circle in the area of the welding point and allows you to separate the part from the base. After the parts are separated, the remaining welding metal is cut off with a grinder or a cutting grinding disc, and in some - especially difficult - cases, a chisel and hammer are used to separate the parts. If it is necessary to drill out the front part of the welding fastener, use a drill that has a kind of cone-shaped protrusion in the form of a spout, with the help of which the centering of the drill is held in the desired position
At the same time, the sharpening of the drill itself is flat
If it is necessary to drill out the front part of the welding fastener, use a drill that has a kind of cone-shaped protrusion in the form of a nose, with the help of which the centering of the drill is held in the desired position. At the same time, the sharpening of the drill itself is flat.
Another effective way to dismantle welding points is to use a small crown with sharpened teeth. This device has in its design a spring-loaded stop with centering, which acts as a limiter. It can be adjusted using a special setting. During operation, the crown removes only the area of the weld point, without affecting the unnecessary parts of the metal of the part.
How to sharpen?
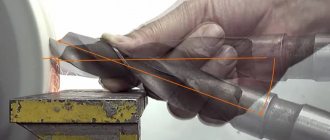
Like any cutting unit, a tool designed to dismantle welding points requires maintenance. When the cutting surfaces become dull, they are sharpened; if this procedure is performed correctly and carefully, the tool’s service life can be extended while maintaining all its cutting properties.
The process for sharpening the spot weld removal tool is as follows:
- preliminary cleaning of the drill tip with sandpaper is carried out;
- the cutting side surfaces of the tool are ground down using an abrasive wheel - this manipulation must be performed very carefully in order to maintain the sharpening angle of the cutting edge of the tool;
- check the quality of sharpening and evenness of the cutting surfaces of the drill;
- The process of processing all the edges of the drill is carried out with constant monitoring during the centering of the tool in order to avoid regrinding it on one of the sides.
Sharpening the drilling tool must be done carefully . If you violate the sharpening angle of the cutting part, the drill will become unusable.
If you do not have independent skills in turning cutting tools, you can take the drill bit for sharpening to a specialized workshop.
You can learn how to sharpen a drill bit for drilling spot welding with your own hands from the video below.
Other Spot Weld Removal Methods
There are several ways to remove weld spots in hard-to-reach places. They can be used in conjunction with drilling if getting to the point is problematic.
- Felling. A sharp chisel is installed between the parts, and the point is cut off with sharp blows. The parts are deformed, so additional editing will be required. You can make the process easier with a pneumatic chisel or hammer drill.
- Sanding. Using an abrasive wheel, the metal of the point is selected until a clear outline of the connection appears. The method requires caution, as there is a risk of damage to the part.
- Cutting out. To do this you will need a plasma cutting machine. They can be used to carefully cut out points and weld the holes.
Depending on the goals that the master has and the ease of use, you can use any of the proposed methods. Each case is unique. You should trust your experience and intuition.
Spot welding drilling tool and technology
When carrying out repair work on car bodies or other metal structures, it becomes necessary to separate parts held together by spot welding.
This type of connection of metal elements is very common. It allows you to quickly and efficiently fasten thin metal parts together. Such technologies are widely used in the automotive industry.
Necessary tool
The following tool helps to drill resistance spot welding joints:
- hand drill (pneumatic or electric);
- a set of drills or metal bits of suitable diameter;
- hammer, center punch for applying preliminary markings to spot welding areas to be drilled;
- electric sander (if necessary).
Using a hammer and punch, make a small dent at the connection point. Using a previously obtained mark, drilling is carried out.
An electric or pneumatic drill for drilling spot welding must have a speed controller. This allows you to optimally select the tool spindle speed.
Separating parts
Drilling is carried out in the places marked with a center punch until all metal is removed at the connection point.
You can drill over the paintwork or sand the metal with sandpaper to obtain a smooth surface. At the cored spots of spot welding, the metal element is bored using a drill.
Kits (steel processing tools) for this type of work are not specialized. All this can be purchased at stores that sell power tools.
It is necessary to drill spot welds at low and medium speeds. The sharpening angle of the drill is of particular importance. A point is made at the end, which will allow you to easily and quickly carry out the work process, removing the point connection. The power tool must be stopped periodically to allow some time to cool down.
Depending on the area of the contact point, it is necessary to select a drill; usually it can be 6-8 mm in diameter
If the welding point on the structure is difficult to reach, then such places require more careful handling
You can use a special drill attachment for this to drill the weld at a certain angle.
The tool, powered from the mains supply, also has speed control functions. When carrying out work, you can always experimentally set the required spindle speed of the power tool.
Drilling process
Removing a body part consists of several logical steps:
- Preparation. It is worth removing all rubber bands, moldings, overlays. The entire edge of the joint should be visible. We clean the edge with sandpaper - this way all the points will be visible. If necessary, use a narrow sharp chisel to remove sealant, putty or paint deposits.
- Punching points. Using a sharp core, carefully strike the drilling center. The punched points will help you maintain the center and not break the drill when you start working.
- Drilling. Using a sharp nose, the drill is installed in the center of the weld point in the intended recess. It is necessary to drill out spot welding at low speeds; you should hold the drill firmly with both hands - the parts are uneven, and the edges of the tool always try to touch the protrusions of the metal.
- Detaching surfaces. As a rule, parts after drilling continue to adhere to paint, sealant or undrilled areas. Prying with a flat, thin chisel will help to disconnect, and un-drilled areas will be cut out with it.
A new drill will last much longer if it is not overheated and worked carefully; the drill should be perpendicular to the surface being processed. It is better to set the speed low; occasionally the working surface needs to be lubricated. Thick parts are drilled in several stages with periodic cooling of the cutting part.
What is a spot welding drill bit?
Spot welding is very widespread and is widely used in almost all areas of industry and beyond. However, a task often arises, the essence of which is not spot welding, but, on the contrary, its removal.
Car owners often encounter this procedure when replacing or repairing body parts, etc.
And here it is possible to use a hydraulic punch, but not always, so the best option is a special drill for drilling spot welding, installed in the chuck of an electric drill.
A drill for spot welding is easy to “identify” - its working end is flat, and along the axis there is a core projection sharpened to a 90º cone, thanks to which you can get rid of the most labor-intensive stage - centering the drill. Therefore, craftsmen often use ordinary drills sharpened in a special way for drilling.
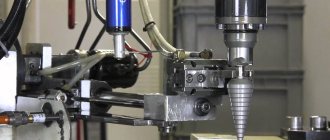
In principle, another option for drilling spot welding is possible - the use of special crowns. Such a tool includes a centering spring-loaded rod on which a cutting disk with several end teeth is mounted.
It is assumed that the user first presses the core into the metal, and then, as the bit sinks into its thickness, drills the metal around the weld area.
To give the tool the necessary rigidity, the entire structure is enclosed in a mandrel.
Let us perform a comparative assessment of the effectiveness of both drilling methods, assuming that the metal of the crown and drill is the same: high-speed steel R18 (although tools of this kind are also made from steels R6M5, R6M5K5 and even R9K6). It is preferable to use a domestically produced tool: instead of a high-speed cutter, Chinese manufacturers can offer completely different steel, such as 45X, with an expectedly poor finish.
Spot welding bit
The tool is quite massive, so it is first recommended to press the centering rod firmly against the surface of the part, and then, at low speeds, begin cutting out the metal. The difficulty is that during spot welding, the low-carbon steel from which all body parts are made is significantly strengthened. Therefore, pressing the centering rod into the metal will require significant effort from the worker.
The second problem is the non-simultaneous cutting of the teeth of the crown into the steel. This happens because the surface in the welding zone has microroughnesses formed as a result of thermal effects from the electrodes for contact welding. The result is likely eccentricity of the drilled hole.
Experts advise to pre-core the drilling sites (for example, using a screwdriver), since there are often cases when the centering rod jumps out of the socket and the bit begins to drill steel in a completely different place. In this case, the operation requires two driven instruments.
However, not everything is so bad: the crowns are double-sided, so when they become dull, it is enough to turn the tool 180º and continue working with the same set.
What does a spot welding drill consist of?
It consists of three sections:
- Core (its height is chosen so that it is no less than the thickness of the metal of the part, usually 2...3 mm is enough).
- Main cutting part. It can be conventional or coated with titanium nitride, in which case the durability of the drill increases noticeably, and the dimensions of the cutting part will not depend on the heating temperature.
- Mounting part for an electric drill chuck.
The drilling technology in this case is somewhat simplified: first, the core is embedded into the metal of the product, and then the required operation is performed with the side edges of the drill. In this case, the main problem is the need to keep the tool strictly perpendicular to the surface of the body part.
When choosing a drill for spot welding, you must first evaluate the accuracy of the core location, for which a caliper with a vernier division value of 0.01 mm rather than 0.1 mm is suitable.
Misalignment leads to the fact that part of the drill works on unhardened metal, and therefore the load on the tool is distributed unevenly.
You will also have to spend more time periodically sharpening the drill and the core itself, carefully maintaining its apex angle and height.
When using a drill for drilling spot welding, you will also need to change the speed of the drill: at first it should be small, up to 700...800 min-1. However, the total complexity of the operation is still less than in the previous version, and for drilling it is enough to use only one power tool - a drill.
Drills for this type of welding
Spot welding drills are quite easy to identify by their appearance. Its working end has a flat surface, the axis has a cone-shaped core protrusion at a right angle. With its help, the centering of the drill is removed, which is the most labor-intensive stage in extracting the result of the point procedure.
Due to possible difficulties, experts prefer to use a regular drill, which must be sharpened properly.
An alternative option for drilling welding points is the use of specialized crowns. Their structure includes a rod with springy and centering properties, to which a disk with a cutting surface and several end teeth are attached.
Initially, the master must press the core protrusion into the metal surface, after which, controlling the immersion of the crown into the structure itself, the material is drilled near the welding seam.
Special drill for drilling spot welds.
To ensure that the part is sufficiently rigid, the structure is enclosed in a frame. In comparison with methods for eliminating the welding in question using a rod, it is worth noting that the material of the part and the crown itself may be the same.
The only difference is the type of steel R6M5, R6M5K5 or R9K6. Often such an item is used in domestic production for car repairs. In the Chinese industry, they prefer high-speed cutting materials from types 45X.
How to use
Unlike a drill, you can use a simple tool - a household drill. It’s good if it has low power and speed (rpm).
This could be an electric drill with the ability to manually adjust the wrapping speed. This will prevent the drill from becoming deformed while you remove the weld.
Insert the drill of your choice (regular or sharpened) into the tool and turn it a couple of times. Be sure to make sure that the drill fits well and will not fall out during operation.
Before you start drilling, mark the weld spots. To do this, use a core. Its diameter can be less than two millimeters, this is not critical. After the core, the hole can be expanded with a standard electric drill up to three millimeters.
This short action will reduce the amount of distortion in the workpiece when you finish drilling it.
If you have prepared everything correctly, set up the drill, secured the drill and processed the welding points, proceed to drilling the seam with a homemade or special drill.
The time you spend on preparation will pay off, thanks to the fact that the drilling process itself lasts a few seconds.
It is advisable to configure a drill with manual adjustment so that it does not produce more than 800 revolutions per minute, so as not to encounter its breakdown.
While working, keep the tool parallel to the structure, taking care not to tilt it too much. The drill itself should clearly rest vertically on the element you are drilling.
Drill for drilling spot welding: nuances during operation and sharpening
Many body repair specialists have encountered a situation where it was necessary to replace any part in the car structure that was connected to adjacent elements through spot welding. At the same time, it is not always possible to use a hydraulic punch for this, so the best solution for drilling out spot welding is a special drill placed directly in the chuck of an electric drill.
Design
It is quite easy to recognize a drill for spot welding by its appearance - along its axis there is a core protrusion sharpened to a 90-degree cone, which significantly simplifies the process of centering the drill. The working end is made flat. Based on this, many craftsmen often use ordinary drills with special sharpening to drill holes.
However, another method of drilling out spot welds is possible using special crowns. For this purpose, a tool is used that consists of a spring-loaded centering rod, on top of which a cutting disk with teeth on the end side is placed. During the work process, the master must initially press the core into the metal surface, after which, as the crown is lowered into the thickness of the material, the weld area is drilled. For greater rigidity, the instrument is equipped with a special frame.
It is worth making a comparative assessment of the effectiveness of the presented methods for drilling spot welding, assuming that the material of drills with crowns will be identical, namely P18 high-speed steel. However, nothing excludes the possibility of using other steels, for example, R9K6, R6M5K5 or R6M5. It is best to use domestically made tools. Instead of the usual high-speed cutter, Chinese analogues can use another material, for example, 45X steel, the service life of which is significantly lower!
Spot welding drill
The tool in question offers 3 sections:
- Mounting element for an electric drill chuck.
- The main cutting part, which can be presented in either a conventional version or coated with titanium nitride. In the latter case, the service life of the drill is significantly longer, while the heating temperature will not affect the dimensions of the cutting element.C
- Kern. As a rule, its height is about 2-3 millimeters, while remaining greater than the thickness of the metal of the workpiece.
In this case, the process of drilling welding is slightly easier: first of all, the core enters the metal surface, after which the side edges of the drill begin to gradually perform the desired operation. With this approach, the main problem is that it is quite difficult to hold the tool in a strictly perpendicular position relative to the body element.
When choosing a drill for spot welding, you should take care in advance about the exact location of the core. For this purpose, it is best to use a caliper with a division of 0.01 millimeters instead of the usual 0.1 millimeters
It is important to emphasize that misalignment causes part of the drill to pass through unhardened metal, as a result of which the tool begins to be subjected to uneven loads. In addition, more time will have to be spent on sharpening the core with the drill, each time carefully measuring its height and angle at the tip
When using a drill to drill out spot welding, it is necessary to additionally periodically change the number of revolutions of the tool, and at the beginning of work the number of revolutions should remain small, in the region of 700-800 min-1. And still, the total labor intensity will remain lower than in the previous case, and the work will require only one tool - an electric drill.
Crown
The tool itself is quite massive, so initially you need to press the centering rod well against the surface of the metal, and then proceed to cutting out the metal at low speed. The problem lies in the fact that low-carbon steel, which is what all body elements are made of today, is significantly strengthened during spot welding, which is why a lot of effort is required from the worker to press the centering rod into the metal surface.
Another nuance during work is that the teeth of the bit do not cut evenly into the metal, since the steel at the welding site is always distinguished by the presence of microroughnesses formed due to thermal effects from the operation of the electrodes. As a result, there is a high probability of eccentricity of the new hole.
Experienced craftsmen recommend core drilling the drilling area in advance, for example, with a screwdriver, since it often happens that the centering rod unexpectedly slips out of the socket, as a result of which the crown begins to cut metal in the wrong place. With this approach, the worker needs to acquire a pair of power tools.
The problems do not end there - rapid overheating of the bits also negatively affects the work, because the thermal expansion of the bit causes the new hole in the body to become larger than necessary, and the attachment itself begins to crack.
Although not everything is so sad, because modern crowns are double-sided, so after one side has dulled, you can simply turn the tool around and continue cutting metal with the same set.
source
