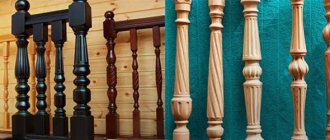
The classic design of fencing for staircase structures is figured wooden posts. Making balusters is a rather complex process that requires high precision, as well as compliance with certain technical standards and rules. After all, they perform not only a decorative function. Balusters are, first of all, a supporting structural element of the fence that supports the railing. Hand-made support posts will become an exquisite decoration of any interior. For their manufacture, pine, birch, oak, and beech wood are often used. Wooden posts can be given different shapes. Unlike concrete products, on a pliable wooden surface, you can depict the most elaborate patterns or carve figures inspired by nature itself. Before answering the question: “How to make balusters?”, Let’s try to understand their types and features.
Making a screw baluster
| Category: Woodworking | Author: admins | (November 21, 2016) |
| | print Was the article useful to you? Yes No Only registered users can leave comments in this news. They searched for: do-it-yourself twisted balusters (December 18, 2016 10:38 p.m.) how to make a screw baluster (December 18, 2016 9:28 p.m.) how to make a screw baluster (December 17, 2016 11:44 p.m.) making twisted balusters (November 3, 2016 00:00) production of twisted columns using a router (November 2, 2016 23:23) milling and copying table for making twisted balusters with your own hands (October 31, 2016 22:41) machine for making twisted balusters with your own hands (October 31, 2016 21:34) screw balusters (October 29, 2016 10:15) homemade machine for making screw balusters (October 25, 2016 06:11) do-it-yourself twisted balusters video (October 20, 2016 00:45) how to make a machine for screw balusters (October 14, 2016 22:16) DIY wood lathe with a copier (October 14, 2016 15:45) how to make bolts with a screw (October 13, 2016 15:09) how to make a copier for a wood lathe (October 9 2016 11:56) lathe with a copy from a milling machine (October 8, 2016 22:54) www.websr.ru |
DIY technology for making wooden balusters
If desired, you can make balusters for the stairs yourself
The classic design of fencing for staircase structures is figured wooden posts. Making balusters is a rather complex process that requires high precision, as well as compliance with certain technical standards and rules. After all, they perform not only a decorative function. Balusters are, first of all, a supporting structural element of the fence that supports the railing.
Hand-made support posts will become an exquisite decoration of any interior. For their manufacture, pine, birch, oak, and beech wood are often used. Wooden posts can be given different shapes. Unlike concrete products, on a pliable wooden surface, you can depict the most elaborate patterns or carve figures inspired by nature itself.
Recommendations for installing balusters
Before starting work, the master needs to remember the simple rules for installing the staircase structure:
- maximum distance between balusters 150 mm;
- For any assembly methods, be sure to use a layer of wood glue - this will protect against unpleasant squeaking when loosening threaded connections and will increase the reliability of the connection;
- maximum railing height 900 mm;
- installation begins with the installation and fastening of the outer support pillars of the span;
- At the ends of the balusters, holes are pre-drilled, the diameter of which is 2–3 mm smaller than that of self-tapping screws and studs.
You can make balusters yourself, but you need skill in working with woodworking machines and performing painting work on wood. Simple flat stands can be made by any home craftsman who knows how to work with a jigsaw and a grinding machine. We recommend that you first practice and make a simple fence on a terrace or in a garden gazebo, and then start building a complex staircase structure.
Wooden balusters: design and functionality
Before answering the question: “How to make balusters?”, Let’s try to understand their types and features.
Design features and types of wooden balusters
To suit the design decision, you can make wooden balusters of any shape and texture. However, in the design of support posts for filling fences, there are three parts:
- base - the bottom of the column;
- body - the middle part, usually made with decorative elements;
- the upper support part, on which the fence handrail is attached, is symmetrical to the base.
Baluster structure
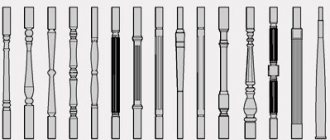
According to the manufacturing method, balusters are carved, turned and milled. Depending on your wishes, they can be given any shape. Most often they are:
- in the form of a square or rectangle;
Square balusters
Flat balusters
Spiral balusters
Cone-shaped balusters
Square posts are the simplest option, suitable for making railing supports with your own hands. Using a jigsaw, flat balusters are cut from the boards according to the template. More labor-intensive and complex to make are carved posts, which require manual application of various ornaments. The use of special carpentry machines greatly simplifies the production of wooden balusters. Using modern multi-axis numerical control machines, columns with fine threaded elements are created.
Turning balusters on a CNC machine
The main stages of making balusters
Having your own small workshop, as well as following the established rules for making support posts, you can decorate the staircase structure with your own hands. To do this, the master will need a lathe or drill, a metal rod for fastening a wooden workpiece, sharpening, flat or semicircular chisels, and paint and varnish materials.
Important!
When carrying out carpentry work, safety regulations must be observed. When working with machines, it is recommended to use gloves and special devices to protect the torso, eyes and neck.
First of all, you need to decide on the material for making balusters. In this case, you need to take into account what material the staircase structure itself is made of, the fastening features, and also observe the general architectural style of the room.
Balusters should harmoniously complement the architectural style of the room
The shape of the baluster is pre-developed. In accordance with the dimensions of the fence, the parameters of the columns are calculated. Next, blanks with a square cross-section of a given size are made from the edged boards using a machine with circular saws. If you have a cross-cut saw, it can be used to quickly saw blanks to length, removing wood defects and chips.
Before manufacturing, decide on the shape and size of the baluster
A lathe is used to form the support, body and main part of the baluster. If necessary, it can be replaced with a mechanism built with your own hands from an electric drill.
Drill lathe
A machine with a copier greatly simplifies the process of making balusters. First, prepare a template and fix it on the machine next to the workpiece. A special roller moves along the template, giving the same shape to the wooden blank. After giving the column the intended shape according to the approved sketch, they begin to perform decorative work. The carving or ornament is applied manually, treated with impregnations, painted or varnished.
After you have given the baluster the required shape, you can begin to carve and treat the surface with an antiseptic and varnish
Features of manufacturing flat balusters
To make flat supports for railings with your own hands, you will need a marker, paper, a jigsaw, and boards. To process finished products you will need sandpaper or a sanding machine, antiseptic, varnish and brushes.
To construct a drawing, use a large sheet of paper on which a real-size rack template is drawn.
To begin, select a template for the balusters
With the help of voids in wood, various patterns can be formed. A paper template is cut out along the contour, placed on the board canvas and outlined with a marker.
If you have decided what your baluster will look like, cut out a template from paper or plywood
Next, place the template on the canvas from which the baluster will be cut and trace it with a marker or pencil
Next, a baluster is cut out using a jigsaw along the drawn lines. The resulting blanks are thoroughly sanded. Sharp contour transitions and places difficult to reach with a grinder are best treated with fine abrasive sandpaper. Finished wooden fencing parts are coated with an antiseptic. Then the varnish is applied and left until it dries completely and harmful fumes disappear for about 1.5 days.
After you have made the balusters, you can begin painting work.
Manufacturing of concrete balusters for fencing
To install fencing for external stairs, it is more advisable to use concrete elements. The production process is greatly simplified by the availability of ready-made plastic forms with the most popular sketches in construction stores.
Today on the market there are many molds for casting concrete balusters
If the existing assortment for some reason does not fit the main design, the mold is made by hand.
Advice!
Before you begin making supporting elements, you should study the process of making concrete mortar.
There are two options for making concrete supports. When beating balusters, a wet mixture of cement and sand is used. Before placing the mixture into the mold, iron pins are placed at the top and bottom for subsequent installation of the finished products. They should protrude by 8 and 5 cm, respectively. The form is placed vertically and, adding small portions, the concrete solution is compacted by blowing with a pipe. After filling, the mold is removed and the column is left in a vertical position for final hardening.
Baluster beating technology
To cast concrete columns you will need a mold with a lid. A solution of standard consistency is poured inside and the mold is closed. The workpiece is rotated in a horizontal position to ensure uniform filling. After 2 hours, the mold is removed and the baluster is dried.
Casting concrete balusters
Wood products are less resistant to environmental influences compared to concrete fencing elements, so they require special care and careful cleaning. To extend the life of wooden structures made by yourself, it is necessary to use special antiseptic and antifungal agents.
In order for wooden balusters to last longer, they must be regularly treated with protective agents.
Different types of wood are susceptible to rot to varying degrees, so even after protective treatment you need to monitor the level of humidity in the room.
lestnitsygid.ru
Flat balusters: step-by-step instructions
Flat supports are easiest to make yourself. Their production does not require complex equipment. Skillfully made supports have an attractive appearance. They can decorate any interior.
Step 1. The first stage of work is devoted to preparing the materials and tools necessary for the manufacture of balusters: jigsaw, paper, marker, scissors, ruler, sandpaper or sanding machine, dry boards or plywood.
Electric jigsaw
Prices for popular models of jigsaws
Jigsaw
Step 2. At the second stage, a sketch of the future support is developed. To do this, the full size of the contours of the product and patterns are applied to the paper. After this, a support template is cut out according to the dimensions marked on the paper.
Stencils
Step 3. The third stage is devoted to applying a stencil to the workpiece, drawing the contours of the future product on it and cutting out a support along them with a jigsaw.
Flat balusters cut with a jigsaw
Step 4. At the fourth stage of work, the surface of the products is processed. For these purposes, use sandpaper or a grinding machine.
Prices for popular models of sanders
Sanders
Sanding a piece of wood with an emery wheel
Step 5. To extend the service life of products, their surface is treated with an antiseptic. After it dries, the supports are coated with wood varnish. This improves their aesthetic appearance.
Features of varnishing stairs
Find out how to make a wooden countertop for a bathroom sink with your own hands in a special article on our portal.
How to carve a baluster with your own hands?
You either need a lathe (there is also a CNC one, there are simpler ones for home use), or you need this kind of lathe attachment (attachment) for a drill.
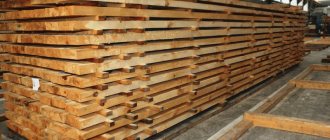
We harvest wood, bars (timber) that are dry, without knots or cracks.
Balusters are not machined in a single copy (a baluster is one of the elements of the staircase railing), that is, we determine their quantity.
It makes sense to immediately make a template for making balusters; all balusters will be made according to this template.
Next, we fix the workpiece (block) in a lathe, or attachments for a drill.
We turn on the machine (drill) and use turning semicircular chisels (cutters) for rough processing of the workpiece.
First, use a semicircular cutter to give the workpiece a cylindrical (round, rounded) shape.
Next, on this blank using a pencil (focusing on the template, see
above) make marks for the shaped cutouts of the baluster.
That's it, then the cutter makes notches according to the marks.
The last stage is finishing grooving, grinding.
www.remotvet.ru
Variety of shapes
A beautiful baluster, regardless of whether it is wooden or plastic, will decorate the stairs in the house. The design of the decorative stand is conventionally divided into several parts:
- the lower part, which is attached to the step or floor covering - the base;
- the central segment with decorations and carvings is the body;
- The upper support is designed to connect to the railing and increase the area of the joint.
Important! When making or purchasing ready-made decorative parts, you need to decide on their length. The size depends on the height of the staircase railing, but the balusters should have a small margin in length to make corner cuts when joining with the overall structure.
According to their shape, wooden products are divided into cylindrical, ellipsoidal, rectangular and figured.
A cylindrical baluster made of wood is a classic type of product on which various decoration and decorative elements are made. The pattern consists of various differences in thickness. Such parts can only be made with special cutters on a lathe.
Elliptical or rectangular balusters are made according to a sketch using a jigsaw. Various designs are made on the body using a manual milling cutter or CNC machines.
Figured stands with elements of hand-carved wood are made from expensive types of wood (hard fruit or exotic).
Methods for making balusters
Making balusters will not be difficult for you if you have woodworking skills.
Balusters are vertical supports that are important elements of the staircase. They perform a number of functions:
- balusters are needed to support the handrail;
- they are designed to ensure the safety of people climbing stairs.
Balusters are an important part of room decor. They consist of several structural elements. The base is a stand that is installed on the steps. Speaking about the central part of the vertical racks, keep in mind that their functions are exclusively protective and decorative.
Baluster manufacturing technologies
To produce wood racks you will need a machine. The following production technologies can be mentioned:
- The most common type is the production of turned products.
- Milling. In this case, cutting is done on the racks. Decorative elements adorn the product.
- Wooden balusters with carvings. Today, carvings are not applied manually, but by processing the workpiece on high-precision machines.
If you look at the cross section, you can distinguish the following shapes:
The device of a machine for milling balusters.
In addition, flat racks are often made, which are widely used in public buildings and private homes. Flat balusters are installed tightly to each other. This approach allows you to create quite complex ornaments that are large in area.
The production of flat balusters from wood does not require much time. The process begins with preparing workpieces of the required size. Additionally, you need to select a pattern and then create a design based on it. After this, take a sample and apply a contour to the workpiece. Next, you must take a jigsaw and cut out the workpiece. Then start finishing, using cutters to process all the elements of the balusters.
Carry out the work so that all parts are symmetrical. When the process is completed, glue the elements and install the structure. Cover the balusters with varnish.
How to choose lumber for the production of balusters
The final cost and performance characteristics of the product depend on the choice of lumber. Craftsmen advise making balusters and steps from the same type of wood, this helps prevent deformation of the structure in the future.
For the production of posts, it is better to choose lumber from the following wood species:
- nut;
- beech;
- oak;
- ash;
- larch,
- pine.
Cutters for making balusters.
To produce wooden balusters, it is better to buy lumber from hardwood. For example, oak is very suitable; it is wear-resistant. Oak is not susceptible to rotting and will last a long time. Twisted columns are made from it.
You will get almost the same product from beech wood. It is plastic, which is important when processing products. Beech elements can be easily bent. The blanks are impregnated with various compounds, this increases their service life. Finished balusters are varnished.
Among the disadvantages of beech, it is worth noting that it is deformed during the drying process. Beech is excellent for simulating mahogany and walnut products.
Ash wood can be used to make stands. Externally, this tree is similar to oak, but is considered less durable and hard. The wood is quite elastic and dense. Ash does not rot, which significantly extends the service life of products.
Birch. Balusters are made from it the least often, since this breed has average density characteristics. Wood tends to crack and is also susceptible to rotting. However, a birch product is easy to glue, polish and paint.
Balusters can be made of larch. When finished, they have a brown color or tint. This species is less durable than oak. However, over time, strength increases. Larch is almost not deformed, but sometimes drying can cause internal cracks.
Wooden balusters are also made from pine. The material is easy to polish. The products are resistant to temperature changes. The disadvantage is that the paint penetrates the wood unevenly, and this leads to a decrease in the quality of the coating.
Production stages
Variants of baluster shapes.
Balusters come in different shapes. Because of this, the techniques for making balusters with your own hands are different and have their own characteristics. For example, flat balusters are made from polished boards, or bars are used in their work.
Carefully cut the board. Using the template, transfer the outline to each piece. After that, cut out the elements. To get the job done faster, use a jigsaw.
You can assemble several pieces of board and securely fix them in place. Apply a contour to the upper section and cut out the blanks. This way you will receive several products at once. Process the cuts and sand with sandpaper.
Another way to produce products with your own hands is to work with solid timber. Once it has been given its general shape, you can cut it into several elements. Next, the workpieces need to be processed. The construction of a staircase from such elements will not be very difficult.
To produce square posts, first buy timber of the required cross-section, then cut it into pieces of the required height. The balusters will be processed by hand. As for round products, bars are needed for their production.
Using a machine for making balusters will speed up the work.
Video about making wooden balusters:
Mounting supports: options
When choosing the fastening of supports for enclosing structures, various factors are taken into account:
- wood type;
- size and shape of products;
- fencing design.
Professional craftsmen most often use wooden pins or dowels to attach volumetric supports. It is recommended not to make their diameter larger than 1/4 of the diameter of the baluster base. This may cause the product to crack.
Fencing fastening diagram
According to the requirements of the current SNiP, fencing is installed on stairs with more than 5 steps. The minimum distance between the supports is 10-15 cm. The upper part of the supports is attached to the handrails. The method of fixing the lower part of the balusters depends on the type of structure. They can connect:
- with steps;
- bowstring or stringer;
- landing.
It is not allowed to use nails to connect structural elements. During use they quickly become loose. This leads to loss of strength and imbalance of the fence. When fastening balusters to a narrow string, a special board of greater width is placed on it. It serves as the lower support of the baluster.
Staircase design elements
Incorrectly installed and poorly secured supports make the operation of the ladder dangerous. The most durable mounting should have support posts. Intermediate balusters are installed between them at equal intervals. When attaching the supports to the string, their base and upper part are cut to the slope angle of the flight of stairs.
Fastening supports with dowels
The fastening process begins with marking the location for drilling holes for installing dowels. It is located exactly in the center of the base of the baluster. The depth of the hole is equal to 1/2 the length of the dowel inserted into it. The strength of the connection of structural elements is increased with the help of wood glue. They fill the hole before installing the dowel.
Scheme of fastening the structure with a dowel
The recesses are drilled in 2 stages. They start with a hole with a diameter of 5 mm, and then gradually expand it, changing drills of different diameters. The dowel should not go completely into the hole. The length of the outer ends of the fasteners must be at least 5.5-6 cm. Before installation in the base of the stairs, they are lubricated with glue and sprinkled with fine sawdust. This increases the adhesion strength of structural elements.
Fastening the supports with a metal pin
One end of the fastener should have a screw thread, the other should have a nut thread. The depth of the hole for the stud in the base depends on the length of the fastener. Usually it is from 10 to 20 cm. First, a 1-2 mm indentation is made with a drill in the center of the base of the support. After this, they begin to screw the fasteners into it. The ends of the studs protruding from the supports are inserted into the holes drilled through the steps, after which a nut and washer are put on them and tightened until they stop.
Fastener location diagram
Find out how to make a hatch to the attic with a ladder with your own hands, and also read the step-by-step instructions in a special article on our portal.
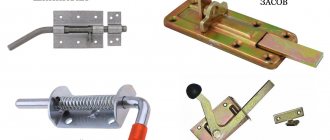
Fastening supports with self-tapping screws
The easiest and fastest way to attach. Self-tapping screws ensure the strength of the connection of the elements, but have one big drawback - after installation of the structure, their caps are visible. This spoils the aesthetic appearance of the staircase. This type of fastening is widely used for connecting flat balusters when constructing gazebos and porch railings.