Free Weaving Pattern for Beginners | Loom
Earlier this week I talked about finding your own artistic style. But if you're thinking right now,
Ok, you showed me how to get started with a loom, you showed me a lot of different weaving techniques and I would like to find my own style... but I just don't know what to do next.
Well then you're in luck because I've spent weeks putting together a beginner weaving pattern just for you!
This pattern will guide you step by step with images from the beginning of weaving to the very end. It will cover the following weaving techniques:
- Weaving fabric
- Weave stitch hem
- Weaving Sumac
- Forming a triangle
- Rya nodules
And the best part is it's FREE!
All you have to do to receive it is join my mailing list. When you get on my mailing list, you'll receive this template along with my new email alerts, store discounts, and more.
Register!
Don't miss out, sign up for blog notifications sent to your inbox.
Already on my mailing list? Big! Then this template will be waiting in your mailbox!
Happy Weaving!
Kate
For more fun, follow me here ->.
LiveInternetLiveInternet
DIY tapestry. Preparation https://artmasterskaja.ru/gobelen-swoimi-rukami/
Making a tapestry with your own hands is not as difficult as it seems. Tapestries are woven on rectangular frames. The frame can be ordered from a workshop or you can make it yourself. To make the frame ourselves, we will take four wooden planks. The simplest option is that the planks can be connected with screws on the reverse side. For large jobs you need a special machine, but this is for advanced people. And works up to 1 meter can be woven on a frame.
There are two ways to stretch warp threads:
We hammer small nails onto the horizontal slats of the frame in a checkerboard pattern at a distance of 10mm. And we pull the warp thread over them. The resulting distance between the warp threads is 5 mm. It is possible more often, but for mastering the technique this is the best option. The second option is to wrap the thread around horizontal strips. This method is less convenient, since the warp threads can move. But if you wish, you can weave two fabrics. For warp threads, linen or cotton thread is most often used. The thickness of the warp threads is approximately the same as the harness you will use in your work. But in principle it does not play a big role, since then it is completely covered with a weft thread.
Now you need cardboard - a sheet of paper with a drawing of the future tapestry, preferably in color. To simplify the option, you can find a suitable picture and enlarge it to the desired size. Of course, if you want to create an exclusive tapestry, then you need to draw. For your first works, you should not choose complex drawings. The pattern should be simple, but so that you can try several types of weave and knots and methods of connecting threads. When fixing the pattern, you need to take into account the direction of weaving. Tapestry can be woven both horizontally and vertically. Which direction of weaving to choose depends on the pattern. More details in the next post on this topic.
After this, a wooden river or ruler is laid at the bottom of the frame, from which weaving will begin. Or use thick paper folded several times in the form of a strip.
To make a tapestry with your own hands, you will also need some tools - a carpet beater; instead, you can take an ordinary steel fork, scissors, and a hook knife for tying knots.
a) carpet beater
b) knife hook
To make a tapestry with your own hands, woolen threads are traditionally used. But in a modern tapestry you can use a variety of materials, such as linen, decorative cords, lurex, sisal - and much more, the main thing is that it matches the design of the tapestry.
Learning to weave - Etsy Journal
My mother is a weaver, so the apartment I lived in as a child had a loom that took up half of our living room. As a child, I loved sitting on the ground and watching the loom pedals go up and down and the shuttle move back and forth while she worked.
Since then, I have often dreamed of having this loom back in my life. But at the same time, I realized that you don't need to invest in a big professional loom to learn the basics of weaving. Instead, you can make your own loom from a simple piece of cardboard!
You will need: Cardboard Packing tape Masking tape Ruler Permanent marker Craft knife Scissors Large needle Twine Yarn
Additional decorations: ribbon with sparkles, ribbon with rhinestones, beads, driftwood leather
Step 1: Make a Loom
Before we begin, it is important to note that the size of your cardboard will determine the size of your finished weave. For this project, I used a 5″ x 12″ piece of cardboard.
When you're ready to start, secure the top and bottom of the cardboard with packing tape. This will make your machine stronger. Using a ruler, mark two lines along the top of your cardboard, 3/4″ apart on each side. Then mark a line every 1/2″ from these points until you have 10 lines along the top of the loom. Repeat this step below. Cut along the line with a scalpel to create indentations.
Attach the end of the twine to the back of your cardboard. Insert the twine through the first notch at the top and down the cardboard to the first notch at the bottom. Keep learning the twine and keep winding the cuts until you reach the other end. Cut the twine and glue the end to the cardboard.
Step 2: Weaving
Cut about 1 yard of yarn and thread the needle. Guide the threaded needle through the twine using a top-to-bottom pattern, remembering to leave a 5-inch tail at the end. After the first row, guide the needle back through the twine using the bottom pattern. Tip: Try not to pull the yarn too tight (or too loose) or the weave will start to look wonky!
Continue weaving back and forth until you are satisfied with the amount you have woven. When you're ready to try a different color or pattern, pull the woven section up with your fingers. Cut the yarn, making sure to leave another 5″ tail.
Step 3: Rya
To create the Rya or "fluff" in the weave, cut several 4″ pieces of yarn. Lay the first piece in a U shape over the first two pieces of vertical twine. Tuck the ends under the twine and pull them up until the piece of yarn meets your main weave pattern.
Repeat the third and fourth pieces of twine, the fifth and sixth pieces (etc.) until you have a row. For the second row, skip the first piece of twine and wrap your yarn under the second and third pieces of twine. Repeat the fourth and fifth pieces of twine (and so on) until you have completed the second row.
Continue alternating rows until you have about an inch of fluff, making sure to lift it up with your fingers after each row to keep it nice and tight. When you're ready to return to weaving, simply continue with the under-under pattern of step two, alternating colors as you see fit.
Step 4: Add Decorations
Now it's time to experiment with all types of decorations - from leather and driftwood to ribbon and beads. Slide the leather (or driftwood or ribbon) under and over the twine. Continue weaving using the yarn to hold it in place. To add a bead, simply pull it over the yarn at any point and continue weaving.
Step 5: Finishing Touches
When you reach the bottom of the loom, it's time to finish the edges of your weaving. Start by passing each tail of yarn through the needle and stitching it through the weave. Cut off the excess.
Then trim the fringe so the yarn is about an inch long.
Finally, unroll the loom and untie the tails of your twine. Cut the twine down the middle of your cardboard. Turn the loom over and remove the first two pieces of twine from the cardboard. Tie them together with a square knot and repeat with the next two pieces of yarn (and so on) until you have tied all the twine.
Take two pieces of twine at the top ends of your weave and tie them together. Trim the excess twine hanging from the bottom of the loom and there you have it: a handmade arrangement ready to hang!
I had a great time with the weaving piece I made for this tutorial and ended up making a second one with different embellishments and colors. Once you have the finished piece, you can either hang it on a line or put it behind glass so everything saw. Personally, I like to hang mine using washi tape to add color.
Trial photo by Roman Laurent, last photo by Claire McGibbon.
,
Weaving in Rus'
Spinning and weaving in Rus' were a compulsory occupation for women. Regardless of social status, every girl was taught to weave, spin, knit and embroider from early childhood. The nickname “not a weaver” was considered the most offensive for a teenage girl, because each one had to prepare her own dowry - sheets, tablecloths, bedspreads, towels and other elements of everyday life and home decor.
During great holidays and special occasions, when there were many people in the house, each room was decorated with the best woven works: beautiful curtains were hung on the windows, the table was covered with the best tablecloth, and the walls were decorated with various towels. This spoke not only about the skills of the housewife, but also testified to the wealth of the family. Therefore, every woman, and especially an unmarried girl, trying to show herself as a skilled craftswoman, tried to weave the best work for such occasions. That is why family craftsmanship was carefully preserved, improved and passed on from generation to generation. The secrets of Russian weaving accumulated over centuries have survived to this day.
Of course, in Rus' there have always been many talented craftsmen and skilled craftswomen. Therefore, despite the complexity and labor intensity of the primitive process, weaving techniques were constantly improved.
Archaeological research by modern scientists indicates that many examples of clothing and household items dating back to the 10th–11th centuries have high artistic merit and are distinguished by a harmonious coloring with balanced proportions and a successful scale of ornamentation. This testifies to the high level of weaving skills in Rus' at that time.
Machines and reeds: what you can use to weave at home
What do you need to weave at home?
In addition to a great desire - only the necessary devices that have not changed since ancient times.
On the Internet you can find many very good master classes on weaving on boards, but in MK there are very few on weaving on a reed or table loom.
Here I will show you what a reed is, what they are like and how they differ, and I will also share links to available woven fabrics that I used to learn how to weave myself.
So, birdo. Wikipedia says that Berdo is “a device for hand weaving, a type of comb. Known since ancient times. Can be used to create a narrow woven strip. A belt, a narrow towel, tablecloths, etc. can be made on the reed.” A traditional reed looks like this:
This is a regular single-row reed, i.e. we see holes in it in the middle of each plank. Threads are tucked both into the holes themselves and into the slots between the slats.
There are also two rows (holes in two rows, two for each strip, one above the other) and three rows. I have a small three-row reed, although I haven’t mastered this technique yet. It looks like this:t
Weave belts, braid, headbands, etc. onto the reed. possible in three techniques:
filling into the pattern
(examples can be seen in my article “Weaving” posted earlier) when the threads are threaded in a certain color order, and the pattern is formed by their weaving;
swearing
2 to 1 - when the background and patterned threads are threaded according to the principle of 1 patterned thread - 2 background ones. The pattern is formed by half-raising or lowering the patterned threads. Used for geometric designs;
swearing 1 to 1, used for weaving texts (for example, prayer belts)
Weaving can also be mortgaged, i.e. when the warp threads are the same color and quite thin, and the weft threads, on the contrary, are dense, it is the weft that forms the pattern.
This is not a complete list of the bird's capabilities.
You can buy a birddo, or you can make it yourself. A selection of master classes on making your own bird on my LiveJournal - https://jenny-jan.livejournal.com/
In addition to the reed, you also need at least a shuttle and a knife. It is difficult to replace the shuttle with anything: a thread is wound around it, which will later make up the weft. I have this one (I ordered it at the Masters Fair):
but can come in many different forms:
The second necessary part is a nailing knife. It also serves to set the threads of the pattern (that’s why it is sometimes called the take-up thread); it nails the weft threads to the previous row, forming a dense fabric.
You can also order it, or you can use a regular ruler. On the forums I came across the opinion that rulers often break. It only broke once for me (and I’ve been weaving for 2 years now). The main condition is that the ruler must be quite heavy and not metal (light and uncomfortable in the hand).
Detailed instructions on reed weaving are here: https://miroslavna.ru/obuchenie.html
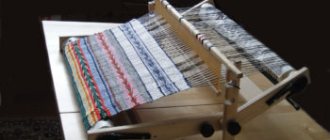
Tabletop weaving looms make our life easier: they are compact, convenient and do not put so much strain on the back. There are different ones: with a reed, with healds. You can weave either on a reed or with your own special techniques. Here I refer you to Tatiana Suris at the Crafts Fair - her course for beginners on the loom is the most intelligible and understandable that I have come across. I would like to add that this is the only online course of its kind.
The machines look like this:
reed. Convenient because if you remove the reed, you can easily weave on planks
and two-shaft (healds - two strips with steel sticks, similar to a reed machine)
They are very comfortable to weave with.
My review does not claim to be complete or original)))))
All photos are taken from the Internet.
Thank you for your attention!
Wrap weaving
This technique was known in Rus' even before the Tatar-Mongol invasion. It is distinguished from mortgage weaving by the relief texture of the fabric. When performing this technique, a special rod or board was used - a scoop. With its help, some threads were selected from the warp, creating an additional shed. The result was a pattern superimposed on top of the background, either on the front side or on the back. Therefore, the design applied to the surface of broken tablecloths and linens looks like a negative from the inside. Typically the main background of the woven pattern was horizontal and could be red or blue. However, in some regions, products of the same color were often found, where the pattern stood out due to the contrast in the thickness of the threads and the play of chiaroscuro.
Where to buy reed and other looms
We immediately share the contacts of the online store where you can purchase both the reed and the necessary auxiliary tools: the creative workshop “World of Traditions” www.wtradition.ru/shop.
So, we have become the happy owners of a “starter” kit for beginner weavers of reed belts:
- reed for 39 threads (600 rubles);
- wooden broom (200 rubles), used for hand weaving on reeds, planks, thread, and ribbon loom;
- Knife for tamping (150 rubles), necessary for tamping fabric.
All instruments are made of natural wood, with attention to detail. Made by hand, it is obvious that it was made with love. Nice to hold in your hands.
In addition to the simplest sets, the “World of Traditions” workshop offers something more serious: children's looms, table looms for adults, looms for weaving braid (ribbon looms) and much more.
We recommend the online store “World of Traditions” to all lovers of hand weaving, spinning and felting!
For home and going out: hand weaving
Items made using the hand-weaving technique are difficult to compare with anything else. Each product exudes warmth and comfort. At the same time, clothes woven on hand looms look very neat and elegant. You can find colored woven items on the most fashionable catwalks in the world, or you can make them yourself.
First of all, you need to choose a machine. This can be either a complex system that allows you to weave large volumes of fabric, or very simple devices.
You can get by with the most primitive frames, including homemade ones. To create them you need a couple of thin plywood boards and nails.
You can weave small squares and stitch them into larger pieces, or you can move the fabric around to make a long piece.
Openwork fabric is obtained with a special arrangement of nails on the machine. It is more convenient to work with a special long hook.
The size of the frame can vary greatly. For figured weaving, special rings are used to make a complex pattern. Round rings are made very large, and rugs are woven on them.
Weaving has many different uses. And first of all, these beautiful clothes, which are often woven directly from patterns.
The style for such things is often chosen to be simple, not involving complex grooves and shapes. After all, every centimeter of such fabric is very valuable, and you don’t want to cut it off at all.
It is good to connect woven parts using lace knitting.
The classic straight silhouette in this design will sparkle with new colors.
You can combine threads of different quality and thickness in one thing. This allows you to create interesting effects, making some places almost transparent.
Use yarn and threads of different colors to highlight the texture of each item.
This technique involves informal colors and styles.
Create your own creations, inspired by advertising campaigns of fashion houses.
Woven items made from homemade yarn look very impressive.
The easiest way to test the technique is to take on a simple item, such as a scarf or stole. They are the easiest to introduce into your wardrobe if you are not yet ready for bolder things.
In addition, weaving will help create bright and original jewelry.
If you have a large machine or frame at your disposal, start making interesting home textiles.
You can make bright pillow covers almost as easily.
Once you gain experience, you can take on complex panels with interesting designs.
What does a beginning weaver need?
This ancient craft has been known to mankind since the late Neolithic period. The very name of this type of small handmade production speaks for itself. By hand weaving we mean the process of making fabric on a loom or using simpler devices (reed, reed, planks) by interweaving 2 systems of threads that are located perpendicular to each other.
To start weaving at home, you will need a minimum set of tools: thread or yarn, a loom. When creating one fabric, several types of raw materials can be used simultaneously: regular, art and textile yarn, floss, silk threads, viscose and wool fibers, roving.
It is better for novice craftswomen to give preference to simple projects, the creation of which will require 2-3 skeins of colored thread. You can buy them or discard old unnecessary things. It is desirable that they be of different shades.
This is interesting: Twill weaving: types, properties, assortment