Not all young housewives know that literally a dozen years ago there were homespun rugs on the floors of every house. These homemade rugs were created using various techniques. They were distinguished by originality and uniqueness. In this way, every woman decorated her home and made it beautiful and cozy.
You will not find identical woven runners, because they were made from different materials using a hook. After all, each needlewoman conveyed her mood and worldview through knitting, and a rug made with her own hands revealed the soul of the hostess.
Homemade homemade carpets
What acts as a base for a rug?
Over time, the ancient technique of knitting homespun rugs was replaced by new rugs. But today housewives will return to their original culture, creating a rug with their own hands. After all, in this case there are a lot of advantages. The size, material, pattern and color of such a product are chosen solely by you, taking into account all the details of the interior.
Important! To make homespun homemade carpets, you do not need to buy consumables. Using a crochet hook you can knit an amazing rug of any size and texture using the ancient technique. Don't throw old things in the trash, but collect them. This way you can give a worn T-shirt or shirt a new life.
But before you start creating a rug, it is recommended to think about what you want to get as a result. The technique used depends on this. You can use a standard hook or a special machine. If you like, take some canvas and thread strips through it. There are many ways to knit such a black or colored rug. Just use your imagination. We will talk about some techniques later in the article.
How to knit a rug on a frame?
This technique of knitting rugs of various sizes is typical for the craftswomen of Transcarpathia. And to start a large batch of such products, you will need a special weaving machine.
Weaving loom for knitting rug
Important! The weaving loom will not fit in the apartment. Therefore, you can use a slightly reduced variation of it. But the size of the rug will be smaller.
Tools and materials:
- a picture frame can act as a frame. But it is important that it is strong and reliable.
Picture frame
- medium-sized carnations, to which the knitting thread will cling;
- threads to create the base. They must be different in thickness and strength. After all, this is the base of the rug.
Threads for knitting a rug
- threads of different colors. Can be black or another shade. Moreover, it is better not to choose white. It's not practical. Thinly cut fabric sewn into a long piece can act as threads.
- dense fabric of the same size as the frame itself plus another 30 mm allowance for bending.
How to weave fabric at home?
It is recommended for a beginning weaver to start creating with small and easy-to-make items. First, you can make a napkin. You can see what things created in this way look like in the photo above. The pattern on the canvas is obtained by alternating threads of different colors. The process of working on the machine includes the following manipulations:
- Distribute the warp threads.
- Thread the yarn under the first warp thread and secure it in the cut. There are no strict restrictions on which side to start weaving from. This can be done both on the left and on the right.
- Thread the remaining part with a snake through the warp threads.
- Having reached the end of the fabric, turn the thread so that the thread on the machine is wrapped in it. Subsequent rows must be woven so that the thread is at the bottom in those areas where it was at the top in the previous row.
- Upon completion of work, bend the cuts on the cardboard. Carefully remove the loops, cut them and tie knots.
This is interesting: Waterproof and water-repellent finish: description, properties
Preparatory work
To make a homespun fabric rug, make notches along the width of the frame in 5 mm increments. It is recommended to drive cloves prepared in advance into these places. Having hooked the thread, they should connect from left to right. Thus, you have a base for a rug using this knitting technique.
Then, using a hook, make two braids from air loops, immediately threading one of them down. In the future, the top thread will determine the top of the rug, which will be woven by hand.
Knitting a rug on a hoop
Creating a side
It is recommended to knit a border for a rug exclusively from a thin thread. In this case, you will need to tie a knot on the original warp thread, subsequently throwing it up and down alternately. Once the first row is completed, go back.
At the same time, do not forget about alternating the base threads. In other words, the thread that went at the bottom should end up at the top in the next row. The height of the side is 5-6 rows. Moreover, it is imperative to ensure that each row fits tightly together.
Important! Real craftswomen recommend using a table fork when knitting a rug of any size using this technique. It can be used to press down the rows on top to obtain the required density of the rug.
Crocheting a rug
Next, we will look at creating a rug using a hook, but the thread will be ribbons or fabric strips. Such rustic rugs are woven, as in the previous case, with a border. The initial "stitch" continues the end of the bead thread. And everything repeats itself in a circle.
At the same time, the size and quality of the rug depends solely on the material you have. Make sure that the stitch is not loose or tight.
Uniform screed of the rug
Important! Craftswomen who create rugs with their own hands recommend taking measurements using a ruler. To ensure that the mat is uniform and neat.
Machine assembly
In common parlance, this design is called a krosna. It will take 2 people to assemble the manual machine. Set up a barrier between people. This is what friends will wear. On one side there is a scythe in his hands, on the other hand a man holds a hook. First take 10 passes from the braid and put them on your fingers, this makes it easier to work.
The passes must not be mixed up and go in order, as they were scurrying around.
Remove one friend at a time and serve to the tooth. On the other hand, the person must hook the hook into the reed, through the tooth, in his direction. The next friend gets dressed through one tooth. Do all the remaining threads in the same way as the previous steps.
Spring Fashion: 5 Ways to Wear Warming Cinnamon
Crochet rugs
There are different sizes of rugs that you can crochet. It all depends on your wishes. This work will always be original and unique. And the fact that you select the consumables yourself will only have a positive effect on the result. After all, this way you can advantageously emphasize decorative accents with the right colors, without spending crazy amounts on interior design.
Using knitting needles, it is in principle possible, but difficult, to weave a pattern for a rug. Better give preference to the hook.
Crocheting a rug
Important! The hook number should be selected according to the width of the strips of fabric material. The wider these “threads”, the larger the number of the hook itself.
Prepare clothes that you no longer intend to wear and cut them into strips. At the same time, be sure to remove solid parts so that the imaginary thread is homogeneous. Sew the strips together to create a long thread, carefully winding it into a familiar ball.
After you have prepared the required number of balls of different colors, you need to figure out what kind of rug you should get. Here you will have to use your imagination and imagine the finished product, and follow its creation according to the picture.
The threads will be thick and difficult to knit with. But this is at first, then you will get used to it, and the work will go faster.
Homemade fabric threads
Take a hook of the required size and cast on a column. And then, continuing around the circumference, knit the rug to the required dimensions. This job is not easy, and you will have to work hard. But in the end you will get a really high-quality flooring that will be pleasant to your feet.
Important! And through the resulting holes in the rug, all dust and dirt will settle on the floor.
PVC pipe loom
Make a simple loom from PVC pipe. This tutorial shows you how to make a simple loom using affordable PVC material!
I wanted to build a loom because I've been seeing a lot of really cute weaving projects on home design blogs lately and always thought, "I could do that!"
Inventors shop at a budget Chinese online store.
Happy reading, I'm sure you can make your own machine too!
Step 1: Tools and Materials
Here are all the tools and materials I'm using in this build. I really like using PVC because they look a bit like giant structured Tinker toys.
Step 2: Marking where the pegs will go
DIY electronics at a Chinese store. I put masking tape on the PVC pipe and then used measuring tape and a permanent pen to mark 1/2" distances, starting and stopping 1" from each end so the joint could still slide down to the pipe Later.
Drawing a straight line on a cylindrical surface is a pain, so... tape to the rescue! I've learned from previous PVC trades that the easiest way to make markings along a curved pipe surface is best with a guide attached to the surface, rather than holding a wavy tape measure in place
I used a tool to make small dents in the PVC along each of my 1/2″ marks.
These small indentations will act as guides for the screws to go into the soft PVC plastic. The magic about using self-tapping screws is that you don't have to pre-drill.
Step 4: Align the Pegs
The pegs/screws protruded from the pipe at different heights and I wanted to make sure that none of them were at risk of being pulled out, nor were they so strong that they couldn't fit into the twine behind the screw head.
I got down to eye level with pegs and quickly completed this task with a hand screwdriver, but if your hand isn't tired from holding the drill, you can use this tool as well.
Step 5: Completing the Assembly
I posted a parts diagram on the materials step more closely, but the loom actually came together within seconds of setting the pegs.
The knee joints go along the bottom of the square, and the 3-way joints go along the top of the square, and the pegs lie across the loom.
Once the square is assembled, the 6-inch piece fits into the back of the 3-way joints and connects to the 45-degree joints and the remaining posts and end caps.
Step 6: Making Adjustments
I used a hammer drill to make sure the connections were REALLY secure. Along both rows of pegs, I hammered to align the pegs a little more so the string wouldn't slide behind them, and oriented the top row pegs toward the ceiling.
Step 7: Start stringing the twine
I started the tension by creating a slipknot in the string and tightened it to the peg, which was 12 pegs from the edge.
I used synthetic thread for my warp, which in hindsight was a mistake, I should have used some natural, more forgiving fiber - cotton twine is probably ideal.
Step 8: Install the Twine
Make sure your warp is not too tight. I learned this the hard way. The first time I positioned the pegs facing me, the pipe slipped out of the seams when I installed the base. The second time I rebuilt the loom so that the pegs were pointing towards the ceiling, and when I dropped the base it seemed to flex less and more rigidly.
Step 9: Create the Shuttle
Shuttles are things that carry yarn through the warp. They are usually narrow, flat, long spools of yarn that can be easily inserted and pulled between the fibers. It's much easier to put thread between the fibers than a whole spool of yarn, I made it from cardboard in 2 seconds.
Step 10: Start weaving!
I'm just starting out so I didn't try any fancy stitches or patterns, I just went back and forth slowly adding layer after layer. Getting the tension right was a little tricky, but easier once I started.
Step 11: Continue
Okay, I didn't realize weaving was such a timely skill! Although it was very meditative, this part took approximately 4-5 dedicated evenings to complete.
Each time I started or ended with different strands, I simply used one knot to attach it to the warp strand.
Step 12: Removing the Piece from the Loom
Removing the piece from the loom was very easy, all I did was rotate the top PVC pipe so the peg heads were facing the table top and the loops slid off the loom.
Step 13: Tie the Edges
I know some people like to add stripes or pom-poms to their woven pieces, but for my first attempt I just went with the easiest tying method - regular knots.
I took two warp strands at the same time and wrapped it around my finger to create a tight knot.
Step 14: Gluing the Loose Thread
I had a couple of loose ends that had come loose that I wanted to hide in a piece from the tails that were left hanging off the edges. Using a yarn needle, I wove them into a couple of columns, then glued the tails together.
I used Fabri-Tac because I knew it had a short open time and a very fast drying time, although I think it takes 24 hours to cure completely.
Once the tails were completely dry to the touch, I trimmed them closer to the piece.
Step 15: Training
I mentioned this above, but if I didn't pull the base as tight, the piece would end up bending a little in the middle due to the sides getting tighter as I went up the loom.
Another note about skew: I used synthetic thread because that's what I had, but in retrospect I wish I had used heavy cotton thread instead, it would have provided more and maybe solved some of my stupid skewing issues. by tension.
All the pictures of actual weaving that I include in this tutorial are basically me playing, "drawing" and learning the nuances of a home loom. Thanks, I hope this inspires you to try making a loom!
Source
Canvas rug
You can very easily make a homespun product from canvas. In this case, you need to prepare a canvas of the required size. And also cut fabric blanks 20-30 mm wide and 50-60 mm long. Then thread the thread through the canvas and create a knot.
Canvas rug
And continue to do this until the entire fabric is filled. To make the product look aesthetically pleasing, sew any fabric on the back side. Ready!
A loom is a device that helps you manually create interesting, exclusive items. These can be carpets, floor runners, tapestries, bedspreads for furniture, scarves, bags, and even fabric for coats. And it’s quite possible to make a loom with your own hands at home.
History of the Slavic woven rug
Among the Slavs, the production of floor mats, paths, and bedspreads was considered a “grassroots” technique. Initially, this craft was practiced only for the needs of ordinary people. These products did not require a high level of skill, as required by weaving lace and weaving thin fabrics. And the most primitive devices were used for their manufacture.
And most often, floor runners were woven from old fabric items that had served their purpose. Strong durable threads were used as a base, but strips of fabric were transverse. Homespun paths were popular among the Slavs in the 19th century.
Sometimes flax waste and straw were used to weave rugs. Such items were usually placed at the very entrance to the huts. For the manufacture of both, a village loom made of wood was most often used.
The scheme of work is quite simple. Transverse threads are pulled between the stretched warp threads by interlacing. From time to time they need to be compacted with special reeds that resemble combs. They were used to knead transverse rows into a continuous sheet.
Do-it-yourself spinning machine: how to make it, how to operate it
A loom is a piece of equipment that makes it possible to handcraft beautiful and unique things. These can be rugs, special runners, tapestries, as well as bedspreads for furniture, scarves, bags, and even fabric for coats. It is quite possible to create a weaving loom on your own.
Among the Slavs, the creation of floor carpets, paths, and bedspreads is one of the “grassroots” techniques. At first, this craft was practiced only for the needs of ordinary people. These things did not require a serious level of skill, as required by weaving lace and weaving thin fabrics. And the tools used to create them were the simplest.
- In most cases, they wove ordinary paths from unnecessary fabric items that had served their purpose. Strong, dense threads were used as the base, but the transverse ones were strips of fabric. Homespun paths were popular in our country in the nineteenth century.
- Sometimes they took flax waste and straw to create rugs. Such things were usually laid out at the very entrance to the huts. To create both, in most cases an old loom made of wood was used.
- The workflow is quite easy. Transverse threads are pulled between the stretched threads of the base using the interlacing method. From time to time they will need to be compacted with some reeds, which are similar to combs. They used them to assemble transverse rows into a large canvas.
Rectangular
The easiest way is to create a frame on which you can quickly make a small-format tapestry. In fact, this is an ordinary weaving loom, where all the work is done by the master himself. You can call the frame a hoop , which is easy for the master to work with, since this tool can be carried and installed anywhere.
- It is enough just to lay out 2 slats parallel to each other, onto which you need to hammer nails. The warp threads are pulled over them. Weft - transverse threads - are pulled with your own hands using a shuttle.
- You can use simple, standard weaving. Then the canvas will turn out to be one color. To do this, we drag the shuttle first under the even threads of the base, then under the odd threads. By changing the color of the weft, you can make cross stripes on things. To create an ornament, you will need more complex weaving. Then the shuttle is passed under the base threads, no longer in a checkerboard arrangement, but depending on what pattern you decide to use.
- If you place a printed image under the stretched threads of the base and use several different colors, you can easily make a real picture. These products are called tapestries and require patience, time, and skills from the craftsman.
Round
Hoops for creating products do not always have to be rectangular. To make round carpets you will also need a frame of a suitable shape.
If you take a hoop and pull the base threads so that they intersect in the central zone, you can easily achieve this. In this case, weaving starts from the middle , and the rows will be arranged in a circle, “snail-like”. It is very easy to assemble such a loom yourself. You can even use a special hoop. The shuttle remains the same design.
Stationary
When creating huge canvases, working on a frame is very difficult. And it’s completely impossible to make long special paths. There is no way to work here without a stationary machine.
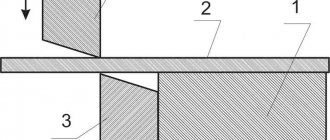
The drawing gives a simple diagram showing how to make a loom. It provides a horizontal frame onto which the base threads are pulled, and a vertical frame responsible for creating clearance for the passage of the shuttle with the weft thread and the shuttle. All elements are made of wood. Metal fasteners, nails, and rubber gaskets are also .
This special do-it-yourself loom helps create fabric by eliminating the need for the craftsman to pick out the warp threads with his own hands while pulling the cross threads through the weaving process.
What is the operation of the machine? The fact is that the even warp threads are passed into the holes of the vertical frame. First, by moving your foot, this part goes down . As a result, a gap is created between the warp threads, into which the shuttle is passed.
- A new row is made by moving the frame up. At the end, the even threads rise, again creating a gap. The weft thread passes through, and a “basket”, checkerboard weave is formed on the material.
- The manufacturer compacts the rows with reeds, knocking them into the product. Many machines have power tools to perform this action, which makes the job very easy.
- It is important to take into account the need to regulate the tension of the warp threads. For this purpose, screws are used, which the manufacturer has the ability to unscrew or tighten as he chooses.
- It is also necessary to take into account the distance between the threads of the base. The ability to adjust it also expands the functionality of the tool.
- Creating a loom that has mechanized weft insertion makes the work even easier and helps to improve the quality of things.
The simplest weaving device
The easiest way is to make a frame on which you can easily make a small-format tapestry. In fact, this is a simple weaving loom, where the main work is done by the master himself. You can call the frame a hoop, which is convenient for the master to work on, since this device can be carried and installed in any convenient place.
It is enough to simply place two slats parallel to each other and put nails on them. The warp threads are pulled onto them. Weft - transverse threads - are pulled by hand using a shuttle.
Dressing threads in threaders
Nitchenka represents chapeki in large numbers. They are paired parts. Now you need to divide each one and put it in each cap in order. It is important to insert the threads correctly; one should be in front, the other behind it. Throw the whole braid in like this.
The next job will be putting the braid into the reed. The reed consists of numerous wooden very thin teeth. With a distance of a few millimeters from each other. We put it on one friend and in each tooth. Whites must be worn in front of the birdie.
Attach the footrests to the threads in the middle. Usually there are two. We complete the work by tying a thread to the front shaft. We straighten the entire system and prepare it for work.
Round weaving loom
The hoop for making products does not have to be rectangular. To create round rugs, you will also need a frame of the appropriate shape.
If you take a hoop and pull the warp threads so that they cross in the center, you can easily achieve this. In this case, weaving starts from the center, and the rows are arranged in a circle, “snail-like”. It is very easy to make such a loom with your own hands. You can even use a hula hoop. The shuttle remains the same design.
Factory machines
If you are wondering how to make a DIY loom, then you are one of those who want to create their own textile products from scratch. To do this, it is not necessary to make the machine yourself. You can buy it.
Read also: A ruler is a device or tool
There are hundreds of varieties of factory-made looms on sale. Domestic or European manufacturers provide a guarantee for their products, so you can buy machines without fear that they will not be able to work.
Judging by the reviews, among Russian manufacturers the best are looms and Pelsi. The latter specializes in the manufacture of wooden toys.
As for manufacturers from other countries, their products are many times more expensive.
Stationary loom
When making large canvases, working on a frame is quite difficult. And it’s completely impossible to make long floor paths. There is no way to do this without a stationary machine.
The drawing provides a simple diagram showing how to make a loom. It provides a horizontal frame onto which the warp threads are stretched, and a vertical frame responsible for creating a gap for the passage of the shuttle with the weft thread and the shuttle. All parts are made of wood. Metal fasteners, nails, and rubber gaskets are also used.
This do-it-yourself weaving loom eliminates the need for the weaver to manually select warp threads while drawing cross threads during the weaving process.
Do-it-yourself loom - features, device, types and reviews
Today, a loom in the house is exotic. And some 70-80 years ago every village housewife had one.
In many ways, this is a plus, because it means that the modern standard of living allows everyone to purchase ready-made clothes and fabrics, rather than waste time and effort on making them.
However, modern women (and men) are increasingly interested in this forgotten craft, recreating ancient village weaving looms. Let's find out a little more about the features of these devices, as well as how you can make them yourself at home.
Factory machines
If you are wondering how to make a DIY loom, then you are one of those who want to create their own textile products from scratch. To do this, it is not necessary to make the machine yourself. You can buy it.
There are hundreds of varieties of factory-made looms on sale. Domestic or European manufacturers provide a guarantee for their products, so you can buy machines without fear that they will not be able to work.
Judging by the reviews, among Russian manufacturers the best are looms and Pelsi. The latter specializes in the manufacture of wooden toys.
As for manufacturers from other countries, their products are many times more expensive.
How to make the simplest machine from thick cardboard
The process of creating fabric itself is not very complicated. If you plan to weave small items like belts, bracelets or napkins, you can make a very simple handloom.
To do this you need a sheet of thick cardboard. If you don’t have it on hand, you can use juice or milk packaging material.
To begin with, take an even rectangle. Next, equal distances are measured along the edges and tiny rectangles are cut out at the top and bottom. All.
Now the warp threads (vertical) are pulled through these holes and secured. An ordinary gypsy needle will act as a shuttle. Using it to stretch horizontal threads between the main threads, you will gradually be able to weave a small piece of fabric.
Of course, on such a primitive machine it will only be possible to weave coarse fabric.
However, most craftswomen who began their creative journey with such a device advise in their reviews not to neglect this machine.
It will be an excellent budget start that will help you get your bearings and understand the process a little. In addition, once you start working on it, you will be able to decide for yourself whether this trade is interesting to you.
Frame type machines
If you've mastered the cardboard jig and are ready for more, it's worth taking up making a frame loom.
It's easy to do. A rectangle or square of the size you need is knocked out of wooden planks. Next, nails are driven evenly into it from above and below. They will serve as fasteners for threads.
Before starting work, a base is stretched between the upper and lower rows of nails. Next, weft threads are passed between these threads.
If the frame is very large, it is worth making a small shuttle for it from a piece of the remaining plank. To do this, you need to sand it well, give it a thin streamlined shape and make grooves along the edges so that it is convenient to wind the thread onto it.
If the frame size is modest, you can use a large gypsy needle.
Please note that for this type of hand loom a reed is already required to ensure that the fabric is dense. This comb can be made from the same wooden plank by cutting holes in it corresponding to the location of the threads on the nails.
If you plan to sew clothes from woven fabric, you can make frames in the shape of patterns for future parts. This way, you won’t have to waste extra material when cutting, which you spent so much effort creating.
Weaving loom for rugs
In addition to clothes, bed linen and towels, our grandmothers wove carpets and bedspreads on their looms. To create such products, the same classical devices were used. However, they are quite bulky. In addition, it takes a lot of time and effort just to thread the machine to start working on carpets.
Therefore, a simpler weaving device, the frame type, is very popular.
As a rule, rugs that are well known to all of us are created on such a machine from scraps of old clothes. You can also use special thick woolen threads.
How to make such a loom with your own hands? Quite simple. It is an improved version of the classic frame. However, it will be larger and longer. As fasteners for the base threads, you will have to use large nails or screws with thick legs and wide heads.
Pay attention to the special detail. You need to place 4 metal loops along the four edges of the machine. They are needed to fix 2 rods. When working on a rug, they will need to be inserted into its edges so that the width of the finished product is uniform.
Round machine for rugs
Many people like round floor mats rather than rectangular ones. To weave them, you need to use a round loom.
You can make it, for example, from an ordinary plastic hoop. Just make sure that it is not curved, as this will affect the quality of the finished product.
First, the edges are marked around the entire circle. Next, you can drill holes at the marks or drive in nails. Some people simply tie the threads to the rim itself. However, with this technique, the finished rug will not be of very high quality, since poorly secured threads can sag or move out.
If you were not lazy and made normal fasteners for the base, you can start working. To do this, the main threads are pulled radially. The machine begins to resemble a bicycle wheel. Now you can start weaving the rug from the very middle.
As a rule, this machine is operated by hand. Reviews advise using a miniature shuttle or a large needle only when making very thin fabric.
How to make a machine from plywood or wood
If you have enough space to accommodate a full-fledged weaving device, it is worth trying to make a more professional model. Most often they are made from plywood or wood.
There are many ways to make such a device with your own hands.
There should be two rollers at the very beginning and at the end. Threads are wound onto one, and finished fabric is wound onto the other. The ideal option is to make them with bolts or handles with the possibility of fixation.
If your machine does not have a separator that facilitates the slipping of the shuttle, you should first attach not 1, but 2 rollers. One will place the even warp threads, the other will place the odd warp threads.
The last required detail is the reed. It can be made from 2 wooden planks with nails often driven between them.
When threading the machine, the threads will need to be passed between these teeth.
If all this is done correctly, you can get to work.
Machine tools from other scrap materials
In addition to wood and plywood, weaving jigs of the above type can also be made from other materials. For example, from plastic pipes. When making miniature models, ordinary combs or cards are used. A photo of such a machine is presented above.
Also, when making miniature models, ordinary combs or cards are used. And the machine itself can be built from a cardboard box.
If you want to show your creativity even in the way of creating your own loom, go for it! You will succeed.
Weaving technique
The operation of the machine is based on the fact that even warp threads are passed into the holes of the vertical frame. First, with the movement of the foot, this part is lowered down. As a result, a gap is formed between the warp threads, into which the shuttle is passed.
The next row is performed by moving the frame up. As a result, even-numbered threads rise, again forming a lumen. The weft thread passes through, and the material produces a “basket”, checkerboard weave.
Using reeds, the master compacts the rows, knocking them into a canvas. Some machines have mechanized devices for performing this action, which greatly facilitates the work.
It is important to consider the need to adjust the tension of the warp threads. For this, screws are used, which the master can unscrew or tighten at his discretion.
You also need to take into account the distance between the warp threads. The ability to adjust it will also expand the functionality of the device.
The manufacture of a weaving loom, which provides for mechanized weft insertion, will further facilitate the work and improve the quality of the products.
The concept of words used in the article
- 1 friend: 2 threads.
- Wall: 5 meters.
- Pass: 15 friends.
- Circle: 5 meters.
- Capek: thread crossed with a figure eight.
- Rogulya: protrusion based design.
- Birdo: a kind of comb for threading.
- Beads: paired parts for aligning threads.
We start work from the top of the warp. Take 2 threads of white and black and join them together. They are tied to the top of the roguli. We begin to wind three circles from left to right. We wrap the bagel from the bottom and wind it from right to left 3 circles. We do this with 15 friends. We tie it to red and wind 5 friends in the same order. We bandage again in white and black. We make a winding of 8 psam. Again we tie it to red and wind 5 friends.
Loom
We finish the work with black and white thread. We remove the threads from the top of the bag and put it on the hand, forming loops. You should get a long braid. The bottom of the braid is tied with a thick thread so that the lower part does not get tangled before starting work, putting it on the shaft.
Briefly about the main thing
Ancient crafts are becoming increasingly in demand today. Many designers now put the rustic style at the forefront. Therefore, having a loom in the house can become the basis of a profitable business. Exclusive items made using this technique will create an original design in your home and make it unique.
Nowadays you can buy almost all home craft products in stores. But sometimes you don’t have the money to buy it or you want to make something yourself. Recently, the variety of interiors has simply gone off scale. Designers often use antique items to create a unique and unique atmosphere in the home.
Many people cannot afford to hire a designer and purchase unusual decorative elements, so you can make such items yourself. For example, woven carpets will add color to the interior. And if they are made on their own, they will delight you every day. Moreover, with them your home will become cozy and warm. In addition to carpets, you can make napkins or lampshades. All these items are made using a loom.
All these things were made using a handloom. The first looms were large wooden structures. There were weaving looms in almost every house. And they were taught to use them from childhood. The skills of patterned weaving were passed down to the younger generation. Ancient looms were mostly shuttleless.
If you are interested in an activity such as weaving, then you can make a loom with your own hands at home. The loom is widely used in the modern world. The shuttleless table loom is also designated as STB. It is used in the processing of various fabrics to obtain finished products.
Weaving in Rus'
16.04.2019
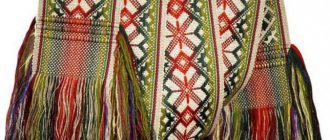
Hand weaving is one of the oldest crafts, one of the most widespread types of Russian folk art. “Like the thread, so is life,” people said and approached the process of creating fabric very responsibly. Homespun fabric often served as a talisman, protecting the owner from illness, evil spirits and the evil eye. And therefore, home weaving was preserved in the Russian village until the 20th century. And even now his traditions are alive.
It is believed that weaving arose in the primitive communal system, as an evolution of weaving. That is, at first people learned to simply weave using grass, reeds, vines, strips of leather and animal sinews, and only then they began to invent various devices that made it possible to simplify, speed up the process and make it of better quality. A simple handloom was created already 5-6 thousand years BC. It was used to make clothes, shoes, and bedding. Later, peasants began to weave towels, tablecloths, bedspreads, rugs and many other things necessary for life and useful in the household.
We used exclusively natural fiber - from nettle, flax, hemp, cotton and wool. There were craftsmen who wove and spun from everything they could get their hands on: fireweed, burdock, quinoa, and even boiled pine needles. The tools for producing thread were a spindle and a spinning wheel - symbols of creative life.
Spinning and weaving in Rus' were a compulsory occupation for women. Regardless of social status, every girl was taught to weave, spin, knit and embroider from early childhood. Almost every village house had a handloom. Traditionally, they spun in the long autumn and winter evenings, and wove in early spring before the start of field work.
The nickname “not a weaver” was considered the most offensive for a teenage girl, because each one had to prepare her own dowry - sheets, tablecloths, bedspreads, towels and other elements of everyday life and home decor.
During great holidays and special occasions, when there were many people in the house, each room was decorated with the best woven works: beautiful curtains were hung on the windows, the table was covered with the best tablecloth, and the walls were decorated with various towels. This spoke not only about the skills of the housewife, but also testified to the wealth of the family. Therefore, every woman, and especially an unmarried girl, trying to show herself as a skilled craftswoman, tried to weave the best work for such occasions. That is why family craftsmanship was carefully preserved, improved and passed on from generation to generation.
The rich could afford to sew clothes from imported fabrics, and all working people always dressed in homespun.
Archaeological research by modern scientists indicates that many examples of clothing and household items dating back to the 10th and 11th centuries have high artistic merit and are distinguished by a harmonious coloring with balanced proportions and a successful scale of ornamentation. This testifies to the high level of weaving skills in Rus' at that time.
The secrets of Russian weaving accumulated over centuries have survived to this day. We invite you on a short excursion into the world of hand weaving.
Types of hand weaving
Weaving on a home loom
A weaving loom (loom, crosny) is the main weaving machine, equipment or device for the production of all kinds of pile, smooth, woven fabrics and carpets: linen, hemp, cotton, silk, wool, as well as other products of the textile industry.
There are different types of weaving on the mill: sackcloth, pile, variegated, tapestry. Patterned weaving also developed, that is, the production of products decorated with geometric patterns by interweaving colored threads.
The fabric was also used to make belts - striped, with ornaments and even inscriptions; As a rule, these are flat or ribbon belts.
Other devices are also used for weaving.
Weaving on a reed
What is a reed? This is a very simple and ingenious weaving device, on which two types of holes are made - longitudinal and round. Their number is arbitrary, corresponding to the number of warp threads (longitudinal threads). In the old days, folk craftsmen wove a variety of patterned belts from wool, silk, cotton, and linen threads using this method.
The reed can be made from a thin polished board, plastic or thick cardboard 0.4-0.5 cm thick. Its size is 20x27 cm. Since cardboard is not durable, it can only be used when there is no other material at hand. The holes should be thoroughly cleaned so that the warp threads do not cling to rough edges and interfere with work. The reed should not be bulky or heavy.
Weaving on planks
The technique of weaving on planks is one of the oldest methods of producing textiles, which arose long before the invention of the loom. In Russia, weaving on tablets has been known since the late Neolithic era. At the end of the 19th century it was common among many peoples of East and Central Asia, as well as in the Caucasus.
Planks are devices for weaving in the form of plates made of various materials with holes. The materials for tablets at different times and in different territories were clay, metal, bone, and wood.
A “classic” board is a small square board with round holes in the corners.
The technology of weaving on planks was used by many peoples. There are quite a lot of techniques for working on boards. In the Russian North, this type of weaving was called weaving in circles. Threads, which are the warp threads, are passed into the holes of the board in a certain sequence and position.
One end of the warp is tied to a stationary object, the other to the weaver's belt. The shed changes when the boards are turned one quarter in the direction “from” or “towards” the craftswoman. A weft thread is inserted into this shed each time. For weaving, an even number of planks is most often used. The more planks, the wider the belt. A characteristic feature of such belts is the double-sided pattern and the peculiar surface texture, reminiscent of dense knitting. In ethnographic belts, the warp is most often wool yarn, and the weft is linen thread.
Weaving on a needle or thread
A nit, or nit, is simply a round or flat stick. Working on it requires knowledge and skill. On the one hand, it is more difficult to handle than with a reed, on the other hand, this tool does not limit the number of threads, and is very easy to manufacture.
The process of thread weaving involves alternately moving the threads of the top layer down and the bottom layer up, resulting in the formation of a pattern. Each shed change is secured with a weft thread.
Weaving on frame
Frame weaving is a type of hand weaving used to make items smaller than one meter in size.
To work, you will need a wooden frame of the required size. For warp threads, linen or cotton thread is most often used. The thickness of the warp threads is approximately the same as the weft that you will use in your work. But in principle, it does not play a big role, since then it is completely covered with a weft thread.
Weaving on cardboard
For work, prepare a piece of cardboard of the required size in length and width or diameter, make cuts with scissors to the same depth and width along its upper and lower parts. You need to pull the threads quite tightly, but not so much that the cardboard begins to bend. The warp threads should be tensioned and located only on the front side of the cardboard frame blank. It is best to thread the working thread into a thick, long needle with a wide eye.
Weaving today
The traditions of folk patterned weaving are supported today by numerous enthusiasts and professional artists, including at folk arts and crafts enterprises.
In the modern world, weaving has not been lost, so finding a loom and other devices for sale and learning such a beautiful skill is not so difficult nowadays. There would be desire and patience.
Handmade things always look special in your home interior or wardrobe. They not only delight the eye with their originality, but also warm the soul with the warmth invested in them.
© Methodical
Other articles on the topic “Folk clothing”
If you want to always learn about new publications on the site in a timely manner, then subscribe to our newsletter.
Self-production of the machine
Many people are faced with the task of how to make a loom? Moreover, to spend less materials. So how to make a loom with your own hands? First of all, you need to adhere to the manufacturing scheme, which contains successive steps:
- A quadrangular frame is selected.
- Round openings are made in two slats.
- Slats with the smallest circumference are placed in the openings made at the ends of the bar and secured with wedge parts.
- There are grooves in the middle part of the side bar to accommodate the comb.
- The equipment has a solid bottom for stable standing.
- Nails are driven into the nearest round block at a distance of 5 mm to tighten the threads.
- At the rear of the installation, a rail is used to wind excess fabric.
The comb can be made from thick plywood. Its height reaches 15 cm. The length of the comb should be greater than the distance between the frames, which are located on the side. The number of nails driven in must be divided by two to obtain the number of teeth. Select the height of the teeth to be approximately 70-100 mm, and the width 5-7 mm. The interdental space is 5 mm.
On the near shaft there are nails to which threads of equal length are tied. Then the threads are divided into even and odd. Behind the comb there is a moving shaft where the odd threads are attached. And the even threads are on the comb, namely, they are wrapped around the nails of the teeth. A homemade loom works according to the rule of winding the remaining amount of thread on a bar, and the base of the product is made.
Next comes the winding of the threads onto the wefts. The end of the thread is attached to the left side of the frame, which is located in front of the drive rack. When the bar is raised, the weft is pushed into the shed. Movement occurs from left to right. By alternating multi-colored threads, you can get designs on the product (checkered, striped).
Video: how to make a loom?
Making a simple weaving device
You can also make a simple mini-device at home, which will serve as a play device for children, and also teach them how to weave. A children's loom will be useful for teaching children the ancient art of weaving. Using such a simple loom, you can make a compact rug that will be useful at home.
Moreover, this device does not require special devices. All you need is thick cardboard, scissors, a hook, a pencil, a fork and yarn. Instead of cardboard, you can use old plywood, chipboard or other rigid base.
The loom operates by threading threads into slits and then weaving. The yarn is made into a cut, and its end is located on the wrong side. Threading the yarn should be done in the form of a snake. The end result is tying the resulting cutouts. On the other side, stripes of threads are also made. One side will be the front side and the other side will be the back side. The front is a completed canvas.
You have to pull the threads smoothly so as not to bend the cardboard. You can use a larger needle for convenience. The number of threads must correspond to the edge being an edge and the transition from row to another row to be made. You can move the threads close to each other using a fork. So, such a loom for children will help you teach your child spinning skills without putting in a lot of effort.
You can tell children how the first looms were spun, and how a homemade device works. After all, getting into weaving is a very interesting activity.
It is difficult to find a needlewoman who would not like to try her hand at weaving at least once, but, alas, not everyone can afford to buy a weaving loom. There is an exit!
Making a machine at home seems to many to be too labor-intensive and time-consuming. We hasten to dispel your doubts and offer a simple and affordable way to make a loom with your own hands.
You will need:
- twine or cotton thread
- wooden picture frame without a backdrop (the width of the product will depend on its size)
- wooden slats (a long wooden dowel, which can be purchased at hardware stores, is best; its length should be no less than the width of the frame)
- scissors
Step 1
Woven fabric, as you know, consists of warp threads (running lengthwise) and weft threads (running across them). We will use twine as warp threads. Even if you use some other thread, the main thing to remember is that the warp thread should be strong, not too thick and not too thin.
Tie the end of the thread with a double knot to the lower left corner of the frame, then pass the ball through the frame, throw the thread over the top crossbar, and go down to the bottom.
Step 2
Your movements should resemble a figure eight: each time you go around the top or bottom crossbar, the ball should pass through the frame. Continue pulling the thread, making sure it is evenly and moderately tight, with no slack.
Step 3
The width of your final product depends on both the number of “loops” you create and the size of the frame. On average, you should make at least 10 and no more than 25 “loops”, the distance between them should be 1 cm. Keep in mind that the greater the distance between the threads, the easier it is to work, so it is better for beginners to start with a minimum number of “loops” and maximum distance between them.
When finished, secure the free end with a double knot.
Step 4
Look at your loom from the side - the threads should cross in the middle (if not, it means you didn't follow the figure eight when stretching).
Using a long wooden strip, we will divide the threads into two parts - insert it between the threads, exactly under the place where they cross, and then pull the strip to the top crossbar of the frame.