Metal structures are connected in two ways: detachable - using screw fasteners, and permanently - using welding. The second method is more reliable and durable; it is often preferred to the first when there is no need to disassemble the structure. In your own home, especially one still under construction or improving, the need for welding work often arises, so many would like to know how to properly weld metal themselves, so as not to look for a specialist for minor work.
It will take much less time to weld two pipes than to find a welder
Choosing a machine for household welding
There are many types of welding today. But most of them are intended for special work or are designed for industrial scale. For domestic needs, it is unlikely that you will need to master a laser machine or an electron beam gun. And gas welding for beginners is not the best option.
The easiest way to melt metal to connect parts is to pointly influence it with the high temperature of an electric arc that occurs between elements with different charges.
Electric arc
It is this process that is provided by electric arc welding machines operating on direct or alternating current:
- The welding transformer welds with alternating current. For a beginner, such a device is unlikely to be suitable, since it is more difficult to work with due to the “jumping” arc, which requires considerable experience to control. Other disadvantages of transformers include a negative impact on the network (causes voltage surges that can lead to breakdown of household appliances), loud noise during operation, impressive dimensions of the device and heavy weight.
Welding transformer
- An inverter has many advantages over a transformer. It generates an electric arc with direct current, it does not “jump”, so the welding process is more calm and controlled for the welder and without consequences for home appliances. In addition, inverters are compact, lightweight and virtually silent.
Therefore, if you are faced with the task of learning how to cook with electric welding, then it is best to purchase an inverter machine.
Welding inverter
Where can you become a welder?
There are many options available to those interested in welding today. The main thing is to understand that this cannot be learned by mastering only theory. Practice is definitely needed.
To get it, beginners should enroll in appropriate courses that last several months, or join an experienced welder friend who will be ready to share the basics and show how to properly weld a particular metal.
And for schoolchildren who are thinking about a future profession, it’s even easier - after the ninth grade, you can go to a college or school, where manual and automatic arc welding is taught for three whole years, and then they are issued a corresponding diploma.
After the eleventh grade, training to become a welder lasts one year, and for some beginners this may be the most optimal option.
Ultimately, no one is stopping you from becoming a self-taught artisan. On the Internet you can easily find text instructions, tutorials and textbooks, as well as lessons on arc and other types of welding in video format. And if you have, say, a garage and welding equipment, you can practice on your own.
What else do you need to have?
A welding machine without electrodes is a completely useless unit. Electrodes are a consumable material, they also come in different types: melting and non-melting, metal (made of steel, copper and other metals) and non-metallic, in the form of wire or a rigid rod, with different protective coatings, etc.
For those who are wondering how to properly weld with electrodes, it is best to start with steel universal rods 3 mm or 4 mm thick. The diameter is indicated on the package, it will not be difficult to choose the ones you need. Having mastered working with them, you can switch to other types, but they are unlikely to be in demand in everyday life.
Electrodes for inverter
In addition to welding consumables, you will definitely need a welder's mask. It is absolutely impossible to work without it, otherwise you can quickly get a burn to the cornea and many other vision problems. Masks with chameleon glass are considered the best. Or rather, with an automatic light filter that reacts to changes in illumination and protects the eyes from harmful radiation.
It is also advisable to acquire suitable clothing, shoes and gloves that are not burned by sparks and can protect against electric shock if something happens.
The tools you will need are a hammer to knock down scale from the seam, as well as all kinds of vices, clamps and magnetic corners that can be used to fix the parts to be welded in the desired position.
Minimum kit for a beginner welder
Possible difficulties
We must not forget about the gap between the electrode and the metal product - while arc welding is in progress, it should be approximately three millimeters. This is not so easy - the electrode is constantly consumed and burns out during the welding process.
Therefore, the device always needs to be lowered down a little. If the gap is small, there will not be enough metal to create a seam. And too large a gap causes the arc spark to become unstable.
For a beginner, it is better to choose a straight-line type of movement at first. If desired, you can try to make small circular swirls around the weld metal pools. It is better to master various complex figures such as zigzags and figure eights later.
Another important parameter is speed. It is because the electrode moves jerkily or at the wrong speed that welding defects arise - burns or uncooked areas.
To avoid such defects, novice arc welders need to carefully monitor the shade of the surface under the electrode and smoothly move the device in the chosen direction.
The thinner the electrode, the weaker it heats the metal and the slower it is driven. In particular, this is why it is advisable for beginners to work with thin electrodes.
During electric arc welding, it is imperative to monitor how smooth and invisible the seam is, and how many defects there are on it. The optimal seam width is from 0.8 to 1.5 times the electrode diameter.
If desired, some arc welding defects can be eliminated later. But any additional operations should be carried out only when the seam has completely cooled down and is cleared of slag.
At the end point of the seam, do not rush to remove the electrode . Here experts advise making a round metal seal. Otherwise, a small crater may form at the point where the electric arc breaks off.
The last thing to do is to remove the cooled and blackened slag from the seam with a hammer and a stiff brush. If the arc welding is done correctly, the slag will bounce off the metal product in large chunks. And there should be no slag inclusions in the seam at all.
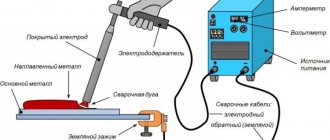
Basics of welding work
To cause the formation of an electric arc, two differently charged conductive elements must come into contact. One of them, negative, is the electrode, and the other is the surface to be welded, to which a metal clamp is connected, the cable from which is connected to the positive output of the inverter.
Electrode welding is caused by the melting of the metal by the heat generated by the arc. In order for the seam to be smooth, it should not be interrupted. So, to get started, you need to install the electrode, configure the inverter, light the arc and learn how to control it.
Electrode installation
The inverter device is equipped with two cables. A clothespin clip is attached to the end of one of them, with which it clings to a metal part. And the second cable is equipped with an electrode holder, which can be screw or spring.
Welding cables
See also: Catalog of house projects for which artificial stone was used for finishing
For the screw holder, you need to unscrew the head on the handle, and after installing the electrode in the socket, screw it back in. With a spring one it’s easier: just press the key to open the socket.
Connecting the welding machine
Welding cables are connected to the inverter through special outputs on the device body with different polarities. Which of them to attach the clamp to, and which electrode, depends primarily on the materials being welded. You need to understand this point in order to understand how to weld correctly and not get confused:
- The standard connection for welding steel parts is a minus to the ground cable with an electrode, and a plus to the cable with a clamp. It is called direct polarity and is suitable for most connections required in everyday life. Direct polarity ensures the classical movement of electrons from minus to plus, in which they transfer a significant part of the energy to the metal and heat it better.
- If you connect the clamp to minus and the electrode to plus, we get reverse polarity with a lower degree of heating. What is necessary when welding stainless steel products and in some other cases.
The arrows on the diagram indicate the direction of electron movement
Advice! It is best to master the basics of welding on parts made of ferrous metal, using a connection with straight polarity.
Now you can plug the device into the network and get to work.
Ignition of the electric arc
Before learning how to weld, you need to cause an arc to appear, for which you make short-term contact of the electrode with the metal part. This can be done in two ways: end-to-end and by striking:
- Butt ignition involves tapping the metal with the tip of the connected electrode.
- Ignition of the arc by striking is performed in the same way as lighting a match on a box.
There are no advantages to any of these methods - everyone does what he likes and is most comfortable with.
What errors might there be?
Welders who do not yet know enough how to use welding correctly often make the following mistakes:
- uneven connection line when moving the electrode quickly;
- a large number of burns when driving is slowed down;
- flat seam when the angle of inclination of the rod is violated;
- lack of penetration due to underestimation (or overestimation) of the distance from the tip of the rod and the workpiece.
These are just some of the mistakes that insufficiently experienced workers make. Using an inverter source, you can quickly learn to avoid them.
It will take much more time to learn how to weld thin-sheet workpieces, profiles or water pipes. There is a technique of applying a piece freed from coating to thin workpieces and welding directly over it.
Welding alloyed, stainless and tool alloys, as well as non-ferrous and light metals is much more difficult. They are welded in an environment of inert or low-active gases, such as argon, helium or carbon dioxide. The operating device is an inverter power source, supplemented by a gas supply system through a welding torch. Instead of rod electrodes, welding wire is used, fed into the working area at a constant speed by a special mechanism. Such a device is called a semi-automatic device.
Video description
The methods for igniting electrodes are clearly shown in the video:
The main thing is that the movements are fast enough and the contact is short-lived, otherwise the electrode will “stick” to the metal. This happens especially often with new electrodes that have not yet been used.
At the same time, a partially spent electrode may not ignite immediately due to the buildup of the melted protective coating formed at its tip. It is easier to beat it off using the tapping method.
You can proceed directly to how to properly weld with electric welding after confidently mastering the skill of exciting an arc. But first, it’s worth understanding what is happening or should happen in the process. Without this it will not be possible to move on.
See also: Catalog of companies that specialize in working with electrical networks and related equipment
Welding process analysis
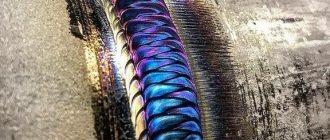
At the point where the welding arc occurs, the temperature rises greatly, as a result of which the metal of both the parts being welded and the electrode rod itself begins to melt. Liquid molten metal fills a burned-out depression, which in professional language is called a weld pool.
Schematic illustration of the electric arc welding process
At the same time, the protective coating of the electrode is destroyed, fulfilling its function: part of the coating melts, turning into slag, which covers the fresh joint and prevents the metal from contacting oxygen, and also maintains a high temperature underneath. And the other part goes into a gaseous state, creating a protective atmosphere around the weld pool, and also preventing air oxygen from reaching it.
Preparation of electrodes and workpieces
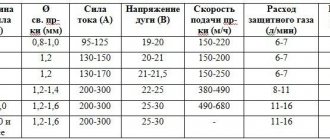
For those who want to become a good welder in the future, it is best to start by using electrodes with a thickness of 2 to 3 millimeters. Most operations at home are carried out using such electrodes.
The electrode must be correctly inserted into the holder. It is better to deal with new electrodes, since the old ones are very unstable. After refueling, you need to set the appropriate current parameters.
If you are using a two-millimeter electrode, then in order to get a high-quality seam, you need to set the switch to 70–80 amperes. For three-millimeter products, an electric current of 100 to 140 A is suitable, for four-millimeter products - 160 A.
Whether the power mode was chosen correctly can be determined by the sound of arc welding - it should sound like a crackling sound, not a buzzing sound.
The area of the future seam must also be cleaned of dirt. Using a special brush, you can remove rust and remove remaining varnishes and paints from metal products.
If the thickness of the parts is more than 3 millimeters, then the edges must be treated in a special way before arc welding - chamfering them.
Video description
All this is clearly visible in slow motion:
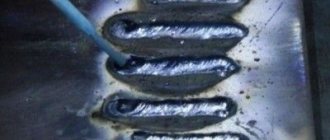
The slag crust from the weld is beaten off by tapping with a hammer after it has cooled.
Important nuances
The main secret of how to properly weld two parts and get an even seam is that when moving the electrode, the slag has time to cover the entire surface of the molten metal. And this depends on the speed of movement, the angle of inclination of the electrode and the trajectory of its movement. The current strength is also important.
The universal working angle is 30-60 degrees relative to the vertical. Wherein:
- moving the electrode at an angle forward (away from you), it is convenient to make any vertical, horizontal and circular seams;
- at an angle back (towards you) - weld corner joints;
- the vertical position of the electrode is allowed only when welding in hard-to-reach places;
- An angle of more than 60 degrees greatly stretches the weld pool, and the metal of the welded parts heats up worse. It is usually used when you need to trim off excess or touch up a rough seam.
The influence of the angle of inclination of the electrode on the shape of the weld pool
The welding speed is determined experimentally: it is necessary to ensure that the shape and dimensions of the weld pool remain stable and do not stretch or spread. It is very important to keep the electrode at the same distance from the surface - 3-5 mm from it. Moreover, as the bath is burned out and deepened, it must be lowered slightly, and when moving to the next section, raised again, trying not to go beyond the specified limits.
To connect the edges of two parts, you need to ensure that their particles penetrate each other. To do this, the electrode must move not in a straight line, but along a certain trajectory, oscillating from side to side. This trajectory may resemble a herringbone, ladder, figure eights, connected triangles, etc.
Options for moving the electrode tip during welding
Process Features
Manual arc welding has several obvious advantages:
- it can be performed even indoors;
- Thanks to the wide range of electrodes produced, arc welding is suitable for many different metals and alloys. And if first you need to weld one metal, and then another, no problems will arise. You can reconfigure the equipment and change electrodes quite quickly;
- arc electrical equipment has a simple design, is lightweight and easy to transport;
The disadvantages of electric arc welding of metals include the presence of harmful conditions and low efficiency.
It is easiest to perform arc welding manually if the metal products are located in a horizontal position. In this case, it is very convenient to control the electrode and the molten metal - gravity does not allow the melt to spread to the sides.
Vertical and ceiling arc welding is much more complex - such work is performed only by professionals.
Welding of elements
Having confidently mastered the basics of the welding process, you can move on to connecting elements into a single structure. And here, too, there are subtleties associated with the reaction of the metal to such an impact.
First of all, you need to correctly assess the length of the seam and ensure that it does not pull the parts being connected at the joints. To do this, they must be fixed in a given position using clamps or other methods. And to secure the fixation, they are secured with transverse seams in several places. And only then are they scalded.
The welding order depends on the length of the joint. Only short seams up to 300 mm long can be welded in one direction and in one pass. If this distance is greater, it is necessary to compensate for the resulting stresses by applying stitches in small sections.
Seam patterns depending on length
When the work is finished, not very beautiful seams can be carefully cut off and sanded with a grinder.
Basic rules for joining parts
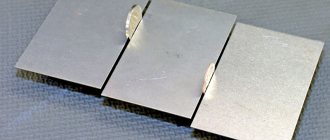
After you have mastered the basics of welding, you need to weld metal structures yourself and move on to performing simple assembly and tack operations at home. As a rule, a home craftsman does not weld thick metal, so cutting edges is not required. First, you can practice connecting a profile pipe. To do this, you will need to cut sharp corners at the ends of the parts for a larger penetration area.
The parts are inserted into the corner clamp and secured with a clamping bar. Now you need to first grab it from several sides. To do this, light an arc and place a small point.
There is no need to withstand a large leg, you just need to fix the parts. After checking the diagonals, tacks are performed on all accessible sides. Now the structure is removed and welded with a reliable and high-quality seam.
If the lessons on the angle of inclination and laying metal in a molten weld pool are well learned, then the operations of assembling metal structures will not cause difficulties even for dummies in welding.
Having studied the basics of welding and gained theoretical knowledge, you need to practice as often as possible, put on welding equipment, turn on the welding machine and hone your skills for a long time. Only practice will allow you to become a high-class welder.
What defects should you be aware of in order to make the correct seam?
Even a novice welder needs knowledge about weld defects. They need to be identified in time and not start using a defective product. A properly welded joint looks neat. Typical defects in welded joints are as follows:
- Lack of penetration . The seam is not filled enough with metal and has insufficient strength in this place. Caused by low arc voltage or excessive holder speed.
- Undercut . Indentation along the seam line. Caused by exceeding the distance from the electrode to the workpiece. A slight increase in the operating current helps.
- Burn-through . The appearance of holes in workpieces. Appears when the operating current is too high and when the speed of the electrode is slowed down. It also happens when the gap between the edges of the parts is too large.
- Pores . They occur when the protective environment that prevents contact of the weld pool with air is violated. Measures should be taken to eliminate drafts.
If the workpieces are not firmly fixed or tack welding is neglected, cracks may appear. They arise during the cooling of parts and the action of thermal stress on them.