How to check the functionality of a screwdriver charging
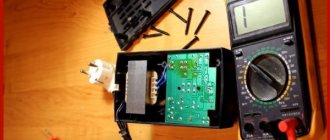
The first thing to do if the screwdriver charger stops charging properly is to check the power supply. To do this you should:
- Connect the power supply to the mains.
- Take a multimeter in your hands and set the mode to measure constant voltage, which varies from 9 to 24 volts.
- Apply the multimeter to the contacts of the charging unit, observing the polarity of the terminals.
- Look at the instrument readings that are displayed on the screen.
Basically the following 3 situations occur:
- The DC voltage meter screen shows "0". The power supply is not working and needs to be repaired or replaced.
- The set voltage corresponds to that specified in the description of the power supply. This means the device is working properly.
- When a multimeter is applied to the contacts of the power supply, the device displays a value below the specified value, then charging must be repaired. This means that the radio elements have failed.
Also, the cause of a non-functioning screwdriver charger may be a faulty electrical network. You can check it in two ways: connect another tool to the outlet or try charging the battery from a different network.
What can break
There are a number of “typical” breakdowns typical of cordless screwdrivers. Their list includes a fuse, a diode bridge, a capacitor and a high-voltage transistor. Less common:
- rupture and burnout of the power cable;
- fuse failure;
- transformer short circuit;
- breakdown of rectifier diodes or insulation;
- oxidation of toggle switch contacts and output device contacts.
These faults can be corrected by cleaning the contacts, as well as replacing small parts - transformer, power cable, automatic control unit.
Fuse
A protective element built into the board of all factory chargers. It is located in front of the rectifier bridge after the transformer. It is designed to protect against common problems: voltage surges, short circuits and stray current, etc.
Fuse in electrical circuit
The current rating in the electrical circuit is calculated based on the rated voltage of the battery. Most often, the “hair” - the main part of the fuse - passes current up to 5A.
Diode bridge
After checking the fuse, you should check the rectifier, otherwise it is called a diode bridge. It consists of four diodes connected in series that rectify alternating current and convert it to direct current.
Diode bridge
This way the battery is charged. To repair a diode bridge, you will need to replace the diode or remove it when there is only one faulty element.
Capacitor
The most common reason for a screwdriver charger to break down. The capacitor is a cylindrical part that swells due to overheating of the board.
Capacitor
This is followed by a breakage of the fuse and subsequent combustion of the rectifier. All elements of the electrical circuit are interconnected, and if one of them breaks down and the fault has not been eliminated, this will lead to other, more serious faults.
If there is a suspicion that one of the above-described circuit elements has broken down, then you first need to check the screwdriver’s battery, because the tool most often stops charging precisely because of a faulty battery. If everything is in order with it, then you should find another faulty element that caused the charging failure.
Resistor
Needed to limit current in electrical circuits. It is one of the last to fail; most often it breaks down as a result of damage to the entire electrical circuit after a short circuit.
1 ohm resistor
How to find what exactly is broken
Before repairing a charger or battery for a screwdriver, you need to measure the circuit voltage. A multimeter designed to measure current and voltage, as well as the resistance and capacitance of capacitors will help with this. After this, you should make sure that it is the charger that is to blame. To do this, connect it to the electrical network and pay attention to the LEDs. If the light does not light, then you can move on and look for damage directly in the circuit elements.
Multimeter
You will need the following list of parts:
- double-sided screwdriver;
- pliers;
- soldering iron with flux and solder;
- serviceable radio elements for replacement;
- tester.
Attention! Before disassembling the charger case, you need to disconnect it from the electrical network. You can connect it to the outlet only when measurements are taken with a multimeter to determine the performance of each of the elements.
How to identify a bad fuse
The performance of the power supply fuse can be determined using a tester; it must be prepared in advance. The list of actions below will help you find the problem:
- Unscrew the screws securing the back cover of the charger. Their number varies from 3 to 6 depending on the PSU model and the screwdriver itself.
- Inspect the body from the inside. You can find traces of carbon deposits on one of the elements, which will immediately indicate the cause of the memory failure. In this case, there is no need to rush, because other parts of the chain could also be affected.
- Pick up the tester and switch it to the “dialing” mode.
- Touch the fuse outputs with the probes.
If the tester starts beeping, then the fuse is not broken.
How to identify a faulty capacitor
Next you need to check the functionality of the capacitor. To do this, an external inspection of the element is carried out. If traces of swelling are found, the capacitor is replaced with a serviceable similar part.
Swollen capacitor on the board
Before you start desoldering it, you need to make sure that it is not working. To do this you need:
- Pick up a multimeter.
- Use the button to set the mode for measuring the resistance of radioelements.
- Touch the probes to the outputs of the part.
If the device shows the value “0” on the screen, then the patient is dead. It must be carefully removed and replaced with a working element.
How to identify a burnt-out diode bridge
All 4 diodes in the charger, or just 1, can fail. They need to be checked after the capacitor, because The rectifier breaks less often and most often next. Step-by-step instructions for identifying a burnt-out diode bridge:
- Inspect the part externally. Traces of carbon deposits on the diodes may be obvious.
- Take a multimeter in your hands and switch it to DC voltage measurement mode.
- Touch the probes one by one to the output of each diode. Parts that pass current through themselves must show the corresponding values on the tester screen.
- Reverse the polarity and test all diodes in the other direction with a multimeter. If the current flows in both directions, then the rectifier is faulty.
Broken diode bridge
Diodes that pass voltage in the opposite direction are soldered off and replaced with functional elements.
How to identify a faulty resistor
If all the parts inspected before are in good condition, then the last point to inspect the screwdriver power supply is the resistor. To check the functionality of the charger throttle, you need to:
- Pick up a multimeter.
- Use the button to set the mode for measuring the resistance of radio elements or for continuity.
- Touch the resistor outputs with the probes.
Faulty resistor on the board
The choke is considered to be working if the device shows the declared current resistance and beeps (depending on the selected multimeter mode). A faulty resistor will not show signs of life and must be replaced.
If all of the above parts, after inspection and repair, begin to work properly, but the charger still does not function, then the reason may lie in the smallest and most atypical places. The screwdriver charger may break due to:
- rupture and burnout of the power cable;
- transformer short circuit;
- oxidation of toggle switch contacts and output device contacts;
- damage to wires.
This is a small part of the list of things that can cause a malfunction in the charger. But most often the search ends at the diode bridge.
How to independently check the charger for serviceability
The very first sign of a faulty charger is that the corresponding indicator does not light up when plugged in.
The charger has failed - the network indicator does not light up.
First of all, you need to make sure that the outlet is working properly and that there is voltage in it. If everything is in order, then you need to look for a fault. She may be:
- in the power cord (the wire may break in places where it is frequently bent - near the entry into the device body or near the plug);
- in the internal circuit of the charger;
- The indicating LED has failed.
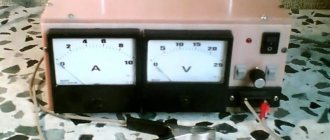
If everything is normal, you need to measure the output voltage with a multimeter.
An 18.5 volt charger has a measured open circuit voltage of 22.5 volts.
At idle, it can be 20-30% higher than the rated battery voltage. This is due to the fact that nickel-cadmium, nickel-metal hydrite batteries are charged with a stable current (lithium-ion cells are also charged in the same mode at the first stage of energy replenishment).
To ensure stable current, a voltage reserve is needed. If there is no voltage, then the charging is faulty. If the charger maintains a normal level at idle, it must be loaded onto a standard battery and the voltage measured in this mode. It should drop relative to idle speed, but be higher than the battery voltage - this ensures the desired direction of the current during charging. If the voltage is below the nominal value (with a known good battery) or absent, then the charger requires repair.
If you have doubts about the serviceability of the charger, it is better to experiment with an unused battery (for example, a battery that has lost capacity).
How to repair a screwdriver charger
Before you start repairing the charger yourself, you need to prepare serviceable elements to replace the old ones. Fuses, resistors, diode bridges and capacitors can be removed from old microcircuits and charging blocks. After this, you need to prepare gloves, a soldering iron with flux and solder, and a tester.
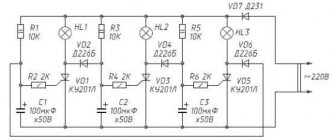
Typical diagram of a screwdriver charger
Detailed video instructions for repairing chargers from the Interskol company can be viewed at the link: https://www.youtube.com/watch?v=koMGQTc70I8&t=1s.
Attention! It is important to follow safety precautions; you cannot repair the charger under electrical voltage, this is life-threatening, and a short circuit may occur in the power supply.
Unstable contact due to bent terminals
A trivial, but quite common reason why a cordless screwdriver does not charge. If, when measuring the voltage, the charger shows unstable values, and when the battery is moved, the contact in the power supply disappears, then the problem is the bent terminals of the charger.
Charger with terminals
You need to disassemble it using a double-sided screwdriver and move the terminals to the desired position. Then measure the current in the power supply with a multimeter. The value will begin to increase and the LED indicators should remain lit steadily. Thus, the charging process will improve if contact is restored between the charger and the screwdriver battery.
Fuse
After diagnostics and external inspection of the faulty fuse in the power supply, you need to:
- Determine whether the fuse is plug-in or soldered. If the replacement part has legs, then the inserts need to be removed from the board.
- Desolder the old part.
- Solder a new safety element in the screwdriver charger to the contacts.
- Test the performance of the power supply using a multimeter.
The procedure is simple and does not require special skills.
Capacitor
If the capacitor of the charger unit is faulty, it should also be removed and replaced. Step-by-step instruction:
- Determine the correct location of the legs of the part and remember it.
- Unsolder the old element from the contacts.
- Solder a new capacitor, the positive contact should be connected to the cathodes.
The replacement part should not differ in parameters from the one removed from the power supply.
Diode bridge
After diagnosing a faulty power supply rectifier, you should:
- Remove the old diodes from the contacts.
- Solder new elements. An important point is that the diodes must be soldered correctly, the anodes at the input of the high-voltage part, and the cathode at the low-voltage part.
- Test operation with a multimeter in DC voltage measurement mode.
The most serious problem that you may encounter is the failure of the power supply microcontroller. It is almost impossible to fix it yourself; it is easier to replace the charger. If a resistor or transistor in the power supply of a screwdriver breaks down, then they are also soldered off and replaced with working analogues. After completing the repair, you need to check the functionality of the power supply, and then connect the battery. First screw the back cover into place.
There is no point in charging a screwdriver battery if it is worn out. This can be determined by the constant shortening of charge recovery periods. The capacity decreases if the screwdriver is not handled properly, so it will need to be replaced.
Do-it-yourself Interskol screwdriver repair: how to repair the gearbox and button?
One of the types of home tools that differ in functionality is a screwdriver. Interskol is one of the most popular brands of household screwdrivers. For long-term and efficient operation, it is important to know how to repair an Interskol screwdriver.
How to disassemble an Interskol screwdriver
The tool includes many working elements. Among the most important are the following:
- Electric motor. The electric motor includes brass bushings and a steel armature. Several turns of winding and a gear are attached to the armature. At the bottom of the armature there are graphite brushes, through the use of which current is transmitted to the collector.
- Gearbox. Designed to transmit rotation using mechanical transmission. Can be presented in the form of a 1 or 2 stage gearbox. As a rule, screwdrivers use 2-stage gearboxes. You can repair the Interskol screwdriver gearbox yourself, taking into account the recommendations of experienced craftsmen.
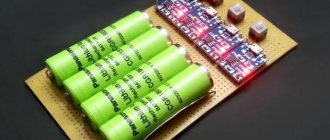
- Accumulator battery. Consists of several small batteries. They are connected in series. Different models may have different compositions, which affects the power and duration of operation without intermediate charging. In order to extend the life of the battery, it must be charged correctly, which depends on the composition of the element. Experts recommend that after purchase, perform 3 full battery charging cycles, each of which is performed after the battery is completely discharged.
- Cartridge. Screwdrivers use quick-release chucks. It can be attached in several ways (threaded, screw, Morse taper). This indicator determines the quality of the tool attachment clamp and the method of its dismantling.
Before starting any repairs, it is necessary to carry out an operation such as disassembling the Interskol screwdriver. To do this, it is recommended to follow the following sequence of actions:
- Disconnect the battery.
- Separate the cartridge, spring and rotary housing. In this case, you should pay attention so that the balls do not roll out.
- Unscrew the bolts connecting the 2 halves of the housing (they are located around the perimeter of the housing).
- Carefully remove all elements located inside the housing.
- Disable the start button.
- Remove the speed switch and adjustment clutch.
- Remove the electric motor.