Every car owner needs a battery charger, but it costs a lot, and regular preventive trips to a car service center are not an option. Battery service at a service station takes time and money. In addition, with a discharged battery, you still need to drive to the service station. Anyone who knows how to use a soldering iron can assemble a working charger for a car battery with their own hands.
The nuances of battery operation
The most common type is the lead-acid battery. The service life of the device is calculated on average for 5 years. Recharging such batteries requires using at least 10% of the current from the total capacity of the device.
For example, with an indicator of 75Ahh, a minimum current value of 7.5A is required for charging. If the current is higher, the battery will not fail, but the car may lose its brains.
Repairing the control unit for air conditioning, gearbox, alarm system, and so on is not a cheap pleasure.
A device with a voltage of 11.9-12.1 Volts is discharged; in working condition, the charge level should be 12.5-12.7 Volts.
A little theory about batteries
Any battery is a storage device for electrical energy. When voltage is applied to it, energy is stored due to chemical changes inside the battery. When a consumer is connected, the opposite process occurs: a reverse chemical change creates voltage at the terminals of the device, and current flows through the load. Thus, in order to get voltage from the battery, you first need to “put it down,” that is, charge the battery.
Almost any car has its own generator, which, when the engine is running, provides power to the on-board equipment and charges the battery, replenishing the energy spent on starting the engine. But in some cases (frequent or difficult engine starts, short trips, etc.) the battery energy does not have time to be restored, and the battery is gradually discharged. There is only one way out of this situation - charging with an external charger.
How to find out the battery status
To decide whether charging is necessary, you need to determine the state of the battery. The simplest option - “turns/does not turn” - is at the same time unsuccessful. If the battery “doesn’t turn”, for example, in the garage in the morning, then you won’t go anywhere at all. The “does not turn” condition is critical, and the consequences for the battery can be dire.
The optimal and reliable method for checking the condition of a battery is to measure the voltage on it with a conventional tester. At an air temperature of about 20 degrees, the dependence of the degree of charge on the voltage at the terminals of a battery disconnected from the load (!) is as follows:
- 12.6…12.7 V - fully charged;
- 12.3…12.4 V - 75%;
- 12.0…12.1 V - 50%;
- 11.8…11.9 V - 25%;
- 11.6…11.7 V - discharged;
- below 11.6 V - deep discharge.
It should be noted that the voltage of 10.6 volts is critical. If it drops below, the “car battery” (especially a maintenance-free one) will fail.
Correct charging
There are two methods of charging a car battery - constant voltage and constant current. Each has its own characteristics and disadvantages:
- Constant voltage charging - suitable for restoring the charge of not completely discharged batteries, the voltage at the terminals of which is not lower than 12.3 V. The process is as follows: a direct current source with a voltage of 14.2–14.7 V is connected to the battery terminals. The end of the process is monitored by the current consumption: when it drops to zero, charging is considered complete. The disadvantage of this method is that the initial charging current may be high; The more the battery is discharged, the higher the current. The advantages of the method are obvious - you do not need to constantly adjust the charging current, and the battery is not in danger of being overcharged if you forget about it.
- DC charging is the most common and reliable method. In this mode, the charger produces a constant current equal to 1/10 of the battery capacity. The end of the charging process is determined by the voltage on the battery - when it reaches 14.7 V, the battery stops charging. The disadvantage of this method is that the battery can be damaged if you do not remove it from charging in time.
Conditions for homemade battery charging
To charge the device, the following requirements must be met:
- Constant voltage setting – 14.4V;
- Possibility of charging for a long time;
- Automatic shutdown when maximum current values are exceeded;
- Protection against pole connection error. When connecting minus to plus, the charging process must be stopped.
Any violation of the above requirements may irreversibly damage your device.
Charging Requirements
Based on the operating conditions of individual vehicles and the specified conditions of the battery charging mode, the requirements for a charger for a car battery are as follows:
- A homemade charger for a car battery must be autonomous, not requiring supervision and control of the charge current/voltage, because The battery will be charged mainly overnight;
- The PI memory must provide a stable voltage of 14.4 V, acceptable in the case where there is a voltage drop across the US, 15.6 V;
- The ultrasonic switch must ensure irreversible disconnection of the battery from the charger both when the charging current is exceeded and when the voltage on the battery increases above 15.6 V. Irreversible means that the ultrasonic switch must be self-locking, i.e. to reset it to its original state, you will need to turn off and turn on the IP again;
- Also, the ultrasound must provide protection against polarity reversal, i.e. Incorrect, reverse polarity, battery connection. If the conditions in clause 3 are met, protection against polarity reversal is provided automatically.
About polarity reversal
In case of battery polarity reversal, 2 cases are possible: the battery is serviceable, undercharged or deeply discharged and/or “profitable”, depleted, and has largely exhausted its resource, or a fully charged battery is incorrectly connected to the charge. In the first case (properly undercharged), the charge current increases above the nominal one. In the second, before this, the battery voltage will “jump” for a short time above the specified IP, and then the extra current will immediately “jump” and the battery will boil. In the latter situation, in order to save the battery from irreparable damage, it must be turned off due to overvoltage.
Models of homemade battery chargers
Any homemade charger does not provide any guarantee of long-term operation. The main thing here is simplicity and efficiency. Next, let's look at examples of how you can charge a car battery yourself.
Composition and terms
Autocharging consists of a primary power source for the charger itself, which provides a specified charging mode for the battery, and circuits to protect it from various types of emergency situations. Circuit design, these nodes can be combined to one degree or another. Below, for brevity, the following is used. abbreviations:
- AKB – rechargeable battery.
- PI is the primary power source.
- IP – any other power source.
- Ultrasound – protection device.
- TZ – current protection.
- ZN – overvoltage protection.
Using a lamp and a semiconductor diode
This method of recharging a battery device is relevant at home. To implement this, you must have a 220V outlet.
- The circuit elements include a standard 100-150 Watt incandescent lamp, a semiconductor diode, a socket plug and a cable with crocodile clips.
- In this connection, the diode serves as a voltage converter from AC to DC.
- To prevent a short circuit, it is enough to use a 10-15 A fuse. The lamp and diode must be connected to the “+” of the battery.
With a lamp power of 100 watts, the incoming current will be 0.17A. To achieve a value of 2A, you will need to charge the battery for at least 10 hours.
Most likely, it will not be possible to completely restore the charge of a dead battery, but it will be enough to start the car.
What is needed for the memory?
Structurally, the charger includes the following elements:
- The main element is a two-winding transformer; if you have a unit with a large number of windings, you can use it, but the remaining coils will be unused. In addition to classic ones, pulse transformers taken from Chinese electronics are also quite suitable.
- Since the voltage at the output of the transformer will be variable, and constant voltage is required to recharge the battery, you will need a rectifier. In this example, we will assemble it ourselves from four diodes, but if you have a suitable model, you can install it.
- Depending on the distance and the magnitude of the secondary voltage, you may need connecting wires, and for self-winding, a copper conductor in varnish insulation.
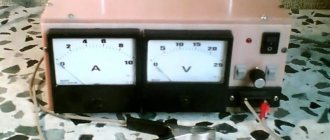
- An ammeter and a voltmeter for monitoring the main values at the output; they can also be checked with a conventional multimeter, but this will require unnecessary time, so it is much easier to install stationary devices.
Rice. 1: Measurement with a multimeter - Automatic shutdown can be performed using a voltage or current relay. Reacts when the battery capacity is full and turns off automatic charging. Together with the relay, you can install a car light bulb or LED to register the end of the charge.
- A variable resistor or switch to regulate the current in the secondary circuit of the charging unit. Necessary if you are going to use the charger for different types of batteries or if it is difficult for you to calculate the operating parameters and you will have to adjust them.
Rice.
2: Example of installing an adjusting resistor If you are going to charge the battery once, you can use only the first three elements; for constant use it will be more convenient to have at least control devices. But before you put it all together, you need to make sure that the charger's parameters after assembly will meet your needs. The first thing that needs to match is the charger transformer.
Charging model assembled from a PC power supply
The standard power supply for a personal computer is rated at 12 Volts. To charge the battery, we remind you that you will need at least 14.4 Volts.
First, all unnecessary wires are unsoldered; for charging you will only need green wires. The end of this cable is soldered to the negative contacts where the black wires exit.
- This circuit allows you to start the charger directly. The wires coming from the battery terminals are connected to the minus and plus on the power supply. The plus is soldered where the yellow cable exits, and the minus is soldered to the end of the black wire.
- Next, you need to regulate the power; a TL494 or TA7500 microcontroller is assigned to this characteristic in the power supply. We turn the board over and look for the leftmost leg of the microcircuit.
- 3 resistors are connected to the lower output of the microcontroller. You need to find a resistor connected to the terminal of the 12V block, unsolder it, and then measure the effective resistance.
To determine the required number of kOhms, a variable resistance resistor is soldered in place of the soldered resistor. We connect the power supply board to the network by hooking up a multimeter to it.
Using a variable resistor, we obtain the minimum required voltage value of 14.4 Volts. Once this voltage is reached, we solder the variable resistor and measure the resistance.
Next, install a constant resistor designed for the obtained value. Such a homemade charger will produce a current of about 5-6A, which is quite enough to charge batteries with a capacity of 50-60Ah.
No need!
Let's first talk about typical mistakes in designing homemade chargers for lead batteries. The first is illustrated by pos. up. Connecting directly to the household electrical network (left) is not worth discussing. This is not a mistake, this is a gross and dangerous violation of safety regulations. The error is in limiting the charging current by capacitive ballast. Expensive, by the way, this is a method by today's standards: the battery of oil-paper capacitors alone at 32 uF 350 V (lower voltage is not possible) costs more than a good branded charger.
Incorrectly and irrationally constructed charger circuits for car batteries
But the main thing is that a reactive load appears in the network. If your electric meter has a reactivity indicator (LED “Return”), then when these charges are plugged into the network it will flash. Managing modern electrical equipment is impossible without computers, and the “return” confuses the electronics even to the point of shutting down due to a false alarm. That's why today's electricians are merciless when it comes to reactive power. Well, what if it turns out that its source is illiterate or an overly cunning consumer, then... let’s not look into the night.
The circuit below, if we take into account the same capacitive ballast, was developed skillfully, this charger will protect the battery, figuratively speaking, from the Tunguska meteorite; (a detailed description of it can be found here: https://ydoma.info/avtomobil-zaryadnoe-ustrojstvo-dlya-avtomobilnogo-akkumulyatora.html). But, with all due respect to the author, who certainly knows his business, building such a difficult (and expensive) charger for lead batteries is like assigning a nanny from a kindergarten to command a platoon of experienced, seasoned soldiers. A lead battery needs little to live well. What will we do next?
How to properly use a homemade charger
Any homemade device requires special care to use. Here are some tips when using them:
- Carefully observe polarity when connecting. Check manual charging with a multimeter.
- Do not close the contacts to check the operating voltage level. Although it is recommended to short-circuit for 1-3 seconds in order to establish which can the discharge is coming from, such a short-circuit can have a negative impact later when charging the device.
- Connect the battery to the network only after the terminals have been correctly connected and securely fixed. Switch off in reverse order.
- Many people, when working with a battery, forget about the acid inside the device. After removing it, do not keep it in an area exposed to sunlight and allow it to overheat.
- After charging the battery, do not leave it for a long time. A homemade charging device can fail at any time. And as a consequence, you will have to purchase a new battery.
Homemade chargers are ideal for cases when the battery has already passed more than 3-4 years of use and is close to exhausting its service life.
If you don’t have the financial means, then such models will really help you start your car, especially in winter. For relatively new batteries, it is better to purchase certified factory starting devices.
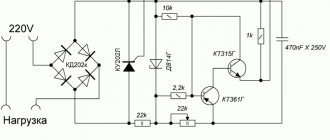
Rectifier circuit
In fact, there is absolutely no point in using complex rectifiers for a car battery. To charge such 12-volt batteries, it is enough to take a rectifier that will provide the correct voltage parameters, as well as charging current, if required. That is, in this case, beginners should not assemble multi-component electronics or automation. It’s complicated, and essentially pointless. As a result, the circuit for the rectifier used to charge the battery should be as simple as possible.
Let's take for example a rectifier that is perfect for a car battery and its charging, consisting of:
- transformer;
- switch;
- diode bridge;
- LEDs;
- ammeter;
- relay;
- buttons.
That's all, nothing more is required to assemble a rectifier for effectively charging a car battery with your own hands.
Here you can argue endlessly about which rectifier will be better for a car battery. But the fact is that beginners need to create simple but effective and safe systems. This way you can avoid unwanted problems. And professionals in this field do not need recommendations at all. They themselves know everything perfectly well.
Photo of a homemade charger for a car battery
It’s also important to know: 3 nuances about operation
The homemade product differs somewhat in its method of operation from the factory version. This is explained by the fact that the purchased unit has built-in functions that help with operation. They are difficult to install on a device assembled at home, and therefore you will have to adhere to several rules during operation.
- A self-assembled charger will not turn off when the battery is fully charged. That is why it is necessary to periodically monitor the equipment and connect a multimeter to it to monitor the charge.
- You need to be very careful not to confuse “plus” and “minus”, otherwise the charger will burn out.
- The equipment must be turned off when connecting to the charger.
By following these simple rules, you will be able to properly recharge the battery and avoid unpleasant consequences.