A tool in demand in the household is a screwdriver. It is used for screwing and unscrewing fasteners, drilling, or performing other types of work; you just need to change the nozzle. Often working with a tool, you have to change the battery from time to time. In this case, it itself or the charger may fail. Chargers are reliable and usually rarely break down before the battery life is exhausted, but anything can happen. The article describes how to repair a charger for a screwdriver with your own hands and in what situations it will be easier to entrust this work to a service center specialist.
Repair of the screwdriver charging unit is necessary if it is not possible to purchase a new charger.
Benefits of cordless tools
Today there are many devices that successfully cope with installation work using fasteners: screwdrivers, drills, drilling machines, many of them have a charger for a screwdriver.
Small, lightweight, mobile and self-contained screwdrivers have the following advantages:
- The comfortable, easy-to-hold handle shape facilitates high-speed work.
- Economical. Many models come with useful options and attachments, such as universal bits and attachments that are easily replaced, giving you more flexibility on the job.
- Energy-saving design, saves energy and increases the charging period.
- Increased efficiency, the tool allows you to quickly and accurately tighten fasteners in hard-to-reach places.
- High versatility. Variable speed of rotation, forward and reverse stroke.
- Flexibility of use, three-mode range of work.
- Good repairability, availability of a sufficient number of spare parts on the market.
Checking the load
There is only one drawback of the preliminary test - it does not allow you to accurately determine the battery capacity, and therefore the charging time. A load test will help you evaluate this parameter. The latter must be trimmed in accordance with the technical characteristics indicated on the battery case.
When this data is not available, use a consumer (load) equal to half the current. In most cases, it is enough to take a 12-volt light bulb with a power of 40 watts. Both automotive and regular halogen lamps are suitable.
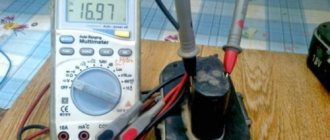
The circuit looks simple: a lamp is connected to the negative terminal of the battery. The second wire from it is connected to the “plus”. In parallel mode, readings are taken with a voltmeter. Next, the battery is turned on for 2 minutes. If the brightness of the lamp has not decreased within the specified period, then a preliminary conclusion is given - the battery is functioning normally. The voltmeter reading confirms the result. Ideally, it will output 12.4 V. If the voltage is lower, but still remains within 12 V, one of the battery elements is not working properly.
In addition, a noticeable decrease in the brightness of the light bulb also indicates a malfunction of individual cans. The fact that the entire battery is unusable is indicated by its rapid extinction.
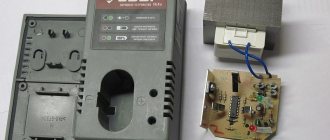
Wireless power supply device
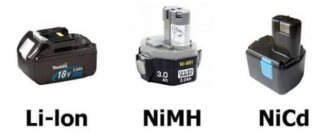
Battery chargers convert 220 V alternating current from the mains into direct current. To perform its functions, the charger has a transformer and a special printed circuit board. Batteries produce current through a chemical reaction between two electrodes and an electrolyte. The voltage ranges from 1.2 to 24 V or more, depending on the battery type and amperage.
Many wireless devices are powered by a rechargeable nickel-cadmium (nicad) battery or a 20-cell battery. Each cell provides approximately 1.2 V DC current. The packs are built directly into the tool and have snap-on clamps.
A number of batteries have permanent built-in batteries that cannot be removed and are charged in the unit.
How to check a screwdriver battery with a multimeter
For the very first diagnosis, you need to determine the voltage and strength of the battery while charging the screwdriver. Normally, the device should show 13V 30 minutes after connecting to the network. After 1 hour the value will change to 0.5V.
The maximum voltage of the screwdriver should reach 17V.
When connected to the network, the current strength of a well-functioning device should reach more than 1 ampere in 1 hour.
The multimeter itself is switched to DC mode to check the battery voltage. At the same time, the mode switch must be set to 20V. This means that the voltage value on the screwdriver will not exceed 20 volts.
When measuring the voltage of an already fully charged screwdriver, the value should be equal to the number of “cans” multiplied by the voltage of each battery.
Typically, the number of batteries in a device is 10-12 pieces. With a nickel-cadmium battery voltage of 1.2V, the required value will reach a maximum of 14.4V.
Restoring the drill
When working under increased loads and in a polluted repair environment, the screwdriver may break. The most common causes of malfunctions are dirt or dust. Sometimes a screwdriver stops working when the copper connections on the contacts oxidize. You can repair and at the same time configure the screwdriver yourself after studying the manufacturer’s instructions in the following sequence:
- Precautions must be taken before any type of repair work.
- Before replacing the chuck or removing the housing, make sure that the electric screwdriver is not connected to power.
- Try turning on the tool via the battery. If it does not function, there may be a problem with the battery or power supply. Replace the battery and check operation. If the electric screwdriver does not turn, there may be something inside that is blocking the start and you will have to remove the socket.
- To do this, use a screwdriver to loosen the screws and carefully remove the cartridge. Before that, you need to make sure that there is a spare part for replacement.
- Carefully unscrew the housing using a screwdriver. Open it, lift it up and check the device for internal defects.
- Cleaning the copper connection. If they are covered with dust or copper oxide, they need to be cleaned. To do this, you can use sandpaper until the surfaces are shiny and smooth.
- Wipe the instrument from dust and copper filings with a soft cloth.
- Save the connection diagram by taking photographs and a drawing on paper. This is very important, otherwise it will be difficult to assemble the wires in the same way as before the repair.
- Replacement and reassembly. Identify the parts where the parts are stuck and carefully replace them.
- Assemble the screwdriver, connect the wires and install the housing.
Troubleshooting the adapter
It often happens that the user charges the battery, but it stops working almost immediately; the indicator reports that the batteries are low. In this case, diagnostics are necessary to determine exactly what is faulty - the battery or the charger.
If the wireless mechanism (with built-in rechargeable battery) does not work, there is not enough power, you need to make sure that:
- The power is on at the output and the outlet is not connected to the network.
- Check the electrical cord and replace it if it is faulty.
- Test the power supply and carry out repairs.
- If your wireless device or rechargeable batteries are operating for shorter periods between charges, they are likely worn out. They should be inspected for damage or leaks and replaced if necessary.
Self-charging lithium-ion batteries
Sometimes for older tool models it is impossible to purchase a new charger and it is necessary to modify it or make a new one yourself. Lead-acid Ni-Cd and Li-ion batteries will require a charger circuit for an 18-volt screwdriver. The main features of this universal source are:
- DC voltage.
- Automatic shutdown when fully charged.
- The maximum current is 5 amperes, batteries can be charged normally.
- Fully customizable mode according to battery specifications.
- Low cost.
- Optimal electrical circuit. No special parts are required, they are all standard and easily available.
- LED indicators to monitor cut-off and charging status.
- Suitable for garages and home use.
This multi-purpose fixture is a 5 amp DC source, however, charging at a lower current may require an additional DC circuit between the input power supply.
When deep charging, the battery may overheat, which must be protected by automatic temperature controller circuitry or cooling fan. List of parts for repairing a screwdriver with your own hands:
- Resistors.
- Capacitors.
- Simistry.
- Zener diodes.
- Gearbox.
How to check the battery capacity of a screwdriver with a multimeter
The main property of a battery is capacity. This value shows the accumulated energy, that is, the current strength for 1 hour. Measured in A/h.
How to check battery capacity with a multimeter?
- Disconnect the battery from the screwdriver.
- Charge the battery to 100%.
- Using a multimeter, a resistor and a light bulb, measure the time it takes for the lamp to go out and the voltage at the battery output.
- Calculate the capacity of the device using the formula /
- Compare the results obtained with those indicated in the screwdriver operating instructions.
Formula for calculating capacity:
E=M/N*t,
M is the power of the light bulb,
N - screwdriver voltage,
t is the battery discharge time.
Let's say the battery voltage reaches 18V. With an incandescent lamp power of 10 W, the battery discharge time should reach at least 2.3 hours.
If the connected light bulb goes out after 30 minutes, the calculated battery capacity will be:
10 Watt / 18 V * 0.5 h = 0.28 Ah
This value is significantly lower than the values of, for example, a 1.3 Ah nickel-cadmium screwdriver battery.
Repair of current sources
Rechargeable batteries actually do not have complex spare parts, since they are assembled from simple charging elements. In order to determine the repair, you need to open the source and check for damage. Tools and materials that will be needed when performing repairs:
- Multimeter.
- Screwdriver.
- Electrical contact cleaner.
- Insulating tape.
There are times when the coil of a cordless screwdriver is defective and hence overheats the device. The insulation melts easily, the batteries are damaged and the cordless screwdriver cannot be used. A technical error cannot always be determined by external inspection and disassembly of the instrument is required.
Sequence of operations:
- Unplug the tool from the electrical outlet.
- Use a rag, sandpaper, or electric contact cleaner to clean the contacts between the power handle and the charger.
- Plug in the power supply several times to make sure it is functioning correctly.
- Check the device for DC output. Set the multimeter to 25 DCV. Plug it into an electrical outlet.
- Touch its two probes to the corresponding contacts (+ and -). If the meter readings are zero, swap them.
- The DCV output should be around or slightly above the power rating of the source. That is, at 9 V DC the device should show no more than 10 V.
- Check the AC output source. Set the multimeter to 25 ACV. Touch the two probes to the contacts. If there is no reading, the transformer is faulty. Select a replacement with the same denomination and size.
- Check the battery. Fully charge the battery. Set the meter to a DCV scale greater than the rated power of the battery pack.
- Touch the red probe to the + terminal and the black probe to the terminal and measure.
- Replace the battery if the reading is 1 volt below rated power.
How does a screwdriver battery work?
A battery is a device designed as a source of direct current, which is transmitted from batteries. When charging a battery device, energy, on the contrary, accumulates in the system.
The structure of batteries in electrical appliances has the same elements:
- rows of batteries (“cans”);
- temperature sensor;
- 2 power, 1 control and 1 service contacts.
The energy of the batteries is stored and transferred through their series connection to each other. A characteristic feature of the “cans”: the same dimensions and voltage of the individual elements.
When a screwdriver battery breaks down, as a rule, only one or more batteries fail.
In addition to batteries, battery performance is affected by damaged contacts. Power allows the device to receive charge and release energy. The temperature sensor protects the screwdriver from overheating. And the service wire equalizes the charges in all elements.
In addition, the type of batteries affects the operation of the device.
Diagnostics of the condition of power tools
Hot surfaces of the cordless screwdriver and battery indicate overheating of the tool. Overheating is a process that can occur in two cases. On the one hand, the screwdriver has an internal defect, and on the other hand, it is possible that it is being used incorrectly. To do this, before repairing, you need to check:
- First, test the current sources - an electrical outlet. There are 3 ways to check. First, connect another device to it and see if it works properly. And you can also connect the tool you are testing to another outlet and see if the battery charges. Finally, check the indicators on it, such as lights or sound, to make sure it is receiving electricity.
- Battery performance. Sometimes the reason may not be in it, but in some separate elementary battery. This can be determined in two ways. Try connecting the battery to a different charger and see if it will charge. You can try replacing the problematic element in the battery.
- Check the charger and determine if there are any visible damaged parts. You need to pay attention to the contacts that connect to the outputs. Make sure they are not bent or broken.
- Check metal parts for corrosion or rust, which is a sign of moisture. If the parts have come into contact with liquid, there may be a short circuit that prevents the battery from turning on.
- Use a voltmeter connected to it to repair battery chargers. Touch the contacts of the device using the probes and ensure there is a reading. If they are missing, switch probes and try again. If there is still no reading, the battery is not working and needs to be replaced.
- Clean with a small amount of alcohol and a cotton swab. Remove corrosion using fine sandpaper. Before applying test voltage to the device, you need to make sure that the alcohol is dry and the electrical parts do not have a wet surface.
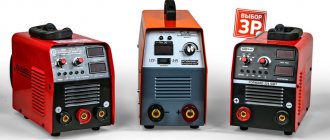
Screwdrivers are produced by a large number of companies; tools from Interskol, Bosch, and Makita are especially popular. They are usually extremely durable and reliable, however, individual parts may wear out. For example, when the drill does not work when you pull the trigger. Such a breakdown indicates that the trigger (button) does not work. Replacing the trigger is a fairly simple operation. Before starting repairs, the battery must be removed to prevent injury when the engine is engaged. The procedure for replacing the regulator using the example of a charger for a Bosch screwdriver:
- Remove the battery before using the drill. Release the two release clips on each side of the battery and remove the battery. After removing the 12.0V battery, place it in a safe location away from the work area. Place the equipment on a clean, level surface with the screw holes facing up.
- Locate the screw that connects the two halves of the outer housing at the rear edge of the battery shaft. Use angled tweezers to remove it.
- Place the tweezers into the slot on the inside of the clamp. Use your other hand to firmly attach the drill and pull up until the clamp releases.
- Locate the eight 5.5mm screws located on the upward facing side of the drill bit.
- Remove each screw using a T8 screwdriver, storing them in a safe place. Once all the screws are loose, release the housing to open the motor and remove it.
- Place your finger under the metal tab and carefully lift it up to release the trigger. Gently grasp the trigger assembly and gently pull up.
- Disconnect the two wires connecting the motor to the trigger using a pair of pliers.
- Fix a faulty trigger.
Another type of repair with a Bosch screwdriver, for example, or from another well-known manufacturer is required much less frequently and is best entrusted to a service center.
Cordless screwdrivers are quite reliable these days, so it's actually hard to find any failures on the 18V model. Lithium-ion batteries have excellent battery life and low self-discharge rates, making tools equipped with them a regular choice in the home.
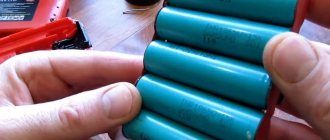
Checking screwdriver battery cans
If preliminary tests of the tool indicate a malfunction of the cans, you should begin disassembling the battery case. Banks are batteries that are connected in series and located inside the battery. They store the electrical charge and power the instrument. As a rule, any battery includes 10–12 1.2 volt cells.
Initially, you need to visually check the integrity of the connections between the cans. It often happens that several individual cans fall out of the circuit due to a break, which leads to deterioration in the performance of the battery as a whole.
If all connections are in order, you need to measure the voltage of each of the cans separately. In this case, the voltage should be at least 1.2 volts. Measurements are carried out using a multimeter, the probes of which are connected to the poles of the can. If the device does not show voltage, such banks must be replaced. If the faulty parts are not identified, the load test must be repeated.
To repair a battery, you will need minimal electrical knowledge - even a novice house owner can handle it. Repairing a screwdriver battery yourself will save your family budget and give your tool a second life.
Operating principle of the charger
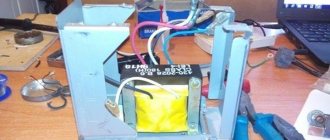
If a memory device fails, it makes sense to first try to restore it. To carry out repairs, it is advisable to have a charger circuit and a multimeter. The circuitry of many charging devices is based on the HCF4060BE microcircuit. Its switching circuit forms the delay of the charging time interval. It includes a crystal oscillator circuit and a 14-bit binary counter, making it easy to implement a timer.
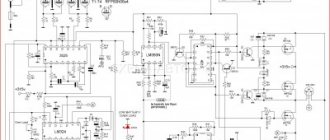
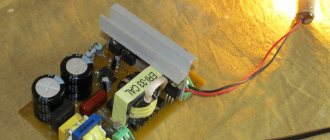
The operating principle of the charger circuit is easier to understand using a real example. This is what it looks like in an Interskol screwdriver:
This circuit is designed to charge 14.4-volt batteries. It has an LED indication showing the connection to the network, LED2 is lit, and the charging process, LED1 is lit. The U1 HCF4060BE chip or its analogs: TC4060, CD4060 are used as a counter. The rectifier is assembled on power diodes VD1-VD4 type 1N5408. PNP transistor type Q1 operates in key mode; the control contacts of relay S3-12A are connected to its outputs. The operation of the key is controlled by controller U1.
When the charger is turned on, the alternating voltage of 220 volts is supplied through a fuse to a step-down transformer, at the output of which its value is 18 volts. Then, passing through the diode bridge, it is straightened and falls on a smoothing capacitor C1 with a capacity of 330 μF. The voltage across it is 24 volts. When connecting the battery, the relay contact group is in the open position. The U1 microcircuit is powered through a zener diode VD6 with a constant signal of 12 volts.
When the “Start” button SK1 is pressed, a stabilized signal is supplied to the 16th pin of the controller U1 through resistor R6. Key Q1 opens and current flows through it to the relay terminals. The contacts of the S3-12A device close and the charging process begins. The VD8 diode, connected in parallel to the transistor, protects it from a voltage surge caused by the relay turning off.
The SK1 button used works without fixing. When it is released, all power is supplied through the chain VD7, VD6 and limiting resistance R6. And also power is supplied to LED1 through resistor R1. The LED lights up, signaling that the charging process has begun. The operating time of the U1 chip is set to one hour of operation, after which power is removed from the transistor Q1 and, accordingly, from the relay. Its contact group breaks and the charging current disappears. LED1 goes out.
Features of proper storage to increase service life
Knowing how corded and cordless screwdrivers work, it remains to figure out how to care for them in order to extend their service life. Everything is as simple as the principle of operation of a screwdriver. When storing, the following recommendations are taken into account:
- Prevent water from entering the instrument
- Do not miss or drop the device, as in addition to damaging the housing, internal devices may fail.
- Ensure that the chuck is regularly lubricated to increase its service life
- If various contaminants get inside, then before using the device again, you should disassemble and clean it.
- Do not store the tool with completely discharged batteries.
- The device should be stored and operated in a temperature range not lower than -5 and not higher than +30 degrees
- Cool the bit when drilling
Only by following all of the above recommendations can you ensure long-term use of the tool without breakdowns. The service life of the device also depends on the quality, since a cheap Chinese screwdriver cannot serve for a long time a priori, because only low-quality components are used in its production.
To summarize, it is worth noting that not only the master whose work is related to the operation of the device, but also beginners who use the tool for the first time should know how a screwdriver works. This will extend the life of the screwdriver, and will also eliminate the need to take the device to a service center if malfunctions occur.
How to connect a screwdriver directly to a laptop charger
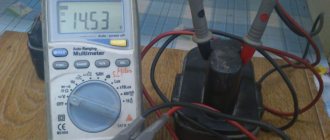
This method requires minimal technical knowledge from you. If there is a need to convert a screwdriver into a network one, an unnecessary laptop charger can help you, since it has similar characteristics and can easily be found in any home. First you need to look at the output voltage of the charger. 12-19V chargers are suitable.
It is important to check the voltage and current of the charger
The battery pack will need to be modified; to do this, you need to disassemble it and remove the failed batteries.
- Take a laptop charger.
- Cut off the connector and strip the wires of insulation.
- Take the bare wires and solder them. If this is not possible, tape them with electrical tape.
- Make a hole in the body for the wire and assemble the structure.