SHARE ON SOCIAL NETWORKS
FacebookTwitterOkGoogle+PinterestVk
The dowel is the most popular fastener, which is used for reliable fixation of any structure or element to a solid surface. The principle of its operation is based on the emergence of a friction force, which arises as a result of its expansion in the thickness of the base under the influence of a screw or screw that is screwed into it. The solution to the question of how to install a dowel in the wall will depend on the type of fastener and type of surface.
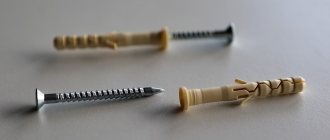
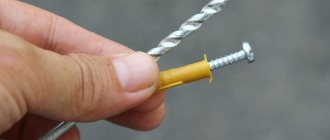
Dowels are necessary to firmly hold screws and self-tapping screws inside the hole
Dowel: This is a fastener used to secure a fastener.
In order to attach the structure to the base, various fastening options are used. To ensure their reliable adhesion to the surface, various products are used, which include dowels (or dowels).
Dowels securely fix the screws inside the wall
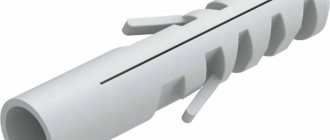
A dowel is a sleeve or sleeve that is inserted into a hole in the wall. The design consists of two parts: spacer and non-spacer. A screw is screwed into the sleeve, which helps expand the spacer part, forming a reliable connection between the dowel and the base. The non-expandable part of the product eliminates the possibility of the screw turning in the hole.
In the upper part of the dowel for the self-tapping screw there is a cuff of a cylindrical, mushroom-shaped or countersunk type, which prevents the screw from falling into the thickness of the base. The predecessor of the dowel was an ordinary wooden block, which was screwed into the wall, into which a nail was subsequently driven.
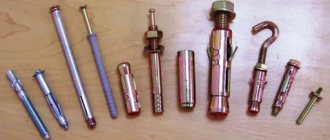
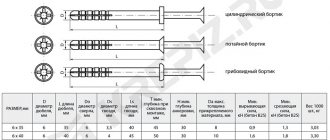
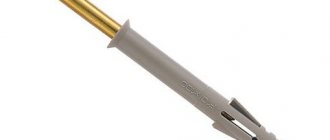
Modern dowels are presented in a wide variety of species. They can be used on a variety of surface types, including heavy and porous concrete, brick, natural stone, cinder block, drywall, plaster. Dowels are available in lengths of 40-140 mm in increments of 20 mm. The internal diameter of the hole is 5-7 mm. The outer section of the product is 6-10 mm. Each product model has a symbol consisting of two values: hole diameter and length, which eliminates the need to solve the question of how to measure the diameter of the dowel.
Important! Dowels are selected based on the thickness of the material that needs to be fixed, and are designed for values of 10-100 mm, since it is important that the product enters the base to a sufficient depth to open the spacer part.
There are different types of dowels for different types of surfaces
The main advantages of using dowels:
- reliability;
- easy entry into any surface using impact;
- reliable adhesion of products to the base;
- rigid fixation in any surface, including porous, which eliminates the possibility of the fastening element spontaneously falling out;
- lack of torque in loose holes;
- ability to withstand heavy loads without changing the original position;
- durability.
What is a dowel-nail
A dowel-nail is a special product used to perform fastening work. It consists of two elements - a special nail and the dowel itself, and is used for mounting objects to concrete, brick, stone, and other solid, dense materials. There are also types of the described fasteners designed to work with chipboards and drywall.
The design of the dowel-nail is very simple. It is made in the form of a cylindrical rod, which consists of a spacer part (it expands during installation and allows for reliable fastening) and a nail that is familiar to everyone.
In some cases, the fastener we are interested in may be additionally equipped with a special cuff that acts as a limiter that does not allow the fastener to fall into the hole made. The shape of this cuff can be different, for example, cylindrical or hidden.
Also, modern industry produces dowel fasteners with a thread applied to the nail and a slot, which is located on the head of the product. This element can be mounted using a screwdriver. Working with it is quite simple, since the process of inserting a nail into a dowel is made easier due to the presence of a “smoothed” thread in the product. Let us add that the top of the thread of this mounting device is directed towards the head. Purely externally, the dowel-thread is no different from the standard thrust thread.
Most often, dowels are made from polyethylene, polypropylene or polyamide. But the dowel-nail itself is made from steel alloys with a zinc coating. To be fair, we note that there are many fasteners of the described type on the market without additional coating. Standard dowel diameters are 5, 6, 8 and 10 millimeters, and their length ranges from 30 to 160 millimeters.
Material for making dowels
Most dowels are made from polymer materials - polyethylene, polypropylene and polyamide. Such elements are characterized by high performance, availability, ease of installation (there is no need to make significant efforts to attach them) and low cost.
Common materials for making dowels are polyethylene, polypropylene and polyamide
Products made from polypropylene are hard, wear-resistant, and resistant to high temperatures. Such elements are intended exclusively for indoor installation, which is due to their sensitivity to sub-zero temperatures. During long-term operation with temperature fluctuations, deformation of the dowels and the appearance of cracks may occur.
Polyethylene dowels are characterized by low weight, ductility, ability to operate at low temperatures and low cost.
The most reliable and durable products are dowels made of polyamide or nylon. They are characterized by high wear resistance, resistance to mechanical stress and temperature changes.
Dowels can also be made of metal. For this purpose, stainless steel, galvanization, alloys based on bronze or brass are used. Iron dowels are distinguished by high strength qualities, rigidity, the ability to withstand large mechanical loads and durability without compromising the integrity of the structure.
Important! The surface of the metal dowels has a special galvanized coating that prevents the formation of corrosion.
Metal dowel
Homemade fasteners
It often happens that there are no suitable brackets, pads or clamps to secure the cable. All these elements can be made yourself
Of course, in terms of their design they will most likely be inferior to factory elements, but in some cases this is not so important. And if your hands grow from where they need to be, then the fasteners can be quite a worthy replacement for branded fasteners
Homemade wire fastener
A wide variety of materials can be used to make installation elements. These can be single-core or double-core wires, plastic, galvanized sheet and much more. Here are some of the DIY options.
- We cut two-core pieces of wire; the length is selected depending on the wire being attached. We thread a self-tapping screw into the middle of each.
- We wrap the same, but single-core pieces around the head of a dowel or self-tapping screw.
- We cut tin strips. We punch a nail or self-tapping screw into the middle.
The advantages of such homemade fasteners are as follows:
- ease of manufacture and installation;
- there is no need to search for fasteners and buy them in stores;
- the ability to use (install and replace) homemade products repeatedly;
- You can attach one or several wires at the same time.
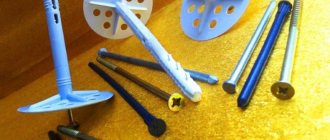
Types of fasteners
Construction stores offer a wide range of dowels. Photos of products clearly demonstrate the diversity of their designs, materials of manufacture and purpose.
The most common product is the universal polypropylene dowel. It has a traditional design in the form of a sleeve, into the cavity of which a self-tapping screw is screwed. This element is suitable for concrete, brick and stone foundations. The design of the product is equipped with special spacers, with the help of which the element is securely fixed in the hole.
To perform complex external work, a spacer construction dowel with a locking edge is used, which eliminates the possibility of fasteners falling into the hole.
Nylon dowels are equipped with fastening antennae, thanks to which the products are securely fixed in the holes. They can be used on any surface.
Drywall dowels are used for mounting them into porous concrete and sheets of gypsum fiber and plasterboard. They can be made of plastic or metal. The last option is called dowel molly. Before hammering in a dowel of this type, there is no need to first prepare the hole, since its tip has the appearance of a sharpened drill.
Dowel for plasterboard walls
Facade dowels are made of polypropylene or nylon. They have directional antennae for secure fixation at the base. Such fasteners can be used for any surface. They are produced without sides, which eliminates the possibility of shedding or cracking of the facing plaster.
The frame dowel is intended for installation of door and window frames, cladding through layers of thermal insulation and plaster. The products are made of metal. They are often called thermal insulation dowels, which can be of two types: for working with hard and soft materials.
Types of dowels with special design
Dowel nails are made of polypropylene, nylon or stainless steel. Thanks to the presence of knurling in the form of reverse cones, reliable retention of the product in the base is ensured. They are widely used for quick and extensive installation of skirting boards, sheathing, windows, timber, metal profiles, cable ducts, plywood to concrete, brick or stone surfaces.
Helpful advice! When deciding whether to hammer or tighten a dowel-nail, preference is given to the first installation option.
Butterfly dowel for hollow structures
The butterfly dowel is characterized by increased wear resistance and the ability to withstand high loads even in hollow surfaces. Such products are made of metal.
The adjusting dowel is used to install the sheathing under the sheathing. It has a special design containing a certain element that allows you to adjust the position of the product relative to the surface to which it is attached.
Helpful advice! To carry out large volumes of installation work, it is advisable to use dowels-screws designed for mounting guns.
The dowel-clamp has the shape of a loop with characteristic tendrils for fastening along the edges of the product. Such elements are designed for mounting electrical wiring to the base. The wire is inserted into the clamp, and its edges, in turn, are inserted into holes previously created in the wall and fixed with tendrils.
A special type of fastening element is an umbrella dowel, which is designed for installing thermal insulation made of polystyrene or mineral wool. This product has a wide round cap that holds the insulation. They produce plastic and metal dowels.
An umbrella dowel is often used to hang ceiling chandeliers
Helpful advice! The best option for loose foundations would be liquid dowels, or chemical anchors, which provide a strong and reliable connection and are at the same time able to withstand heavy loads.
The Molly umbrella dowel is a nail with metal arms that provide reliable fastening of structures to hollow surfaces with uniform load distribution.
Helpful advice! To attach the chandelier to a suspended ceiling, you should use Molly umbrella dowels.
How to choose the right fastener
There are many different options for dowels. Each type of mechanism is designed for a specific weight, material and method of fastening. The reliability of installation of mounted interior parts depends on the correct selection and fastening.
For dense walls, spacer, frame and nail fastenings are used; for cable fastening, a dowel clamp is used. In hollow or loose walls that are constantly crumbling, fasteners with a spacer end and an external thread are secured. For sheets of drywall, chipboard or other materials - molly and butterfly. An expansion dowel for fastening is also mounted into the plastic panel.
How to choose the right dowel
Dowels for self-tapping screws are selected based on the location of their attachment and the weight of the structure. It is important that the fastener fits tightly into the hole, so it must match its outer diameter. The product is selected based on the base material, which will ensure reliable and durable fixation. To perform installation work indoors, you can choose any product. For fastening external structures, it is better to give preference to elements made of polyamide, which are resistant to temperature fluctuations and low temperatures.
For outdoor work it is better to choose a metal dowel
An important point is the type of surface. To deepen the dowel into a solid base, spacers are used. For hollow, layered or multi-hollow walls, anchor dowels are used.
Important! There are special purpose dowels designed for a specific type of surface, such as plasterboard, concrete, sheet substrates or facades.
The depth and type of dowel depend on the load that the fastening will support. The larger it is, the more powerful and longer the product should be.
For heavy massive products in the form of wall bars or wall-mounted exercise machines, fasteners with a depth of at least 85 mm should be used. When thinking about how to fix a shelf on the wall, you should take care of purchasing dowels with an outer diameter of 7-11 mm and a depth of at least 30 mm, which will ensure the strength and reliability of fastening the structure. In the case of installing ceiling lamps, fixing a suspended ceiling and other products in which the main load is located from below, dowels with spacer antennae or transverse notches are selected.
The use of polymer dowels for aerated concrete walls
Fastening methods
Loose sand walls of old houses. Fastening methods.
The sands of time flow and with this flow everything around us turns into sand. Today we’ll talk about “sand walls” in old houses, in fact, of course, this is not a squeak, more often it is either “shingles” or experimental materials based on gypsum, asbestos or other silicate-containing materials mixed in various proportions with various fillers to reduce the cost construction. This approach was popular not only during the construction of “Khrushchev” buildings, alas, and now in our time we often see unjustified ways to save money, I’m talking about modern partitions made of gas and foam blocks, because primarily these materials are intended for insulating external walls, but some for some reason they consider foam and gas blocks to be suitable materials for the construction of partitions. But now we are not talking about modern methods of constructing partitions, but about modern life in the conditions of old Khrushchev walls and partitions. The best way out of the situation is to demolish such a partition and rebuild it from solid brick, but when there are no funds for repairs, and life goes on, then you have to proceed from the current realities. But the reality is that old walls don’t hold up, dowels fall out of them, shelves and cornices tilt and fall. How do you attach a curtain rod or TV bracket to a sandy wall where you can't be sure it won't drop your plasma or the curtain rod won't fall on a child clinging to the curtain?
Methods of fastening to old Khrushchev walls.
Load vector. In order to hang something on the wall, you need to choose a fastening method, and in order to choose a fastening method, you need to understand the load vector, i.e. understand what load the connection will have to bear when breaking or breaking. If the upcoming load involves a “lever” load, as for example in the case of a horizontal bar, where the center of gravity will be placed far from the attachment point, then you should choose the most reliable and proven fastening methods, for example, anchor or through pin fastenings, where it is necessary to make a through hole and install a long hairpin with a metal insert on the tail. In all other cases, where the load is not large, less radical methods of fastening are suitable.
Method number 1. Fastening with dowels in old sand walls.
If your design involves a “break” type of load, then you can use high-quality plastic dowels with a larger diameter than the dowels and screws supplied in the kit. If the mounting loops of your design do not allow you to install larger self-tapping screws, then simply buy high-quality dowels of the same diameter. Don’t even think about using a standard dowel-nail in old sand walls; you’ll be redoing it. Before inserting the dowel into the drilled hole, remove any dust from the hole that always remains during drilling. If the dowel fits in without much effort, i.e. If you stuck it in with one finger press, then it definitely won’t be able to stay in such a loose wall. The dowel should fit tightly into the hole under light blows of the hammer; in addition, it is advisable to dip the dowel in PVA glue or drop any assembly glue, for example, “liquid nails” into the hole. A more reliable method for wall kitchen cabinets. Take a wood bit with a diameter the size of a socket box or larger, such a bit will easily cope with a “sandy” wall, drill out the intended fastening points for the cabinets with it, this diameter will allow you to screw in half the long screws on the sides of the wide hole and they will serve as a reinforcing base. Moisten the prepared holes with water or PVA glue diluted to a liquid state, then fill them with cement-sand mortar and put them under the wall level with a spatula, wait until they dry completely and you can drill drills with the diameter you need for hanging cabinets and shelves. Of course, this method is time-consuming, but you don’t have to worry about the reliability of the design and risk not only expensive sets, but also your health and the health of your loved ones.
Method number 2. Fastening with a metal anchor.
Perhaps a metal anchor is the most effective method of fastening that exists. But in the case of sand walls, the anchor may not live up to the expectations placed on it. You shouldn’t have high hopes for it if you have a Khrushchev building with sandy walls. The most unpleasant thing that can happen is that the anchor pin turns in the wall when it is almost tightened, you will have no other choice but to cut it off with a grinder and leave it in the wall, the anchor bolt in this regard looks simpler, you can dismantle it even if it turns . Therefore, when installing a structure on an anchor bolt or stud, pay special attention to proper drilling. When driving in the anchor pin, make sure that the thread is not deformed, otherwise you will not be able to tighten the anchor with the nut, since the anchor pin will rotate with the nut due to the deformed thread.
Method number 3. Fastening with chemical anchor.
Relatively recently invented, and already quite popular, the chemical anchor has earned universal recognition for good reason. The once expensive and rare product is now gaining popularity and becoming more accessible. Its advantage is ease of use and reliable connection. Today I know of 2 types of packaging for chemical anchors, which are used differently, in tubes and glass flasks. In the case of old, loose walls of Khrushchev-era buildings, I recommend using a chemical anchor in a tube. You drill a cone-shaped hole in the wall, clean it from dust, then fill it with a chemical anchor, insert a pin, and after 25-60 minutes (depending on the manufacturer and personal instructions) you can fasten the structure.
Drilling. If you have the same sand walls as described above, then you need to drill such walls with a regular drill in non-impact mode. I advise you to replace the standard dowels included in the kit with dowels and screws of increased diameter, if your design allows it. I recommend using Fischer dowels; this is not advertising, but a reality proven by time. Ideally, the diameter of the drill should be 0.5 mm smaller than the dowel, but such a drill is not always available. Knowing this nuance, the fischer company produces dowels of a slightly larger diameter so that when driving the dowel, sufficient density of the mounting hole is maintained. When drilling, choose a position that is comfortable for you and try to hold the drill as level as possible relative to the plane of the wall, observing the angle of entry of the drill so as not to expand the diameter of the hole. By the way, at the extreme points of attachment it is better to increase the angle slightly in order to create additional resistance, i.e. make it not 90 degrees, but 91-95 degrees. After the hole is drilled, be sure to remove dust from it; this can be done using a vacuum cleaner or a can of compressed air.
Well, if you are still not confident in your abilities or something is not working out for you, then we are ready to offer you ours.
How to install a dowel in a wall: step-by-step instructions
Before installing the dowel into a concrete wall, you should prepare the necessary materials and tools. Fasteners are selected depending on the type of base. To do this you will need dowels with screws or self-tapping screws, a hammer, an electric drill, and a Pobedit drill bit.
Related article:
Which screwdriver to choose so that it becomes a real helper around the house
Main types of devices according to purpose and methods of use. What characteristics are considered decisive when purchasing a product? Manufacturers.
The first step is to mark a place for the hole, which is drilled using a drill. It should be held strictly perpendicular to the base. Using a manual method, the hole cavity is cleaned from cement chips and dust. To do this, you can use a vacuum cleaner. The diameter of the hole must match the cross-section of the dowel, which must fit into it with some effort. If the hole is too large, the fastener will fall out of it.
Important! The length of the dowel must correspond to the size of the self-tapping screw that is used in tandem with it.
The dowel is inserted into the hole and, using a hammer, driven into it until it stops so that the edge of the part coincides with the surface of the wall. The process is performed carefully, without powerful impacts that could damage the fastener. A screw is screwed into the dowel cavity. If a nail is used, it is driven into the cavity of the fastener.
Step-by-step algorithm for installing a dowel: 1 - drilling a hole, 2 - installing a dowel inside the hole, 3 - driving in a self-tapping screw, 4 - finishing the surface
When deciding how to properly install a dowel for aerated concrete, you should take into account the following recommendation. Self-tapping screws for fastening elements must be selected with a larger diameter. This will contribute to a significant expansion of the dowel walls, providing a rigid and reliable fastening. When drilling aerated concrete or foam concrete using a hammer drill, the breaker mode is not used, since the hole may turn out to be too large and have an inaccurate configuration, which will complicate the fastening of the dowel.
Rules for drilling and installing fasteners
How to attach a dowel:
- Mark the desired location in any suitable way.
- Make a small indentation at this point.
- Choose a drill with the same diameter as the fastener or slightly smaller.
- Drill a hole slightly deeper than the length of the dowel, holding the drill perpendicular to the wall.
- Clean the resulting funnel from construction dust and dirt.
- Insert fasteners. If necessary, wrap it in gauze or cellophane. You can coat it with glue.
- Screw a screw into the fastening shaft. Before hanging the item, you need to try to pull out the fasteners. If the device does not budge, installation is completed successfully.
Practical solutions for strengthening fastenings
When fastening dowels in a loose base, it is difficult to achieve maximum strength and reliability of fastening. However, there are effective methods to strengthen the connection. A good option for sealing the connection is regular electrical tape, which is wound around the dowel. Some craftsmen use ordinary cellophane for this purpose. However, this option is suitable for fastenings that will not have heavy loads.
When installing large and weighty structures, the best option for strengthening the connection is a plaster bandage, which can be purchased at a pharmacy. It is wound around the dowel, wetted, and then the fastener is inserted into the hole. After the gypsum has completely hardened, a reliable and durable fastening will be ensured. If the hole is larger than the diameter of the dowel, you can use a wooden plug or plank, which is cut into thin strips, to seal it at the base. They are inserted into the hole into which the dowel is driven.
You can strengthen the dowel using liquid nails or plaster
Helpful advice! You can insert matches into the plastic element, which are used for better wedging of the product due to the tight interaction of the dowel and the self-tapping screw.
An effective but expensive method is to use liquid nails. The adhesive composition fills the cavity of the hole into which the dowel is inserted. The self-tapping screw is slightly baited, but not screwed in completely. This option is best suited for solving the question of how to attach a curtain, since it ensures reliable fastening for weighty elements.
How to strengthen the fastening?
If you determine that the connection is not secure enough and the base is quite loose, measures to strengthen the connection may be necessary. To do this, you can take electrical tape and screw it onto the dowel. After this, you can safely attach large items. On the Internet you can find recommendations for using cellophane for these purposes. However, immediately exclude this option, since in this case you will not have to count on fixing large loads.
If you intend to install large structures, you can use a plaster bandage. Be sure to wet it with water for a strong bond. Seals are especially useful if you accidentally end up with a hole that is too large. Additional sealants can be wooden blocks or matches. They are inserted into the hole for the dowels.
How to install a dowel in a wall: installation technology for drywall
The surface of the walls is often sheathed with plasterboard sheets. However, it is not always possible to install decorative elements or other structures on such a base. This is due to the fragility of the surface and its inability to withstand significant loads. Fasteners for concrete, brick and stone are not intended for plasterboard, asbestos, MDF, fiberboard or particleboard. There are special dowels for them, which mostly lack expansion. As a replacement, a two-sided crimp is used for the carrier sheet. The expansion is present only in Driva dowels.
Installing a dowel into a plasterboard surface
When deciding how to install a dowel in drywall, you should use the technology of installing fasteners on a concrete base, with the exception of some points. Holes for fasteners in drywall should be made using a drill with the impact mode turned off. Their diameter must strictly correspond to the thickness of the dowel, and the length must be 5 mm longer than the size of the screws.
If you use a self-tapping dowel, which has a kind of drill at the end, the element is screwed into the base using a screwdriver or screwdriver. However, if the thickness of the sheets is more than 15 mm, then to facilitate the work it is necessary to first make holes in them.
Before installing the butterfly dowel for drywall, a through hole is made in the surface. A fastener is inserted into it, which opens from the back side in the free space and rests against the base when a self-tapping screw is screwed into it.
Important! The self-tapping screw for the butterfly dowel must have a length of at least 55 mm, this will ensure full opening of the fastening element during installation.
The location of the dowel and self-tapping screw inside the plasterboard structure
The umbrella dowel is inserted into a pre-prepared hole and opens into the empty space after screwing in the self-tapping screw. This product is complemented by a fastening hook or ring, so it is often used when installing chandeliers.
Tips and tricks from experienced builders
Recommendations on how to secure the dowel part in the wall correctly:
- Pre-clean the funnel where you will insert the self-tapping screw.
- The hole must be deeper than the length of the dowel.
- If the wall is fragile, before installation, wet the plastic part of the fastener with glue.
- If there are voids in the wall, it is advisable to use butterfly fasteners.
- It is advisable to drill the funnel at a slight angle, tilting the drill towards the floor.
- It is advisable to use new drills of the same diameter as the dowel.
- During installation, if complications arise, the fasteners are removed and a wire is used to check what prevents it from going deeper.
- Select fasteners according to the type of wall.
Did you manage to solve your problem using the recommendations from the article?
Yes!
46.39%
No. More answers required. I'll ask in the comments now.
38.56%
Partially. There are still questions. I'll write in the comments now.
15.05%
Voted: 804
Types of dowels for drywall profiles
Dowels for profiles are fasteners used in the installation of guide profiles and hangers for the frame under gypsum boards.
There are:
- dowel nail;
- dowel-wedge (anchor);
- butterfly;
- wood;
- Knauf-Hartmut;
- Fischer Pd";
- umbrella;
- chemical anchors.
The main types of dowels used when installing the frame base
To understand which dowel should be used in a certain situation, all options are discussed below.
Dowel-nail for drywall profile
The most common fastener for mounting the gypsum board frame. According to the method of fastening, there are two types: manual driving and using a mounting gun.
The second type is a fastening element consisting of a nail and a washer. Used for installation of heavy massive structures to a concrete base.
This type of fastening element is not applicable for working with gypsum plasterboards
I mark products by size. Dimensional characteristics indicate the diameter of the base and the length of the nail. When working with a profile for drywall, the optimal option is 6/40, 6/60 mm, where 6 is the diameter, 40 and 60 are the length. They are used to fix guide profiles to the rough base, and also fix direct hangers.
Dowel-wedge
A wedge or anchor wedge is a reliable fastening element. Dowel for fastening profiles on concrete and solid brick walls. Withstands heavy loads. Fastening is possible even at a short distance from the edge of the base. They produce anchor wedges ranging in size from 8/45 mm to 16/150 mm.
Fasteners are used for through-hole and pre-installation
Butterfly dowel
According to dimensional characteristics, they are distinguished:
- 8/28 mm. The smallest, suitable for attaching light objects. Self-tapping screws are not included. Must be purchased separately, size 3.5 x 35 mm.
- 10/50 mm. Self-tapping screws with dimensions 3.5 x 55 mm. Withstands loads up to 24 kg. Suitable for fastening furniture shelves and cabinets.
- Metal butterfly dowel. The second name is Molly. Suitable for use on walls made of hollow materials. Size range from 4/21 to 6/80.
By following all the rules for fastening, “butterflies” serve as strength for a long time
You can learn more about the sizes and types of butterfly dowels on our website.
We recommend watching a video about the process of attaching the butterfly.
Driva
They produce two types of hardware: with and without a drill, made of nylon and metal. To hang heavy objects on a plasterboard surface, use a galvanized part.
The shape is a cone-shaped cylinder. The thread pitch is large. A flat-shaped hat with a cross-shaped slot. Used when installing small-sized, lightweight structures. Dimensions 12 x 38, 12 x 42, 14 x 38, 15 x 29.
Knauf-Hartmut
The fastener consists of:
- U-shaped profile;
- plastic antennae and bushings;
- screw with dimensions 5/60 mm.
Principle of operation:
- drill a hole in the wall;
- insert the profile plate into the hole using guide antennae;
- break off the antennae;
- screw in the screw.
Withstands loads up to 55 kg.
Fastening element for mounting heavy objects
"Fischer Pd"
Fastening device for working with drywall and profiles. Plastic cylinder with sleeve and side blades. Principle of operation:
- drill a hole, the diameter is equal to the dimensions of the sleeve;
- insert fisher;
- secure with a screw.
The mount can support up to 16 kg. Sizes – 10/28.
When fixing, the side blades should be open and pressed to the base from the back
Umbrella
It got its name because of the principle of operation. After fixing in the hole, the side blades unbend and the fastener looks like an open umbrella. This promotes load distribution and the ability to withstand heavy weight.
Chemical anchors
It is a cartridge with a capsule containing an adhesive liquid. When mechanically applied, the capsule bursts and the glue gets into the hole.
Due to its properties, it is a monolithic fastener that can withstand heavy loads