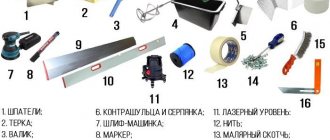
Types of protective corners: from what materials
According to the area of application, corners are available for external (outdoor) and internal use. For now, let's talk about how to protect corners in an apartment and a house - indoors. Let's start with the materials. Corners for protecting wall corners can be:
- Made of plastic (PVC). Different colors, textures, there are even transparent ones.
- Made of metal. Brass, aluminum (polished and not), stainless steel, with or without painting.
- Wooden. Made from different types of wood, smooth, with relief.
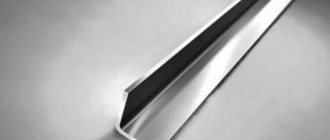
The corner on the arch is covered with a flexible plastic corner
- MDF. With imitation of various types of wood, smoothly painted, with various patterns.
- From a traffic jam. It could be an interesting move to add cork trim to more than just the corners.
Cork corners to protect corners - Rubber. Typically used in hospitals or kindergartens. Perfect for protecting corners in the garage.
- Foamed rubber. Same as rubber ones, but softer. Suitable for protecting overly active children from injury.
- Decorative - with carvings, rhinestones, patterns, etc.
The most popular are plastic corners for protecting wall corners. Don’t think that such protection looks poor. In any case, no worse than frayed corners. It’s just that there are different types of plastic – polished, with a metallic effect, with a satin (matte) surface, with different reliefs. It is clear that in order to find something specific or special, you will have to run around construction stores and markets. But there are many types of design. If the corners for protecting the corners of the walls are chosen correctly, they fit organically into the design without attracting attention at all. At the same time, they protect and decorate the joints very reliably.
Why mount the cabinet to the wall and how to do it. Part 2. Solid walls made of brick or concrete.
In this post, we have collected the three most popular methods of attaching cabinets to the wall. Each method has its own advantages and disadvantages, but all of them can be recommended for use
HANGING CORNER
One of the simplest and most reliable options. Using such a universal mount, you can hang almost any cabinet without the need to perform complex professional manipulations. Surprisingly, such a simple fastening is quite enough to hang massive cabinets and shelves. This is the method we recommend to our clients and a similar corner can always be found in our catalog and added to your order.
Fasteners of this type are made in different sizes and shapes. We have chosen one universal option that is suitable specifically for furniture and is what we recommend to our clients. This corner has several holes to increase reliability and comes with a plastic cap that helps hide the mount.
With this mount you can not only hang a cabinet, but also simply fix any object against the wall to prevent it from tipping over. We strongly recommend not protecting the walls from holes and fixing any cabinets, especially if there are children in the space.
Instructions It is advisable to attach the corner from the inside under the top lid of the cabinet. The corner is attached to the cabinet using short self-tapping screws. Next, a hole is drilled in the wall for the dowel, into which the cabinet with corners is then screwed onto a long self-tapping screw. We recommend using one such fastener for each vertical part of the cabinet and no less than one for every 10 kg.
Advantages - cost-effectiveness - reliability - versatility - simplicity
Disadvantages - it is necessary to drill holes in the wall very accurately, since it will not be possible to adjust the position of the corners
SIMPLE FLAT HINGE
About the same as a hanging corner, but even simpler in design. The tips and installation methods are the same, but this option still has a lot of disadvantages.
Advantages - cost-effectiveness - reliability - versatility - simplicity
Disadvantages - it is necessary to drill holes in the wall very accurately, since it will not be possible to adjust the position of the corners - withstands less load than a corner - it is difficult to hide the mounting location - you can quickly remove or hang the cabinet (if you suddenly need this for some reason)
RATK AND HINGAGE
This type of fastening is most popular among professionals, as it allows you to hang the cabinet faster, more accurately, and more securely. For conventional fixation to the wall, this method is already redundant. The design of cabinets for this type of suspension changes somewhat, since the back wall is mounted in special grooves at some distance from the wall in order to hide all the technological elements. If you don’t care much about appearance, then you can do without the back wall, this will significantly simplify the production of the cabinet.
Instructions First, a metal strip (rail) is attached to the wall. Unlike point fastenings with self-tapping screws, using a strip you can distribute the load across its entire width. If you have several cabinets, you can make one long strip.
The cabinets are hooked onto this bar using a hinge, which is a simple mechanism with a hook that can be adjusted. Thus, there is no need for precision at the stage of hanging cabinets. Small deviations can be compensated by adjusting the hitch. Usually the hinge is installed inside the cabinet on both sides from the top.
Advantages - adjustable - easy to install by one person - neat and aesthetically pleasing - reliable - suitable for different walls
Disadvantages - a special cabinet design is required to hide the fasteners - minor, but more expensive
How to properly glue corners to slopes: step-by-step instructions
Plastic corners must be glued at temperatures above +15 degrees with doors and windows closed.
Instructions:
- Prepare the surfaces: if possible, level, clean, wipe off dust, degrease. If textured wallpaper is pasted on the wall, it is better to cut a thin strip with a stationery knife for better adhesion of the glue.
- Take the corner and apply it to the top of the opening. Apply marks on the inside. Measure the width of the shelf. Add the resulting number on one side and the other of the serifs. Draw a diagonal between the serifs. The result is an angle of 45°. Cut the inside of the corner at 90°.
- In the same way, measure and cut the corners to the side parts of the opening.
- Apply glue down the center of the corner in a continuous line or in a zigzag pattern. Don't feel sorry for him, but don't overdo it either. The glue should fill the entire internal space of the corner, but not protrude along the edges after installation on the slope.
- Install the corner on the slope. Please note that some types of glue must reach the desired viscosity in air. In this case, the corner is attached to the wall 3-5 minutes after applying the composition. Read the instructions carefully.
- Press down the part with your hand or install supports.
- If there is excess glue at the edges of the plastic, remove it. Try not to smear the glue on the surface. Traces can be removed with a solvent.
- Keep the corner under pressure for as long as written in the instructions.
Shapes and sizes
Finished versions of the product are standardly made with a 90-degree angle. The angle is created acute, but rounded types are also found. According to the degree of protective properties, the material can be divided into the following:
The latter type is so called because of the ability to glue them at different-degree angles, due to the flexible central part, which is soft. For this reason, protective functions are somewhat reduced in this zone.
Shelves of material can differ in size; they are more popular with the same sides, but they are also found with different widths. The width can also be varied; here the choice is made based on the specific angle and preferences of the owner.
How to attach an anchor bolt: video, photos, nuances, tips
In order to ensure high reliability of the connection using an anchor bolt, it is important not only to select it correctly in size and type of structure, but also to know how to properly fasten such a product.
There is a wide variety of anchor bolts, differing in their design and principle of operation, so it is important to know how to attach a particular type of anchor
An anchor bolt of a classic design provides a reliable connection not only due to the frictional forces of its outer surface with the walls of the mounting hole, but also due to the fact that its spacer sleeve increases in diameter when the threaded element is screwed into it. The reliability of installation of such a fastening element is also influenced by the strength characteristics of the building structure material, which should also be taken into account.
For all fasteners under consideration, the drill for making the mounting hole is selected according to the diameter of the anchor, with the exception of impact-type anchor bolts.
Dowel selection
When choosing dowels for concrete, the operating conditions, expected loads, type of material, and other features of the fastener are taken into account.
How to choose dowels for concrete:
- For heavy structures, choose dowels with a mounting depth of at least 85 millimeters.
- Horizontal fixation requires a fastening depth of at least 30 millimeters, and an external dowel diameter of 7 to 11 millimeters.
- When arranging suspended ceilings and lighting fixtures, where the main load comes from below, fasteners must be made with transverse notches and spacer antennae of different lengths.
- When choosing a dowel for a finished hole, you need to ensure that the diameter (mm) of the fastener and the hole is the same. If the hole diameter is larger and the dowel goes in without force, the fastener may become loose.
- In weak walls, dowels act as a softening pad. The fastener must fit tightly to the fastener so that the load is distributed evenly throughout the product.
- Depending on the load, the sizes of dowel nails for concrete are chosen - the larger the diameter and length, the more reliable the fastening. The exact parameters can be viewed in special tables or in the product labeling.
- For old concrete, it is better to use universal fastening, since there may be voids in the monolith.
Visor
The hole for fixing the visor above the entrance is made with a drill. Steel or wooden brackets holding the structure are subsequently secured with anchors.
Important! Construction stores sell special drills for fragile building materials that do not destroy its structure.
Drilling is done carefully and carefully. First, markings are made for the desired height of the visor. There is no need to drill into seam joints. The canopy may collapse.
Anchor products have improved properties compared to other hardware. Provides an increased degree of fixation of heavy objects. This is subject to the purchase of products in specialized construction stores with quality certificates for the existing product. It is important not to skimp on fastening. Such a mistake can be costly.
Options for installing corners on walls
Before gluing the corners, decide on the installation method. There are two of them.
This option is suitable for wallpaper with shallow relief, but be careful when finishing slopes with deep embossing, as due to the loose fit of the corners, cracks may form in which dust collects.
- With cutting a strip on the wallpaper to apply the glue directly to the wall. To do this, follow this action plan:
- Attach a corner to the installation site, level it and press it to the wall surface;
- using a sharp knife, cut off the wallpaper on both sides of the overlay;
- Apply glue to the plastic corner and install it in the intended place;
- secure the corners with tape designed to set the adhesive;
- After 24 hours you can remove the tape.
If you are not sure of the accuracy of cutting the blanks, you can first try on the part for the finishing area, and mark the place of the cut with a pencil.
Installing a roof or mauerlat
On a concrete, expanded clay block or aerated concrete block belt, it is possible to fasten the timber using the following options:
- on the anchor;
- on a stiletto heel;
- on the wire.
A hole is drilled through the Mauerlat into the body of the wall and an anchor with a metal sleeve is driven into it and when the nut is tightened, the sleeve at the end expands and creates a reliable fastening (Fig. 5)
If the installation of the Mauerlat is carried out on a stud, then during reinforcement a stud is installed and welded to the reinforcement with an extension of 4-5 cm beyond the dimensions of the concrete and the thickness of the timber. The belt is poured, two layers of roofing material are installed and placed on the Mauerlat studs. Tighten the nuts and washers (Fig. 6)
Fastening with wire is similar to the option with studs. The ends of the wire ∅ 6 mm with an outlet of 0.5 m are brought out beyond the concrete belt and the beams are fixed with their help (Fig. 7)
Probably the most reliable option is with wire, but this is when there is a concrete belt and you can make reinforcement outlets from concrete, and if the wall is made of expanded clay blocks, then an anchor will do. Although it is possible to recess the wire into the mortar joint.
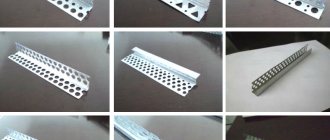
Types of plastic corners
Plastic corners for finishing joints differ in the material from which they are made, shape and size. They are for external and internal use, decorative and finishing. Before buying a corner, you should find out which type will be most suitable.
Depending on the material from which they are made, the corners are:
- plastic;
- wooden;
- MDF;
- ceramic;
- metal.
PVC corners come in different shapes and sizes:
- in the shape of the letter L - shelves can be the same size or different, 10–50 mm wide and up to 3 m long;
- in the shape of the letter T - masks the joints between slopes and walls;
- arched - curved, designed for finishing arches and other non-standard openings.
Testing modern technologies
Fix hanging kitchen cabinets, install radiators or stair railings... For such tasks, you need to choose the right fasteners depending on the material in which you will install them. After all, a fallen dowel will cause a lot of problems when fixing critical structures and variable loads. The cabinets may be damaged, the radiator may leak, and a significant piece of the wall around the hole may fall off along with the fasteners! We list the main solutions for the most common loose materials.
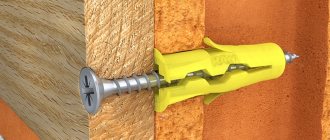
Dowels for gas and foam concrete
For example, you want to install an air conditioner in a private house made of foam blocks. Which fastener should I choose? The most common mistake is using concrete dowels. They will not stick to a loose wall! Moreover, the thinner the element, the greater the likelihood of falling out. There is no point in trying to strengthen the dowel using traditional methods: after all, there are special fasteners.
Dowels for aerated concrete and foam concrete come from different materials. Plastic ones are suitable for attaching lightweight objects, such as paintings, lamps, shelves and mirrors. Metal ones can withstand heavy loads and are intended for installation of equipment, partitions, plumbing fixtures, etc.
It is important to know: the foam block has a cellular structure and is quite fragile. Therefore, for fastening heavy objects, it is better to use dowels of large diameter, for example, 10 - 14 mm. It is worth considering the shape of the element. If it has longitudinal ribs , there is a risk that the fasteners will become loose and fly out of the wall due to changing loads. The transverse ribs better engage the material inside the hole, so they are not afraid of dynamic loads. They are great, for example, for hangers or shelves.
We'll tell you how to secure a dowel in foam concrete. We drill a hole, screw in the plastic element using a hex key, and then fix the suspended object with a screw or self-tapping screw. You will need a screwdriver, or better yet, a screwdriver.
Drywall dowels
Partitions, niches, suspended ceilings... Increasingly, they are made from gypsum plasterboard - plasterboard sheets. These are literally two sheets of cardboard with compressed plaster between them. The structure of the material is very loose, so heavy shelves or air conditioning units cannot be attached to it. However, you have to fix lamps, photo frames, baseboards or cable ducts. For such purposes, there is a special fastener - drywall dowels.
Note : now there are elements that do not require pre-drilling the wall. This solution reduces the risk of the hole becoming loose. You can take so-called self-drilling dowels with a drill-shaped tip. There are also classic ones, but they require a special attachment for the drill. The butterfly dowel is suitable for structures with variable loads, as it has spacers and is securely fixed in the wall without the risk of twisting.
Chemical anchor
An almost win-win way to strengthen a dowel in a loose wall. Suitable for brick, thick layer of plaster, foam and aerated concrete. Fixation occurs due to the spacer of the shell at the base, and the adhesion is created by the chemical composition that secures the stud or reinforcement. It has been proven that a chemical anchor can withstand 2.5 times more load than a standard threaded fastener. Suitable even for installation of equipment. You can read more about the installation process in a separate article.