If you like neat and stylish corrugated roofing, then this article is for you. It is important not only to choose the right quality coating, but also to secure it correctly. Then the metal roof will serve for a long time, without bothering you with the periodic need for local repairs.
How to attach corrugated sheeting to the roof with self-tapping screws and how difficult is it? There are really a lot of subtleties and nuances here: starting from the choice of suitable screws and ending with the puzzle of which wave of the sheet to attach them to - top or bottom. Let's figure it out.
Selecting fasteners for quality fastening
In order for a corrugated roof to be durable and operate flawlessly for decades, there is a special fastening technology. Under no circumstances use regular nails for this.
Water will easily seep into the holes and within a month or two, traces of rust will appear in these places, and there will be chronic dampness under the sheets.
Next, the rust will begin to eat away at the entire roof until it completely destroys it. That is why it is not recommended to fasten corrugated sheets with roofing nails, especially since they simply will not hold the sheets in place under the influence of strong winds.
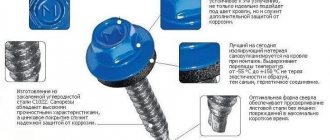
For a modern metal roof, today professional roofing screws are produced - with a rubber gasket, which, when compressed, completely blocks the path of any moisture:
We are talking about special high-quality cutting screws. Even self-tapping screws that are similar in appearance are not always suitable for arranging a roof - they can weaken the fasteners or become covered with a corrosive coating.
If you did use self-tapping screws that were not suitable for the roof (or they were installed by unskilled workers), do not rush to rip them back out. Seal all holes with sealant, even if there is a rubber gasket. Although it is better not to resort to this method at all.
Professional roofing screws are always made of galvanized alloy steel. It is the source material that directly affects the quality of fastening, ensures correct fit of the material and prevents disruption of the metal structure around the drilled hole. What does this affect?
First of all, whether corrosion of the roofing sheet will appear around the self-tapping screw. If you've ever seen a roof with cheap screws, you probably recognized it by the rusty streaks from the washers. Heading down, they simultaneously destroy the entire leaf.
This does not happen when using the correct roofing screws. After all, even in the factory they are electrolytically galvanized with a layer of at least 20 microns.
Next, the cap is coated with polymer paint on all sides at once to also protect it from corrosion. High-quality self-tapping screws are powder coated in a color according to the RAL catalogue. And the rubber gasket is resistant to temperature changes, ultraviolet rays and load changes.
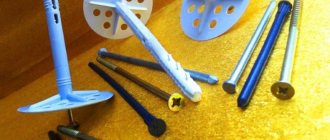
By the way, among the most suitable ones specifically for profiled sheets, it is recommended to take self-tapping screws from Essve, Gunnebo and Sfs-intec.
Description of the dowel
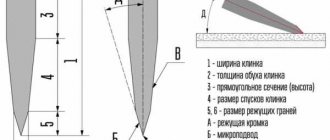
A self-tapping screw for concrete consists of a pointed rod and a head with a cross notch. Due to its high strength, it does not deform or collapse under heavy load.
Pins are made of brass, carbon or stainless steel. These materials are similar in strength and price characteristics. However, carbon steel is most in demand, since self-tapping screws made from it are coated with a protective layer that does not allow oxidation. Each type of coating has its own color, which indicates the rules of application:
- The silver layer is made of zinc and is a universal option.
- Yellow protection also means zinc, but its scope is narrowed to interior work.
- The black color is an oxidized coating. It exhibits maximum protective properties only indoors with normal humidity levels.
Screws hold various structures in concrete, for example, a plastic window profile or a door frame.
For metal and wood sheathing: how to distinguish a drill
Depending on what kind of base (wood or metal) the corrugated sheeting will be attached to, you will need different types of screws.
So, today they produce two main types of self-tapping screws for sheathing from different materials: fasteners for metal and wood. For wooden sheathing you need 4.8x28 mm or 4.8x35 mm self-tapping screws. For metal purlins, use metal screws:
- 4.8x19 mm for metal with a thickness of 3 mm or more;
- 5.5x25 mm for metal up to 6 mm thick;
- 5.5x35 and 5.5x50 mm for metal up to 12 mm thick.
This mount looks more solid than its wood counterpart:
However, all of these screws are equipped with a hex head, a sharp drill tip and a durable threaded rod. Only the length and thickness of this rod differ.
Also, the thread pitch of wood screws is sparser than that of metal hardware: the difference is from 1 to 1.5 mm and is visible to the eye. The thicker the metal base that needs to be drilled, the more frequent the threads and the longer the drill.
Usually, in order to find out what thickness of metal a self-tapping screw can drill, it is enough to measure the length of the drill. It is logical that the thickness of the metal base, in total with the thickness of the metal being screwed on, should not exceed the length of the self-tapping drill:
Also, according to the general rule, the thicker the corrugated sheet and the denser the sheathing, the sharper and longer the drill should be.
Experienced roofers have their own technology for selecting drill lengths. Often they take long and short drills in the following proportion - 80% short and 20% long.
You can, of course, take all the long screws to be on the safe side, but short ones are easier to tighten and are less likely to break during installation. In general, if we are talking about wooden sheathing, then you need to fasten the corrugated sheet with short screws to the bottom ridge, and with long screws through two sheets at the joints. Select screws of such length that they protrude slightly from the back side of the purlin.
Restoring the hole
First of all, we measure the thickness of the chipboard. Next, take a wood drill and set either a limiter or a mark on it to make a hole of a certain depth. If your material thickness is, say, 9 mm, then you need to drill to a depth of no more than 7 mm. The thickness of the drill is also selected individually, everything depends on the diameter of the screw being screwed in and the nature of the damage. I took a 5 mm drill. Carefully drill a blind hole.
There is no need to rush, because if you accidentally drill the front side, it will not be pleasant.
Pour wood glue around the edges. You can use the classic one - PVA or any other.
Naturally, the chopik must be pre-fitted to this hole in diameter and length. Carefully drive it into the hole.
We are waiting for the glue to dry. Next, we drill a hole under the screw so that when screwing there is less internal stress, since the chop is made of a single piece of wood and with excessive pressure it will easily burst or crack.
That's all! The hole has been restored.
You can screw the screw into place.
The connection is very strong. Most likely even stronger than it was, since the insert adds additional density.
We repair all the necessary holes for the hinges. Using this simple method, you can repair and restore a hole not only in chipboard, but also in other, absolutely any wood.
How to calculate the number of screws for one sheet?
In total, there are two main schemes for fastening corrugated sheets:
- vertical , which is ideal for corrugated sheeting with a drainage groove. In this case, first lay the first sheet in the first row, fix it for a while, and then the first sheet of the second row. Having laid a block of four sheets in this way, it is leveled and secured to the roof. All other sheets are laid according to the same pattern.
- 3 sheets each , which is suitable for corrugated sheets without drainage grooves. In this case, first lay the first two sheets in the first row, attach the sheet of the top row to them, and after aligning with the eaves, the block is securely attached to the roof.
The fastening scheme also depends on the length of the purchased profiles:
Let us separately dwell on what the overlap of the corrugated sheet should be:
- At an angle of less than 15°, the overlap should be at least 200 mm, and preferably in two waves.
- At an angle of up to 30°, the overlap is made from 150 to 200 mm, depending on the width of the wave.
- At an angle of more than 30°, the overlap can already be from 100 mm.
If the profiled sheet has horizontal overlaps, then they need to be made at least 20 cm, with mandatory sealing of each. To do this, use bitumen mastic or silicone sealant that are suitable for roofing.
To secure a square meter of corrugated sheet, 7-9 screws are required. To calculate the number of hardware for your roof, this number is multiplied by the area of the entire surface. Reduce the resulting number of screws to a multiple of 250. The fact is that screws are sold in packs of 250 pieces or in boxes of 1000 to 4000 pieces. Therefore, it will be more convenient if you immediately decide how many boxes of fasteners you need. At the same time, round the figure up - a small margin is always necessary.
Here is the most rational mounting scheme:
Also keep in mind that the fastening step of corrugated sheeting is different for different brands:
Please note that the more attachment points, the stronger, on the one hand, the corrugated sheet will be mounted on the slope, but at the same time, a large number of holes increases the risk of leaks.
Selecting the brand of material
When thinking about which corrugated sheeting to use for the roof, it is important to know its numerical index. According to the wave height and sheet thickness, several types of material are distinguished
Profile marked C21
Available in the form of a trapezoid of standard length (2, 3 and 6 m). To complete the roof, you need to focus on the dimensions of the corrugated sheeting: width 1.05 m, wave height 21 microns and thickness 0.4 - 0.7 mm. The metal material is suitable for creating a roof covering on sparse sheathing or as garage cladding.
Roofing profiled sheet C44
It is most convenient to work with sheets with a width of 1.47 m. The height of the corrugated sheet laid on the roof is 44 microns, and the thickness varies from 0.5 to 0.8 mm. The profile is reinforced with additional stiffening ribs and provides for the construction of a roof on sheathing in increments of 2 m, as well as frames for gazebos or cabins.
Corrugated sheeting with index NS45
The construction of a home roof can be carried out from corrugated sheets with a width of 1.06 mm. The recommended thickness is 0.5-0.8 mm, and the profile height is 35 mm. The rigidity and strength of the material guarantee the reliability of the roofing on the sheathing in increments of 4.5 m. Having decided on the material, do not forget that its price depends on the alphanumeric index.
In what wave should the self-tapping screw be fastened? Theory and practice
Now let's move on to the most controversial issue. The fact is that as long as corrugated sheeting has been on sale, disputes about its installation have not subsided.
How to properly attach a self-tapping screw: in the upper or lower wave? It would seem, why do such questions arise at all if the manufacturer clearly indicates that the fastening occurs in the lower wave?
Actually the question makes sense. The self-tapping screw in the lower wave reliably presses the corrugated sheet to the sheathing, and the roof itself looks protected. But, at the same time, the water along the slopes always follows the lower wave, and such fastening is always in the water, unlike the upper one.
Moreover, any error during the installation process will result in roof leakage and rapid corrosion of the roofing material. Therefore, the roofers themselves offer an unusual, but practically justified solution to the problem:
- If the roof is installed by professionals in whom you are confident, then let them screw a self-tapping screw into the lower wave;
- If the team is unreliable and there is a risk that the craftsmen will not observe all the technological details, it is better to go to the top. This method will not affect the overall strength of the roof in any way, but during rain, problematic attachment points will not create problems.
But remember! In case of violation of the installation instructions supplied by the manufacturer, the warranty does not apply to the finished roof. Therefore, weigh the pros and cons and choose the appropriate installation option.
Features of working with metal tiles
Metal tiles are a common roofing covering that consists of rectangular sheets of profiled steel. Zinc coating and polymer protection help this material retain its qualities when in contact with water, preventing corrosion. Many inexperienced craftsmen have a question about how to properly attach metal tiles to the sheathing, as well as what tool to use for this. Manufacturers note the following features of working with this material:
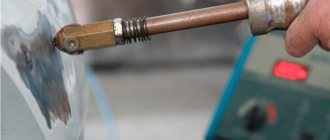
- To cut metal tiles, it is not allowed to use abrasive tools, when used, the surface of the material heats up, burning out the polymer coating. For this reason, you cannot cut metal tiles using a grinder or attach sheets by welding.
- It is necessary to use a cutting tool, drill or screwdriver to process metal tiles at low speeds so as not to damage the material and also to make the edges smooth.
- When tightening self-tapping screws with a screwdriver, it is necessary to clearly determine the required pressure force, since with excessive force the coating is deformed, and with insufficient force it is poorly fixed to the sheathing.
Important! Fastening metal tiles is a technologically quite simple process, which requires special fasteners, as well as a powerful screwdriver powered by rechargeable batteries.
We analyze popular installation mistakes
Let's look at the main mistakes - the more you know about them, the more reliable your roof will be:
- Drill bit too big . The result is no tightness or load-bearing capacity of the connection.
- Drill bit too thin . This will certainly lead to either broken fasteners or biting of the thread - its partial destruction. And such a mount, of course, cannot be called high-quality.
- The self-tapping screw is tightened too loosely . In this case, the rubber gasket will not fit tightly to the surface of the metal sheet, and moisture will easily get under it.
- The self-tapping screw is tightened too tightly . In this case, the rubber gasket will quickly crack due to overvoltage and begin to leak water.
The following illustration will help you understand this:
To avoid over-tightening the washer or breaking the drill, it is necessary to use the appropriate tool. A screwdriver with a low rotation speed (up to 1800 rpm) is suitable for this purpose, which allows you to control the angle of entry of the self-tapping screw into the roof.
Be careful: self-tapping screws for corrugated sheets are equipped with a washer, which is sensitive to tightening when screwing.
But what to do if you screwed the self-tapping screw into the wrong place (for example, you missed the sheathing), and twice? There is a way out: you need to close the hole from the self-tapping screw with sealant and a rivet. As a result, the consequences of incorrect fastening will be almost invisible:
Another good tip for the same problem:
As you can see, anyone can make a mistake, but if you know how to correct it, you can avoid problems in the future.
What kind of fasteners should I use to fasten the corrugated sheet?
Before attaching corrugated sheeting to the roof with self-tapping screws, you need to choose the right type of fastener. It should provide the following functions:
- Allows for fastening without pre-drilling a mounting hole both in the sheathing and on the profiled sheet itself;
- It is securely held at the base of the material into which it is screwed, and is able to withstand high pull-out loads;
- Prevents loosening of the fastening point throughout the entire service life, does not become loose, does not play;
- Provides high resistance to corrosion;
- It qualitatively seals and seals the hole at the screwing point.
There are hundreds of types of fasteners on sale, but not all of them are suitable for attaching corrugated sheets to the roof. To ensure compliance with all of the above requirements, manufacturers have developed a special type of hardware. They were called roofing screws.
Roofing screws are modified products, the prototype of which was the self-tapping screw with a drill DIN 7504K. Its design is as follows:
- The hardware is a rod product with a hexagonal head for an open-end wrench.
- The rod has a tip in the form of a sharpened drill;
- A spiral self-tapping thread is wound from the end of the drill to the head of the rod.
The difference between the roofing screw and its prototype is the presence of an additional pressure washer (or press washer), as well as an EPDM sealing gasket. Thus, in the process of screwing the product, the washer presses on the seal and presses it with force to the surface. Since EPDM is elastic, it conforms to the exact shape of the surface. Due to this, the joint is completely sealed.
Installation process in detail
It is customary to lay corrugated sheets on the roof with a distance between the rafters from 600 to 900 mm. When screwing in self-tapping screws, always make sure that they only enter the corrugated sheet at a right angle, and that the rubber washer is compressed by no more than 1 mm. If you break one of these rules, you cannot avoid moisture getting directly into the fastening points.
To make it easier to screw in roofing screws, use a screwdriver with a hexagon socket:
The screws themselves are evenly distributed along the waves, at the joints of the sheets, when approaching the ridge, ridges, along the gables and on the eaves line.
Adjust the speed of the screwdriver in advance - so that during the process, when you press the corrugated sheet to the sheathing, the rubber gasket is only slightly pressed. Here is an example of incorrect (left) and correct (right) compression of a rubber gasket:
By the way, sometimes you have to install corrugated sheeting into a sheathing made of very dense wood. For example, if a self-tapping screw gets into a knot. Then, with the same rotation of the screwdriver, the screw will remain unscrewed. Here you will have to increase the rotation speed, tighten the screw and return to the previous settings.
Try to hit the self-tapping screw exactly in the center of the sheathing - this will minimize the possibility of deformation of the corrugation. Next, tighten the screws in a checkerboard pattern. Place the fastening points for high profiles through one wave, and for low ones through two - this will increase the reliability of the roof.
Advice : if the corrugated sheet is too long, like the roofs of industrial facilities, and the profile is high, then, with a run pitch of more than one meter, attach the sheets to each lower corrugation.
Next, along the line of the roof end, you need to screw self-tapping screws into each sheathing. In general, you will need about 6-8 pieces per square meter.
Once you have finished installing the corrugated sheeting, carefully inspect the roof. Its general appearance, reliability of transverse and longitudinal joints, dents and correct fastening with self-tapping screws.
Fastening corrugated sheeting to the roof with self-tapping screws - what you should pay attention to
Fastening the corrugated sheeting with self-tapping screws to the roof is the most critical stage of roof installation. The tightness of the roof, as well as its durability, depend on how correctly the corrugated sheets are laid and secured. If you do not know, or have not fully understood, how to attach corrugated sheets to the roof, under no circumstances start work. Do not try to “figure it out as you go,” since this approach is almost guaranteed to lead to damage to the material or a serious decrease in the performance characteristics of the roof.
To attach the corrugated sheeting to the sheathing, special screws are used. They can have a diameter from 4.8 to 6.3 mm and a length from 20 to 250 mm. Roofing screws have a special sealing washer made of neoprene rubber under the head, which protects the roof from possible leaks at the fastening points. You can also use flat head screws. In this case, sealing rubber gaskets must be installed under the head.
Attaching corrugated sheets to purlins is usually done with special elongated self-tapping screws, which is not always convenient. To avoid this, it is necessary to calculate the sheathing pitch based on the width of the bottom of the wave of the profiled sheet.
Particular attention should be paid to the quality of the screws, since drying out and cracking of the material from which the sealing gaskets are made will inevitably lead to roof leaks. Branded screws always have the manufacturer's mark on the head
Typically, fastening a corrugated sheet to the sheathing is considered reliable when using 6 to 8 screws per 1 square meter of roofing.
The corrugated sheeting is attached to the sheathing in the lower wave. In this case, its tightest fit is ensured and the possibility of leakage at the attachment point is reduced to a minimum. The prepared sheets must be laid with an overlap of one or two waves in a row and 100-200 mm. between the rows. In the upper and lower parts of the roof, a sheet of corrugated sheeting is attached to the base in each wave, and in the gaps it is possible to fasten it through one or two waves. Sheets of corrugated sheets are usually connected to each other using rivets. For this, special hand guns are used.
Self-tapping screws must be screwed strictly perpendicular to the plane of the corrugated sheet, since any distortion will lead to a loose fit of the sealing washer and, as a result, to possible leakage
This is especially important when attaching corrugated sheets to purlins, since in this case the length of the screw is much longer, and therefore the likelihood of misalignment is higher
The ridge is attached to the sheathing through the upper wave of the sheet, which ensures the tightest connection of the ridge elements with the corrugated sheet. In addition, for small roof slopes, it is recommended to install sealing gaskets in the lower waves of the corrugated sheet under the ridge. They prevent water from entering under the ridge during heavy side rain.
Fixing additional elements with self-tapping screws
Fastening additional elements has its own technology. As a ridge, special planks are used, which are laid with an overlap of 10 cm and a pitch of up to 30 cm.
Additionally, a sealant is placed between the slats and the corrugated sheet. If the sheets have a shallow wave, then a regular seal will be sufficient; if the waves are high, then a ventilated seal is needed:
For additional elements, take longer self-tapping screws than for the sheathing, because sometimes they will have to be attached through the top of the wave. Therefore, the length of the self-tapping screw should be chosen so that it exceeds the thickness of the material with the wave height of the corrugated sheet.
Now you know all the secrets of professional roofers. Ask questions, share your experience and thoughts on how to properly attach modern corrugated sheeting.
Preparing the sheathing for covering
Before installation, it is necessary to make a high-quality sheathing. It is made from wooden planks treated with an antiseptic composition. It prevents rotting due to condensation dripping from the inside of the roof. During installation, it is necessary to correctly determine the distance between the planks (sheathing pitch) and the distance between the screws.
Based on SNiP data, the following rules for its calculation are recommended:
- with a profile height of 35 mm (HC35) and an inclination angle of up to 15º - up to 0.5 m, more than 15º - 1 m;
- with a profile height of 60 mm (H60) and an inclination angle of 8º – no more than 3 m;
- with a profile height of 70 mm (H75) and an inclination angle of 8º – no more than 4 m;
NOTE! There must be a ventilation gap between the sheathing and the waterproofing. To create it, a counter-lattice is installed from rafter strips or metal purlins attached along the rafters.