Thicknessing machines for wood are a type of planer and planer, and are designed for precise production of “to-size” boards with a certain cross-section. Unlike planing woodworking equipment, such units are equipped with clamping and feeding devices, and can also process several workpieces simultaneously. The versatility of modern thicknessing machines increases if the tool kit includes not only flat, but also shaped knives.
Classification and capabilities
The design of the units in question can be quite varied. Machines are classified according to the following criteria:
- By drive type. Homemade mini-devices can also have a manual drive, but in most cases they still use an electric drive. At the same time, household models are equipped with a 220 V motor, and professional ones – with a 380 V motor.
- By type of delivery. The machine design may have one or two pairs of feed rollers; accordingly, in the first case, it will be necessary to make the pressure of the workpiece being processed to the table more powerful; vibrations at the time of cutting cannot be excluded. Double-sided roller feeds are more advanced and convenient to use. A number of foreign companies (Makita, DeWalt, etc.) equip their products with automatic feed units, but this option is justified only with significant production programs of the same type of products.
- According to the number of knife shafts. This determines how many different profiles the machine can process simultaneously. True, the number of operators will increase accordingly.
- By functionality. The design of thicknessing machines allows not only dimensional processing of a semi-finished product, but also its subsequent calibration. This eliminates the appearance of transverse chips, dents and other defects that may appear on the treated surface in case of non-compliance with the jointing technology or with an excessively large supply of starting material.
- According to its technological characteristics. In practice, the equipment under consideration is produced with a power range of 1...40 kW, at a shaft speed of up to 10000...12000 min -1, planing width up to 1350 mm, stroke up to 50 m/min and thickness of the initial workpiece 5...160 mm.
In addition, some models differ in the way they adjust the gaps and the design of the main drive bearing assembly.
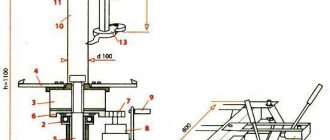
Electrical equipment of the single-sided thickness planer SR-6-9
Location of electrical equipment on the thickness planer SR 6-9 Fig. 16
Electrical equipment of the machine. General information
The electrical equipment of the single-sided thickness planer CP6-9 (Fig. 16) contains:
- Ml - electric motor for driving the knife shaft;
- M2 - electric motor for driving the table feed and movement;
- Em1 - brake electromagnet of the blade shaft drive;
- Em2, Em3 - electromagnetic couplings for table movement;
- Em4 - electromagnetic brake clutch for table movement;
- Control equipment, alarm system - located in the control panel and the electrical cabinet niche
The following voltage values are used on the machine:
- power circuit 50 Hz, 380 V;
- control circuit 50 Hz, 110 V;
- signaling circuit 50 Hz, 24 V.
- power supply circuit for electromagnetic couplings = 24 V.
Electrical circuit diagram of thickness planer SR 6-9 Fig. 17
Description of the operation of the electrical circuit
List of elements for the electrical circuit (see Table 6). Before turning on the machine, it is necessary to open the electrical cabinet door and check the condition of switch B2 and fuses Pr1...Pr3, and then close the electrical cabinet door.
Voltage is supplied to the power circuits and control circuits by turning on the input switch B1. At the same time, the milky-colored signal lamp L1 on the control panel should light up. The knife shaft drive is turned on using the Kn5 button. In this case, the magnetic starter P1 is turned on, closing its contacts in the power supply circuit of the electric motor of the knife shaft. The knife shaft drive is turned off using the Kn4 or Kn1 button.
The knife shaft drive cannot be turned on when the exhaust hopper is open or the side cover is open (right and left). The blocking is carried out by microswitches B4, B5, B6.
The feed drive is turned on by button Kn6 when the knife shaft drive is turned on. In this case, the magnetic starter P2 is turned on, closing its contacts in the power supply circuit of the electric motor M2. The feed drive cannot be turned on if the knife shaft drive is not turned on, due to the presence of the closing contacts of the P1 starter in the power circuit of the P2 starter coil.
The table is moved by turning on the Kn2 or Kn3 button in jog mode with the knife shaft drive turned off. When the knife shaft drive is turned on, the table movement drive will not turn on, since its circuit contains a break contact of the magnetic starter P1.
The Kn2 button turns on relay P3, which closes its contact in the power circuit of the electromagnetic clutch Em2 and turns on the upward movement of the table.
Button Kn3 turns on relay P4, which closes its contact in the power circuit of the electromagnetic clutch Em3 and turns on the drive to move the table down.
To fix the table in a given position, an Em4 brake clutch is used.
Switch B3 is used to turn on the local lighting lamp L2.
The Kn4 button, located on the control panel, and the Kn1 button, located on the machine frame, serve for emergency shutdown of the machine.
Protection of electrical equipment from short circuit currents and overloads is carried out by the input switch B1, switch B2 and fuses Pr1...PrZ.
Zero protection is provided by magnetic starters.
Preparation of the electrical equipment of the machine for initial start-up and initial start-up.
When initially starting up the machine, it is necessary first of all to check the reliability of grounding and the quality of installation of electrical equipment by external inspection. After inspection in the electrical cabinet at the terminal blocks, disconnect the power wires of the motors Ml and M2. Turn on the input switch B1. Using the buttons located on the control panel, check the precise operation of the starters. Then restore the circuit to its original position and check the correct direction of rotation of the electric motors.
Device and principle of operation
A typical wood planer can successfully replace two pieces of equipment: a mechanical drive jointer and a planer (transverse for short products, or longitudinal for long ones).
Homemade thickness planer
The simplest layout of a thicknessing machine (with one-sided supply of source material) includes the following components:
- Drive motor.
- Transfer. It can be a standard V-belt, toothed, with a variator, as well as with replaceable pulleys (the latter option has minimal values of transmitted power, and therefore is used only in low-power equipment).
- Knife shaft. May have multiple instruments with different configurations. Spiral knives are considered particularly successful because they produce minimal noise during operation.
- the upper direction unit, which, in turn, consists of a pair of rollers - front and rear. The front roller has a corrugated surface: in order to improve traction with wood and prevent a possible change in the direction of movement of the board being processed. The rear roller is always smooth;
- a clamping unit that prevents jamming of chips and possible cracking of the material. Structurally, the clamp can be made in the form of claw grips that penetrate into the wood, or it can also be made in the form of a massive metal element equipped with spring-loaded teeth;
- a lower direction unit, facilitating the feeding of the workpiece into the workspace;
- a table with devices for adjusting the technological gaps between the rollers of the upper and lower clamps;
- the bed on which all other elements of the working circuit of the machine are located.
Operating principle of a thickness planer
Units with a double-sided feeding device are distinguished by the fact that they are equipped with an additional unit for extending the knife shaft. In this regard, replacing a tool to reinstall it from one standard size to another (or for subsequent sharpening) is much easier.
Device of a thickness planer
This is how a thickness planer works. The torque from the electric motor is transmitted through gears to the blade shaft. The board to be processed is inserted into the gap and pressed first against the lower and then against the upper pressure rollers. In this case, the workpiece is captured by a grooved roller and fed to the tool. Before cutting, the semi-finished product is clamped between the upper and lower guide devices, which ensures reliable fixation of the material during processing. The clamping device ensures timely removal of chips from under the rotating tool. At the moment the workpiece leaves the rear guide roller, the next product is inserted into the front one, after which the process is repeated.
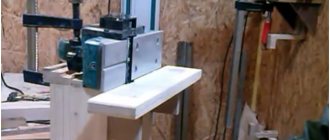
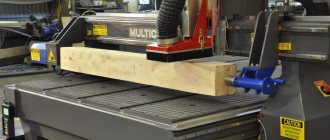
High-tech method for manufacturing a thickness planer
The author of this homemade thickness planer decided not to skimp on the technological equipment of the equipment being created and to electrify all processes as much as possible.
There are 3 independent electric drives, which:
- drive the cutting drum,
- are broaching pressure rollers,
- adjust the position of the desktop.
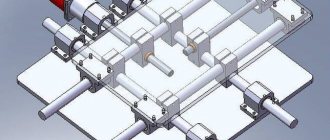
Torque is transmitted to the drum using a V-belt drive, and in the two remaining options - a chain drive. Moreover, the uniformity of pressure on the rollers is regulated by interconnected spring-loaded intermediate sprockets, although in our opinion, such a system will still not allow us to avoid some temporary loosening of the chain at the moment the workpiece leaves the feed roller.
The tensioning of the drive chain for adjusting the height of the work table is carried out by two rigidly fixed sprockets.
Such an approach, obviously, can be justified if you have a flexible mini-production with a large number of equipment reconfiguration operations. Although here some schemes could be simplified. For example, like this:
Such a machine will not be cheap, and the abundance of rather complex components will require constant maintenance. But, apparently, this is exactly the case when the desire for self-realization was in the foreground, because for similar money it would be quite possible to find a used thickness planer and, having slightly repaired it, provide a solution to the same problems.
Homemade thickness planer in your own workshop: choosing parameters
There is a significant number of different models of the equipment in question on the market, both from domestic manufacturers (Corvette, Enkor, Krasny Metalist, etc.) and imported ones. The latter options are dominated by dubious Chinese brands, which are not reliable in operation, and, in addition, often have underestimated parameters compared to the passport ones. In such cases, and also if the proposed machines do not fit into the available space dimensions, it makes sense to make a surface planer with your own hands.
It’s worth noting right away that it’s better to purchase a number of components and parts rather than try to make them yourself. This, first of all, concerns the knife shaft itself along with the mounting bearings: home-made options will not differ in the required mating accuracy, as a result of which the part will overheat greatly under load.
Read also: How to determine the period of oscillation of a spring pendulum
When choosing a machine diagram, they are guided by the available drawings (can be found on the Internet), but before that it is worth clarifying a number of elements of the device. For example, if in one unit there is a need to combine a jointer and a surface planer, then it is advisable to make equipment with a double-sided drive. Then, on one side of the device, it is possible to carry out preliminary cutting of the workpiece, and on the other hand, to carry out the final processing of the wood “to size”.
You also need to decide on the longest length of the knife shaft: a homemade machine with a shaft longer than 500 mm may lose rigidity when working on hard types of wood: pear, hornbeam, oak. As a result, wavy ridges up to 1 mm high may appear on the surface of the board, which will require further processing of the semi-finished product. The landing dimensions and diameter must be made such that home-made equipment can be used to produce plinth, baguette profiles, as well as other decorative elements made of wood.
When choosing a design, safety measures for subsequent operation of the unit should be fully taken into account. Homemade thicknessing machine Do-it-yourself machines must have a reliable fence for the working area of the table, and also eliminate the possibility of the board going backwards if the gap is too large, as well as its destruction during processing.
When analyzing the available drawings of home-made devices, it is worth keeping in mind that the presence of two lower clamps in the table will reduce the force of moving the board into the workspace, since the workpiece will move along the smooth surface of the roll, and not along the table.
Tips for profitable use
It is best not to save money and not to cheap out on dubious Chinese analogues of units of this type, because saving 30-40% will then come back to haunt you. Main reasons:
- Most Chinese machines today are disposable.
- Insufficient number of components for Chinese machine models.
- Difficulties in finding a specialist in Russia who could repair a Chinese machine.
Advantages of Russian-made mechanisms:
- spare parts for machines are always available in any quantity;
- a drive belt can be purchased for 200 rubles;
- The belt is replaced no more than once a year.
The best manufacturers of woodworking thicknessing machines these days:
- Anchor.
- Kraton.
- Makita.
- Interskol.
- Jet.
Republished by Blog Post Promoter
Manufacturing and assembly
The manufacture of the machine begins with the bed. For these purposes, it is advisable to use tubular steel with a cross section of at least 60×40 mm: the pipe has increased rigidity and moment of resistance, which will have a positive effect on the accuracy of operations performed on a homemade unit. Structural elements are connected by welding. It can be replaced with a prefabricated version, but it is less preferable - assembling the table and frame using an angle and connecting pins with a diameter of M30 or more will force you to frequently check their tightness.
For feed rollers, you can use rollers from an old washing machine: their rubberized surface will cope with the tasks. The rollers are bored to the diameter of the existing bearings, taking into account the required adjustment range. In homemade thicknessing machines, this process can be done manually by rotating the handle.
To make a table for a homemade unit, a wide sanded board made of larch or oak is suitable. Wood dampens vibrations well, but to increase anti-corrosion performance, and from a fire safety point of view, it should be impregnated with fire-resistant compounds or creosote. The connection between the table and the frame can be bolted.
3d model of a homemade surface planer
When selecting a motor, the maximum required torque must be matched to the processing needs. As a rule, an electric motor with a power of 5...6 kW, with a speed of up to 3500...4000 per minute, is sufficient.
To ensure safety, a homemade machine must be protected by a removable casing. It can be made from thin sheet steel (0.6...0.8 mm thick).
The necessary components - bearings, knives, pulleys, fasteners - are selected in accordance with the specifications for the drawings of a homemade thickness planer.
When assembling a homemade machine, you must:
- ensure maximum flatness of the table surface;
- balance all rotating parts in static and dynamic modes;
- provide convenient adjustment of the table position;
- check the reliability of the fencing device for moving elements.
A homemade thickness planer is checked at idle speed. If all components are working correctly, check the unit in operating mode, after which all fixed parts are painted with weather-resistant paint.
If you find an error, please select a piece of text and press Ctrl+Enter.
Craftsmen who often work with certain wooden blanks are faced with the need to plan a large number of boards to give them an attractive appearance. At the same time, it is also necessary to equalize their thickness, make their surface smooth, so that the material can be used for the production of furniture, interior decoration, or for many other similar purposes. A wood planer is best suited for such work.
Now the cost of this type of equipment is quite high, even if it is a small machine for use in a home workshop. As a result, not everyone can make such a purchase. In this case, the right solution would be to make a thickness planer with your own hands according to ready-made drawings. As a result, on a regular workbench you will be able to plan a variety of wooden workpieces quickly and efficiently.
crazy hands
Let's find out how and from what do-it-yourself thicknessing machines for wood are made.
Assembly diagram
The photo shows a homemade machine with electric broaching in the process of assembly.
The design shown in the photo above, in its functionality, is close to a factory-made thickness planer. However, in practice, much simpler structures are made with one’s own hands.
The reason is quite obvious: homemade thicknessing machines for wood have only one obvious advantage over factory ones - low cost; Accordingly, to minimize costs they are extremely simplified.
To create any complex structure, you will have to purchase quite a lot of expensive rolled steel, wear-resistant bearings, pulleys, gears, and a powerful electric motor will not be cheap.
Here are a few, unfortunately, superficial instructions for creating a simple machine with manual broaching.
| Element | Description |
| bed | Two independent frames are welded from a corner measuring 40 - 50 mm. They are connected by threaded rods machined from a 32mm hexagon. |
| Broach | It is a modification of the rubber squeezing rollers from an old washing machine. The rollers are bored out for bearings and mounted on an axle 20 mm thick. Feeding is manual, carried out by rotating the handle. |
| Table | It is assembled from a sanded board, attached to the frame with countersunk bolts. To protect against rot and improve glide, the board blanks are impregnated with waste oil. |
| Motor | 380 volts, three phases, power 5.5 kW, rotation to the knife is transmitted by a belt. The rotation speed of the knife shaft is 5000 rpm. |
| casing | Made of millimeter sheet metal on a frame made of a 20 mm angle. |
In this case, the costs only for components will be approximately the following:
- Electric motor – 7 – 15 thousand rubles.
- Corner – 2 – 3 thousand.
- Bearings, pulleys, belt, axles, studs - 3 - 4 thousand.
- Knives – 1 – 2 thousand.
Total costs (excluding time, electrodes, electricity) will range from 13 to 24 thousand rubles.
Machine bed diagram.
Results
Here are the parameters of a very real machine created using the given algorithm:
- The maximum board width is 320 mm.
- The thickness of the workpiece is from 0 to 200 mm.
- Thickness adjustment is manual, measured with a caliper/ruler.
- Broaching is manual, using a roller handle.
- Security is minimal. The design does not provide for claws that block reverse movement. The casing protects against the scattering of chips, but not from the destruction of the workpiece: when fragments of a board or beam fly apart, the millimeter-sized sheet will be crushed.
Table and frame of the future machine
Before you start making a surface planer for wood yourself, you should decide on its design and familiarize yourself with the finished drawings (at the end of the article). The entire structure should be located on the work table so that you can walk around it freely to feed the material. This tool can also be used in a home workshop, since its dimensions are quite small.
The main thing is that the surface of the table where it will be located is as smooth as possible to prevent the occurrence of strong vibrations.
To make such equipment for home use, the following design is usually suitable. The work table of the machine and its frame are welded; for this, a metal corner and a square pipe of dimensions 50x50 and 40 millimeters are used, respectively. In principle, when assembling the table and base of the machine, you can use materials not only of these, but also of any other sizes, but it should be remembered that the more massive the elements used, the more stable the equipment will be, and the less vibration will occur during its operation.
Read also: Liquid pressure measuring instruments
To make a thickness planer for your home workshop, you will need:
- drilling machine;
- lathe;
- welding machine;
- drill;
- Bulgarian.
Types of surface planers
Thicknesser setting machines differ in several characteristics, the first is the number of knives used, mounted on the cutting module.
Unilateral
It has one knife, costs less, but is mainly used in small home workshops. In one stroke, he is able to process the product on one side.
Double sided
Consists of two shafts with knives parallel to each other. It has high productivity and is also equipped with automatic wood feeding.
Double sided thickness planer
Professional
Designed using three or more cutting modules. Used for professional processing, can produce workpieces in large quantities.
The price of equipment ranges from 35 to 100 thousand rubles. Machines created using the latest technological developments can cost even more. This is why homemade woodworking devices are popular.
The second criterion for distinguishing thicknessing machines is the scope of application:
- Household - allows you to achieve the required performance, has low weight and an affordable price. It will become indispensable when building a house.
- Combined - inexpensive, has low productivity. Purpose: domestic and household use.
- Semi-professional - used in carpentry workshops.
- Professional – produces large volumes of blanks, used in wood processing factories.
- Industrial – used in sawmills, sawmills, woodworking enterprises. It has impressive size and power.
Knife shaft
The next element, the presence of which is mandatory in a thickness planer, is the knife shaft. This is the main part of the machine, which processes wooden blanks. The best option is to buy a ready-made design with axle boxes, since homemade shafts are very difficult to make well balanced. A suitable option would be to use a three hundred millimeter shaft, the design of which has three knives. It is best to choose stepped pulleys for the shaft and engine; as for the shaft speed, the best option would be 4000-7000 revolutions per minute.
To operate such a shaft, an asynchronous motor with a power of 4-5 kW is suitable. An important advantage of this choice is the fact that having made a machine with such a motor, it can be started from single-phase electric current, which significantly reduces the costs and complexity of using the equipment.
It is best to grind the pressure rollers yourself; it is also a good option to use ready-made parts from old Soviet-style washing machines. The roller frame must be welded with spring-loaded bolts.
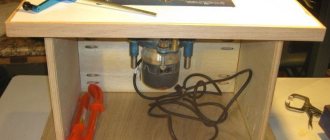
Original idea
The essence of the original idea is that the described machine will be made on the basis of a drilling machine. In addition, on the basis of the same drilling machine, you can build other devices: lathes and grinders. Their description is presented in the following articles:
- DIY wood lathe. Description, drawing, video.
- Homemade grinding machine from a drill. Description, drawings, video.
These articles, like this one, detail the entire sequence of their creation and technological operations, and include photo and video materials. The fact that you can make some kind of universal base and, as necessary, give it the desired functionality, replacing only some elements, while getting a set of machines: lathe, drilling, thickness planer and grinding machines, makes this idea very valuable.
| Drilling | Turning | Grinding |
This solution is convenient, universal and unified.
Adjustment bolts and workpiece feeding
According to the drawing used, the table for installing the thickness planer must be installed on adjusting bolts, which will make it possible to adjust it if necessary. To adjust the table plane as accurately as possible, and also to prevent the need to adjust each bolt individually, bicycle sprockets can be welded to them, connecting them with a chain. Springs can be taken from valves from any truck engine.
In the drawing used, the workpieces are fed manually. But there is always the opportunity to improve the design by equipping the machine table with an automatic workpiece feeding system. In this case, the workpiece will be fed very smoothly into the machine, which will ensure accurate removal of the required layer of wood during planing.
In addition, it would be useful to use special rollers that will press the workpiece to the working surface during its processing. It is very difficult to do this manually efficiently, while rollers cope with this task “excellently”.
This completes the assembly of the thickness planer. To prevent the formation of corrosion and fungi, it is recommended to paint all metal parts of such homemade equipment. There is no need to paint only the lower working part of the tool, which will process the material.
Preparing the machine for operation
Regardless of which thicknesser is used - homemade or factory-made, before carrying out any work it must be configured for operation. Not only the quality of the work performed, but also the safety of the worker who uses such equipment when processing wooden workpieces will directly depend on this.
In addition, when preparing for work, it must be remembered that if the table is significantly filled, if it is necessary to simultaneously feed several parts across the entire width of the table, in the process of planing a large-width panel or similar work, the pressure in the feed rollers must be adjusted so that it is increased, since in such cases of work the cutting resistance increases significantly. If parts of small width are being processed or the table is not completely filled, in order to prevent the wood from being crushed during processing, the pressure in the rollers should be reduced to the required level.
Additional Assembly Tips
The metal for the stove is cut with a grinder or jigsaw. To cut a groove, it is convenient to use an electric jigsaw, having previously drilled a hole for its file in the slab, or an electric drill with an appropriate attachment. The edges of the slot are processed with a file so as not to get injured by them later.
You can secure the metal base plate with flat head screws (so that they do not interfere with work) or by welding it. The first option is preferable because, if necessary, the electric plane is easy to disassemble.
Before installing the drum, it is recommended to check the sharpness of its knives. If it is bad, then it is better to sharpen the blades immediately, using, for example, a regular whetstone. It is necessary to constantly ensure that the cutting attachments are well secured without distortion.
The basis for making your own knives are steel plates or hacksaw blades for metal, sharpened at an angle of 30 degrees.
The sequence of making an electric plane from a grinder with the working drum placed in a vertical position is demonstrated in the videos below. It also shows possible errors when assembling a homemade product.
https://youtube.com/watch?v=SY6xchF8VzU
Another option for creating a homemade electric planer from an old, non-working model is shown step by step in the video below.
Using the made power tool, you can process boards, beams and other workpieces. An electric planer assembled with your own hands must be used in compliance with safety requirements. The parts must be fed correctly to avoid getting your fingers caught in the drum.
There are many options for homemade electric planes. They have varying degrees of complexity, as well as different functionality. In this regard, the limitations are mainly related to the technical thinking of the inventors and the parts and materials available “at hand”. If necessary, the manufactured equipment can also be equipped with automation equipment.
Safe operation of the machine
Before each start of work on the machine, it is necessary to carefully check the correct position of the knives, as well as their level of sharpening. The knife shaft must always be guarded. On a homemade thicknessing machine, you cannot process parts whose length is less than the distance between the shafts.
To prevent the possibility of injury, it is strictly forbidden to repair, adjust or clean the machine, as well as clean the workbench with the machine while it is in operation.
It is necessary to feed wood blanks onto the work table and into the machine itself end to end, and it is necessary to use the entire width of the table.
By making a universal thicknesser with your own hands, you can significantly simplify the processing of lumber, saving on the purchase of professional tools. Thicknessers are used for planing lumber and giving surfaces an ideal, even shape. Homemade machines are versatile in use, allowing you to guarantee high-quality processing of lumber and giving it the required shape.
Description of the tool
Thicknessers are machines for wood processing that allow planing and leveling the surface of lumber to produce boards of a given thickness. This type of wood processing is carried out by using lumber in construction and making various structures from them. Planing equipment is in demand on the market and is popular with ordinary homeowners who independently engage in construction at the dacha and in their own home.
Self-made surface planers are distinguished by their simplicity of design, which allows them to be made using an electric planer, grinder and other similar power tools as a basis. You just need to make sure that you have the appropriate diagram, which you should adhere to when making homemade equipment.
Machine parts
A homemade jointer is represented by a combination of various units that are connected together. The manufacture of the jointer must be carried out taking into account the information below:
- Base. It is represented by the lower part, on which various nodes are based.
- Side wall. It acts as a load-bearing element to which various components are attached for mounting.
- The table is rear or fixed. This element is attached to the side wall and forms the plane of movement of the workpiece.
- Front table. Often this element can change its height. A special mechanism is created for this.
- Side support. It is mounted on the back table; its main purpose is to direct the movement of the workpiece.
- Spacer corners. They are used to strengthen the structure and increase its stability.
- Electric planer. An electric planer is used as a basis in the manufacture of the structure.
This mechanism is characterized by a fairly simple design. To connect individual units, various fasteners are used.
Advantages of homemade machines
A do-it-yourself jointing machine is distinguished by its versatility of use. The functionality of such equipment will be sufficient for high-quality wood processing. Using homemade machines, you can not only plan lumber, but also finish the boards, giving them the required thickness and a perfectly flat surface.
The advantages of hand-made surface planers include the following:
- Simplicity of the device of a planer for wood.
- Functionality and versatility of use.
- Affordable cost of the components used.
- Possibility of subsequent upgrades.
- Reliability and maintainability of equipment.
To make a homemade surface planer with your own hands, you can use an electric planer, which is used to create a machine that allows for high-quality wood processing, including planing, edge processing and chamfering. It is only necessary to select a high-quality project for the manufacture of a homemade thickness planer, which will be the key to producing reliable and universally-usable equipment.
Read also: Homemade motor sleigh for winter fishing
How much will a machine at home cost you?
An old friend of mine recently told me some good news. He finally acquired the same planer for wood that he had dreamed of for so long. Yes, this is really cool! But he could have spent money on some additional equipment if he had time to read my advice.
Well, maybe it wouldn’t be one to one. But, nevertheless, with the functions that its expensive machine performs, a homemade thickness planer from a planing machine will cope with a bang!
How to make with your own hands what is usually bought for a lot of money? And how much will it cost? The asking price is minimal.
Whatever is at hand can be used. Depends on the model you choose. For more complex machines using grinding, for example, the list of required parts increases.
And you can make it from “waste”. I cut the tabletop for my surface planer from an old sink. But her fate was already decided. She was sent to the trash heap! I gave her a new life!
Next, we assemble the entire machine using the same scheme. Whatever is bad, we put everything into action. In general, we take a planing machine and provide it with devices for precise planing.
So, if you know what the main difference between an electric jointer and a thickness planer is, then you clearly understand that it is quite difficult to do without such an assistant in the construction of any object or in the manufacture of furniture.
The planer will not come out with calibrated boards. He's just whittling! And the thicknesser will give you perfectly smooth boards of the same thickness, exactly like a carbon copy.
We have finally come to the main issue.
Making a thicknesser with your own hands
On the Internet you can find various designs for homemade jointers, which are distinguished by their functionality and ease of manufacture. Subsequently, you should adhere to the scheme on hand, selecting the appropriate components and correctly assembling the machine, the functionality of which will fully meet the requirements of homeowners.
Necessary materials
There are many options for making homemade planing machines, which will differ in their basis. The easiest way to make such a tool is using an electric planer or jigsaw.
To perform a surface planer you will need the following:
- Electric planer.
- Screwdrivers and keys.
- Ruler and corner.
- Screwdriver.
- Drive sprockets.
- Bicycle chain.
- Wooden beams and slats.
- A sheet of plywood 15 millimeters thick.
- Long threaded screws.
Plywood and timber will be required to make the base of the machine and the manual table, on which the electric planer and other elements responsible for the functionality and safety of using the equipment will subsequently be attached.
It is necessary to use high-quality wood, which is additionally recommended to be treated with impregnations against rotting.
Step-by-step instruction
Making a surface planer is not difficult, so almost anyone can handle this type of equipment.
The following work will need to be done:
- A sheet of plywood 15 millimeters thick is cut into a rectangle with a width of 400 millimeters and a length of 500 millimeters.
- In the middle of the rectangle, a mount-stand is made, to which the electric planer will subsequently be attached. The stand for the surface planer is made from a piece of plywood and is attached to the base with screws from the back side, which will ensure the strength and reliability of the machine made by yourself.
- A platform for an electric planer is being built. An opening is made in the platform, which is identical in size to the shape of an electric planer. The electrical appliance used is attached to the platform with screws and clamps.
- A drive mechanism is mounted on the base of the platform, which is responsible for raising and lowering the platform with the surface planer. Large-threaded screws are attached to the corners of the base. Subsequently, four sprockets are attached to the installed screws.
- Small stands are made from plywood, on which the platform with the upper part of the surface planer is installed. The stands are attached to the platform with screws or similar fasteners. It is necessary to think about the proper placement of the cable from the electric planer, which should be located at a short distance from the working saw of the planer.
- Fix the handle, which is intended to adjust the location of the platform. The easiest way is to fix the handle with a long screw with a large thread or secure it with several screws at once.
- At the final stage of work, an indicator and a measuring bar are installed.
- Using a measuring strip, you can measure the thickness of the processed lumber. It can be made from a small piece of plastic or wooden ruler. The indicator can be made from a pointer or a tin strip.
This is the simplest surface planer design that can be done at home. On the Internet you can find various drawings of a thickness planer made from an electric planer with your own hands, which will differ in their functionality and manufacturing method.
Subsequently, you can upgrade the completed basic design of the machine by adding additional tools, which expands the functionality of the equipment.
Thicknesser from an electric planer
A thickness planer is a woodworking equipment that is used to plan even planes of lumber until the desired thickness is achieved. In this case, only pre-prepared (coated) boards or beams are processed.
Preparation of materials and working tools
There are quite a lot of different options for creating structures that allow you to convert an electric planer into thicknessing equipment. To make a relatively simple homemade machine at home, you will need the following tools and materials:
- screwdriver with a set of bits;
- carpenter's square or corner;
- tape measure or simple ruler;
- screwdrivers with different tips;
- spanners;
- electric plane;
- jigsaw or hand saw for wood;
- plywood with a sheet thickness of 1.5 cm;
- long screws with coarse threads (4 pieces);
- bicycle chain and four drive sprockets for it;
- wooden blocks (2.5 by 2.5 cm) and planks (1.5 × 1.5 cm);
- nuts with M14 thread;
- washers of suitable sizes;
- screws 25 by 100 mm.
Manufacturing algorithm
Drawings and diagrams will help to simplify the process of creating a thicknessing tool from an electric planer, but it is easier to do it from photographs. The equipment is manufactured in the following sequence.
Read also: Lathe 1m63 deep 300 technical specifications
- A rectangular fragment is cut out of a sheet of plywood, having a length of 50 cm and a width of 40 cm.
- It is used to assemble stands for an electric plane mounted on a working platform from pieces of plywood, which are secured to each other with self-tapping screws or self-tapping screws.
- They create a working platform for installing an electric planer on it. To do this, use a jigsaw to cut an opening in the prepared rectangular piece of plywood in the shape of the power tool being used (as shown in the photo below).
- Using special clamps, which often come with an electric planer, as well as screws, fix this tool to the working platform.
- A drive mechanism is mounted on the base using screws, which will ensure its raising and lowering. Threaded screws with asterisks are installed at the corners of the platform.
- Using screws, install the platform base onto the stand made for it.
- In a convenient place, the thicknesser position control handle is attached to the long screw using nuts and washers.
- Install a measuring bar (ruler segment) and an index arrow.
- The created device is configured and tested.
The created structure is installed on a flat surface. To fix it to a workbench or table, you will need to use suitable fasteners.
When assembling the machine with your own hands, you should fix the cable supplying the power tool so that it does not interfere with operation, and the wire is not accidentally damaged. To securely fix the electric planer itself on the work site, it is recommended to use bolts and nuts.
The measuring ruler is a mandatory structural element of the homemade surface planer being created. With its help, the thickness of the lumber that is planned to be processed is determined. A piece of plastic, wooden or metal ruler 8 cm long is suitable as a bar. You can also make a pointer arrow from similar materials.
Safe to use equipment
When performing any homemade woodworking machine, you need to take care of the safety of working on the equipment. If possible, the cutter should be covered with protective devices, and working on a machine where the working cutting element does not have any protection is prohibited. Most home-made planer manufacturing schemes have high-quality protection for the electric planer, which eliminates injuries when working with such equipment.
- When working with homemade tools, you must use safety glasses and work gloves. In particular, the latter will be required when working with coarse, dense workpieces, when beating of a homemade surface planer from an electric planer is observed when processing the material.
- The studs used must not have cracks, defects or damage. If cracks or damage are found, the defective parts of the machine should be replaced.
If you follow the simplest safety measures, working with a thickness planer will not present any difficulty, and the machine itself will last for many years. Using homemade machines, it will be possible to perform high-quality wood processing, saving on the purchase of industrial milling cutters.
Rules for working with milling machines
Knowledge of the rules for working with a surface planer will improve the quality of lumber processing, relieving the homeowner of any difficulties in operating the tool he has made.
The operating rules are as follows:
- The machine pin is installed in the correct position.
- Depending on the size of the parts being processed, the thicknesser stroke is set, for which the guide bar is fixed.
- The machine is slightly tilted, which opens the cutting part of the pin, the processed lumber is placed inside, after which the tool is pulled towards itself, this allows the cutting head to remove a thin layer of wood.
- Over and over again, forward movements are performed with the head of the thicknesser, removing a layer of wood from the processed lumber, achieving their perfectly flat surface.
A properly assembled thickness planer based on an electric planer will not be inferior to expensive factory equipment in terms of functionality, efficiency and productivity. You just need to find a high-quality plan for manufacturing a surface planer on the Internet and then follow the drawings when assembling an electric machine. The easiest way to make such a tool is on the basis of an electric plane, which is mounted on a plywood base. The simplest thicknesser, made independently, will differ in functionality in use, guaranteeing high-quality wood processing.