A compact and relatively mobile sawing tool, it has earned a reputation as a practical device used all over the world. A universal jigsaw, capable of making straight and curved cuts, including at an angle. Possessing impressive capabilities, this device could become a leader in multi-purpose applications. Unfortunately, certain design features made it more of a narrowly focused tool, but with good potential. One of the disadvantages of working with a jigsaw is that it is quite inconvenient to carry out an accurate, straight cut. The main reason for this drawback is the thin saw blade, which easily changes its direction during sawing. The second reason lies in the structure itself, which becomes loose over time and noticeably reduces the evenness of the cut. Fortunately, these flaws can be ignored if you have special jigsaw tools that you can make yourself. Next, we will tell you how to make a special table and stop for maximum precision sawing with your tool.
DIY jigsaw table - Metals, equipment, instructions
An economic person who is used to doing housework on his own, rather than looking for specialists on the side, usually has a good workshop. It doesn't matter if it's a large room, a separate room or a garage. For lack of free space, this could be a small nook in the pantry. The main thing is the tools, each of which has a use.
Do-it-yourself desktop jigsaw
One of the rather necessary tools is a jigsaw. This device is especially appreciated:
- residents of private houses;
- those who have a summer cottage;
- lovers of working with wood.
Conventional hand jigsaws, which were in use in the past, have changed significantly over time. A modern desktop jigsaw is convenient and quick to use, not to mention a better result.
There is a category of people who independently do all kinds of work around the house or their summer cottage and can make working tools with their own hands, and not only for reasons of economy.
A handmade electric jigsaw can compete with a factory one in both price and quality. After all, your product will best meet your requirements, having all the necessary functions.
A homemade jigsaw will give you the opportunity to make all kinds of products from plastic, wood and other materials at home, without making much effort and without spending extra time, as would be the case when working with ordinary hand tools.
A tabletop jigsaw has a number of advantages. It is especially convenient because it is stationary - the jigsaw itself is fixed to the work surface. As a result, your hands are free and you can unfold the work material without any problems.
The file relative to the table is fixed in a vertical, stationary position, and the movement of the material can be controlled manually. There is no need to constantly hold the tool in your hands, thereby making the work easier.
To avoid chipping the seams when sawing and get a better result, it is recommended to install the file from bottom to top.
Jigsaw table
Creating a design with a tabletop jigsaw is easy. Initially, there must be a platform for installing the jigsaw and for maneuvering materials when cutting, in other words, a tabletop.
Each master determines its dimensions individually for himself, taking into account the tasks that will be assigned to it. It is necessary to take into account the dimensions of the parts being manufactured so that the table is not initially too small or large.
The height of the machine is also important; ease of use depends on it.
If you still decide to create a homemade desktop jigsaw, prepare the necessary tools:
- screwdriver and caliper;
- screwdriver and electric drill;
- hammer and hacksaw;
- file and grinder;
- chisel;
- taps and guides.
To make a tabletop for an electric jigsaw, you can use a sheet of plywood measuring 50 by 60 cm and 10 - 15 mm thick.
On one side of the sheet, retreating from the edge to 20 cm, a drill is used to drill a hole for a file with a diameter of 20 - 25 mm.
Turning the sheet of plywood over, you need to mark the holes that need to be drilled for further fastening of the jigsaw itself. When marking, make sure that the file fits neatly into the previously prepared hole. Otherwise, by securing the jigsaw slightly to the side of the hole, you will deprive the file of mobility.
Often, factory-made electric jigsaws have holes on the sole for fastening to the surface. If they are not provided initially, you should contact specialists who have the ability to make the necessary holes on a drilling machine. Or do it yourself if you have the necessary equipment.
The jigsaw is attached to the tabletop from below with bolts, where the file is brought up through a hole made in advance.
If you have a workshop with machines or large work surfaces, the resulting structure can be mounted on a workbench or table, not forgetting that part of the plywood sheet with a jigsaw should protrude beyond the edge of the tabletop.
If it is not possible to secure a board with a jigsaw to a workbench, you can turn this plywood sheet into an independent table. Attaching metal legs at the corners.
They are easy to make yourself, if you have steel strips about 0.5 cm wide. When preparing the legs, it is worth considering that their length should be several centimeters longer than the size of the jigsaw.
Otherwise, when installed on the legs, it will rest against the surface.
Complete stationary design
If you plan to often work with a jigsaw, it is better to provide a full-fledged stationary structure. You can make a simple table yourself using a sheet of particle board, two sides and a back wall.
It is better to take chipboard for the tabletop with a thickness of 15 - 20 mm, a board for the back wall 70 - 80 cm wide, two side walls 50 cm wide. The height of the table directly depends on the height of the master who is going to work at it. Standard machines are made 80 cm in height.
You can assemble the frame of the future table using corners or wooden beams. Since working on the machine can be difficult, and the materials for sawing are heavy, it is better to strengthen the walls by attaching wooden jumpers at the top and bottom.
As in the previously discussed case, for the tabletop you can use a plywood sheet 70 by 100 cm and up to 15 mm thick. An electric jigsaw is attached similarly from below. It is worth considering that during operation the saw may vibrate, thereby reducing the quality of work.
To avoid this, you can use a simple device - guide the file between two bearings measuring 10 - 15 mm. The bearings can be secured to the table using a metal strip.
It is recommended to install moving guide rails on the working surface of the table, secured with clamps at the end of the table.
This device greatly facilitates the work of any master. Knowing the principles of operation, it is not difficult to make it yourself.
Working on a device you created yourself will not only give good results, but will also bring moral satisfaction from the work done.
Useful tips
As mentioned above, you shouldn’t delude yourself - although this is no longer just a jigsaw, it’s still not a band saw. Here are some tips:
- In a band saw, moves in only one direction - from top to bottom, due to which the workpiece is pressed against the table by cutting forces. On a homemade table, it is possible for the workpiece to explode upward, since the pendulum of the jigsaw also makes a return movement. Therefore, the workpiece must be pressed against the working surface of the table and the most important thing is to feed (move) the workpiece as slowly as possible.
Note! More revs and less feed are much better than the other way around.
- When working with a jigsaw (with or without a table), it is useful to remember that the stroke of a jigsaw is usually about 15–20 mm; you need to read this value for your tool in the instructions or determine it yourself. Material thicker than this value should be sawed only with set . Otherwise, the chips will not be completely removed, which can lead to overheating and jamming of the blade.
- You can lay a sheet of thick rubber between the working surface of the table and the sole after making a cut for the file. Assemble the table and let the blade run idle for a while so that the blade “gets used” to the slot in the rubber. This will protect the moving components of the inverted jigsaw from a large number of sawdust for which it is not designed, because in normal operation the tool designers clearly did not count on such a quantity.
- Safety glasses are required. It is also necessary to organize the device to be turned on via a pedal or to provide another way instantly turn off the instrument. But this is a topic for another article.
- Don’t be afraid creatively and improve your tools, because any idea is just a starting point for creativity, and universal solutions.
For more information on making a jigsaw table, watch the video:
- Author: Svetlana K.
Rate this article:
- 5
- 4
- 3
- 2
- 1
(4 votes, average: 3.8 out of 5)
Share with your friends!
How to make a table for a jigsaw
Today, not a single carpentry workshop can do without a jigsaw. This tool can be found on a construction site, as well as at almost any repair base. But not all craftsmen, especially those in the beginner category, know that the functionality of a traditional jigsaw can be significantly expanded .
The potential of a jigsaw increases significantly if the sawing tool is used in conjunction with a specialized table . This device allows you to rigidly fix the jigsaw, making it possible to carry out different types of cuts, from straight to figured and at a certain angle.
It is worth noting separately that a rigidly fixed jigsaw makes cutting extremely predictable, which has a very positive effect on both safety and production standards.
This review is devoted to the topic of creating a homemade table for a jigsaw . But before describing the stages of implementing this device, I would like to tell you what options for jigsaw tables the industry offers. After all, only the most successful models, distinguished by practicality, reliability and aesthetics, are put on the conveyor.
Tabletop
This is an ordinary stove without legs, which is fixed to the edge of the main work table/workbench. A striking example of such a device is the table for the jigsaw Phiolent (Fiolent) .
The table for the Phiolent jigsaw is represented by a metal plate, which is rigidly fixed to the edge of the workbench with a pair of clamps.
To securely fix the jigsaw, the set includes 4 brackets, which are secured using convenient screw clamps.
Additionally, the jigsaw table is equipped with a guide bar, which allows you to trim workpieces, as well as make smooth, fast and accurate longitudinal cuts.
The Phiolent kit costs about $10-$12 . You can install almost any jigsaw model on the stove.
The main disadvantage of this set is the absence of a vertical stop bar, which prevents the blade from deviating back and to the sides. But you can make and install the thrust bar yourself. Below is a video on how to modify a table for a Phiolent jigsaw.
Work table in the form of a guide bar
A multifunctional device designed for straight end cuts. The cutting angle can be adjusted from -45˚ to +45˚. A prominent representative of branded jigsaw guides is the Bosch PLS 300 .
The cabinet elements of the desktop are made of durable ABS plastic. The cutting guide itself is aluminum. The guide bar rests on several crossbars. One of the crossbars can be moved along the guide bar. In this case, the guide bar is mounted on a hinge with a degree scale. The position of the guide can be fixed using a convenient screw clamp.
The main feature of the Bosch PLS 300 table is that it is compatible only with branded Bosch jigsaws, which have a green body. By the way, in addition to a jigsaw, the table allows you to use a knife for cutting tiles.
Bosch PLS 300 costs around $100 . Below is a video that clearly demonstrates the capabilities of the jigsaw guide.
How to make a table for a jigsaw with your own hands
Experienced craftsmen often prefer homemade cutting devices. Such equipment is made to perform certain technological operations that are most often used by the carver.
Below in the text we will give an example of how to make a table for a jigsaw. This homemade product is suitable for performing ordinary work with a jigsaw. Each reader can easily “finish” this device so that it exactly matches the needs and requests of a particular master.
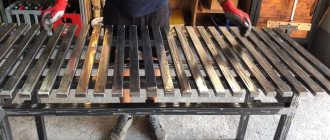
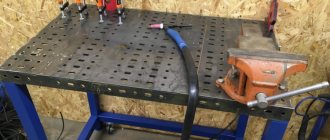
- The table will be equipped with power tools, a source of increased danger, so the design must be extremely reliable and durable. It is best to create a table for a jigsaw based on a metal frame . It is advisable to use a durable metal profile as a frame. An example in the photo below. Overall dimensions of the frame from the example: 500x325x300 (mm). As is clear, the frame elements are connected by welding. All seams must be thoroughly cleaned.
- Preparing the tabletop. The working surface of the table is best made from sheet metal with a thickness of 3-5 (mm). But it is quite acceptable to use wood. The photo below is an example of a wooden tabletop. The surface is made of veneered chipboard. Tabletop size: 575x400x20 (mm).
- Marking the working position of the jigsaw and tabletop.
- We are preparing a U-shaped mounting platform for fixing the jigsaw . A sheet of plywood 8 (mm) thick was used as a blank.
- Preparing the thrust bar . For the thrust strip you will need an equal angle angle and a 25x25 (mm) profile pipe, as well as a metal plate 4 (mm) thick. The process of creating a thrust bar is shown in detail in the video, which will be attached at the end of the instructions.
- We fix the jigsaw . The craftsman had to make through holes in the tabletop for bolt fasteners. The holes are located along the contour of the U-shaped profile. The bolt heads are flush with the working surface of the countertop. The jigsaw itself is pressed with large diameter washers.
- Some craftsmen additionally advise equipping the structure with a pipe for removing chips . As is clear, the return end of the pipe must be connected to a vacuum cleaner. Chip removal will make the operation of the jigsaw safer, more productive and aesthetically pleasing.
- That's it, you can try out the jigsaw in action.
This instruction is for informational purposes only! Each reader must finalize the table so that the device complies with the safety standards that are relevant for a particular case.
Power tools require respect. This requirement especially applies to homemade products, such as a jigsaw table.
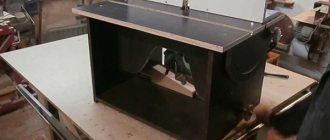
Jigsaw attachment
Installing a jigsaw in a table greatly simplifies the process of sawing thin materials, but the cutting accuracy drops when it comes to thick bars. Due to the flexible structure of the saw blade, when it turns in a large mass of wood, the end of the file bends and lags behind the central part. In this case, it will not be possible to obtain an exact 90-degree angle. At least, without a special jigsaw device that holds the file strictly perpendicular to the surface.
First of all, we will outline the main nuances in the manufacture of the saw stop itself. To do this you need a suitable metal bracket, as in the photo below. You can find one in a specialized fastener store or try your luck at the nearest construction market. If the search is unsuccessful, this element can be replaced with any L-shaped metal plate into which the rib of the saw blade can be rested.
We measure and drill 2 holes for the bearing screws. Their location should be equidistant from each other, at a distance equal to the thickness of the jigsaw file.
Having finished constructing the stop, we move on to assembling and installing the lever. To do this, we make 2 pieces of timber of the required length, and connect them at an angle of 90° using PVA glue and metal corners. We combine the resulting structure with a bearing guide and press it against the side wall of the table with a plate with 4 screws. This fastening technique allows you to change the height of the lever to work with massive materials.
At this point, the guide to assembling a jigsaw table with a file holder is considered complete. The assembled device is a neat and very compact mini-workbench for convenient cutting of materials of various thicknesses. We hope that the author’s product will become a visual example for you or at least give you a couple of ideas for assembling your own table.
DIY jigsaw table - Metalworker's Guide
Any man can make a jigsaw table with his own hands, even without special carpentry skills.
Since a mains-powered jigsaw is an integral part of any household, it will need a workspace.
Such a device significantly speeds up the work time, and also allows it to be carried out efficiently, clearly and quickly.
A stationary device will allow you to turn your tool into a mini-machine, thanks to which you can make a wide variety of patterns.
We prepare tools and materials
A DIY electric jigsaw table has many advantages. In particular, you can select all the necessary tools for this product without any problems. An important condition is the rigidity and evenness of the surface.
Therefore, it is best to opt for a material such as plywood. But the boards should not be thin, as they may warp. Therefore, it is best to take waterproof laminated plywood about 1 cm thick.
Workbench-drawing Box for jigsaw
You can take particle board, which is somewhat thicker than plywood and also stiffer. But the most suitable option would be a high-quality laminate kitchen countertop.
The only disadvantage of this material is the poor attachment of tools to the material, so you will have to carefully select fasteners.
The main advantage of particle board is its availability - you can place an order for all the necessary elements in any workshop. In this case, choose a thickness of about two cm.
Table for a jigsaw (dimensions) Place the jigsaw on a tabletop made of 12 mm laminated plywood and screw a chipboard base to it. Attach the base flush with the left edge of the tabletop.
On the other sides, make small indentations to strengthen the equipment. We make a couple of holes on the bracket for the bearings. We bolt the L-shaped structure to the base of the table with a piece of dense hardboard. Durable L-shaped structure, rear view
Workflow Now the jigsaw blade does not bend, even when cutting parts from a thick sheet of wood
A DIY metal table is an alternative to wood.
The only difficulty is that finding a suitable metal part is somewhat difficult - it must not only be smooth, but also carefully processed.
In addition, it will be difficult to make holes for fastenings in such a part. If you watch the video and arm yourself with a drill, everything will be much easier.
At the same time, you should stock up on a simple pencil (it’s better to take a soft one so that it is brighter), a ruler or tape measure, a screwdriver, a drill, and self-tapping screws.
In addition, we will need a square with which we will mark the product, and also use it at the last stage of assembly.
At the last stage, fiolent tape and bearings will not be superfluous.
How the process works
In order to construct a basic table, you must prepare drawings. A correctly drawn or selected diagram will make your work much easier.
Use a plywood board up to one cm wide as a work space. If the elements are small, you can take a smaller board. At the same time, step back from the edges up to twenty cm and make several holes.
Don't forget to mark the places for fastenings at the bottom of the board.
If the jigsaw stand does not have holes, they must be made in four copies. Using the prepared marks, make holes in the plywood. Please note that steel legs must be attached to the board.
In this case, the height of the legs depends on the body of the device itself. In this case, the planks are bent at an angle of 90 degrees. To do this, holes are made for fasteners.
The device is secured under the plywood element so that the saw looks out through the hole.
Such an ordinary table can be installed on the same workbench or desktop. At the same time, such a table does not need legs, but is fixed at the edges of the workbench. The device should be outside the table. This product attaches perfectly to wood pieces up to three cm thick.
As you can see, making such a table for a jigsaw is not at all difficult. All you need is a little attention and concentration. And, of course, do not forget to strictly adhere to the scheme.
How to make a jigsaw table
If you want to make a table for a regular jigsaw, the process will be much easier, since you won't have to bother preparing your workbench for mains power. First, cut out a blank for the tabletop from plywood.
Don't forget to prepare the holes with a drill into which the screws will be screwed.
In the corners of the future structure there will be squares of plywood, which will add rigidity. Prepare the holes so that the jigsaw fits freely into them. The tabletop is attached using self-tapping screws.
Don't forget to cut holes for the cutlery in the top of the future table. Please note that a parallel stop is fixed in the tabletop; for this, self-tapping screws are driven into the holes. That's all.
The most primitive table for a jigsaw is ready.
It’s even easier to make a sawing table:
Diagram of a sawing table Drawing of a sawing table Another design of a sawing table Drawing of a classic sawing table It is made from two blanks. The blanks are connected to each other with screws. The screws must be recessed into the workpiece material so that they do not interfere with work
DIY jigsaw table
Any man can make a jigsaw table with his own hands, even without special carpentry skills.
Since a mains-powered jigsaw is an integral part of any household, it will need a workspace.
Such a device significantly speeds up the work time, and also allows it to be carried out efficiently, clearly and quickly.
A stationary device will allow you to turn your tool into a mini-machine, thanks to which you can make a wide variety of patterns.
Universal table for jigsaw and hand router
Almost only from plywood, a small number of screws, and driving nuts, you can make a folding table with your own hands for a hand router and jigsaw. In principle, if you have a circular saw, then you can use this table with a circular saw.
If you really fanatically approach this table, then it can also be endowed with the functions of a workbench, then this table-workbench was practically no different in function from the Wolfcraft master cut 1000
. I don’t argue that a lot of functions is good, but you shouldn’t increase the number of functions at the expense of their quality.
Wolfcraft just got caught up in the fact that there are a lot of functions, but most of them are not of particularly high quality. A homemade workbench for a jigsaw has already been described, so this article describes a more universal table in which you can install a router. Plus, this table's legs can be folded.
But these seemingly advantages can also be disadvantages: folding legs are usually less stable. The universal angle stop discussed in this table article is less cruel. General view of the table.
Folded table.
Making the table base
First of all, you need to cut out the base of the tabletop and strips to strengthen the tabletop from plywood. We drill holes in the plywood strips to assemble a box on which the tabletop will be installed. We glue plywood squares into the corners of the box; they will add rigidity to the box.
We cut a hole in the tabletop so that the jigsaw and router installed on the tab can easily fit into it.
We fasten the tabletop to the box with screws.
We cut out the top part of the tabletop and cut a hole in it for tabs with power tools.
Glue the top of the tabletop to the base. Please note that the surface of the tabletop consists of two strips of plywood, and between the strips there is a recess into which the corner stop will be installed.
Homemade equipment for a jigsaw from scrap plywood (6 photos)
From scrap plywood, which can be found in any home workshop, you can make a useful device - equipment for a jigsaw.
The device, although the most primitive, can help out in certain situations. You can make it literally in 20-30 minutes.
Using this equipment, you can make straight cuts at an angle of 90 degrees and cut circles of the desired diameter. A very convenient thing.
We also recommend reading: how to make a jigsaw from plywood with your own hands .
DIY jigsaw table
Any man can make a jigsaw table with his own hands, even without special carpentry skills. Since a mains-powered jigsaw is an integral part of any household, it will need a workspace. Such a device significantly speeds up the work time, and also allows it to be carried out efficiently, clearly and quickly.
However, we should not forget that the highest quality can only be achieved through the correct use of this tool, that is, by placing it on a jigsaw table.
A stationary device will allow you to turn your tool into a mini-machine, thanks to which you can make a wide variety of patterns.
Making table legs
We move on to making the support for the future table. We cut out the legs. Please note: the two legs are slightly shorter, this is necessary so that the table can fold properly.
We cut out the jumpers and cut out decorative ovals in them.
Smooth out the edges and corners.
Drill holes for screws in the legs.
We fix the legs.
Screw on the plywood spacer strips.
The same goes for the bottom of the legs.
Now we cut out and screw the longitudinal jumper in place.
To make it easier to remove the jumper during disassembly, we use wing nuts instead of regular nuts.
Table assembled.
We produce inserts for power tools
According to the size of the opening in the top sati of the tabletop, you need to cut out rectangles from plywood and round the corners. Drill and countersink holes for attaching tabs in each of the 4 corners.
We put the tab into the table top and drill holes in the bottom of the table top.
Now we place a router in the center of the tab and mark the holes for the router and the router fasteners.
Work on manufacturing table parts and assembling it
- Making a table box for those who are a little familiar with carpentry will not be difficult. From a USB sheet using an electric jigsaw, according to the sketch drawn on the sheet, cut out the parts for making the frame. We assemble the box according to the drawing.
- Holes are drilled for mounting the jigsaw and the output of the hacksaw blade. An electric jigsaw is installed.
- The center is measured along the canvas, and the bracket guide is attached to the side of the box.
- The bracket rod, as shown in the figure, does not have holes for fastening, but slots for changing its height in accordance with the length of the blade used.
Let's take a closer look at the manufacture of a bracket for a guide cutting hacksaw:
- We make an elbow (vertical lever), which is attached to a guide with slots for moving the bracket in height and removing the upper part to connect the second part of the part.
- The horizontal arm consists of a bar with a tenon at one end to connect to the vertical arm and guide block for centering the hacksaw blade.
- We connect all the parts into a block and make a precise adjustment of the equipment so that the movement of the cutting blade has a free, easy movement.
The assembled workbench for working with a jigsaw is tested in work with various materials. If any design flaws are identified, they are eliminated.
To cut materials with different densities and viscosities, specific blades are used for each type. In addition, the optimal speed of the tool is selected to prevent overheating of the blade.
Source: pro-instrument.com
DIY jigsaw table: making a homemade machine
An electric jigsaw is an extremely useful tool, without which many operations on processing wood and wood-based materials are simply impossible to imagine today.
Possessing a relatively small weight and compactness, a manual jigsaw allows you to cut out products of quite complex configurations from workpieces, but still, sometimes it would be more convenient to use a stationary tool. It is often more convenient for them to work, and the machine also provides more accurate cutting. True, such a machine costs several times more than a manual jigsaw.
Anyone who doesn’t want to spend extra money on this equipment can make a jigsaw table with their own hands and end up with an inexpensive and effective hybrid of a hand tool and a machine tool.
Figure 1. Diagram of a jigsaw table.
The simplest device
Some kind of table for a jigsaw can be made in a few minutes. The advantage of this design is its simplicity. It is easily mounted on a workbench or tabletop and can be easily disassembled if necessary. The disadvantage can be considered its small area.
The working surface of the machine will be laminated plywood, in which holes are drilled for sawing and for installing fasteners. The thickness of the plywood should not be less than 10 mm.
You may also need to prepare holes in the base of the power tool for mounting screws. The structure is attached to the workbench with clamps. The heads of the mounting screws must be flush with the plane of the sheet.
Such a machine can easily cope with cutting small workpieces up to 30 mm thick. What the device looks like is shown in Figure 1.
Second option
Another stationary device for working with wood consists of more parts, but it is also not difficult to make. The table frame consists of 2 sidewalls and a back wall made of chipboard.
The machine does not have a front wall to make it easy to reach the button. Holes for the cord and tube of the vacuum cleaner are drilled in the back wall. The machine cover is made of laminated 10 mm plywood. The entire structure is tightened with confirmations.
The jigsaw is attached in the same way as in the first case.
Figure 2. Diagram of a frame-support for a jigsaw.
Using a homemade machine, you can saw larger workpieces, but when working with thick wood, the jigsaw blade may tilt back and in both directions. This degrades cutting accuracy. The disadvantage is eliminated by installing a stop bracket on a homemade machine (Figure No. 2).
The jigsaw blade will move between 2 11mm bearings, which are screwed to the L-shaped steel strip with screws. The back of the file will rest on the wall of the bracket.
This design will not allow the jigsaw working blade to deviate from the specified plane.
The bracket is attached to a frame made of birch bars 50 x 50 mm. It can be raised or lowered depending on the thickness of the material being processed and the length of the file.
To do this, the frame with the stop is not tightly attached to the side of the machine, but is pressed against it with a steel, hardboard or textolite plate.
The vertical post of the birch frame is located between the frame and the hardboard, into which 4 clamping bolts are inserted.
The area of the countertop depends on the size of the workpieces you are going to work with.
The machine can be made more perfect by installing a limit bar on it, which will help cut wood into pieces of the same thickness.
The limiter can be attached to the machine with clamps. It is made of a wooden block, steel or aluminum corner. If desired, the bar can be installed on a slide attached to the bottom or sides of the table top.
You can make 2 parallel slots in the tabletop along which the slats will move. Holes are drilled in it. Studs or screws with wing nuts are passed through them and the slots.
Tape measures are attached to the ends of the tabletop.
Table made of bars and chipboard
Figure 3. Diagram of a tabletop for a jigsaw.
The manufacture of this table requires certain carpentry skills, since the connections between its drawers and legs are made in a tongue and groove manner. However, you can use dowels, wood glue and screws instead.
The machine cover will be liftable to provide easier access to the tool when dismantling it. Figure 3 shows what the countertop looks like.
If desired, you can provide space for installing a manual milling machine, then the machine will become multifunctional.
The table is made from:
- bars 80 x 80 mm;
- bars 40 x 80 mm;
- Laminated chipboard or laminated plywood 900 x 900 mm.
The distance between the legs can be from 600 to 700 mm. The bars for the drawers and legs are obtained after longitudinal sawing of the 80 x 80 bars. You can choose the height of the legs yourself, based on how convenient it will be to work on the machine. At each end of the frame and legs, 2 holes are drilled for dowels.
Corresponding holes are made on the sides of the legs. The dowels are coated with glue half their length and inserted into the ends. After this, the frame is assembled in rough form. After correcting possible shortcomings, it is finally tightened. All contact surfaces are lubricated with glue before assembly.
Additional strength of the structure will be given by self-tapping screws, which are screwed through holes prepared in advance for them.
The lid is attached to one of the drawers on hinges; for this purpose, a slot is made in it to facilitate installation and removal of the jigsaw. 2 strips with a selected quarter are screwed to the back of the tabletop, which will include the sole of the power tool. Holes are made in the strips into which clamping screws or bolts will be installed.
A jigsaw mounted under the tabletop will be able to process thicker workpieces if a recess is made in the lid for its sole. The easiest way to make it is with a milling machine. The table turned out to be quite spacious, so a large thickness of plywood or chipboard can provide sufficient strength to its lid.
Use 20mm or thicker sheets.
Furniture for working with thin saw blades
Figure 4. Diagram of a tabletop jigsaw.
Still, the jigsaw file is not well suited for cutting complex shapes from plywood. A thin file is ideal for this. But it can also be installed on a hand-held power tool by making an original device. It is shown in Figure No. 4.
The hand jigsaw is still attached to the tabletop, but the thin blade must be taut, since it is not enough to simply attach it to the pendulum. To tension the file, a rocker arm is made from a block.
The tension of the web is provided by a spring. Its lower loop is hung on a transverse pin. The upper loop is inserted into the adjusting screw, which changes the tension force of the damper.
The wooden parts of a homemade machine are made from hardwood.
The jigsaw does not provide the ability to attach a thin blade. To do this, you can adapt a piece of an old file by drilling a hole in it and completing it with a clamping plate and a screw with a nut.
A vertical slot is made in the rocker arm into which another steel plate is inserted. It is attached to the rocker with screws. The upper part of the file is attached to it in the same way as the lower one.
To make the task easier, you can use scraps from an old jigsaw to make the plate.
How to turn on a jigsaw with your foot
By the way, a machine for working with a jigsaw can be made on any old table - from a dining table to a desk. The large countertop area allows you to process workpieces with impressive dimensions. In addition, a wide variety of equipment can be installed on the table.
If we talk about the jigsaw itself, some craftsmen manage to attach a pedal to its button to turn the tool on and off without removing their hands from the workpiece. The pedal is made of a metal tire.
Its upper part is made in the shape of a hook, which is hung on a button, and the lower part is made in the shape of a stirrup.
The strip should be such a length that the pedal is located from the floor at a distance not exceeding the travel of the jigsaw button (7-8 mm).
Tool and material
Let's prepare the following tool:
- screwdriver or drill;
- electric jigsaw;
- wood drills (3.5, 6, 8, 10 mm);
- hammer;
- chisel;
- roulette;
- level;
- sanding paper.
Material for making the model:
- USB plate (18 mm);
- wooden beam (120 x 25 x 400 and 60 x 40 x 1400);
- wood screws (4 x 45) 35 pcs.;
- bolts 8 x 30 (for fastening the jigsaw to the bed), 8 x 60 (for fastening the bracket to the bed), 8 x 80 (for fastening the hacksaw blade guide), 8 x 30 (for fastening the bearings);
- nuts – 10 pcs.;
- washers – 10 pcs.;
- bearings – 2 pcs.;
- aluminum corners 25 x 25 x 80 – 2 pcs.
How to make a jigsaw table with your own hands (photo, video)
Any man can make a jigsaw table with his own hands, even without special carpentry skills. Since a mains-powered jigsaw is an integral part of any household, it will need a workspace. Such a device significantly speeds up the work time, and also allows it to be carried out efficiently, clearly and quickly.
However, we should not forget that the highest quality can only be achieved through the correct use of this tool, that is, by placing it on a jigsaw table.
A stationary device will allow you to turn your tool into a mini-machine, thanks to which you can make a wide variety of patterns.
Cutting table
The multifunctional tool - the jigsaw - has quite a few modifications, the simplest being the manual type of the device. This is a simple unit, not equipped with complex mechanical components and electrical wires, which is used for high-precision figured sawing of medium-thick wood blanks. The speed of its functioning is determined by the convenience of the workplace and the physical characteristics of the master. A homemade jigsaw table will make the sawing process easier.
This fairly simple device can significantly increase productivity and save operator effort. You can make it yourself using various materials: wood, chipboard sheets, metal, laminate, high-strength plastic. When there is nothing suitable for the countertop and supporting walls at hand, the necessary material can be purchased at the store or at the construction market. In this case, ordinary plywood will be the easiest to process and affordable.
Furniture for working with thin saw blades
Figure 4. Diagram of a tabletop jigsaw.
Still, the jigsaw file is not well suited for cutting complex shapes from plywood. A thin file is ideal for this. But it can also be installed on a hand-held power tool by making an original device. It is shown in Figure No. 4.
The hand jigsaw is still attached to the tabletop, but the thin blade must be taut, since it is not enough to simply attach it to the pendulum. To tension the file, a rocker arm is made from a block. The tension of the web is provided by a spring. Its lower loop is hung on a transverse pin. The upper loop is inserted into the adjusting screw, which changes the tension force of the damper. The wooden parts of a homemade machine are made from hardwood.
The jigsaw does not provide the ability to attach a thin blade. To do this, you can adapt a piece of an old file by drilling a hole in it and completing it with a clamping plate and a screw with a nut. A vertical slot is made in the rocker arm into which another steel plate is inserted. It is attached to the rocker with screws. The upper part of the file is attached to it in the same way as the lower one. To make the task easier, you can use scraps from an old jigsaw to make the plate.
The simplest device
Some kind of table for a jigsaw can be made in a few minutes. The advantage of this design is its simplicity. It is easily mounted on a workbench or tabletop and can be easily disassembled if necessary. The disadvantage can be considered its small area.
The working surface of the machine will be laminated plywood, in which holes are drilled for sawing and for installing fasteners. The thickness of the plywood should not be less than 10 mm. You may also need to prepare holes in the base of the power tool for mounting screws. The structure is attached to the workbench with clamps. The heads of the mounting screws must be flush with the plane of the sheet. Such a machine can easily cope with cutting small workpieces up to 30 mm thick. What the device looks like is shown in Figure 1.
How to turn on a jigsaw with your foot
By the way, a machine for working with a jigsaw can be made on any old table - from a dining table to a desk. The large countertop area allows you to process workpieces with impressive dimensions. In addition, a wide variety of equipment can be installed on the table.
If we talk about the jigsaw itself, some craftsmen manage to attach a pedal to its button to turn the tool on and off without removing their hands from the workpiece. The pedal is made of a metal tire. Its upper part is made in the shape of a hook, which is hung on a button, and the lower part is made in the shape of a stirrup. The strip should be such a length that the pedal is located from the floor at a distance not exceeding the travel of the jigsaw button (7-8 mm).
Source: thewalls.ru