The exhaust system of cars is quite complex and consists of several elements, of which the muffler is considered the most problematic. It is most exposed to various aggressive influences. From the outside, it is exposed to corrosive salts (in winter), moisture, snow and road stones of various sizes. From the inside, it is exposed to exhaust gases that have a high temperature, as well as many chemicals. All this together contributes to its destruction.
It should be noted that a malfunction of this element is always accompanied by increased noise when the car engine is running.
Exhaust system
Before you begin repairing the muffler, it is advisable to familiarize yourself with its design. You should know that the exhaust system is constantly being improved, but the principle of the muffler structure and its operation are practically the same.
The muffler and all elements of the gas exhaust system are made of steel or its alloys, which withstand high temperatures well. The system itself consists of three parts:
- The front part is often called the "pants". It is connected directly to the engine through manifolds.
- Middle part . These are pipes going from the so-called “pants” to the muffler itself. The resonator also belongs to this part.
- The rear part is the muffler itself.
Most often, the resonator with the muffler fails - it is these parts of the exhaust system that muffle the sound emitted by the car.
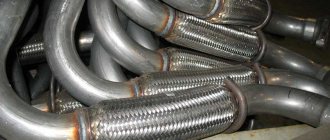
The exhaust system has straight and curved pipes, and most often they burn out at the bend points.
Since at the moment the pipe is bent at the bend, the thickness of its wall decreases, the strongest impact of exhaust gases occurs precisely in this area.
Operating temperatures
Cars Toyota Corolla Corolla 100 Toyota Corolla AE101 GT Former
The components of this system operate at high temperatures. The exhaust manifold of a gasoline engine heats up the most; its temperature reaches + 1300 ºC. The remaining components operate at temperatures from + 1000 to + 250 ºC, which is much lower than the melting point of the adhesive base. Sodium silicate, well known as liquid glass, melts at a temperature of + 1088 ºC. From this we can conclude that such sealants have fairly good heat resistance. The exhaust gases of diesel engines have a lower temperature than those of gasoline engines. This means that such sealants are even more suitable for diesel engines.
Exhaust system operation
The exhaust gas passage system works this way. From the exhaust manifold of a car engine, exhaust gases enter the exhaust pipe and through it enter the catalyst, which is equipped with a vibration compensator (motorists often call it “corrugation”).
The corrugation dampens engine vibration, thus protecting the exhaust system. There, in the catalyst, unburned fuel particles can burn out, and carbon oxides become less toxic. The catalyst chamber consists of metal or ceramic honeycombs. Passing through them, exhaust gases are cleaned of harmful impurities after a certain chemical reaction.
A resonator is installed after the catalyst. This element visually resembles a small muffler, but it has a different role. It does not reduce engine noise, but converts exhaust into an even flow of gases with equal pressure and is a hollow tank with a perforated pipe.
And the most important part of the entire system is the muffler. To reduce the noise effect of the engine, various technologies can be used. For example:
- Constriction or expansion of gas flow.
- Use of special sound-absorbing fillers.
- Changing the direction of gas flow.
- Sound interference.
Removing the exhaust pipe
Most drivers call the exhaust pipe “pants”, since the element is very similar to this item of clothing. It is secured to the exhaust manifold using bronze nuts and studs. The trousers are attached to the neutralizer using a spring-loaded connection. There is a gasket between the exhaust manifold and the pants to prevent gases from leaking.
Dismantling the intake pipe is carried out as follows:
- Using a 13mm wrench, you need to unscrew the nuts that secure it to the exhaust manifold. If there are metal plates with bent edges under the nuts, they must be bent. Please note that the connection uses studs that are screwed directly into the manifold.
- If the stud is damaged, replacement is quite problematic. Therefore, it is necessary to carry out all work carefully to keep the threaded connection intact.
- Be sure to allow the engine to cool before starting work, then apply penetrating lubricant to all threaded connections. With these simple steps, you won't have to use too much force, which will save your studs. If you break a pin, it will need to be drilled out. Before this, the exhaust manifold must be removed. Moreover, if you damage the exhaust manifold, replacing it will cost you a pretty penny. The cost of a new one is more than 2000 rubles.
- After unscrewing all the nuts, it is necessary to move the exhaust pipe to the side and remove the gasket.
- Unscrew the bolts that connect the exhaust pipe to the converter.
This completes the dismantling of the exhaust pipe of the VAZ-2110 exhaust system.
Muffler malfunctions
The muffler is designed to reduce engine noise during operation and release exhaust gases into the atmosphere. It is made of metal, which breaks down over time under the influence of high temperatures and corrosion . The main reasons accelerating its destruction are:
- External exposure to a humid environment.
- The presence of zones in the bottom where moisture concentration occurs after the engine stops working. In this regard, corrosion occurs, corroding the metal.
- High temperature and pressure of exhaust gases.
- Sudden temperature changes and increased vibration during movement have a rather negative effect on the welds and connecting points of the entire exhaust system.
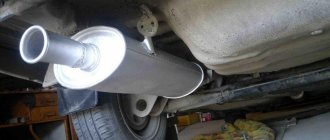
In addition to these reasons, external mechanical influences can also damage the muffler, which is located under the bottom of the car. For example, driving over a high curb, stone or other solid obstacle when driving over rough terrain. In this case, not only the muffler itself may suffer, but also the resonator with the exhaust pipe.
The engine exhaust system consists of several interconnected elements. To ensure their tightness, the connecting units use heat-resistant sealing gaskets, which burn out over time under the influence of high temperatures. At the same time, a loud pulsating sound of engine exhaust appears, which motorists often talk about - the muffler “cuts” .
Installation of a new neutralizer
If you decide to modify your car, you can install the Stinger exhaust system on the VAZ-2110. It is more reliable and advanced than stock.
All work is carried out the same way. The neutralizer is installed as follows:
- Install the neutralizer, and then put on the bolts. This must be done very carefully, making half a turn, no more.
- When tightening, you must first tighten the bolts that secure the neutralizer to the resonator. The last to be tightened are the bolts securing the converter to the exhaust pipe.
Troubleshooting
Having knowledge and some dexterity, following a certain sequence, you can quickly repair the gas exhaust system yourself, dividing all the work into certain stages:
First, on an inspection pit or overpass, carry out a visual inspection of the entire gas exhaust system to identify a malfunction.
Read also: Sewing machine for gloves
Then carry out dismantling work. But before dismantling, it is recommended to treat all threaded connections with a penetrating liquid, many of which are almost always on hand - these are:
After dismantling the muffler, repair it and install it in place. Its repair and other parts of the gas exhaust system can be carried out using one of the options described below.
Alternative to welding
Often, to carry out repair work on the muffler and the rest of the gas exhaust system, it is possible to do without welding work. But, however, this option in many cases can only carry
temporary in nature and is usually carried out when there is no time to contact a car service or there is temporarily no such muffler on sale.
Finding damage is not particularly difficult even for an inexperienced beginner. For example, places where there are cracks or burnouts on pipes or other parts of the exhaust system always darken, and oily spots form around them.
An alternative to welding can be:
- Cold welding.
- Applying a bandage made of fiberglass, tin strip, asbestos or silicone fabrics.
- Heat-resistant sealants.
Attention . It should be remembered that such repair work is a temporary measure; sooner or later the muffler will still have to be replaced.
Cold welding
It has quite universal properties. It hardens quickly and perfectly resists the effects of gasoline, motor oils and many other aggressive substances. Its main advantages:
- Cold welding for a muffler is inexpensive, but has high strength and temperature resistance. It is designed to work in the most aggressive conditions. Therefore, it is the most popular repair material.
- The repair time is quite short and can take a few minutes, and the hardening time can only last about one hour.
- Since cold welding does not require special surface preparation, it can be used in “field conditions” if any part of the gas exhaust system suddenly fails while driving on the road.
In order to carry out high-quality repair work with its help, the following sequence must be observed:
- First of all, the damaged area is cleaned of dirt and scale with a wire brush, after which it is additionally cleaned with emery cloth.
- The area cleaned with sandpaper is degreased with alcohol, solvent or gasoline.
- According to the instructions for using cold welding, prepare the adhesive mixture.
- Apply the prepared mixture to the area prepared for repair and level it. Since cold welding begins to harden quite quickly (within a few minutes), the work of preparing the mixture and laying it should be done as quickly as possible.
- In order for the mixture applied to the damaged area to harden well, you need to give the welding some time to dry.
Attention . Using cold welding for repairs is a reliable and quick option (depending on the damage). But if the damage is serious, it is better to use a more reliable method - contact a car service or purchase a new product.
Metal bandage cover
For a bandage, you can use a sheet of thin tin, which is applied to the damaged area. The tin itself can withstand high temperatures for a long time, so after applying it, you can forget about the problem that has arisen for a while. The work is carried out in several stages. The problem area is thoroughly cleaned with a wire brush and then additionally with sandpaper. After which it is advisable to degrease the cleaned area.
Then a special ceramic heat-resistant sealant is applied to the damaged area and a sheet metal tape is applied. The tape should be approximately 60 mm longer than the circumference of the muffler .
After it is wrapped with metal tape, the ends of the metal are bent at a 90-degree angle using pliers. In this case, one end should be 20 mm, the other approximately 40 mm. Then, using pliers, the long end is bent again towards the short end so that it overlaps the short end and completely covers its plane. The bend is knocked with a hammer towards the short side, and as a result you will get a connecting lock, and the bandage will tightly clamp the damaged part.
Before applying the bandage, the muffler can be additionally wrapped in wet mineral wool, which can withstand high temperatures.
Using sealant
Inexperienced car enthusiasts often make the mistake of thinking that sealant can be used to repair any damage. But, for their information, the sealant is used mainly for additional protection of the joints of the gas exhaust system or for sealing minor damage to the muffler, as well as when applying a bandage.
It is also used in cases where the joining parts do not match each other in size or for temporary replacement of burnt gaskets. The sealing itself greatly simplifies the disassembly of the gas exhaust system in the future.
The muffler is repaired in this way. First, the damaged area is cleaned and degreased, after which it is slightly moistened with water, and then a sealant is applied to it, which should dry after application. After 30-40 minutes, start the engine and let it idle for 15 minutes. This is necessary to remove any moisture remaining in the sealant.
Read also: How to seal an aluminum pan
After this, the engine is turned off, and the applied sealant must gain strength within 12 hours. But it is better to choose the time for its complete hardening according to the recommendation of the manufacturer of this material. It should be remembered that the drying time for each composition may be different.
Other options
In addition to cold welding and various bandages, metal patches are also used for repairs, which are fixed with tight clamps and pressed tightly to the muffler.
Attention . Regardless of which repair option was performed, it should be remembered that this is only a temporary solution. Overlay patches with clamps, bandages and sealant eliminate the problem, but not the cause.
Preventive measures
As has been said many times, it is often better to prevent a problem than to deal with its consequences. So it is with burnout and damage to car mufflers.
To the extent possible, drivers should minimize the likelihood of such situations occurring. To do this, just follow a few simple rules of prevention.
- Monitor the condition of the muffler. Sometimes a simple visual inspection is sufficient. It is unlikely that it will be possible to control the element purely using some sensors. An external inspection is required. At the first symptoms of malfunctions, it will be much easier and cheaper to eliminate them.
- Don't forget to wash the muffler periodically. Since it is made of metal, and not always stainless steel, the accumulating dirt, water, snow, and reagents scattered on the roads contribute to the acceleration of destructive processes. Corrosion covers increasingly larger areas of the part, which leads to the appearance of pronounced rust, faster damage and the appearance of holes with cracks. Washing will remove this dirt, wash away dangerous reagents and extend the life of the muffler.
- Use anti-corrosion compounds. Sometimes mufflers are coated with anti-corrosion agent at the production stage. But the composition tends to wear out and gradually collapse. As a result, the anti-corrosion effect ceases, and the metal becomes susceptible to corrosion. Periodically updating the protective layer will prevent rust from occurring. Thus, you will significantly extend the operating period.
- Use corrugated tube. Not a bad protective measure. The pipe is installed between the manifold and the muffler body. This connection provides additional absorption of excess vibrations, elimination of friction and reduction in the operating temperature of the muffler.
- Drive carefully. Quite often, problems with the muffler arise not due to rust or burnout from high temperatures, but due to mechanical damage. The driver runs over hard objects and hits the bottom with the coating, resulting in holes in the exhaust system. It is impossible to completely avoid such situations. But if you are careful while driving, avoid potholes correctly and minimize the operation of the car in conditions not intended for it, the likelihood of such situations occurring will significantly decrease.
You can clearly see that replacement and hot welding are not the only and only alternative ways to restore the functionality of a damaged, burnt out or rusted muffler on your car.
All the non-welding methods presented are truly effective and working. They are actively used by millions of car owners around the world. Here you only need to rationally approach the issue of choosing a repair method, as well as strictly adhere to the rules for using a particular product.
If the situation is such that sealants, cold welding or tape will not help due to too extensive damage, then the only correct solution will be to completely replace the muffler. Just try to choose high-quality products that can last a long time and not cause similar troubles in the next few years of operation of your vehicle.
A muffler is an important element of any car, because it suppresses the noise generated by the internal combustion engine. Being part of the exhaust system, in addition to suppressing noise, it also reduces harmful emissions. Therefore, when a muffler breaks, it is a serious problem that often requires an immediate solution. Using a car with a broken muffler is not the best idea, but you can repair the muffler without welding. There are several repair methods, the most popular being cold welding for the muffler.
Prevention measures
The need to repair a muffler may not arise immediately. Usually, some prerequisites appear first, which can be prevented by proper prevention, the use of high-quality fuel and a balanced driving regimen.
The muffler must be mounted only on standard suspensions. If the suspensions are made in-house, they must meet certain standards specified for the given vehicle and muffler.
For preventive maintenance, some car enthusiasts fill the muffler with an anti-corrosion liquid, which pushes away moisture and prevents internal corrosion.
Step 1: Materials and Tools.
Fixing a muffler is a fairly simple job (the repair can take as little as half an hour), but you will need a few specialized materials: Wheel ramps or stands. DO NOT crawl under the car without placing tires or a block under it, as even the best jack may not support the weight of the car. People are dying, so be sure to put something under the car.
You will need safety glasses (unless you like rust, dirt and toxic and chemicals getting into your eyes)
You will also need the following:
Metal scissors. Clamps. Screwdriver (flat head for working with clamps). Various pliers, wrenches. Cold welding (available at any auto parts store). Empty tin can.
You should also wear appropriate clothing - you can get really dirty. An old hat can also help.
Step 2: Find your problem.
If your muffler isn't cut all the way but is still leaking exhaust, you'll be able to hear it - your car will sound like the engine has gained an extra couple of liters.
If you can't see the hole in the muffler, simply move your hand along the exhaust pipe until you feel a whiff of escaping gases, but be careful, the exhaust pipe may be a lot hotter than you think.
Step 3: Inside or outside?
Unfortunately, some mufflers have an oddly shaped hole which means it needs to be fixed from the inside.
I used scissors to turn the can into a sheet of steel and then rolled it up until it was small enough to fit into the muffler (be careful with sharp edges as you'll get tetanus shots if you cut them - it's quite painful).
Next, I attached the sheet to the damaged area.
I then clamped another piece of steel to the other side of the muffler.
If the damage was in a straight section, I could simply wrap a sheet of steel around the outer hole, securing it in place with a couple of clamps.
Step 4: Attachment.
Now it was necessary to tightly attach the sheet of steel to the stationary section of the muffler.
I used one clamp around the free section of the muffler as well as a threaded clamp above it.
Having strengthened the first clip, I laid a strong support point, and then tightened the second clip, so they were firmly secured.
I then coated the repair area with a large amount of cold weld and left it to dry.
Unfortunately, I have not found any tool to apply welding more effectively than a human finger. If you have sensitive skin or a cut, use a small spatula or wear gloves.
Once I was happy with how it was all secured, I cut off the ends of the clamps.
Step 5: Warning
This repair is short-lived. You will still have to contact a specialized service to repair the muffler. To repair a muffler in St. Petersburg, I advise you to contact.
This small repair cost about $10, so it's up to you to decide whether to do a short-lived repair or go to muffler repair. But if you don't have money, this is a good option.
Read also: Classification and design features of milling machines
It would of course be ideal to install completely new mufflers.
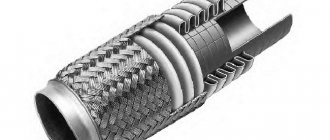
Corrugation (bellows, vibration compensator, vibration damper) is installed on almost all modern cars. Its main function is to prevent vibration of the car exhaust system. The part also helps prevent the car from overheating. It connects the intake manifold to the muffler pipes. It looks like a tube made of multilayer metal mesh. Replacing the muffler corrugation with your own hands without welding is possible in all cases where the brand of the car being repaired allows it.
The part takes on the main vibration loads and therefore often becomes unusable. But the use of this spare part in the design of the car exhaust system helps other parts to operate longer. Also, replacing a muffler corrugation is much cheaper than repairing an entire section of the car. Many people are interested in how to replace it themselves, without using welding. After all, this part quite often burns out, and there may not be a welding machine in the garage.
Current repair methods without welding
Welding means the use of a special welding machine, which is available to many motorists.
But working with such equipment requires certain skills, abilities and knowledge. Therefore, without experience, it is strongly not recommended to undertake such a procedure with your own hands.
You can go the other way and use non-welding methods, which have proven themselves to be effective in restoring the tightness of the muffler. Among the most relevant methods, it is worth highlighting repairs using:
- cold welding;
- ceramic tape;
- sealant.
Each presented technique has its own characteristics and nuances. To better understand all aspects, they should be considered separately. This will allow you to make the final decision by choosing one of the proposed methods for sealing a damaged muffler.
If the features and characteristics of these products do not satisfy you, there is always the opportunity to use alternative methods.
Cold welding
Since it has practically nothing to do with hot welding, motorists often ask questions about whether it is possible to repair a broken muffler using cold welding. In reality, this can be done, and sometimes even necessary.
Causes of damage
The corrugation can break through from external mechanical influence. The cause of the malfunction may be impacts on hard objects protruding relative to the roadway - stones, bumps, etc. It also becomes less durable due to natural wear and tear.
Another possible cause of damage is the unsatisfactory technical condition of the transmission. Damage to the engine mount and wear of the rubber in the muffler fasteners have a negative impact on the condition of the part. Also, the spare part can quickly become unusable due to improper installation or dismantling of the muffler.
Chemical reagents used to clear roads of snow in winter have a destructive effect on metal parts. A clogged catalyst can also damage the spare part. The integrity of the part may be compromised by the presence of additives that increase the octane number in the fuel consumed by the vehicle.
Signs of damage
- car “sneezing”, popping noises;
- engine power decreases;
- the rhythm of the engine becomes unstable;
- exhaust gases penetrate into the car interior;
- soot appears on metal parts.
There are three options for replacing the muffler corrugation without welding. The first two methods imply high-quality repairs with further long-term operation of the part. The third is a temporary replacement in order to get to the nearest service station. We will see that welding mufflers and corrugations, although desirable, is not at all necessary.
Repair with ceramic tape
Ceramic tape is an equally easy repair method. It can withstand temperature loads of up to 1000 degrees Celsius thanks to its ceramic base. Tape won't help when changing whole parts, but it will help to fix a problem with a small hole or gap.
It is easy to use ceramic tape:
- Clean the muffler before repairing.
- Wet the tape with water.
- Wrap at least 2 layers around the damaged area.
Ceramic tape is still a temporary option and will last up to three months. It will not be possible to solve the problem completely with its help, so it is only suitable as an emergency measure.
The first method is corrugation on clamps
In order to repair the corrugation, it can be installed on metal clamps.
Suitable parts for 48 mm Lada cars.
To replace you need to do the following:
- Jack up the car from the rear right;
- Remove the engine crankcase protection;
- Remove the exhaust manifold;
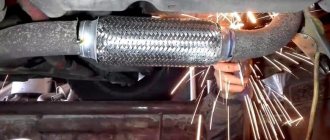
- Saw off the old part with a grinder;
- On the new corrugation, make short longitudinal cuts along the pipes welded to it, this will ensure a tight fit of the part to the exhaust pipe;
- We seal the corrugation and crimp its edges with clamps;
- We install the part in its original place.
After such repairs, the corrugation will not need repairs for a year or a year and a half.
Installing a new exhaust pipe
All work is done in reverse order. But there are several features that you definitely need to know:
- Install a new exhaust pipe.
- A new gasket needs to be installed between the exhaust manifold and the pants.
- Be sure to install a new O-ring between the neutralizer and the pants.
- Tighten the nuts on the exhaust manifold studs. Tighten them evenly in a crisscross pattern.
- Tighten the bolts that are on the spring-loaded connection to the converter.
This completes the repair of the exhaust system. The sound will be muffled as much as possible, the car will become almost silent. It is advisable to lubricate the new gasket with a CV joint type compound. This will improve the seal.
Any VAZ 2110 car is equipped with an exhaust gas exhaust system; without it, the vehicle cannot be operated. The output device is a complex assembly consisting of many interacting parts.
It is designed for safe, efficient removal of waste gas products, cooling them and eliminating noise. The exhaust design on all domestic cars is very similar, but each model has its own nuances.
Threaded connection
The old spare part is still cut off with a grinder. In order to install a new part, you must do the following:
- On the rings and exhaust pipe, drill eight holes with a diameter of 4-6 mm around the circumference at the points of contact;
- Using an M5 tap, cut threads in the drilled holes;
- Treat all structural parts with sealant;
- Screw the bolts into the holes;
- Install corrugation.
The use of high-temperature sealant will ensure the reliability of the connection. After completing these steps, you will receive a fairly high-quality and sealed car exhaust system assembly.
How to remove the resonator
The resonator needs to be changed only after a new muffler has been installed. The sequence of work aimed at dismantling the device:
- The resonator is secured using a crimp-type clamp and an O-ring.
- The connection to the neutralizer is made using a floating flange, which consists of flared pipes and two bolts.
- The fist is located on the opposite side of the resonator.
The work must be carried out on a cooled engine.
Quite often it is not possible to unscrew the bolts, so to make the work easier, you just need to cut them off using a grinder. Be sure to install new bolts during reassembly. If you don’t have a grinder at hand, then you need to use a penetrating lubricant, for example, WD-40. Apply this composition to all threaded connections, then wait 20-30 minutes.
Unscrew all the bolts and remove the clamps on the resonator. After this, you need to remove the old resonator from the rubber suspensions. Be sure to evaluate the condition of all rubber products. If they show signs of wear, install new ones during reassembly.
Important nuances
As we have seen, welding the muffler and corrugation for repair is not at all necessary. But there are some nuances in the above types of repairs.
The corrugation must be installed evenly, without distortions. At the end of the work, make sure that all brackets and hangers for attaching the muffler are intact and ensure its stability and immobility.
All three options for replacing corrugations will take no more than an hour. The part must be repaired at the first sign of a malfunction. Do not forget that timely replacement of the part is necessary for the further safe operation of the car.
Composition of the output unit
The exhaust system for a VAZ 2110 car consists of the following elements:
- Exhaust manifold;
- Lambda probe;
- Receiving type pipes;
- Neutralizer;
- Two mufflers: main type and additional.
Not all exhaust components are disassembled; some parts, such as the converter, as well as both mufflers, are replaced entirely.
Exhaust system of VAZ 2110